Despite the simple design of the engine valves and oil seals, these elements perform important work, without which the normal functioning of the power unit is impossible. The efficiency of the engine directly depends on the correct operation of the valves: power, toxicity, fuel consumption. Therefore, their integrity, like the adjustment of gaps, is very important.
- Adjusting valves on a VAZ 2105
When and why is valve adjustment necessary - Adjustment Tools
- Adjustment procedure
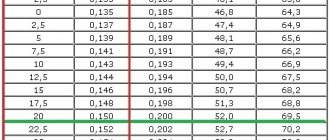
Table: adjusting the thermal clearance of VAZ 2105 valves
- Video: adjusting valves using the example of a VAZ 2105 with a belt drive
- What are valve seals used for?
Video: replacing oil seals on classic VAZ models
- Replacing the valve cover gasket on a VAZ 2105
Purpose of valves in the VAZ 2105 engine
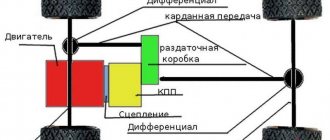
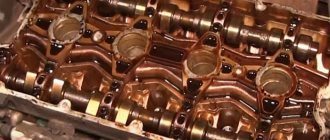
In the VAZ 2105 engine, as in any other internal combustion engine, valves are an important element of the gas distribution mechanism. On the “five”, the power unit uses 8 valves: for each cylinder there are 2 valves, the main purpose of which is the correct distribution of gases. By means of clans, a mixture of fuel and air is supplied to the combustion chamber through the intake manifold and exhaust gases are discharged through the exhaust system. If a breakdown occurs with any valve, the operation of the gas distribution mechanism, as well as the entire engine as a whole, is disrupted.
Valves located in the cylinder head ensure the supply of the fuel-air mixture to the combustion chamber and exhaust gas removal
Procedure for checking valve clearance
Let's move on directly to the adjustment process itself. First, preparatory work is carried out, which boils down to providing access to the valve levers and camshaft. To do this, remove the air filter housing from the carburetor, the timing belt protective housing, and the valve cover from the engine.
To perform the work correctly, you need to know the procedure for adjusting the VAZ-2105 valves. Interestingly, this procedure is the same for all VAZ cars up to model 2107.
The adjustment begins with the 4th cylinder, located closest to the car interior, while the valves must be counted from the first cylinderlocated near the camshaft drive gear.
Before checking the clearance on the required valves, you need to set TDC on the 4th cylinder. To do this you need to rotate your knees. shaft clockwise until the mark on its pulley aligns with the long mark on the timing belt protective housing. After this, you need to look at the camshaft drive gear; on its inner side there is a mark and a small depression that should coincide with the cast on the cylinder head.
| Marks on the crankshaft pulley | Marks on the camshaft pulley |
Next you need to know the procedure for checking the gap.
- When setting TDC on cylinder 4, the clearances on valves 6 and 8 are checked. Next, the knee is rotated. shaft by 180 degrees, while the camshaft will turn only 90 degrees. For ease of work, the camshaft gear has marks every 90 degrees, corresponding to the TDC of a particular cylinder.
- So, turning the camshaft 90 degrees, set TDC on cylinder 2, while checking the clearance on valves 4 and 7.
- Next, another rotation of 180 degrees is made. knees shaft and aligning the next mark on the camshaft gear with the ebb on the cylinder head, while setting TDC on cylinder 1, and checking the clearance on valves 1 and 3.
- After this, another rotation of the knees is performed. shaft 180 degrees to set TDC on cylinder 3, and the clearance is measured on valves 2 and 5.
Related link:
How to start a VAZ engine in winter
What's the problem with the valves?
The concept of “adjustment” is that a specialist should restore the original clearances of the power unit. The signal for the need for repairs is a sound - tapping when the engine is running. As a rule, with minor changes in the gap, knocking is present only at the beginning, and then under certain loads. But over time, the condition worsens and the knocking becomes constant. You can miss it at first. But over time, when the noise becomes constant, even an inexperienced driver should not miss it.
The problem can be not only an expanded, but also a narrowing of the gap. The balance of the engine is set during assembly so that all the internal combustion power is transferred to the pistons at a certain pressure and speed. The gap (no matter which way it changes) will introduce an imbalance into the operation of the machine, which promises a drop in power under loads necessary for powerful operation.
How the VAZ-2105 valves are adjusted
Owners of domestic cars have long gotten used to the idea that VAZ cars are easy to drive and relatively simple to repair.
Therefore, it is preferable for drivers to choose their own hands for these works rather than the experience and knowledge of service station employees. This decision is fully justified, and everyone is happy: the car is intact, the driver is confident in his abilities, money is saved. But such zeal often leads to new breakdowns, imbalances within the technical part of the machine, and other troubles. Therefore, in order to begin even a small and seemingly simple repair, you need to have an adviser on hand. Let's consider the procedure and conditions of repair work if the time has come to adjust the valves on the VAZ-2015. But before you start practicing, a little theory and preparation.
Replacing the timing belt on VAZ cars: valve adjustment, malfunctions
Many drivers are familiar with the sound of a stretched timing chain in VAZ cars and other models of the Soviet automobile industry. Even the metal of the drive chain is subject to stretching, so the VAZ timing drive could not last forever.
One of the first cars of the Volzhsky Automobile Plant, in which the camshaft was driven by a toothed belt, was the VAZ 2105. The drive circuit and belt were borrowed from a Volkswagen car.
Subsequently, all VAZ engines of this plant for cars with front-wheel drive began to be equipped with a timing belt. Replacing a VAZ timing belt has become much easier; the car owner can do it independently.
VAZ engines
The Volzhsky Automobile Plant, like the world's leading car manufacturers, equips its vehicles with various power units. They may differ in displacement, power and torque, and type of fuel used. VAZ equips its cars with engines that run on gasoline; they do not produce diesel versions of engines for them. The first models with front-wheel drive had an 8-valve engine, which could have a displacement of 1100 cm3, 1300 cm3, 1500 cm3.
Subsequently, manufacturers abandoned the use of carburetors in the power system and switched to an injector. This made it possible to increase the efficiency of the power unit and improve the power and traction performance of the engines. When the “ten” appeared in production, a 16-valve VAZ engine began to be installed on its individual models. With the same engine displacement, its performance has become better. This became possible thanks to the presence of four valves per cylinder.
The rate of filling the combustion chamber with fuel and air mixture has increased, and exhaust gas removal has also become better. An increase in the number of valves required changes to the design of the cylinder head. It began to have two camshafts. VAZs with such engines also have a timing mark, otherwise it will not be possible to set the valve timing correctly. VAZ timing belts have the same design, differing only in size.
Manufacturers use rubber to make these belts. It can be of two varieties:
- Chloroprene artificial (neoprene) rubbers. Received the greatest distribution in production. As a disadvantage of this material, experts note low resistance to frost and poor elasticity.
- “Reinforced” belt made of butadiene-nitrile rubber has high strength and elasticity.
Timing belts have their own peculiarity: these are the teeth with which the mechanism is rotated. They engage pulleys on the crankshaft and camshaft, as well as the pump in the engine cooling system. Manufacturers today produce them not only in different sizes, but also in two types of tooth shapes:
- trapezoidal (involute) tooth shape;
- semicircular profile.
The first type is most widespread on domestic cars. The side of the tooth is rounded in the form of an involute, hence its name. The gearing is good in the drive, but the teeth of the gears and belts wear out quickly. Domestic manufacturers have not yet mastered the semicircular shape. This shape wears out less, the belt has a significantly longer service life, and there are practically no cuts during the operation of the vehicle.
Replacement procedure
The drive of the VAZ timing mechanism is the same for all models, but there is no need to say that replacing the timing belt on VAZ cars is the same. Each modification of the power unit has its own characteristics, but the algorithm of actions will be something like this:
- Remove the plastic shield that covers the timing drive mechanism on the engine.
- Next, remove the generator set drive belt (this does not apply to all models).
- Now it’s time for the most important operation, this is placing marks on the crankshaft pulleys and camshafts. It is especially important to correctly align the marks and secure the pulleys on cylinder heads with two camshafts.
- Loosen the timing belt by loosening the tension roller. Engine manufacturers recommend changing it together with the belt. It is also recommended to change the coolant pump.
- Now you can remove the belt from the camshaft pulley (or two pulleys). It should be taken into account that on VAZ 2108, 2109, 21099 models, to remove the belt, you will have to remove the pulley on the crankshaft of the generator drive. To do this, lift the right side of the car with a car jack and remove the fender liner.
- To install a new spare part, you will have to do everything in the reverse order. Particular attention is paid to the coincidence of the marks and the tension of the installed belt.
Video on the topic: Do-it-yourself valve adjustment on a Zhiguli
Adjustment device
Do-it-yourself adjustment of VAZ 2105 valves is carried out in the same way as on cars of other models, for example, 2107 or 2109. You need to stock up on 0.15 and 0.2 mm feeler gauges. The work can be carried out on a cold or even hot engine, but the first option is preferable.
In this case, the gas distribution phases will work more accurately, and gasoline will burn more efficiently. If the adjustment is carried out on time, the engine will run cleaner, there will be no knocking, and the service life of the VAZ 2105 valves will increase. All operations can be performed with your own hands.
Many car owners know how to adjust valves. It is necessary to set the gaps correctly. If they are less than normal, they may burn out. The valve tries to seat itself in the head seat, but the gap located between the drive lever and the cam prevents it from doing so. Gases break through from the chamber, and if their temperature exceeds 2000 K, they burn out the edge of the exhaust valve and quickly seat the seals. As a result, the oil becomes clogged.
Engine valves need to be adjusted constantly. It is advisable to do this every 15 thousand kilometers, so as not to spend money on repairing your VAZ 2105 later.
Adjusting valve clearance
When measuring the gap, the feeler gauge on each valve should fit between the camshaft and the lever with a little force. If it fits very loosely or is not inserted at all, adjustments are made.
Checking the gap with a feeler gauge
To make the adjustment, the locknut is loosened, then the desired clearance is achieved by rotating the screw, after which the locknut is tightened back. By tightening the locknut, the clearance is checked again. In this way the clearance settings are made on all valves.
With your own hands or a service station
Having become familiar with how the VAZ-2105 valves are adjusted, the driver can calmly make a decision.
If he does not have time or does not want to rely on his limited experience, then the above recommendations and advice, which seem overwhelming, will allow him to turn to the service station with a pure soul and not be afraid that the money is wasted. On the other hand, there is nothing fundamentally difficult about the replacement, so the driver can easily cope with the above instructions on his own. All you need for a good repair is determination and attentiveness and, of course, preventive maintenance of the entire car system. The main thing is to remember that a working car means safety for both the driver and other road users.
The procedure for adjusting valves VAZ 2101-2107
First we prepare the car:
- wait until the engine cools down if it was running;
- park the car on level ground;
Valve adjustment procedure:
- Remove the air filter cover and the filter itself.
- Remove the air damper control cable (choke).
- Remove the throttle linkage.
- Unscrew the nuts securing the valve cover and remove it.
- Before adjusting the valves, immediately check how the chain is tensioned. If the tension is not normal, you will have to do the work again.
- Remove the distributor cover.
- We install the piston in the 4th cylinder at top dead center (TDC). TDCs are set using marks on the internal combustion engine crankshaft pulley and the camshaft drive cover, and marks are also applied to the camshaft gears and camshaft cover. The mark is set with a special key for the internal combustion engine crankshaft pulley bolt. If you don’t have a key, you can set the 4th piston to TDC by rotating one of the rear wheels. Raise one side with a jack and place the gear shift lever in 4th gear to make it easier to turn and turn the wheel slowly. When setting marks without a key, you will need an assistant to look at the marks.
- When the marks on the camshaft and the camshaft cover are aligned, check that the marks on the crankshaft are also aligned. You can also check whether the marks on the distributor slider match. The contact terminal should be directed to the high voltage wire terminal of the fourth cylinder. We have already discussed how to determine whether ignition is early or late in another article.
- After the marks match, we proceed to adjusting the valve clearances.
The correct procedure for adjusting the valve mechanism of the VAZ “Classic” 2101-2107. Crank angle Adjustable valves 8 and 6 180 4 and 7 360 1 and 3 540 5 and 2
Disconnect the filter mounting tubes and remove the mount.
From the table we see that if the 4th piston is set to top dead center, then we measure and adjust the 6th and 8th valves.
How to adjust valves on a VAZ 2105?
The operation of the gas distribution mechanism (GDM) has a significant impact on both the completeness of fuel combustion and the level of cylinder compression. A particularly important role is played by the timing valves, which create that very compression, allowing the fuel to show its full energy potential. Like any other mechanisms, valves require periodic maintenance, that is, VAZ 2105 valves need to be adjusted.
When should adjustment be made?
It all depends on the experience and skills of the driver. If the owner of the five knows all the whims of his vehicle and knows how to ensure a competent driving process, then the valve clearance will need to be checked and adjusted no more than 25,000 (km). If the vehicle is in the hands of an inexperienced driver, then valve adjustment on the VAZ 2105 can be carried out after 10,000 - 15,000 (km).
Signs of improper valve operation
- The presence of extraneous noise when the engine is running. The noise is concentrated in the upper part of the internal combustion engine. Extraneous sound can appear at a certain speed or at all speeds (this is already an advanced case). That is, when you hear a suspicious knock in the timing belt, immediately look for the procedure for adjusting valves 2105 and begin repairs.
- Noticeable loss of power. A valve that is not tightly pressed does not allow the optimal degree of compression of the cylinder to be created, which is why the piston is pushed out with incomplete force. A pressed valve that is not pressed in time does not allow full release of exhaust gas, which reduces the efficiency of the next detonation stroke of the combustible mixture. If you feel a lack of traction power, feel free to look for information on how to adjust the VAZ 2105 valves and start adjusting the timing belt.
Malfunctions requiring valve adjustment
The main malfunctions include:
- unstable idle;
- the engine does not develop full power;
- Excessive noise (knocking) at the top of the engine.
When the clearance between the rocker and the valve is below normal or absent altogether, it does not close tightly and the pressure in the cylinder drops. In addition to the fact that engine operation is disrupted and it loses power, this is also fraught with valve burnout, which entails repair of the cylinder head.
When the gap between the camshaft and the rocker is higher than normal, the valve, on the contrary, does not open enough, and filling or purging of the cylinder worsens. This also leads to loss of power and unstable engine operation. In this case, excessive noise appears in the timing belt.
Adjusting valves VAZ 2107
To adjust the valves on a carburetor engine, you will need to remove the air filter housing and disconnect the carburetor throttle actuator. On an injection engine, you just need to disconnect and put aside all interfering pipes and wires. Unscrew the bolts securing the valve cover and remove it.
Next, if the engine is carburetor and equipped with a ratchet, insert the manual engine start handle into it and use it to turn the crankshaft.
On an injection engine, using a special 38mm wrench, turn the crankshaft by the pulley bolt to the top dead center position of the first cylinder. If there is no such key, support the front wheels of the car, turn off the handbrake, use a jack to lift one rear wheel and engage fifth gear.
The wheel will rotate easily on it, and so will the engine crankshaft. While rotating the wheel, set the TDC mark on the crankshaft pulley or on the camshaft gear.
Next, use a 0.15 mm wide feeler gauge to check the gap on closed valves according to the following scheme:
ATTENTION! Thermal clearances are checked on a cold engine!
It is also possible to determine whether the valve is closed or not without a diagram. To do this, you can reach under the kick pedal with your hand and feel the position of the camshaft cam relative to the valve pusher. It should be directed towards him with the back of the head .
When checking the clearance, the feeler gauge should fit between the camshaft and the rocker with slight tension. If the probe passes too easily or, on the contrary, does not pass at all, then this valve must be adjusted.
To do this, hold the adjusting bolt with a 13 wrench (a), release the locknut with a 17 wrench (b) and, rotating it, achieve such a gap so that the dipstick “bites” slightly, but it can be inserted and pulled back out. Having set the gap, hold the adjusting bolt and tighten the locknut.
After adjustment, you need to recheck the gap. We repeat the same operation for all valves.
After successful adjustment, we assemble everything in the reverse order and at this point the valve adjustment can be considered complete.
The result of the work done
As a result of correct adjustment of the valve mechanism, engine operation stabilizes, power and traction appear again. A correctly configured gas distribution mechanism stabilizes fuel consumption, because if configured incorrectly, it increases.
If there is no excessive wear in the timing mechanism parts, then, as a rule, excessive noise in the valve cover area disappears. To keep the engine in full working order and its performance within normal limits, this operation must be performed every 10,000-15,000 km.
Source: https://mylada.net/remont/regulirovka-klapanov-vaz-2107.html
How to adjust the gap between the valve and the cylinder block?
- We use a probe with a thickness of 0.15 (mm). It should fit under the valve with a slight tension (neither strong nor weak). If the dipstick falls into the gap or, on the contrary, does not fit, then from this moment the adjustment of the valves on the VAZ 2105 begins.
- We loosen the lower lock nut with one key, and with the second key we turn the valve stroke screw (up or down, depending on the result of checking with the feeler gauge).
- Tighten the locknut without much fanaticism.
- We do a control check with a feeler gauge at 0.15 (mm).
I hope the instructions are clear and understandable.
Related material: Replacing engine oil and oil filter on Lada Priora. Which oil to choose and how often to change
Additional Information
After adjustment, we assemble all the engine elements into place (valve covers, timing belt cover, air filter housing).
We make a test drive and listen to the sound. At this point, independent maintenance of timing valves can be considered successfully completed.
Please note that the VAZ 2105 is a classic of the bygone Soviet automobile industry. The classic line also includes the VAZ 2101, VAZ 2102, VAZ 2103, VAZ 2104 and VAZ 2106. Starting with the VAZ 2107, cars use an injection system for preparing the combustible mixture. That is, seven is no longer a classic. The procedure for adjusting valves 2105, as well as 2101, 2102, 2103, 2104 and 2106, is completely the same. That is, the classics are configured according to the same principle.
Starting from the VAZ 2107, you need to configure the timing in a different way. Valve adjustment on the VAZ 2107 is carried out at a more subtle level. Only a properly qualified car mechanic can handle this work. Without solid experience in handling vehicles, it’s better not to go into the timing belt of VAZs, starting with the seven. It’s easier to take the car to the nearest service station.
I hope the article on how to adjust valves on a VAZ 2105 was useful. Have smooth roads and fewer breakdowns.
Preparation
Adjusting the valves of the VAZ-2105 is not the most tricky and difficult task. Of course, when you do any car repairs yourself for the first time, it is always exciting and often very difficult.
But you shouldn’t panic, because VAZ has always made cars for people, the circuits of which can be easily understood on their own (especially if the driver has already dealt with other models in the series).
First of all, you will need to prepare your tools.
- It is necessary to prepare a whole carload of open-end and socket wrenches of various diameters (from 8 to 17).
- In addition, the most important attribute of the work will be the key for working with the shaft. Without it, it will be impossible to correct the operation of the valves.
- Repairs are carried out on any engine condition - cold and warm. It's a matter of urgency and convenience. But in any case, for work you will need a probe with a thickness of 0.15.
- Armed with the necessary tools, you can safely begin diagnostics.