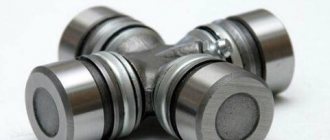
The VAZ 2110 camshaft is an important engine part. With its help, by opening the valve, the fuel mixture is supplied in a timely manner. The waste products also come out through it. The camshaft has specifications that are conducive to normal driving. Some drivers are not entirely satisfied with such data. They are trying to redesign the camshaft to give it a more modern and sporty look.
How to distinguish the intake camshaft from the exhaust camshaft on a VAZ-2112: differences
The camshafts of the 16-valve VAZ-2112 admit the working mixture and release exhaust gases. Unlike an 8-valve engine, where one camshaft serves for intake and exhaust, on a 16-valve engine there is a separate element for each phase. This improves not only engine performance, but also contributes to lower fuel consumption.
Valve overlap
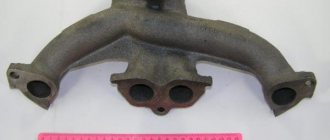
Valve overlap is the moment when the intake valve and exhaust valve are simultaneously open, that is, the exhaust valve has not yet closed, but the intake valve has already opened. The piston is at TDC at this moment. The simultaneous opening of the valves is necessary for the so-called cylinder purging, when the exhaust gases carry the working mixture with them through the intake valve. (by the way, a tuned exhaust manifold or “spider” can help us here) The amount of overlap is expressed in mm (in a standard timing belt, the overlap is almost 0)
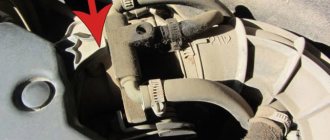
Photo of intake and exhaust camshafts
The intake and exhaust camshafts are indicated by arrows in the photo. The photo shows the engine with the valve cover removed.
Camshaft difference
The difference between the intake and exhaust camshafts is the presence of a groove for the phase sensor
In fact, there is no difference in the design of the exhaust and intake camshafts. There is only one reason why they are not interchangeable. There is a lip on the intake camshaft that is designed for a valve timing sensor.
Some car enthusiasts install sports camshafts instead of standard factory camshafts, which increase power. This is where the significant difference begins.
The intake camshaft has a larger cam size, which in turn opens the valve not by 7.6 mm, but by 13.2. This allows the engine to increase power characteristics. So the exhaust itself has slightly different characteristics - the valve opens not by 7.6, but by 10.8 mm, which significantly adds power.
Differences in sporty camshafts
Camshaft phases VAZ 2110 8 valves
I decided to highlight the question of whether the camshafts 2108 differ from 2110 (eng), and how much. The values are not reference, but very close to the actual ones, no worse than +- 2.5 g. The measurement was carried out with a marker disk, with the valves raised by 0.5 mm (+- 0.015), the thermal gap was no more than 0.03.
As a result, I intended: 1. Camshaft 2108, from a 1.3 engine, 2108 block. Intake cam lift - 8.95mm Exhaust cam lift - 8.95mm Intake valve opening angle - 220 degrees. (240 degrees) Exhaust valve opening angle - 220 degrees. (240g.r) Cam camber angle - 108g. The valve overlap height is practically absent. 0.20-0.3mm, by eye. In parentheses, given the measurement according to the methodology of OKB "Engine".
2.Camshaft 2110, from 1.6 engine, 11193 block. Intake cam lift - 9.5mm Exhaust cam lift - 9.2mm Intake valve opening angle - 230 degrees. (251gr.) Exhaust valve opening angle - 230gr. (251g) Cam camber angle - 106g. Valve overlap height - 0.725mm (+- 0.25) In parentheses, given to measurements according to the methodology of OKB "Engine".
Installation and replacement of camshafts on a 16-valve VAZ-2112
Replacement of camshafts on the 16-valve VAZ-2112 engine occurs when they wear out and the support journals wear out. Most often this happens when the time for a major overhaul of the power unit or cylinder head passes. This is a rather complicated procedure, but you can really do it yourself.
The video below shows the installation of camshafts and split gears on a 16-valve engine of the VAZ family
The video material will tell you how to replace camshafts on a VAZ-2112 16 valves, and give some recommendations and advice.
Camshaft replacement process
Camshafts with gears and fasteners
In order to install camshafts on the VAZ-2112 16 valves, they must first be dismantled. Like any spare part, they are installed in the reverse order from disassembly.
So, let's look at the step-by-step process of removing and installing the intake and exhaust camshaft.
Removing camshafts
- To begin with, as with any repair operations, it is necessary to remove the “minus terminal” from the battery.
- Remove the timing belt cover.
After unscrewing the mounting bolts indicated in the diagram, remove the timing cover
Unscrew the fastening nuts and remove the valve cover.
Disconnect the emergency oil pressure sensor
Scheme for dismantling and tightening the camshaft bearing housing bolts
You need to be careful with the camshaft plugs; if you install them incorrectly, oil will leak out. If you don’t notice it in time, you’ll shorten the engine’s lifespan or end up in need of a major overhaul.
Remove the two rear cylinder head plugs
We remove the camshafts from their seats
Remove the seals from the camshaft. If it does not come off, carefully cut it or pry it off with a screwdriver.
Installation of camshafts
Now that everything is removed, you can proceed to installing new camshafts on the car:
- Lubricate the cams and shaft support journals with engine oil.
Lubricate the camshaft journals and cams with engine oil.
The intake camshaft is shown on the left and the exhaust camshaft on the right.
How to apply sealant to the camshaft bearing housing cover
We press new oil seals onto the camshafts
Choice
Cylinder head camshafts for the VAZ-2112 are produced only by the manufacturer, so there is no need to look for analogues.
Original catalog numbers: inlet - 2112-1006015, outlet - 2112-1006014 . Each camshaft costs an average of about 3,000 rubles.
Nuances
When installing the bearing housing and cylinder head, do not apply sealant that contains silicone. This is due to the fact that the motor heats up, and accordingly the sealant heats up, which releases vapors that can get into the cylinders and further through the system . You should use a sealant whose instructions or packaging indicate that it is safe for the oxygen sensor.
When applying sealant to cavities, you should not apply a lot of it, because when tightening the bolts, it can get inside and this will lead to clogging of the oil channels, and therefore there will be no lubrication. The lack of lubricant will lead to increased wear of parts that will quickly fail.
Marking of camshafts VAZ 2112 16 valves
Today we’ll talk about 16 valve engines of VAZ cars. And specifically about their differences. How not to make mistakes in components when assembling your first powerful engine?
It’s no secret that the dream of any pelvic duct is “16 valves”. And I'm no exception. And for about 2 years now I have had a 2112 1.5 16 cl engine installed. Understanding the intricacies of the whole process, the idea came to write an article to help beginners, as well as to eliminate unnecessary questions.
16 valve VAZ engines began to be serially installed on VAZ 10 family cars. At first, engines with a volume of 1.5 liters and were marked 2112 were installed. After some time, it was replaced by a 1.6-liter engine with the marking 21124. Well, the “newest” development was the appearance of engines marked 21126, which are installed on VAZ 2170 cars, aka LADA Priora.
Let's begin to understand the differences between engines 2112 and 21124, but first we will discuss the difference between block 2112 and blocks 21083 and 2110.
Cylinder block 2112 does not differ in appearance from cylinder blocks 21083 and 2110, but it is not interchangeable with them. A special feature of the 2112 cylinder block are the mounting holes for the cylinder head. The holes have dimensions M10x1.25. There is another significant difference between block 2112 and 21083 and 2110. In the 2nd, 3rd, 4th and 5th main bearing supports of block 2112 there are additional oil channels into which special oil nozzles are pressed. While the engine is running, oil under pressure flows through these oil nozzles and washes the piston heads. AVTOVAZ claims that these oil injectors help to significantly reduce the thermal load on the engine as a whole. We'll talk about oil injectors in the next article. Is it worth installing them or leaving everything as it is.
Now engines 2112 and 21124.
The 2112 engine has a 2112 cylinder block with a height of 194.8 mm, the 21124 engine has a 11193 cylinder block with a height of 197.1 mm (the so-called “high” block). The height of the block is considered to be the distance from the axis of rotation of the crankshaft (crankshaft) to the upper surface of the block. The next difference between these motors is associated with the installation of different crankshafts. The 2112 engine has a so-called “71 crankshaft” with a crank radius of 35.5 mm, with such a crankshaft the piston stroke is 71 mm. The 21124 engine is equipped with a “75.6 crankshaft” - with a crank radius of 37.8 mm, with such a crankshaft the piston stroke is 75.6 mm. As a result, the difference in the height of the blocks and the piston stroke made it possible to achieve an engine volume of 21124 of 1.6 liters.
Tuning and sports camshafts VAZ
Each of us tries in every possible way to improve our car, and there are a great many ways to achieve this. When it comes to the engine, everyone unanimously talks about increasing its power. Although, if we take a more serious approach to the issue, then first we need to pay attention to its torque.
We know that it is possible to squeeze out the most power at a stable maximum speed, but this engine mode is rarely used. For the average driver, what is more important is the car’s throttle response, which obediently responds to the gas pedal both when moving from a standstill and when accelerating. This behavior of the car is ensured by large and relatively constant torque at low and medium speeds, which is what VAZ engines “sin” about. At low engine speeds they do not have sufficient “traction”.
Owners of a VAZ car often complain about the car jerking when starting to move, noticeable dips when sharply pressing the gas, many have a fast clutch, and almost everyone notes the ineffectiveness of fifth gear. Indeed, at engine speeds less than 3000 rpm. its insufficient pickup capacity is observed. The torque curve depends on the valve timing parameters, the so-called “camshaft phases”, as well as the “time-section” of valve opening, which are determined by the profile of the camshaft cams. Depending on its angle of rotation, different amounts of valve opening are obtained. For better functioning of the car at low speeds, they quickly supply the required volume of working mixture into the cylinder, that is, they noticeably narrow the opening phase of the intake valve.
Unlike conventional camshafts, sports models use cams with different geometric dimensions. Their taller and wider shape means that the valve rises to a greater height and stays open longer, which ensures the supply of a complete mixture. The profile of the cams is characterized by a smooth shape, which makes the operation of the gas distribution mechanism more reliable at wide phases.
From the above it follows that the maximum engine power and its torque can have different values. And if the use of a standard camshaft implies increased torque at medium speeds, then the sports one provides maximum output at high engine speeds. The sports camshaft on VAZ cars is installed with a split gear (camshaft sprocket or pulley), with the help of which more precise adjustment and adjustment of the phases becomes possible. With its help, the maximum power is adjusted at the required engine speed.
By using tuning camshafts, you can achieve engine operation under load without noticeable interruptions, even when the speed is reduced to the maximum level. At the same time, the detonation limit moves away, that is, the “knock of fingers” at low and medium crankshaft speeds stops. There is a noticeable reduction in fuel consumption and exhaust toxicity. As a result, the engine’s tendency to detonate decreases, which means its service life increases.
Camshafts on VAZ engines are quite sensitive to gap adjustment, so on tuning camshafts the cam run-off area on the valve closing side is noticeably increased. This makes it easier to adjust the gaps and reduces their number several times. Let's trace this fact using the following example: after installing a tuning camshaft, valve clearance adjustment is required after 60,000 km of engine mileage. Using a conventional camshaft would require at least four adjustments. This significantly increases the service life of the product and saves money and time required for each valve adjustment. Do the math for yourself: proper adjustment takes at least 3.5 hours and costs about $20.
Camshaft classification
Tuning camshaft models can be divided into two groups: low and high. As the name suggests, some increase torque at low engine speeds, while others increase torque at high speeds. This is achieved by changing the lift height and special profile of the cams, as well as certain phases of opening/closing of the valves.
Low camshafts
This type of product has a low lifting height and there is no valve overlap zone. This mode prevents the working mixture from being thrown back into the intake at low speeds. Of course, a low lift height causes a loss of filling at high speeds and this leads to a decrease in the maximum engine power. Therefore, they are mainly used when driving around the city. Do not forget that engine power mainly affects only the maximum speed of your car, which is not a critical indicator. As an example, we can give the following figures: reduction in VAZ-2109 engine power by 10 hp. will reduce the maximum speed by only 6 km/h. The advantages of lower shafts include an increase in torque at the “bottoms”. This is what will allow you to accelerate sharply from a traffic light without downshifting. At medium speeds, these camshafts are no better than standard ones, and at high speeds they are even worse.
Overhead camshafts
These products, on the contrary, have high lifts, a large valve overlap area and wide phases. This mode increases filling at the “tops”, which occurs due to an increase in the flow area in the valve areas and due to the use of the inertial boost effect. This leads to an increase in engine power, with maximum torque shifting to the high speed zone. Unfortunately, there is a noticeable dip in the low end, which occurs due to a wider phase during which the working mixture is pushed back into the intake manifold at low speeds. And the better the characteristics of the overhead camshaft, the stronger this effect.
Tuning and sports camshafts
Overhead camshafts are further divided into tuning and sports camshafts. Their differences mainly concern the phase characteristics, valve lift and overlap height. The higher the lift, the higher the torque and, as a rule, the power at high speeds. Sports camshafts are practically unsuitable for use in urban driving conditions. They have a noticeable dip at low speeds and a rather unstable high idle speed. Their maximum output occurs only in the region of almost maximum engine speeds, which is unacceptable under normal driving conditions. One of the brightest representatives of the sports class of products can be called the VAZ 2101-2107, Niva “NUZHDIN” camshaft 12.70 mm/12.40 mm (292°/290°). You should also pay attention to the following products:
- — Camshaft 8V VAZ 2108-21099, 2110-2112, 2113-2115, Kalina, Priora, Granta “NUZHDIN” 13.70 mm (287°/284°);
- — Camshaft 8V VAZ 2108-21099, 2110-2112, 2113-2115, Kalina, Priora, Granta “NUZHDIN” 12.36 mm (286°);
- — Camshafts 16V VAZ 2108-21099, 2110-2112, 2113-2115, Kalina, Priora, Granta “NUZHDIN” 10.65 mm (306°);
- — Camshafts 16V VAZ 2108-21099, 2110-2112, 2113-2115, Kalina, Priora, Granta “NUZHDIN” 12.00 mm (310°/304°).
Now you can choose the required type of camshaft for your car, based on its intended use.
In what cases is it necessary to change?
The pulleys of the 16-valve VAZ 2112 must be replaced when they are worn out or have mechanical damage. In particular, we are talking about:
- failure or exhausted service life of the pulley bearing journals;
- mechanical bending of the camshaft;
- spent service life, as well as scuffing of element cams.
Lada 2112 with 16 cl internal combustion engine
If some kind of extraneous knock appears in the valves while the engine is running, it is usually caused by one of these damages. If you have recorded a reduced pressure of the engine fluid in the system, this may indicate an increase in the clearances in the bearings.
To do this, in order to eliminate this malfunction, it is necessary to grind and restore the pulley bearing journals. You should also enlarge the grooves through which the engine fluid flows. This is done so that the lubricating fluid, after the next grinding, lubricates the internal combustion engine elements. As for the necks, after grinding they should be polished with green GOI paste.
Step-by-step instructions for a 16 valve car
Required Tools
- new replacement parts (exhaust and intake timing pulleys);
- 8 mm socket wrench;
- sealant.
Stages of work
To correctly carry out the process of replacing exhaust elements, we suggest you use the instructions prepared specifically for our users. This manual is also suitable for those who want to replace exhaust camshaft seals, sensors or plugs.
- Open the hood of your 16 valve VAZ 2112. Remove the protective cover of the timing belt.
- After this, it is necessary to remove the cylinder head cover, as well as the engine fluid emergency pressure monitoring device (sensor). The sensor is removed so that it is not damaged during the work. You can also remove the sensor wire tip.
- Once the sensor is removed, you need to remove all the screws that secure the camshaft bearing housing. This is done using an “8” socket wrench. All bolts should be unscrewed evenly, not one at a time.
- After this, dismantle the bearing housing of the exhaust camshafts of the 16 valve VAZ 2112. It should be noted that the housing is dismantled with spark plug wells. They need to be pulled out of the case.
- Now regarding the plugs for technological holes. During the camshaft replacement procedure, motorists often lose the plugs. The plugs are small round shaped parts.
The plugs need to be removed from their installation locations in the cylinder head; there are two plugs in total, and they are located in the area of the rear ends of the camshafts.
Once these items are removed, place them separately. It's better not to lose the plugs.
- After this, you can dismantle the exhaust camshaft. It is advisable to remove the exhaust camshaft first. With the exhaust camshaft removed, proceed to remove the intake valve element.
- Now it's up to the seals. We begin to dismantle the oil seals and put them aside. By the way, when dismantling the oil seals, also be careful not to damage them. After removing the seals, inspect the dismantled devices. The oil seals must be free of mechanical damage, signs of wear, microcracks, etc.
- If you decide to install sports timing pulleys on your 16 valve VAZ 2112, then you need to purchase tuning parts in advance. Installation of sports elements is common among Russian motorists. Take your sports camshafts and lubricate their cams, as well as the supporting elements, with engine fluid.
- Please note: the exhaust and intake sports components are not interchangeable, they are marked. For example, exhaust valve components are marked with the numbers 1006014.
- After this, a small layer of sealant must be applied around the perimeter of the cylinder head 16 of the VAZ 2112 valve, as well as along the surface of the pulley bearing housing. More precisely, the application sites are marked in the photo. It is better not to overdo it with sealant.
- Once the sealant is applied, the pulleys can be placed in place.
- Then install the bearing housing on the cylinder head. Tighten all screws evenly until the body parts are flush with the cylinder head. By the way, it is also advisable to tighten the screws in a certain sequence; you can learn more about this in the video and photo.
- Then you should press in the oil seals, and also install the plugs in the cylinder head of the 16 valve VAZ 2112. After this, the assembly must be done in the reverse order, do not forget about the sensor.
Installation and replacement of VAZ-2112 camshafts 16 valves: photo, video
Replacement of camshafts on the 16-valve VAZ-2112 engine occurs when they wear out and the support journals wear out. Most often this happens when the time for a major overhaul of the power unit or cylinder head passes. This is a rather complicated procedure, but you can really do it yourself.
The video below shows the installation of camshafts and split gears on a 16-valve engine of the VAZ family
The video material will tell you how to replace camshafts on a VAZ-2112 16 valves, and give some recommendations and advice.
Camshaft replacement process
Camshafts with gears and fasteners
In order to install camshafts on the VAZ-2112 16 valves, they must first be dismantled. Like any spare part, they are installed in the reverse order from disassembly.
So, let's look at the step-by-step process of removing and installing the intake and exhaust camshaft.
Removing camshafts
- To begin with, as with any repair operations, it is necessary to remove the “minus terminal” from the battery.
Remove the timing belt cover.
After unscrewing the mounting bolts indicated in the diagram, remove the timing cover
Now, you need to remove the valve cover. Please note that the bolt tightening order must be followed during assembly.
Unscrew the fastening nuts and remove the valve cover.
Disconnect the wires of the emergency oil pressure sensor, and then unscrew it.
Disconnect the emergency oil pressure sensor
Using a socket wrench or 8mm socket, unscrew the 20 bolts securing the camshaft cover.
Scheme for dismantling and tightening the camshaft bearing housing bolts
You need to be careful with the camshaft plugs; if you install them incorrectly, oil will leak out. If you don’t notice it in time, you’ll shorten the engine’s lifespan or end up in need of a major overhaul.
Remove the two rear cylinder head plugs
We remove the camshafts from their seats
We press the seals out of the camshafts.
Remove the seals from the camshaft. If it does not come off, carefully cut it or pry it off with a screwdriver.
Installation of camshafts
Now that everything is removed, you can proceed to installing new camshafts on the car:
- Lubricate the cams and shaft support journals with engine oil.
Lubricate the camshaft journals and cams with engine oil.
We place each camshaft in its seat. It is worth considering that camshafts are not interchangeable, so they should not be confused.
The intake camshaft is shown on the left and the exhaust camshaft on the right.
Apply sealant to the surface of the cylinder head and camshaft bearing housing.
How to apply sealant to the camshaft bearing housing cover
We press new oil seals onto the camshafts
We collect the remaining parts that were removed from the car.
Choice
Cylinder head camshafts for the VAZ-2112 are produced only by the manufacturer, so there is no need to look for analogues.
Original catalog numbers: inlet - 2112-1006015, outlet - 2112-1006014. Each camshaft costs an average of about 3,000 rubles.
Intake camshaft marking Exhaust camshaft marking
Nuances
When installing the bearing housing and cylinder head, do not apply sealant that contains silicone. This is due to the fact that the motor heats up, and accordingly the sealant heats up, which releases vapors that can get into the cylinders and further through the system. You should use a sealant whose instructions or packaging indicate that it is safe for the oxygen sensor.
When applying sealant to cavities, you should not apply a lot of it, because when tightening the bolts, it can get inside and this will lead to clogging of the oil channels, and therefore there will be no lubrication. The lack of lubricant will lead to increased wear of parts that will quickly fail.
conclusions
Replacing and installing camshafts on a 16-valve VAZ-2112 is not entirely easy, but it is quite possible. The main thing to ensure results is caution and following instructions. It is worth noting separately that the intake and exhaust camshafts are different and not interchangeable. On the intake there is an additional border for the phase sensor.
Camshafts of engines 2112 and 21124 (16v) - removal and installation
The work is shown on engine 21124. For details of performing work on engine 2112, see the text.
1. We prepare the car for work (see “Preparing the car for maintenance and repair”).
2. Remove the camshaft pulleys (see “Camshaft pulleys - removal and installation”).
3. Remove the tension and guide rollers (see “Timing belt - replacement”).
10 mm socket wrench
unscrew the six bolts securing the rear timing belt cover and remove it.
5. Remove the cylinder head cover (see “Cylinder head cover for engines 2112 and 21124 (16V) - removal and installation”).
6. To avoid damage, remove the oil pressure sensor (see “Emergency oil pressure sensor in the engine - replacement”) or disconnect the wire tip from it.
8 mm socket wrench
Evenly, half a turn, unscrew the 20 bolts securing the camshaft bearing housing.
8. Remove the camshaft bearing housing.
On the 2112 engine, remove the camshaft bearing housing together with the guide pipes of the spark plugs (spark plug wells). We remove the pipes from the bearing housing.
9. We remove two plugs for technological holes from the seats in the cylinder head (near the rear ends of the camshafts).
10. Remove the camshafts of the intake and exhaust valves.
11. Remove the seals from the shafts.
12. Inspect the shafts. The journals and cams of the shaft should not show signs of heavy wear, scratches, cracks, or traces of metal envelopment.
1. Lubricate the bearing journals and shaft cams with clean engine oil.
2. Place the camshafts in the cylinder head. The shafts are not interchangeable and have different markings.
The exhaust valve shaft is marked 1006014.
The intake valve shaft is marked 1006015.
In addition, the intake valve shaft has an additional belt.
When repairing an engine, do not use sealant with a high content of silicone (silicon compounds), the vapors of which can get through the crankcase ventilation system into the cylinders and then into the exhaust tract. Use a sealant that specifically states on the packaging that it is safe for the oxygen concentration sensor.
Do not apply too much sealant to the mating surfaces of the bearing housing. When tightening the mounting bolts, the sealant squeezed into the internal cavities of the engine can clog the oil passages.
3. Apply a thin layer of Loctite sealant No. 574 or similar to the plane of the cylinder head and to the lower surface of the bearing housing around the holes of the spark plug wells according to the following scheme:
4. Install the camshafts into the cylinder head with the keyways facing up.
5. Install the bearing housing on the cylinder head and evenly tighten its mounting bolts until the bearing housing comes into contact with the cylinder head. We finally tighten the bearing housing mounting bolts in pairs, to a torque of 8.0-10.0 Nm (0.8-1.0 kgfm) in the following sequence (see photo).
Tightening sequence for camshaft support bolts
6. Press in the camshaft oil seals (see “Camshaft oil seals - replacement”).
7. On engine 2112
Apply clean engine oil to the rubber O-rings of the spark plug guide pipes (spark wells) and install the pipes into the head.
8. Further assembly is carried out in the reverse order of disassembly.
Source
Replacing camshafts on a VAZ 2114 with your own hands
Camshafts, like other mechanisms and components of a car, determine the quality of engine operation. This material will tell you how to determine the malfunction of the shafts, how to replace the camshafts on a VAZ 2112 16 valves, and what needs to be prepared for this.
The pulleys of the 16-valve VAZ 2112 must be replaced when they are worn out or have mechanical damage. In particular, we are talking about:
mechanical bending of the camshaft;
Lada 2112 with 16 cl internal combustion engine
If some kind of extraneous knock appears in the valves while the engine is running, it is usually caused by one of these damages. If you have recorded a reduced pressure of the engine fluid in the system, this may indicate an increase in the clearances in the bearings.
To do this, in order to eliminate this malfunction, it is necessary to grind and restore the pulley bearing journals. You should also enlarge the grooves through which the engine fluid flows. This is done so that the lubricating fluid, after the next grinding, lubricates the internal combustion engine elements. As for the necks, after grinding they should be polished with green GOI paste.
Step-by-step instructions for a 16 valve car
Required Tools
- new replacement parts (exhaust and intake timing pulleys);
- 8 mm socket wrench;
- sealant.
New sports shafts Socket wrench “8” Glue sealant
Stages of work
To correctly carry out the process of replacing exhaust elements, we suggest you use the instructions prepared specifically for our users. This manual is also suitable for those who want to replace exhaust camshaft seals, sensors or plugs.
- Open the hood of your 16 valve VAZ 2112. Remove the protective cover of the timing belt.
- After this, it is necessary to remove the cylinder head cover, as well as the engine fluid emergency pressure monitoring device (sensor). The sensor is removed so that it is not damaged during the work. You can also remove the sensor wire tip.
- Once the sensor is removed, you need to remove all the screws that secure the camshaft bearing housing. This is done using an “8” socket wrench. All bolts should be unscrewed evenly, not one at a time.
- After this, dismantle the bearing housing of the exhaust camshafts of the 16 valve VAZ 2112. It should be noted that the housing is dismantled with spark plug wells. They need to be pulled out of the case.
- Now regarding the plugs for technological holes. During the camshaft replacement procedure, motorists often lose the plugs. The plugs are small round shaped parts.
How to distinguish the intake camshaft from the exhaust camshaft of a VAZ-2112: photo
The camshafts of the 16-valve VAZ-2112 admit the working mixture and release exhaust gases. Unlike an 8-valve engine, where one camshaft serves for intake and exhaust, on a 16-valve engine there is a separate element for each phase. This improves not only engine performance, but also contributes to lower fuel consumption.
Photo of intake and exhaust camshafts
The intake and exhaust camshafts are indicated by arrows in the photo. The photo shows the engine with the valve cover removed.
Camshaft difference
The difference between the intake and exhaust camshafts is the presence of a groove for the phase sensor
In fact, there is no difference in the design of the exhaust and intake camshafts. There is only one reason why they are not interchangeable. There is a lip on the intake camshaft that is designed for a valve timing sensor.
Some car enthusiasts install sports camshafts instead of standard factory camshafts, which increase power. This is where the significant difference begins.
The intake camshaft has a larger cam size, which in turn opens the valve not by 7.6 mm, but by 13.2. This allows the engine to increase power characteristics. So the exhaust itself has slightly different characteristics - the valve opens not by 7.6, but by 10.8 mm, which significantly adds power.
Differences in sporty camshafts
conclusions
The camshafts of the 16-valve engine on the VAZ-2112 do not differ in design features, except that an additional edge is machined on the intake shaft for the camshaft (phase) sensor. If the intake and exhaust elements are swapped in places, this will lead to a violation of the valve timing, and if the engine operates in this mode for a long time, the owner will inevitably face a major overhaul of the cylinder head, at best.
Valve opening time (not to be confused with shut-off)
It is determined by the profile of the cam - the sharper it is, the time during which the valve will be open is less; the more “convex” it is, the opening time is correspondingly longer. Also, using the cam profile, you can adjust the speed of opening/closing of the valve within one stroke.
The phase is the moment of opening and closing of the valves relative to the position of the crankshaft (CV). What is affected by an increase or decrease in phase can be understood by comparing the processes in a standard gas distribution mechanism (GDM) and a timing mechanism using a tuning camshaft.
In a standard timing belt, in the first stroke of engine operation, the intake valve opens as soon as the piston begins its movement to BDC. When using a tuning camshaft with increased valve timing. In the first intake stroke, the piston begins its movement to BDC, and the intake valve is still closed, and when sufficient vacuum is formed in the cylinder, the intake valve opens and the fuel-air mixture literally bursts into the combustion chamber. Since at high speeds inertia appears when filling the combustion chamber with the fuel-air mixture, we thus increase the filling rate of the cylinder, which is very important at high speeds. Now let's look at the exhaust phase on a standard camshaft. Having reached BDC, the piston begins the stroke of displacing exhaust gases through the exhaust valve. The exhaust valve opens when the piston begins to move and closes at the end of the stroke. When using a tuning camshaft with wide phases, the process takes on a slightly different look. After the working mixture is ignited, the piston does work and moves to BDC. At the end of its movement, the work is practically zero, and in order to speed up the release of the chamber from exhaust gases, it makes sense to start opening the intake valve. This is what happens when using a tuning camshaft.
Tightening torque for VAZ-2112 camshaft bed 16 valves: order
Many motorists have heard that it is necessary to correctly tighten the threaded connections on the 16-valve VAZ-2112 engine, but they have never done it themselves. Thus, the tightening torque is determined by the manufacturer and is indicated in the service repair manuals.
Video about installing camshafts and split gears on a 16 valve engine
The video will tell you how to properly tighten the threaded connections on the camshaft beds
Torque and sequence of tightening the camshaft bed
Camshaft cover tightening sequence
Correct tightening of the camshaft bed, as well as other parts of the cylinder head, determines the normal functioning of all components and assemblies. So, in order to tighten threaded connections, a standard tightening pattern and a torque wrench are used.
Before installing the bolts in place, they must be washed thoroughly and lubricated with silicone grease.
In order to properly tighten the bolts, you need to know the sequence. It starts from the middle part and gradually moves directly to the edges. The detailed sequence can be seen in the photo below.
Tightening diagram for each camshaft bed bolt with numbering
As for the tightening force itself, it is 8.0-10.0 Nm. After the bed is installed on the block head, the connection bolts are tightened by hand or without much force using a ratchet with a head.
We tighten all the bolts by hand, but do not tighten them
When all the bolts are in place, you need to take a torque wrench and tighten them according to the standards in the order indicated above.
Torque wrench for tightening threaded connections
In what cases is it necessary to tighten the camshaft bed?
The bolts are tightened. Marked with arrows
Tightening the camshaft bed will be necessary if it was previously dismantled for restoration and repair work. So, in what cases will you need to remove the bed, let’s look at it in more detail:
- Replacing camshafts, lifters or valve seals.
- Engine repair operations.
- Replacement of individual elements of the cylinder head.
Overhaul of the block head.
Camshaft selection
Today we’ll talk about camshafts and how to match them to your needs. When choosing a camshaft for their vehicle, people are faced with the task of selecting the right camshaft for their application. When trying to select a camshaft, they begin to study forums where there is a lot of information about which shafts were installed by whom, in what configuration and how the car drove after all this. The main parameters that appear on the forums are lift, phase and manufacturer. Moreover, some people put the camshaft phase at the forefront and practically pray for this parameter. Quite often on forums you can find phrases: my shaft is wider, which means it will trample better than yours, your phase is a pitiful 262, not like mine is 306! So let's try to understand the parameters of camshafts. The declared phase (also advertised) (264 272 276 306) indicates the maximum duration of the phase in degrees of crankshaft rotation, declared by the camshaft manufacturer; it is measured from the moment the valve begins to lift off the seat until it is completely lowered onto the seat. In real life, this parameter is quite arbitrary; the problem lies in the fact that the first millimeter of lifting and lowering is implemented smoothly so that there is no impact on the seat; it is done to reduce the load on the entire valve lifting mechanism, the camshaft itself, the valve and the seat. Each of these processes takes about