Replacing the exhaust manifold gasket of a VAZ 2110
- Registration
- Entrance
- To the beginning of the forum
- Forum Rules
- Old design
- FAQ
- Search
- Users
The gasket is burnt out.
Does anyone know a link that describes how to replace it yourself (or someone will tell you so in detail). otherwise I have no idea. what and how to shoot. and in what order (do I need to remove the receiver separately and change the gasket there? do I need to remove the ramp? do I need to disconnect the intake pipe from the exhaust manifold and change the gasket there)
those yes and in what order. better in great detail. And what incidents can happen. and what tools and gaskets are needed. (and which pads are better to buy)
Sergg_
, I changed it to 99. I simply unscrewed everything that was in the way and then screwed it back. In fact, they are now selling good repair books with photographs that describe in detail, step by step, how to change something.
Sashka Khalturin2
, is this your avatar photo?
Replacing the exhaust manifold gasket: device, diagram and features
The exhaust manifold (EC) of a car engine is an element of the exhaust gas removal system. Its role is to collect combustion products from all cylinders and, combining them, transfer them to the exhaust pipe. From there they go to the catalyst, and after that to the muffler.
The exhaust manifold is attached to the cylinder head of the power unit (cylinder head). The tightness of this connection is ensured using a special gasket. Due to constant temperature loads, it sometimes fails. And although such a malfunction does not pose a serious threat to the engine, it is better to eliminate it immediately after detection.
In this article we will look at how to replace the exhaust manifold gasket using the example of domestically produced VAZ cars. But first, let's figure out what the VC itself is and how to determine that it's time to change its seal.
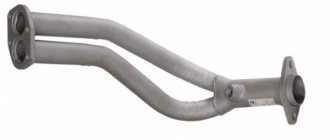
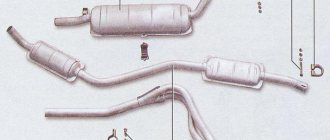
Replacing the resonator
Resonator VAZ 2110
So:
- The resonator is attached to the muffler using a crimp clamp with an O-ring;
- It is attached to the neutralizer by means of a floating flange (two bolts) and flaring;
- On the opposite side of the neutralizer there is a “fist”;
- It is often problematic to unscrew the knuckle mounting bolts; they are simply cut off with a grinder and replaced with new ones;
- If suddenly you don’t have a tool at hand, we clean the places where the bolts are attached and treat them with a “liquid wrench” (WD-40 or its equivalent);
- Unscrew the bolts and remove the muffler clamp;
- We remove the resonator from the suspension rubber bands, change the rubber bands if necessary;
- Then we hook a new resonator onto rubber bands and attach it to the muffler so that the pipe running from the resonator to the muffler is parallel to the ground;
- When there is wear on the neutralizer fist or there are burrs, grooves or rust on it, it is necessary to lubricate the connection with a special high-temperature sealant;
- Using new bolts and nuts, tighten the flanges of the catalyst and resonator;
- The neutralizer is attached to the resonator by means of a flange connection (two bolts), to the receiving pipe (pants) by means of a spring-loaded connection and a pair of flares, between which there is a graphite or metal-asbestos ring.
How long does an exhaust manifold gasket last?
The exhaust manifold gasket is not one of those elements whose replacement is included in the routine maintenance plan. It can serve for two, five, or ten years. Its condition does not depend on age and mileage. The only factor that affects its service life is the correct operation of the engine. If it operates in standard mode, does not overheat, uses good fuel, the gasket will last a long time. If the opposite is true, it may burn out even after three months of operation.
When is it time to change?
Many owners of VAZ 2110 cars are interested in the question of how long it takes to change the gasket. In many ways, the frequency of replacement depends on the quality of the gasket itself; the better the material, the longer it will last. The frequency of replacement is affected by the intensity of use of the car. The cylinder head gasket is a rubber product that over time loses its elasticity, hardens, cracks and ceases to perform its main function - sealing the connection of the cylinder head with the cylinder block.
The quality of the gasket is of great importance for the proper operation of the engine. If you do not monitor its condition, the motor will quickly exhaust its service life. There are signs by which we can conclude that it needs to be replaced:
- the appearance of white steam in the exhaust gases,
- external leaks at the cylinder head connections of antifreeze or engine oil;
- oil stains in antifreeze;
- a large amount of oil in the pan;
- foam appears around the filler cap.
The presence of vapors in the exhaust gases can be checked by unscrewing the cap on the expansion tank and placing the bag over the neck. If it inflates after a short period of engine operation, it means that the gasket has become unusable.
Signs of a burnt-out VK gasket
Signs of a burnt gasket may include:
- change in the sound of a running engine;
- the appearance of a characteristic smell of exhaust gases in the vehicle interior;
- violation of engine stability, CHECK lamp on the dashboard is on.
As for the sound of the power unit, when the gasket burns out, a characteristic “chirping” is usually heard. In such cases, they say that the engine is “cutting.” This sound is created by exhaust gases escaping where the seal is damaged. Naturally, exhaust from under the hood enters the cabin through the heating and ventilation system. This creates additional inconvenience for the driver and passengers, and also poses a certain threat to their health, so in any case, replacing the exhaust manifold gasket if it is damaged is a necessary necessity.
In cars with injection engines, the operation of which is controlled by an electronic control unit (ECU), if the integrity of the gasket is damaged, the CHECK lamp on the dashboard may light up. This is due to the fact that the lambda probe, installed on the manifold itself or the exhaust pipe, detects changes in the amount of oxygen in the exhaust and transmits a signal to the ECU. Until the fault is eliminated, the controller forces the engine to operate in emergency mode.
Causes of malfunctions
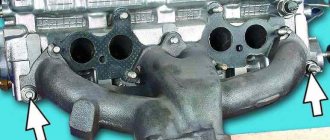
The gasket is placed between the exhaust manifold and the cylinder head. The stamped asbestos gasket is resistant to high temperatures, can be compressed (creating the necessary impermeability) and has increased strength. To enhance the latter quality, the exhaust manifold gaskets are additionally reinforced with steel.
IMPORTANT! The main task of the gasket is to prevent exhaust gases from penetrating under the hood, where they can cause ignition of parts/assemblies of the engine compartment.
The gasket is recognized as the most vulnerable point of the exhaust manifold, which operates under extreme loads in both temperature and pressure. It is not surprising that gaskets have to be changed not only on cars with significant mileage, but also on almost new cars.
How much does a repair at a service station cost?
How much will it cost to replace the exhaust manifold gasket? The price for this type of work depends on the type of engine (carburetor, injection, 8-valve, 16-valve), the model of the seal itself, as well as the prices of the service station where you plan to repair your car.
On average, the work itself, together with the seal, costs somewhere around 1,500 rubles.
But you don’t have to spend money on work. Replacing the VAZ exhaust manifold gasket can be done on your own without much difficulty. Especially if you have a set of hand tools and you have even the slightest idea about the design of your car’s engine.
What is a “spider” for Priora and what is it for?
Tuning the exhaust system of the Lada Priora includes replacing the exhaust manifold with a similar sports version, which is called the “spider”. The main difference between the original manifold and the spider is that the latter has a larger diameter and the same length of outlet pipes, which facilitates the rapid release of exhaust gases from the cylinders to the exhaust pipe.
This spider design prevents exhaust gases from flowing back into the combustion chamber, which increases engine power and performance. In addition, the manifold performs the function of purging the combustion chamber and filling it with a combustible mixture due to the pressure that is created when exhaust gases are released.
To tune the Priora exhaust system, a ready-made kit for installing a direct-flow Stinger exhaust with additional components that are perfectly attached to each other is often used. As a rule, the tuning kit includes the following parts:
- new muffler with nozzle;
- spider;
- resonator Stinger Sport with a pipe diameter of 51mm.
The need to install a “spider” on Priora arises when:
- long vehicle acceleration time;
- low engine power;
- failure of the old exhaust system, where installing a spider on a Priora is considered as an alternative to the old one.
On the tuning parts market there are many modifications of “spiders” made by different manufacturers. Some models are produced without oxygen sensors, which requires reflashing the electronic engine control unit.
There are spiders with long and short pipes, which are indicated by the corresponding numbers 4-2-1 and 4-1. These designations reflect the shape of the spider pipes, that is, 4 pipes merge into 2, and then into 1, in the second option, respectively, 4 pipes are immediately combined into one, which significantly reduces the length.
The most popular among car enthusiasts has become the long spider 4-2-1, which, unlike the short one, shows good results in a wide speed range. A short spider 4-1 is better suited for forced engines operating at 6-10 thousand rpm.
What is needed for repairs
Replacing the exhaust manifold gasket involves using the following means:
- set of spanners;
- slotted and Phillips screwdrivers;
- sharp knife or spatula (to remove old gasket);
- a container with a wide neck with a volume of at least 5 liters (for draining coolant);
- rust preventative (WD-40 or similar);
- dry rags.
Important: replacing the exhaust manifold gasket 2114, like other VAZ models, requires preliminary draining of the coolant. Otherwise, you risk flooding the engine intake windows with it.
Replacing the exhaust manifold gasket of a VAZ 2114
The algorithm for performing work for the “fourteenth” model of “Samara” is as follows:
- We install the machine on an inspection hole or overpass, dismantle the engine protection, and drain the coolant.
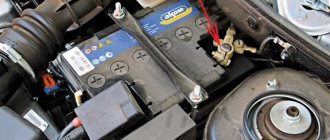
- Remove the negative terminal of the battery.
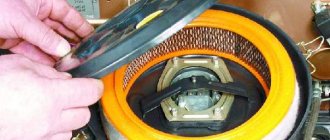
- Remove the air filter housing.
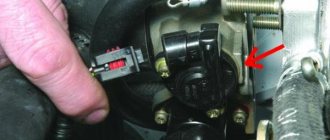
- Disconnect the accelerator cable and fuel pipes from the throttle assembly.
- Disconnect the throttle sensor and idle air control connectors.
- Disconnect the crankcase ventilation and brake booster hoses from the receiver.
- We dismantle the receiver itself, disconnect the wire connectors of the injection control unit.
- Remove the fuel rail (do not unscrew the injectors).
- Disconnect the receiving pipe from the VC.
- We dismantle the intake manifold, followed by the exhaust manifold.
- Remove the old gasket.
- Using a knife (spatula), carefully clean the mating surfaces of the manifold and cylinder head.
- Install a new gasket.
- We carry out installation in reverse order.
- Fill the coolant to the required level.
Spare parts and tools for work
Before starting work on replacing valves on a VAZ 2110, high-quality new parts are purchased, the names and original articles of which are as follows:
- Set of gaskets: valve cover (art. 2108-1003270/77) and cylinder head (art. 21083-1003020), intake and exhaust manifolds (set art. 21083-1008081), exhaust gas intake pipe (art. 2103-1203020-04) , as well as an oil seal (art. 2108-1005034) and oil flinger rings (art. 2108-1007026-86) (the so-called cylinder head repair kit)
- New valves for the fuel mixture intake system 4 pcs. (art. 21083-1007010)
- New exhaust system valves 4 pcs. (art. 2108-1007012)
- Valve guides 8 pcs. (art. 2108-1007032-87)
- Engine coolant
- New bolts securing the cylinder head to the cylinder block (art. 2108-1003271Н/О)
- Timing belt (art. 2108-1006040-86) and generator drive belt (art. 1000012562)
- Engine oil and oil filter
Repairs to replace worn-out parts are carried out using a standard set of tools, which are usually sold as a set, namely:
- a set of open-end wrenches marked from 8 to 21 mm;
- set of internal hex keys;
- a set of sockets with a diameter from 8 to 24 mm;
- valve desiccant;
- screw valve guide puller;
- torque wrench (needed for proper tightening of the camshaft, cylinder head and camshaft gear bolts);
- Screwdriver Set;
- electric drill;
- specialized lapping paste of two types (for rough lapping of valves to their working surface of the combustion chamber and for finishing grinding);
- gloves to protect hands from possible damage.
The presence of tools, parts and a covered room will allow you to carry out troubleshooting work yourself, since the price of replacing 8 valves on a VAZ 2110 in non-certified services in the fall of 2022 varies from 30 to 45 thousand rubles. At a certified service station of official dealers, such work will cost more than 50 thousand, which will greatly affect the financial situation of the car owner.
Changing the VK gasket on a VAZ 2110
Replacing the exhaust manifold gasket 2110 is performed in the following order:
- We put the car on the overpass (inspection hole), remove the protection, and be sure to drain the coolant.
- We de-energize the car's on-board network by disconnecting the negative terminal from the battery.
- Remove the air filter.
- Disconnect the hose of the brake booster, pneumatic valve cover, and fuel pressure regulator from the receiver.
- Disconnect the throttle sensor and idle air control.
- Disconnect the air duct and turn off the air flow sensor.
- Disconnect the crankcase ventilation hoses from the throttle pipe.
- Remove the inlet and outlet hoses of the cooling system from the manifold.
- We dismantle the receiver assembly with the throttle assembly.
- Unscrew the 5 fastening nuts and remove the inlet manifold.
- We unscrew the bolts (3 pcs.) that secure the exhaust manifold to the exhaust pipe.
- We dismantle the VK.
- Remove the old gasket or its remaining fragments.
- We clean the joints on the manifold and on the cylinder head.
- Install a new gasket.
- We install dismantled elements.
- Don't forget to add antifreeze (antifreeze).
As you can see, for a VAZ 2110, replacing the exhaust manifold gasket is performed using almost the same algorithm. Most importantly, do not forget to drain the coolant.
Removal and installation of the receiver and collectors of the VAZ 2110-2111-2112 engine
Replacing the clutch to Reno
We disconnect the exhaust pipe from the exhaust manifold of the VAZ 2112 and the bracket.
Using a “13” wrench, unscrew the two nuts securing the VAZ 2111 fuel pipe bracket to the receiver.
Remove the exhaust pipe from the exhaust manifold studs.
. electro-pneumatic valve and fuel pressure regulator in the fuel rail.
Using a 13mm wrench, unscrew the three nuts securing the receiver bracket.
Using a 17mm wrench, unscrew the nut securing the left intake manifold bracket.
. and five nuts attaching to the intake manifold.
Using a 13mm wrench, unscrew the two nuts securing the eye.
We remove the bracket from the intake manifold.
The connector of the manifolds and the block head is sealed with two gaskets.
Remove the bushing from the intake manifold stud.
Using a 13mm wrench, unscrew one nut on the bottom and two on the sides.
In our material today we will talk about when and how to change the cylinder head gasket. These recommendations are equally suitable for owners of the “ten”, under the hood of which engines with 8 and 16 valves are installed.
The primary issue that concerns car owners is the frequency of replacing the element. Even if the unit is not disassembled, the seal has a certain service life.
White steam starts coming out of the exhaust; Traces of coolant or engine oil leakage appear at the cylinder head joints; Traces of oil appear in the coolant; An impressive amount of lubricant accumulates in the pan; Foam forms around the filler cap. Drive your car onto the overpass inspection pit. Although a lift would also be a good option. You need full access to the bottom. Be sure to disconnect the negative terminal from the car battery. This way you can turn off the power to the car and avoid possible problems. Disconnect the downpipe from your muffler. Remove the carburetor. Now let's get to work with the electrical wiring. You need to disconnect the wiring from the spark plugs, remove the connector from the temperature sensor, and also disconnect the connector from the pressure and oil level sensor. Next, disconnect the vacuum booster pipe attached to the intake manifold. Disconnect the ignition distributor sensor. Now you should dismantle the fuel pump with all its components. Slightly loosen the tension roller bolt. This will allow you to remove the roller itself, as well as the timing belt. Secure the camshaft toothed pulley so that it does not rotate during subsequent manipulations. Remove the mounting bolt, and then remove the pulley itself. To do this, you will need to pick up two screwdrivers at the same time. Locate the nuts that hold the rear timing cover in place. They need to be unscrewed and the cover removed accordingly. Use a Phillips screwdriver to slightly loosen the tension on the clamps, which will give you the opportunity to disconnect the hoses that go to the cylinder head exhaust pipe. A hexagon is used to dismantle the GB mounting bolts. There will be 10 of them in total. The bolts should be removed along with the washers. If necessary, replace the washers with new ones. The cylinder head is removed along with the old gasket.
Replacing the exhaust manifold gasket: “Niva”
Replacing the gasket on a Niva will also not be particularly difficult. The order of work is as follows:
- To get started, follow the first nine points from the section for the VAZ 2110.
- Remove the bolts securing the front and rear support brackets to the exhaust pipe. Remove the front bracket, move the rear one to the side so that it does not interfere.
- Remove the fuel rail with injectors.
- Unscrew the nut securing the front eye bolt and remove it.
- Unscrew the nuts securing the heat shield of the intake pipe and remove it.
- Unscrew the two outermost and then the two upper nuts securing the intake manifold to the cylinder head.
- Using the wrench handle extension, remove the remaining two (bottom) nuts.
- Remove the intake manifold.
- Remove the starter heat shield.
- Unscrew the nut securing the ground wire to the cylinder head. Remove the conductor tip.
- Unscrew the three nuts securing the VK and dismantle it.
- Remove the seal, clean the mating surfaces and install a new gasket.
- Reinstall the removed parts in reverse order and fill with coolant.
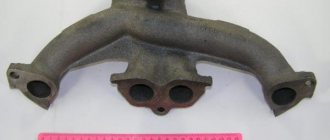
Dismantling of collectors
Now comes the turn to remove the intake and exhaust manifolds. Having dismantled them, you can understand whether it is possible to get by with replacing the gasket, or whether the collectors themselves will need to be completely replaced.
The gasket is a consumable item, the purchase of which will literally cost you 50-250 rubles, depending on the manufacturer and region. Services for replacing the gasket at a service station cost more than 1,500 rubles. Add to this the cost of a high-quality gasket and you will get quite a lot of money. Such costs can be avoided if you do everything yourself.
Intake manifold
By removing the air filter and carburetor, you will gain access to the intake manifold.
To dismantle it you will need a certain set of tools:
- Ratchet with 10mm head;
- Collar;
- Ratchet;
- Deep head 13;
- Regular head 13;
- Open-end wrench 13.
When everything is ready, you can start working.
- Unscrew a couple of mounting nuts to bend back the platform located under the carburetor.
- Disconnect the hoses that are connected to the intake manifold.
- Remove the six mounting nuts located on the intake manifold.
- Remove the manifold itself from the studs. To do this, simply rock the knot to the sides. It often sticks to the gasket, which causes problems with removal.
- Inspect the condition of the unit. If there is damage, the collector must be replaced.
- If the problem is only with the gasket, put the intake manifold aside for now and start removing the outlet.
An exhaust manifold
To dismantle a graduate you will need:
- Ratchet;
- Open-end wrench 13;
- Socket wrench 13;
- Deep head for 13.
All is ready? Then let's get started.
- Unscrew the four exhaust pipe mounting nuts from our exhaust manifold.
- Pull the so-called pants off the heels and take them to the side. Now you can unscrew three more fastening nuts securing the VK.
- Carefully, without sudden movements or jerks, pull the graduate off the stiletto heels.
- It is not uncommon that during the process of dismantling this unit, the manifold or its mounting nuts become stuck to the seats. To prevent this, treat the assembly with WD40 in advance, let it react, after which there will be no problems with dismantling work.
- If the studs break off during removal, you will need to drill out the old element, make a new thread and install a fresh stud.
https://youtube.com/watch?v=kjx36lzB2QE
Pad
Well, the check showed that the burnt gasket was to blame. Therefore, only it will have to be changed.
Alas, to get to a simple gasket, it was necessary to remove the air filter, carburetor, exhaust, and intake manifolds. But there is no way without this.
To replace an old, used gasket, you will need:
- Remove the old gasket. Here you may face certain difficulties, since most likely the gasket has become properly stuck and burned to the cylinder head;
- Arm yourself with a thin screwdriver, sharp knives, aerosol solvents;
- Spray the surfaces first, then let it react. It’s better to take your time in order to make your work easier;
- When the product takes effect, begin to gradually remove the old gasket from the surface of the block;
- Do not forget to remove carbon deposits from the mating surface of the cylinder block. Here you will no longer need an aerosol, but full-fledged sandpaper. Do not use coarse-grain sheets;
- Install a new gasket for the exhaust and intake manifolds of your VAZ 2109;
- Assembly of the unit is performed in reverse order. That is, first, both manifolds are installed in place, then the carburetor and air filter are returned to their homeland, the fastenings are tightened properly and the result of the work done is checked in practice;
- Of course, don’t forget about the coolant that was drained in the first stages. By the way, this is a great reason to change it to a fresh one.
It is up to you to ensure that the new gasket has a long service life. To do this, before installation, treat the gaskets on both sides with graphite lubricant. This way you will increase the product’s resistance to temperature changes that it regularly encounters. Similarly, coat the cylinder head studs with graphite lubricant for the same purpose.
How to extend gasket life
Although replacing the exhaust manifold gasket is inexpensive and can be done successfully in your own garage, who wants to waste their time on it? It's better to let it serve longer. And to extend its service life, listen to the following tips:
- monitor the condition of the cooling system, check the level of antifreeze (antifreeze) to prevent engine overheating;
- use only high-quality fuel;
- check the tightness of the connection between the cylinder head and the exhaust manifold;
- If you find that the integrity of the gasket is damaged, do not wait until it burns out completely, replace it;
- When buying an exhaust manifold gasket, choose a quality product from well-known manufacturers.
Pad
The manifold gasket is made by stamping from asbestos. This material is ideally suited for these purposes: it has excellent resistance to high temperatures, is quite strong, and is also capable of being compressed, ensuring a tight connection. For greater strength, VK seals can be reinforced with steel.
Exhaust manifold VAZ 2110 - replacement and repair
In some cases, when starting the engine, smoke and a gas smell may appear from under the hood. Most often, this indicates that the exhaust manifold may have burned out, and on the VAZ 2110 it needs to be replaced, since the metal has burned out. And here you should not delay replacement or repair, since all these problems can adversely affect the operation of the engine as a whole. You can replace the part yourself; there is nothing difficult here.
Usually the burnout site is practically invisible, but with the engine running you need to open the hood of the car. And then consider where the exhaust gases come from; if they pass with a whistle, then they go past the exhaust pipe, and go through the burnt-out place.
Communities Lada 2110, 2111, 2112, 112, Bogdan Blog Exhaust manifold replacement
What to do if the Renault Logan stove does not work.
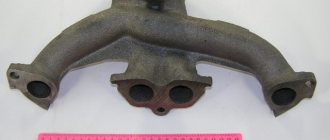
A little about the air conditioning system of the Renault Logan car - watch the video From the moment I started driving my car, I was strained by the characteristic “tractor” sound of a cold engine, after warming up the rumble disappeared, but not completely. In the summer I replaced the muffler, it became slightly quieter, with the onset of autumn the sound intensified and the interior began to smell of exhaust, so I decided to go to the service center, where they told me that my manifold had burst. I went to the store, mistakenly bought a cast-iron manifold for 2000, the service center sent me back, saying that this was an old-style manifold, and I needed a new and steel one, and better without a catalyst (they said that it was not needed at all, plus a guaranteed small increase in power due to - due to the lack of a barrier to exhaust gases). I handed it over, went to the market, bought a manifold, gaskets and bolts and came to the service center:
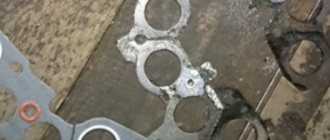
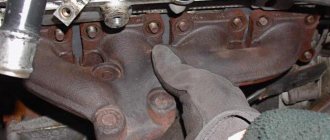
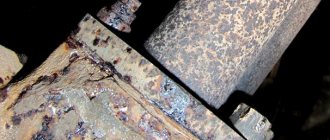
...they removed the old manifold, the catalyst was all clogged:
...and here are the reasons for the tractor sound:
...everything fit, but it all took a long time to do due to the disconnection of all kinds of bolts, hoses and the intake manifold:
Then they put everything back, screwed it back, and said backwater! I started it, hmm, the sound became much better, there was no hint of a tractor sound, and the engine became more “menacing” and purring pleasantly for the ear, of course I didn’t notice much of an increase in power, however, I was pleased with the pleasant sound and the absence of exhaust gases in the cabin .Question price: Collector - 900 rubles. Gaskets - 450 rubles. Work - 1200 rubles.
www.drive2.ru
Replacing the collector on a VAZ 2110 with your own hands
To replace the device yourself, you need to:
- Place the car in the garage.
- Open the hood and hang a special lamp with lantern protection.
- Before carrying out all work, be sure to drain all the antifreeze from the tank.
- Remove the battery.
- Remove the pipe from the vacuum booster.
- Disconnect all hoses from the ramp pressure regulator cover.
- Disconnect the throttle sensor and its cable.
- Unscrew the clamp on the air supply pipe a little, then disconnect it completely.
- Then you need to remove the fastening from the throttle pipe and ventilation of gases from the crankcase.
- All hoses are removed in pairs.
- The clamp on the crankcase ventilation should be loosened.
- Then it is removed altogether.
- Do the same with all other hoses to make further work easier.
It is worth remembering here that the receiver can only be removed together with the throttle assembly. You should also disconnect all adjacent hoses and chips from it, and of course loosen the fastenings. Do not forget about the places where the device is attached; if the replacement is being carried out for the first time, it is better to notice these places so as not to confuse anything. This is all necessary to correctly install the new part. All small fastening elements should be placed in one place so as not to be lost.
After all this, unscrew several nuts securing the receiver and the supply tube bracket. The receiver can then be removed and the gasket removed from it.
Replacing the ramp on a VAZ 2110
The ramp is always removed together with the fuel pressure regulator:
- Disconnect the vacuum hose from the regulator.
- When unscrewing the fitting on the fuel supply pipe, use an open-end wrench size 17.
- Remove the ramp voltage connector.
- Also unscrew the screw securing the gasoline supply pipes and then disconnect it.
- Then, using a hexagon, unscrew several screws from the ramp mounting.
- The ramp is removed along the direction axis of the nozzle and removed from its usual place.
- Then the substitute is removed, you need to unscrew the fastening on the left side of the intake manifold and slightly loosen the lower bolt.
- Remove the bracket itself.
- Now you should remove the right bracket in the same way.
- Unscrew several eye nuts from the stud.
The sequence of work is as follows
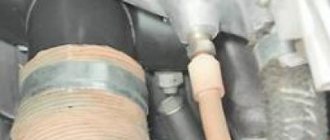
First, the pipe of the additional muffler, which is connected to the catalytic collector, is disconnected. To do this, you need to bend the edges of the plate and unscrew the fastening nuts. Is this where you need a key for 13? with additional extension cord. After this, the locking plate is removed. Once the locking plate is removed, the heat shield is removed. The flange of the muffler pipe is moved, after which the sealing gasket is removed from the studs of the catalyst manifold. After this, the blocks with contact wires are disconnected from the oxygen concentration control and diagnostic sensors installed on the catenary collector. To remove the exhaust manifold, you need to unscrew the two bolts that secure the exhaust manifold to the car engine cylinder block. For these purposes, a 13? key head is used. After the bolts are unscrewed, the catcollector bracket is removed.
By the way, if the starter fails, we recommend looking for it on the website https://www.startvolt.com/catalogue/startery/gaz/.
To remove the collector, you need to unscrew the nut on the rear engine mount and loosen the bolt securing the engine mount to the car body. After this, you need to remove the bolt on the engine mount. Unscrew the three nuts securing the support bracket to the cylinder head. After loosening the nuts, the bracket moves along the cylinder head studs.
The fastening nut on the supply pipe of the coolant supply pump is unscrewed. After loosening the fastening of the bracket to the pump pipe stud, the bracket is moved away from the cylinder head. The eight nuts securing the exhaust manifold are removed. For this purpose, a 13? head is used. The exhaust manifold of the Lada Priora car moves along the cylinder head studs and is pulled down.