Why bleed the clutch?
Bleeding the clutch is necessary to remove air pockets from the system and restore proper operation of the unit. To understand the importance of the procedure, let's briefly consider the clutch device and the way it is connected to the pedal in the cabin.
Main hydraulic drive device
In addition to the release bearing, basket and disc with friction linings, it uses a hydraulic drive. In the engine compartment of most cars there is a single reservoir with fluid (it is called TZh, antifreeze, “brake fluid”), which is used for the brake and clutch circuit. Correctly, such a liquid is designated as DOT with the corresponding number. In some older versions of the car, these systems are separated (brake and clutch) and each has its own reservoir. Pressure is supplied by the master cylinder.
It works with hydraulic fluid according to the following scheme:
- The driver presses the clutch pedal.
- The force is transmitted through a metal rod to the hydraulic unit, from where the fluid is pressurized.
- The clutch master cylinder pushes a slave cylinder piston and a fork connected to the release bearing.
- The discs open and any gear can be engaged, despite the rotation of the input shaft.
- The driver releases the pedal and the return spring forces the clutch sides together.
- Excess fluid flows from the working and master cylinders back into the reservoir.
General diagram of the transmission of force from the pedal to the clutch
When the system is working properly, all actions occur silently and switching is smooth. But if air gets into the hydraulic circuit with the liquid, then malfunctions will begin and the clutch will need to be pumped.
Dismantling the hydraulic drive
To perform the operation we will need:
- container for operating fluid and a large-volume syringe.
- set of wrenches and sockets;
- screwdriver and pliers.
The order of work is as follows:
- Brake fluid is pumped out from the expansion tank of the master cylinder of a VAZ 2107 car using a syringe. A rubber tube is disconnected from the drive, from which the remains are also poured into the prepared container. If liquid gets on paint surfaces, they must be wiped with a damp cloth.
- Using an open-end wrench set to “10”, unscrew the fitting of the pipeline connecting the main and working hydraulic drives.
- Using a “13” socket and an extension adapter, unscrew the nuts holding the assembly to the engine compartment panel.
- To remove the master cylinder from the studs, simply press the clutch pedal, this will move it out of place, after which you can pull it out by hand.
Signs of a system malfunction
There may be air in the circuit or cylinders for three reasons.
Firstly, the driver did not keep track of the level of technical fluid in the tank. There are Min and Max marks on the walls of the container. Antifreeze or other liquid corresponding to the characteristics of the car model should be located between these marks.
Lowering the level leads to air being “swallowed” by the system. A decrease in the volume of technical fluid is associated with leaks.
Liquid leaks can be detected drop by drop under the engine compartment after the car has been parked for a long time. Having noticed such traces, it is important to find the source and eliminate the leak.
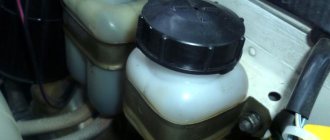
Clutch expansion tank
Secondly, air can enter the system through poorly tightened connectors or broken communications. In this case, a leak is not always present, but the operation of the hydraulic drive deteriorates and the clutch will need to be pumped.
Thirdly, the technical liquid itself is hygroscopic and absorbs moisture even from the air in the expansion tank. When you press the pedal frequently (especially the brakes), it heats up and boils. This causes additional air bubbles to form in the system, interfering with the operation of the cylinder.
Among the warning signs indicating the presence of air pockets in the circuit fluid are the following:
- Crunch. An unpleasant sound is heard when upshifting or downshifting. The driver presses the clutch pedal, pushes the rocker lever to the right place, but hears a strong crunch. Sometimes you feel a blow to your arm. “Speed” does not turn on, although the pedal is pressed to the floor. Then the pedal is released and pressed again and everything works fine. This means that the first force from the working cylinder is not enough.
- Unable to switch gears. When the clutch pedal is depressed, the “speed” simply does not turn on, even in a car without moving. Here it is even more necessary to bleed the clutch, since the line is very airy.
- The pedal fails. The pedal becomes “soft” due to the compression of the liquid along with the air, which then finds a way out. As a result, the leg sinks, although before this there was a feeling that the pedal was pressed all the way.
- Increased fluid level. If the TJ was always at the same level or gradually decreased in the tank, this is normal. But an increase in level indicates an increase in volume. If you did not add fluid to the tank, then the changes occurred due to airing and the clutch needs to be pumped.
Why do you need brake fluid?
When you press the brake pedal, the cylinder is compressed by filling it with liquid. This, in turn, is supplied to the caliper under high pressure. As a result, the vehicle speed drops and movement slows down.
Often, during maintenance, car owners may be told that the clutch brake fluid needs to be replaced. You can do this yourself, which will allow you to save a lot on service station services. The brake system should be checked at least twice a year.
The service life of brake fluid is, for the most part, strictly limited and regulated by the manufacturer. It is advisable to change it twice a year in the spring. During replacement, it is advisable not to neglect banal safety rules.
Required tools and materials
To bleed the clutch, you will need to purchase a special fluid. This could be: DOT3 (for early versions of cars), DOT4 (common on most modern cars), DOT5 (almost does not absorb water, but is very expensive). On cars with ABS, uses an ABS product.
Example of good brake fluid
Important! Do not mix liquids when pumping! If there is yellow and almost transparent liquid in the expansion tank, then it is DOT4 and you will need to fill it with the same one. Red or pink - DOT5.
You will also need a spanner or open-end wrench to unscrew the cylinder fitting. For most cars, the size of the fitting face is 8–10 mm. An alternative is a socket and drive, but it is less convenient to use when bleeding the clutch.
Stock up on a drainage container and a flexible hose. The latter is put on the fitting to bleed air bubbles. It is desirable that it be transparent. Then it is easier to control the process of movement of the vehicle. A tube from a medical dropper sold at a pharmacy will do.
Popular brands:
BMW X5, Hyundai Solaris, Renault Megane
Why do you need brake fluid?
When you press the brake pedal, the cylinder is compressed by filling it with liquid. This, in turn, is supplied to the caliper under high pressure. As a result, the vehicle speed drops and movement slows down.
Often, during maintenance, car owners may be told that the clutch brake fluid needs to be replaced. You can do this yourself, which will allow you to save a lot on service station services. The brake system should be checked at least twice a year.
Step-by-step instruction
Bleeding the clutch cylinder can be done with an assistant or independently, which determines the sequence of actions. It is important to do everything correctly, otherwise the hoses and hydraulic drive will become even more airy.
Leveling with the help of a second person
Let's take a step-by-step look at how to bleed the clutch in the easiest way with an assistant:
- Open the hood of the car. All actions are performed with the engine turned off.
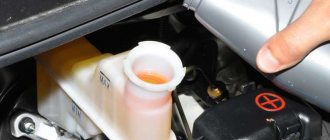
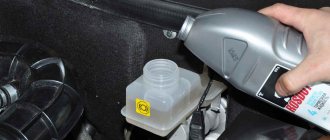
- Closer to the partition of the engine compartment and passenger compartment there is a fluid reservoir. Remove the lid and add the missing volume so that there is 2 cm left to the neck. The reserve will be needed, since part of the fuel fluid will be poured out during pumping.
Adding fluid to the reservoir in the engine compartment
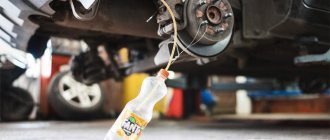
- Next to the clutch, locate the slave cylinder that pushes the fork with the release bearing. There will be a fitting on the top of the unit body. It is closed with a rubber cap to prevent clogging.
- Remove the cap from the fitting and place a transparent hose of the appropriate diameter on it.
- Take a cut plastic bottle, fill it with 150–200 ml of TJ and dip the free end of the hose into it.
- An assistant pumps the clutch pedal 2 times and on the third presses it in the maximum depressed position. This helps build pressure into the system.
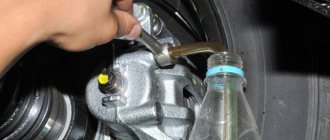
- Using an open-end wrench, unscrew the fitting one turn. Through the transparent hose you will see liquid and air leaving the system. The latter will appear in the form of bubbles in the receiving container.
Draining liquid through a tube into a bottle
With this action, the fork will return to its original position and connect the driven and driven discs, as the pressure is released. After this, the clutch bleeder screw is screwed in and the process is repeated two more times. If, upon completion, air continues to come out of the hose, then there is a lot of air in the system and more cycles will be required. The clutch bleeding is completed by adding technical fluids to the Max mark.
How to upgrade with the help of one person
If you do this work yourself, you will have to regularly move from the hood to the interior and back. You will need a brick or other heavy object to hold down the pedal. But without the help of a second person, you can pump the clutch in the opposite way.
Bleeding the clutch using the reverse method using a syringe
To do this you need:
- Open the hood and get to the fluid tank.
- Unscrew the cap and remove some liquid with a 10-cc syringe.
- Remove the rubber plug on the fitting and attach the transparent hose from the dropper to it.
- Insert a syringe with technical fluid into the free end of the hose.
- Make one turn of the fitting with an open-end wrench to open the channel.
- Slowly squeeze out the contents of the syringe.
- With this pumping method, the air will move in the opposite direction and it will exit through the tank. The pressure is created by the syringe, so the pedal is not activated.
- Tighten the fitting and make sure the fluid level is correct. Top it up if necessary.
Using this sequence, you will be able to bleed the system without the help of a second person.
Requirements for clutch brake fluid
Except for the basic requirements - viscosity and boiling point - brake fluids must also meet some others:
No negative effect on rubber parts. Rubber cuffs are located between the hydraulic drive pistons and cylinders. The tightness of these connections increases provided that the rubber increases in volume under the influence of brake fluid by no more than 10%. After pouring the composition, such parts should not lose strength, ductility, or deform.
Lubrication of friction pairs. The level of wear of pistons, brake cylinder surfaces and lip seals depends on the lubricating properties of the composition.
Resistance under the influence of temperature changes. In the range from -40°C to +100°C, clutch brake fluids must maintain their performance properties, not delaminate, and not settle on components and parts.
The composition should be replaced on average once every 2-4 years, and the frequency depends on the condition of the brake system and the car as a whole. Simply put, the older the vehicle, the more often it is advisable to change the brake fluid. If the composition changes color before the deadline, it is changed immediately.
We recommend watching this video about bleeding the clutch:
Where is the working hydraulic cylinder fitting located?
On passenger cars with a transverse or longitudinal engine, the fitting of the working hydraulic cylinder should be looked for next to the box. Since the clutch is located between the engine and transmission, the hydraulic drive will also be here. The fitting itself is located on top of the housing to naturally collect and remove air from the system.
Example of the location of the trigger element on a Renault Megane
For an easier search, you can “follow the trail” from the pedal and rod leading from the passenger compartment to the mechanism for separating the two discs. It is convenient to accurately find the air release point when you are in a hole under the car. But connecting the hose and bleeding itself is easier to do from above.
Replacing brake fluid
To replace the car clutch, you will need a second person, a 10-size wrench and several items:
A syringe or a rubber bulb.
A container into which used brake fluid from the clutch and hydraulic drive will be drained.
A vinyl tube with a diameter of 4-5 mm, can be taken from a dropper.
Fresh brake fluid. At least a liter and a half.
An overpass or inspection hole is not necessary, but is desirable, since it greatly facilitates and simplifies the replacement process.
The brake fluid in the clutch and hydraulic drive of the car is replaced as follows:
Use a key of 10 to drain the used auto fluid from the system. The likelihood that air will get into the clutch or hydraulic drive is high, so they are not completely emptied. Fresh fluid is poured into a special container of the car to the level indicated on the body.
A new hose is attached to the bleeding hole, and at the bottom there is a container into which the waste liquid will be drained.
The second person must press the brake pedal several times until it fails, after which it is held in this state. During this time, it is necessary to unscrew the bleeder fitting and release the liquid. After the pedal is fully pressed to the floor, the fitting returns to its place and the brake is released.
The whole process is repeated at least ten times with each wheel until fresh fluid begins to flow when drained. It is easy to distinguish by its light color. The fitting is screwed on and the container is filled with fresh composition.
Bleeding with other calipers is carried out according to a similar scheme in a certain order: first the right rear, then the left rear, right front and left front caliper.
Errors when bleeding the clutch
Those who perform such work for the first time may make a number of mistakes. Because of this, it will not be possible to expel air from the system or the operation of the unit will deteriorate even more. The most common problems are the following.
Liquid level drop
The car owner is so carried away by the bubbles escaping through the hose that he does not notice how the fuel fluid in the expansion tank goes very low and the circuit “captures” a new portion of air. Then the work done loses its meaning and everything has to be repeated again.
Upgrade only once
Another common mistake is doing only one loop.
This helps remove some of the air lock, but does not completely solve the problem.
An unpleasant crunching sound and other symptoms may remain when you press the pedal.
Wrong choice of liquid
Beginners often make mistakes when choosing DOT fluid. As a result, different liquids are mixed, which leads to a change in composition. You have to pay for inexperience with leaking connections and hoses, since the mixed composition can be even more aggressive than the original one. Operation of the system will lead to accelerated corrosion of metal elements and a reduction in the overall service life of the hydraulic drive.
Carrying out work on an unadjusted clutch
If you bleed air locks on an unadjusted drive, then all the work may be useless.
When the pedal pressed all the way to the floor does not transmit 100% of the force to the hydraulic cylinder, the latter does not pump pressure into the system. As a result, it will not be possible to release air bubbles through the hose.
But the car owner will think that everything is fine with the system and will begin to look for the cause of the problem elsewhere.
Trivial mistakes
Among the simple violations during operation is a spill of a puddle of brake fluid under the car. This occurs due to the absence of a receiving container and a hose, when the pressure is simply released through an unscrewed bleeder. In a garage, such a stain will make it difficult to track the leakage of other systems (engine oil, gearbox, antifreeze from the radiator, etc.).
Often, when pumping, beginners lose the rubber cap that protects the drain hole from clogging. Since it remains wet and is located at the bottom of the car, after the procedure, road dust easily sticks to it while driving. It will be problematic to perform pumping next time. In view of all this, it is better to turn to professionals for services.
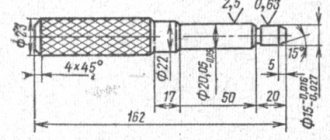
Clutch VAZ 2107
If, when you press the pedal, the clutch does not disengage (“drives”), and the pedal itself is soft, you should pay attention to repairing or adjusting the clutch drive. To do this, it is necessary to remove and repair (or replace) the main and slave cylinders of the clutch hydraulic drive and bleed them.
Requirements for clutch brake fluid
Except for the basic requirements - viscosity and boiling point - brake fluids must also meet some others:
- No negative impact on rubber parts. Rubber cuffs are located between the hydraulic drive pistons and cylinders. The tightness of these connections increases provided that the rubber increases in volume under the influence of brake fluid by no more than 10%. After pouring the composition, such parts should not lose strength, ductility, or deform.
- Lubrication of friction pairs. The level of wear of pistons, brake cylinder surfaces and lip seals depends on the lubricating properties of the composition.
- Resistance under the influence of temperature changes. In the range from -40°C to +100°C, clutch brake fluids must maintain their performance properties, not delaminate, and not settle on components and parts.
The composition should be replaced on average once every 2-4 years, and the frequency depends on the condition of the brake system and the car as a whole. Simply put, the older the vehicle, the more often it is advisable to change the brake fluid. If the composition changes color before the deadline, it is changed immediately.
We recommend watching this video about bleeding the clutch:
Selecting and replacing the main circulation tank
The parts discussed here are made of plastic, which is subject to aging and may become damaged during operation, requiring repairs. Typically, repairs come down to replacing the tank or tank along with the plug and associated parts (hose, clamps, etc.). For replacement, you should take components only of those types (catalog numbers) that are installed on the car from the factory, this especially applies to tanks mounted on the main body (since they have mounting holes of different shapes and cross-sections). Repair work is carried out in accordance with the vehicle repair and maintenance instructions.
Typically the order of work is as follows:
- Drain the working fluid, or empty the tank using a syringe/bulb);
- Tank with fitting - loosen the clamp and remove the hose;
- Tank on the main circulation pump - loosen the bandage or unscrew the fitting;
- Check all mating parts, if necessary, remove old gaskets and hose;
- Install new parts in reverse order.
After the repair is completed, it is necessary to fill the reservoir with the working fluid provided for the vehicle and bleed the system to remove air. In the future, during each maintenance of the hydraulic clutch release drive, you only need to check the reservoir and its plug. With correctly selected parts and repairs, the clutch reservoir will work reliably, ensuring comfortable and safe driving.
Possible malfunctions and deterioration in the performance of the clutch and brake system after replacing the TJ
Modern types of brake compounds can be mixed, but there are strict restrictions. This rule applies only to those auto fluids that meet the same characteristics. However, it is worth considering the fact that products from different manufacturers may have not only different manufacturing recipes, but also different bases. For this reason, you should not allow fluids to mix, since after replacing them the brake system may fail.
A change in shade is one of the main signs that the composition needs to be replaced. It does not indicate the presence of detergent additives, which is applicable for motor oils, but rather contamination with dust particles and wear products. If you do not change the clutch fluid and the hydraulic fluid for a very long time, then irreversible changes may begin in it, for example, an increase in viscosity. All this can cause jamming of the brake cylinders, brake failure and clutch failure. Varnish-like deposits may appear on internal parts and components of the system. It is advisable to change the darkened fluid immediately, without waiting for the end of its service life.
Fluid replacement must be done not only in a timely manner, but also correctly. When bleeding the brake system, old fluid is replaced with new fluid without air bubbles. To carry out this procedure, a volume of composition exceeding the volume of the container by one and a half times is sufficient. If air gets into the system, the brake pedal will operate the second or third time. Bleeding is carried out until the pedal becomes hard and stops at the same point.
It is advisable to use brake fluid only that recommended by the car manufacturer. When purchasing this composition, it is necessary to accurately check all specifications and characteristics.
The key to the durability and performance of the brake system is timely replacement of the fluid. If you purchase a used car, it is better to immediately replace it and bleed the entire system according to the regulations established by the manufacturer.
Replacing brake fluid
To replace the car clutch, you will need a second person, a 10-size wrench and several items:
- A syringe or rubber bulb.
- A container into which used brake fluid from the clutch and hydraulic drive will be drained.
- A vinyl tube with a diameter of 4-5 mm, can be taken from a dropper.
- Fresh brake fluid. At least a liter and a half.
- An overpass or inspection hole is not necessary, but is desirable, since it greatly facilitates and simplifies the replacement process.
The brake fluid in the clutch and hydraulic drive of the car is replaced as follows:
- Use a key of 10 to drain the used auto fluid from the system. The likelihood that air will get into the clutch or hydraulic drive is high, so they are not completely emptied. Fresh fluid is poured into a special container of the car to the level indicated on the body.
- A new hose is attached to the bleeding hole, and at the bottom there is a container into which the waste liquid will be drained.
- The second person must press the brake pedal several times until it fails, after which it is held in this state. During this time, it is necessary to unscrew the bleeder fitting and release the liquid. After the pedal is fully pressed to the floor, the fitting returns to its place and the brake is released.
The whole process is repeated at least ten times with each wheel until fresh fluid begins to flow when drained. It is easy to distinguish by its light color. The fitting is screwed on and the container is filled with fresh composition.
- Bleeding with other calipers is carried out according to a similar scheme in a certain order: first the right rear, then the left rear, right front and left front caliper.
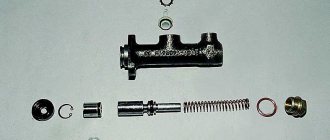
How does the clutch master cylinder fail?
Cheap clutch master cylinders are coming out
failure
due to poor-quality piston seals, fluid leaks due to low precision manufacturing of parts and poor assembly quality
. It makes sense to repair such products; a low-quality cylinder
is completely replaced.
Interesting materials:
What is the purpose of a catalyst in a car? Why is there a Centrifuge in a washing machine? What are stabilizer bars for in a car? What is car wax for? What do you need to register a car? How long does it take to change the car's shoes? How long does it take to change the car's shoes? What is ground clearance in a car? What does DPR mean on license plates? DPR on car license plates?