For the safe operation of a Hyundai Solaris, the condition of the brake fluid is important. It should be changed promptly, following the manufacturer's recommendations for selection.
Carrying out the replacement will not be difficult with your own hands, but the car owner should still know some of the intricacies of the event.
The original Hyundai Brake Fluid is poured into the brake circuit of the Hyundai Solaris. It is sold under article number 0110000110. The volume of the canister is one liter, and the price ranges from 380 to 550 rubles. Branded brake fluid is classified as DOT-4.
Original brake fluid for Hyundai Solaris
It is allowed to fill the Hyundai Solaris brake system with fluid from third-party brands. As an alternative to the original, you can choose any technical specification that relates to DOT-4. The table below presents the best options from third-party companies that have gained wide popularity on the Hyundai Solaris.
Table - Good brake fluids for Hyundai Solaris
| Brand | vendor code | Estimated cost, ruble |
| VAG | B000750M2 | 290-390 |
| Polkar | VA402402 | 260-290 |
| Honda | 0820399938 | 550-590 |
| TRW | PFB450 | 120-260 |
| General Motors | 93160363 | 425-610 |
| Bosch | 1987479106 | 150-245 |
| ATE | 03990158012 | 155-175 |
| Brembo | L04005 | 145-165 |
| Peugeot/Citroen | 469934 | 500-550 |
2272-4-13-03
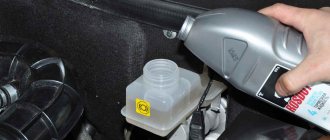
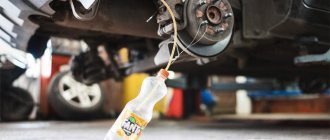
After pumping out the old brake fluid, pour new brake fluid into the reservoir.
We carry out the replacement with the engine not running, first in one circuit, and then in the other in the following sequence:
- brake mechanism of the right rear wheel.
- brake mechanism of the left front wheel.
- left rear wheel brake.
- brake mechanism of the right front wheel.
We clean the bleeder fitting of the brake mechanism of the right rear wheel from dirt.
When pumping is necessary
After renovation
The brakes will have to be pumped in all cases where the tightness of the system has been compromised:
- Replacement, repair of master or working brake cylinders;
- Damage and replacement of hoses, flaring of brake pipes;
- Repair of other components and elements of the brake system.
Periodic fluid replacement
There is no universal answer to the question “how often to change brake fluid”. If the technical documentation of your car does not clearly indicate the frequency of replacement, it is recommended to do this once every 2 years, or after 50 thousand mileage.
The main reason for replacement is the accumulation of moisture in the liquid. Why is this dangerous?
Moisture lowers the boiling point. Friction during braking causes the pads, calipers and the fluid itself to heat up, even to the point of boiling. When boiling, air bubbles are released, which is why air in the brake system is dangerous, as described above. In addition, water causes corrosion and can freeze. Both are fraught with consequences.
Unsatisfactory performance
As a rule, the driver notices a change in the operation of the brakes: decreased efficiency, pedal failure, slow response to pressure, and so on. In these and other cases, bleeding the brakes can be a solution to the problem.
2272-6-12-02-01
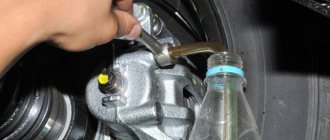
Remove the protective cap from the brake bleeder fitting.
Use a spanner wrench or a 10mm socket to loosen the bleeder fitting. We put a hose on the fitting, and immerse its free end in a container partially filled with working fluid.
An assistant should vigorously press the brake pedal all the way 4-5 times and keep it pressed.
How to bleed ABS brakes correctly and quickly
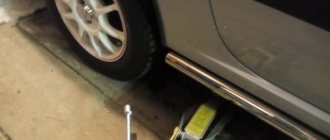
We install the machine on a lift or pit for easy replacement.
To completely replace the TJ, you can use one of two technologies. The first of them requires the presence of an assistant; you can replace the fluid using the second method yourself.
- We place the car on a pit or on a lift in order to provide free access to each of the wheel working cylinders.
Placing the car on a lift to change the brake fluid.
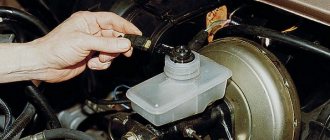
Open the brake reservoir cap.
New brake fluid in the reservoir.
We put the tube and a 10mm wrench on the fitting.
One end of the pipe is placed on the fitting, the other is lowered into the container.
Check the brake fluid level in the reservoir.
Using the replacement technology according to the second method, you can replace the fluid yourself without outside help. However, for this you will need four hoses for fittings and four transparent containers.
The replacement process occurs as follows:
- Open the hood, pump out the old fluid and add new fluid to the tank to the maximum level.
- We provide access to all four wheel brake cylinders.
- We put hoses on all four fittings and lower them into the vessels.
- We unscrew the four bleeder fittings one by one and make sure that the old fluid begins to flow into all containers.
- It is imperative to check the fluid level in the tank and make sure that the system does not become airy, constantly adding fresh fluid.
- Each vessel should contain at least 230–250 ml of liquid; only after this can the fittings be tightened and protective caps put on.
- If necessary, add liquid to the maximum level.
The fluid replacement has been completed, and now the system will operate reliably for 30-40 thousand km. Keep an eye on the brake fluid level and keep your brakes strong!
The procedure for bleeding the brakes is influenced by the design of the system, the location of components and the presence of additional electronic modules. You need to start by relieving the pressure in the hydraulic accumulator. To do this, you need to turn off the ignition (it is not necessary to start the engine) and pump the pedal.
2272-6-12-02-02
Using a 10mm wrench, unscrew the bleeder fitting 1/2–3/4 turn.
In this case, liquid with air bubbles will flow out of the hose, and the brake pedal will move forward.
As soon as the liquid stops flowing out of the hose (the pedal should go all the way), tighten the fitting, and only after that can the assistant release the pedal.
We repeat pumping until the liquid coming out of the hose becomes light-colored. We remove the hose, wipe the bleeder fitting dry and put a protective cap on it.
Let's get started
The first thing you need to do is check the amount of specialized fluid in the tank. If such a need arises, it should be topped up. It is noteworthy that you should pour a liquid similar to that already in the system. If you fill in a different type of oil, not only the clutch, but also other components of the vehicle may fail.
You can work directly on the inspection pit or on an overpass, as shown in the photo below. But if there are no such possibilities, then you will have to open the hood and carry out bleeding from the engine compartment itself. The procedure is performed with a partner, who needs to sit in the driver’s seat and, at your command, squeeze the clutch, periodically adding fluid to the reservoir.
This is interesting: Design features of the Hyundai Solaris steering control
2272-6-12-02-03
We pump, as described above, the brake mechanism of the left front wheel.
Similarly, we bleed the brake mechanisms of the other circuit.
When pumping, you need to monitor the fluid level in the tank and add fluid.
We pump the hydraulic drive of the brake system until new fluid (lighter than the old) begins to come out of the bleeding fittings of all working cylinders. After pumping, bring the fluid level in the hydraulic brake reservoir to normal.
There is an even simpler option for replacing brake fluid. This method does not require the presence of an assistant. With this method, a certain supply of brake fluid is desirable (at least 1 liter).
We place the car on an inspection ditch or overpass and ensure free movement between the brake fluid reservoir in the engine compartment and the brake cylinders of all four wheels.
Use a rubber bulb or syringe to pump out the brake fluid from the reservoir. Add new fluid to the top edge. To speed up the process (to release fluid from all cylinders at once), it is advisable to select four pieces of tubes that fit tightly onto the bleeder fittings of all cylinders. We lower the free ends of the tubes into small transparent bottles.
We unscrew the fittings of all brake cylinders. We make sure that the liquid has flowed through all four tubes. We control the decrease in fluid from the reservoir located on the brake cylinder and immediately replenish the reservoir. We observe an increase in the level of liquid in bottles located near the wheel brake cylinders.
It is necessary to move several times from the position of observing the flow of fluid from the brake cylinder fittings to a position where you can check and replenish the fluid level in the reservoir located on the brake cylinder in order to prevent the reservoir from drying out.
Usually the level rises most quickly in the bottle into which the hose coming from the brake cylinder of the front left wheel is lowered. As soon as there is about 200 ml of liquid in the bottle of the front left wheel, wrap and tighten the fitting of this cylinder. Next, we wait for the same result for the front right wheel cylinder, and tighten its bleeder fitting in the same way. The process can be completed after 200–250 ml of liquid comes out through the fitting of each rear wheel.
We make sure that all fittings are tightly tightened. We put on protective caps. Check the fluid level in the master cylinder reservoir.
[We save up to 5,000 rubles on Hyundai Solaris maintenance] [Hyundai Solaris maintenance for 15 thousand kilometers] [Hyundai Solaris maintenance for 45 thousand kilometers] [Hyundai Solaris maintenance for 60 thousand kilometers] [Do it yourself Maintenance - general recommendations] [Safety rules for carrying out vehicle maintenance yourself] [ Tools required for maintenance of Hyundai Solaris]
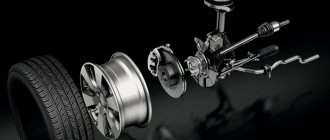
Replacing the working fluid in the hydraulic brake system of Hyundai Solaris
Regulations for replacing brake fluid on Hyundai Solaris
Only recommended consumables should be used.
In order for the brake system to work as efficiently as possible, the fluid that is filled into it must have a number of important properties:
- minimum compression ratio;
- lubricating, water-repellent and anti-corrosion properties;
- maximum boiling point;
- the liquid should not affect rubber seals, boots and cuffs.
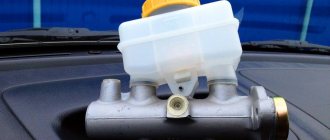
What kind of brake fluid was filled in from the factory?
Brake Fluid packaging.
Packaging, front view.
Packaging, rear view.
From the factory, the conveyor is filled with DOT-4 standard fluid with the catalog name Hyundai/Kia 01100-00110 BRAKE FLUID, the manufacturer is not specified.
It is enough to know that the liquid complies with the DOT-4 standard , and you can choose the brand at your discretion. The volume of liquid in the system is approximately 1.25 liters, therefore, for a complete replacement you need to buy at least this amount. The fluid volume including the clutch drive is 1.75 liters.
When to change?
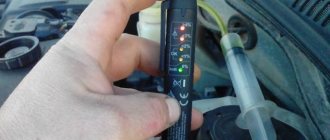
We take a brake fluid sample using a syringe or bulb.
Previously, the manufacturer recommended replacing the fluid after every 30 thousand kilometers or after two years of operation, but today the replacement can be carried out at the discretion of the owner.
This move is not explained by an increase in the quality of the fluid or the reliability of the brake system, but by the price that the owner has to pay regardless of whether the car is under warranty or not.
DOT-4
Replacement is necessary after 30–40 thousand mileage.
Studies have shown that the new DOT-4 fluid has a boiling point of 264 degrees, and after a year of use in the system - only 165 degrees.
This suggests that when a critical temperature is reached, gas bubbles form in the liquid and it can no longer transmit force from the amplifier to the brake cylinders, that is, the pedal will fail with all the ensuing consequences.
In addition, the characteristics of the liquid are lost from contact with water (condensate), so replacement is still necessary after 30–40 thousand mileage . The price of liquid per liter fluctuates within a thousand rubles and this amount is not comparable to road safety.
Finding out what antifreeze to pour into the Hyundai Solaris sedan: suitable options
When trying to find out what kind of antifreeze to fill in the Hyundai Solaris, you should contact the operation management. It correctly states that you can only pour Antifreeze diluted with distilled water. With all this, the coolant should be based on ethylene glycol and completely adaptable to an alloy radiator. Depending on the year of manufacture and place of assembly, the chemical composition of the solution varies:
For your information. Green pigment has been added to the waters listed.
The manufacturer filled the first Solaris models with Shell GlycoShell Longlife or Shell Premium Antifreeze coolant.
Why does the air interfere?
Liquid, unlike air, is practically incompressible, which means it transmits force in full. Along with the brake system, in modern cars the power steering and automatic transmission are hydraulic (operating due to fluid pressure).
Let's imagine a situation where there is a certain amount of air bubbles in the brake fluid pipe of one of the rear wheels.
What will happen in this case when you press the brake? Where there is no air, the fluid will transmit force and the wheel will lock immediately. The air will be compressed and the force transferred to the brake pads will not be enough, the wheel will continue to rotate. For this reason, the car may skid.
DOT Fluid Classification
The technical documentation of any car directly indicates which standard fluids can be used for this car. You cannot deviate from the requirements. Mixing some liquids, but not all (.) Allowed, but not recommended. Description of standards according to DOT:
- DOT 3. This is an older class that can still be found on sale. The waters are made on a glycol base. In accordance with the standard, the boiling point of “dry” (without water) water is at least 205 ° C. And “wet” (3.5% water). more than 140 ° C. The period for changing water of this class is two years.
- DOT 4. Similarly, they have a glycol base, but their composition is improved by the introduction of additional additives created to improve lubricating parameters and protect against corrosion. In accordance with the standard, the boiling point of “dry” DOT 4 water is at least 230 ° C, and “wet” water. more than 155 ° C. Viscosity requirements are also evenly limited. 750 1800 mm 2 / s.
- DOT 4.5, DOT 4, DOT 4 SUPER, DOT 6. These are subclasses. faster, a promotional ploy by SELECTED manufacturers who add additional additive packages to standard DOT 4 waters to improve their features. There is no single requirement here, but in any case, they should not be worse than DOT 4 waters, and from time to time slightly superior to them.
- DOT 5.1. This liquid is a technological continuation of the DOT 4 class, namely, in terms of expanding the temperature spectrum and protective qualities. Such brake waters are also made on the basis of glycols. But they have a significant flaw. they are very hygroscopic. And taking into account their high cost, they did not find adequate popularity.
- DOT 5. Class of brake fluids. Closer to Impeccable characteristics, since their base is made on the basis of silicones. Accordingly, they are one hundred percent NOT hygroscopic (do not absorb water), have a very wide temperature range (according to the standard, the boiling point of “dry” water is 260 ° C, and “wet” water is 180 ° C), and the replacement period is increased to 5 years . The introduction of such water is permissible only according to the requirements of the automaker, because there are a number of operational features
https://etlib.ru/blog/1133-kakaya-tormoznaya-zhidkost-luchshe
Pros and cons of brake fluids
All the brake waters mentioned above have their pros and cons. For convenience, we indicate them in the table below:
Algorithm of actions
Anyone who has not previously pumped the clutch on their own should act carefully and gradually so as not to damage anything. The sequence of actions will be as follows.
The protective cap located on the bleeder fitting of the hydraulic drive of the device is dismantled.
Take the hose and put it on the tip of the fitting. The end of the hose is immersed in a container into which a small amount of brake fluid must be poured in advance. You will also need a ten key, which can be used to loosen the fitting.
The foot feels for the clutch. You should click on it a couple of times. At the moment when the pedal is in the depressed position, you need to unscrew the fitting mentioned earlier by one third. Due to this, a certain amount of brake fluid and air is squeezed out.
Bubbles will be clearly visible in that same container. While the pedal is pressed, the fitting must be tightened. This procedure must be repeated again. This is carried out until bubbles stop appearing in the brake fluid.
At the final stage, the hose is dismantled, after which you can confidently put the protective cap on the fitting.
Brake fluid that gets on car parts can be easily removed by pouring water, since it is hydroscopic.
When pumping the clutch, carefully monitor the amount of fluid in the reservoir. Each time you press the pedal, its level will decrease.
Do not allow the tank to be empty. Top up the product periodically. It is believed that the level in the tank should not fall below 2.5 centimeters. Otherwise, there will be air in the system again. Naturally, the procedure will have to start from scratch.
This is interesting: Removing and installing the Hyundai Solaris air filter housing
Important points
Before you start pumping, you should remember a number of important rules that will help you avoid additional problems.
- Before work, inspect the main components for leaks. If the seal is broken somewhere, bleeding the brakes will be a waste of time and effort.
- Always monitor the brake fluid level in the expansion tank. If it becomes empty during operation, the system will become even more airy.
- Never use an open-end wrench to unscrew fittings - the edges are easily torn off.
- Be sure to clean the fittings from dirt; before pumping, it’s a good idea to spray them with WD-40 and wait 10-15 minutes. Often the fitting becomes tightly “stuck” to the brake cylinder and breaks off when you try to unscrew it. If the fitting does not budge, try gently heating and cooling it several times.
- On vehicles equipped with a brake force regulator (sorcerer), the rear of the vehicle must be loaded before bleeding. You can simulate loading by slipping a screwdriver between the regulator rod and the pressure plate.
- If there are no special instructions from the manufacturer regarding the bleeding order, the following scheme is recommended: rear right wheel, rear left, front right and front left.
There are two ways to bleed brakes alone: by gravity, and by air pressure.
Gravity flow
Gravity bleeding is more suitable for replacing fluid when there has been no serious airing. Since the old fluid is displaced without pressure, air bubbles may remain in the places where the tubes are bent, in the upper cavities of the cylinders.
The idea is simple: the fittings on the brake cylinders are unscrewed, and new “brake fluid” is constantly added to the reservoir. It is recommended to put transparent tubes on the fittings; they will allow you to see the moment when new liquid begins to flow out.
The disadvantages include low speed and low efficiency.
Air pressure
If you don’t have an assistant, you can bleed the brake system yourself by making a simple device. To do this, you will need an additional expansion tank cap and a tubeless tire nipple.
We cut the nipple into the lid and the primitive device for creating excess pressure is ready. The maximum pressure should not exceed 1-2 atmospheres, otherwise there is a high probability that the expansion tank will burst.
Pressure can be created by a pump, or by using a spare tire. In this case, you will have to make an additional accessory - a hose with valves at both ends. Now all that remains is to unscrew the bleeder fittings one by one, starting with the wheel farthest from the expansion tank. One end of the transparent hose is put on the fitting, the other is immersed in a container of suitable size.
Slowly unscrew the fitting so that the brake fluid mixed with air bubbles begins to leave the system. When we see that the air has run out (for this we need a transparent tube), we tighten the fitting.
Before moving on to the next wheel, be sure to check the fluid level in the tank and top up if necessary.