How to remove the engine
VAZ?
So let's start, how to remove a VAZ engine? First of all, let's decide why to remove the engine from the car. This is usually done during major repairs, damage to parts of the crank mechanism and other malfunctions in which the engine needs to be removed.
To work, we will need professional tools and a lifting device to remove the engine from the engine compartment. If the latter is not there, then invite your comrades to help you remove the engine
VAZ.
First, carefully remove the hood. In order to save time and nerves during its installation and subsequent adjustment, you need to mark the places to which the canopies are screwed, to do this, take a black marker and draw a black stripe around the perimeter of the canopy.
After applying the marks, holding the hood, remove the spring and unscrew it.
Now we need a couple of blankets or bedspreads. We cover the front fenders with these blankets so as not to damage the paint.
Now let's get to work. The first thing to do is drain the coolant. If there is water in it, then simply pour it into a container and take it outside, and if there is antifreeze or antifreeze, then you need to take a small watering can with a hose and a canister. unscrew the plug in the cylinder block and drain the fluid.
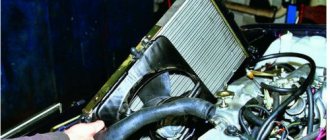
It is better not to drain the radiator; there is always a clogged tap there and attempts to unscrew it lead to damage to the radiator, so it is better not to touch it. We add the rest of the liquid by unscrewing the lower radiator pipe. After draining the liquid, unscrew the pipes and remove the radiator.
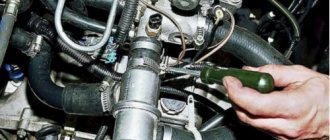
Using a screwdriver, release the clamp and remove the fuel supply hose. We definitely lift it up.
Review of how to remove a VAZ 2106 engine
I’ll explain the words, if you have questions, ask, I’ll answer everyone Subscribe to the channel please!!! Need 100...
ICE theory: How to remove the engine?
Lectures on the topic “Theory of ICE” Group “Theory of ICE” VKontakte: .
We go to the other side of the engine compartment and unscrew the exhaust pipe from the exhaust manifold.
Be careful, the nuts that secure the downpipe are made of a soft alloy (brass) and excessive force can damage the edges. Also, be careful if there are ordinary metal nuts, they can stick to the studs and when unscrewing, you can break the stud. Recovery is very nerve-wracking :)
After disconnecting the terminals from the battery, remove the starter. To do this, take a 13mm wrench and unscrew the three bolts. And we take out the starter itself.
Now, in order to remove the VAZ engine, we need to unscrew it from the gearbox. The top two bolts can be easily unscrewed using Chinese socket wrenches bent to the side. Unscrew the two top bolts.
We arm ourselves with a screwdriver and release the clamps on the heater radiator pipes, and also remove the accelerator pedal linkage.
We disconnect the choke cable from the carburetor and lower ourselves into the inspection hole.
First of all, remove the clutch slave cylinder. Remove the spring and use a 13mm wrench to unscrew the two bolts. Take him aside so as not to interfere. Attention. Do not accidentally press the clutch pedal, otherwise you will also need to sort out the slave cylinder.
Now all that remains is to unscrew the bottom two bolts that secure the gearbox to the engine.
Now, we have come to the final stage of how to remove
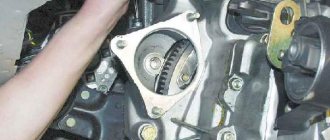
VAZ engine. After the above operations, we just need to unscrew the engine from the support pads. Using a 17t socket, unscrew the nuts from both pillows.
We place a jack under the gearbox and lift it a little so that the engine mounts come out of the studs of the support pads.
We hook the engine with belts and lift it slightly with talc. We put the box in first gear and lift the engine out of the guides. As soon as the engine comes off, remove it.
Well, that’s probably all, here we showed how to remove a VAZ engine.
- How to remove a VAZ engine
- Disassembling the
VAZ engine. Part 1 - Disassembling the VAZ engine. Part 2
- Disassembling the VAZ engine. Part 3
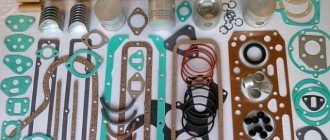
- Replacing the cylinder head gasket for a VAZ 2109
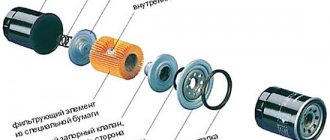
- Replacing the air filter on VAZ cars
- Replacing the cylinder head gasket VAZ 2106-07
- Replacing the VAZ 2109 pump
How to remove the engine with your own hands? Removing and installing the engine is a rather voluminous and difficult process, but it depends more on the type of power unit. So, you can dismantle the engine without any problems, in the case of a VAZ, or it can be long and difficult if it is a foreign-made power unit.
Reasons for dismantling the power unit
Engine removal is carried out for various reasons. Often, to carry out repair and restoration operations, but if the motor is old and cannot be repaired, it is removed to install a new one. Let's consider and describe the main reasons why it is necessary to remove the power unit:
- Wear. This is the most common reason for engine dismantling. Wear leads to the fact that the engine requires restoration, which most people know as a major overhaul. So, the engine is removed from the car and then disassembled.
- Cracks in the cylinder block caused by mechanical damage. In this case, the unit must be removed from the vehicle to replace the unit.
- A traffic accident often leads to deformation of the body, which cannot be eliminated without dismantling the main power unit. Of course, repeatedly, when major damage occurs, the body itself, as well as its structural elements, suffers.
- Other reasons, the elimination of which will require removing the engine from the car.
After considering the immediate reasons for removing the engine from the vehicle, we can move on to considering the processes of removing the engine from the car.
Topic: Get / install a motor in a garage
Theme Options
- print version
- Send by email...
- Subscribe to this topic...
Get/put the engine in a garage
Good afternoon! You may have to pull the engine out and change the cylinder head gaskets. Since, apparently, the engine on a Subaru can often be pulled out for various reasons, I’m thinking about equipping the box in the parking lot with some kind of device so that I can carry out this operation myself, and take the already removed/disassembled engine to the mechanics if I don’t have something to do with it myself. I can do it (for example, grinding, replacing liners, etc.). Please advise whether this is worth worrying about. If so, where and what do you need to buy (I saw small hoists/cranes on wheels on the net for reasonable money) in order to remove the motor in the garage. Thank you in advance
Sir Tolik
the operation to remove and install the engine costs 6 thousand rubles on average (not in a garage, by knowledgeable craftsmen), but now think how many times in your life you will remove and install it. =) this is the same thing as doing tire fitting on the balcony..=)
Donorparts
I have a sad experience of repairs outside the home, if the option turns out to be completely crazy, I will refuse this idea
Cheap engine valves are available in Finnish Biltema.
Sir Tolik
Well then you need to go to a vocational school to study or to a station as a mechanic’s apprentice. But a sad experience, you know, is not avoidable since no one has canceled the human actor. You won’t be able to guarantee yourself that you won’t force it, despite the fact that the one-person engine on a Subaru is extremely inconvenient to install and remove, you need another pair of hands. It’s also a good idea to have a pit or a lift, since you need to unscrew the transmission from the engine and the engine cushion from the beam, drain all the liquids. etc.
I'll support you. otherwise you can “shit”))))
Sir Tolik
My opinion is nonsense! Buy a faucet for a couple of uses. not reasonable. Option: 1. hire an adequate man with a truck crane at a nearby construction site. 2. Find a garage with cross beams and stir everything through them. 3. come up with something on the ground that you can throw a rope over and..
A friend practiced the 2nd option, more than once, everything was good. The main thing is to fasten everything wisely. PS My friend was not the only one who did all this.
True, it wasn’t on Saturday, I removed the engine using a tractor with a bucket, wrapped it with a cable, hooked it to the bucket and it’s done. Well, if you are going to remove and install engine many times, then it makes sense to buy such a crane!
people are ready to break their ass for 6 thousand rubles)))) why is this necessary? You’re not preparing a rally car to constantly remove and install the engine, it’s better to find a normal service, at least you’ll get some kind of guarantee.
yes, I don’t tear anything, I like the process of digging in the car (of course, provided that I can put everything back together)
Sir Tolik
HERE!))) to the point, put it back together, otherwise it was like in childhood, and how is this magnet standing, I’ll take it apart and see that’s all!!))) and then this is where it’s from, where the spring is, and this is how it stood and that’s it arrived))
Sir Tolik
Do not listen to anyone! Everything can be removed normally, just jack up the gearbox and when you remove it you will either use a hoist or 2-3 volunteers! I filmed it myself in the garage!
a hook on a beam in the ceiling and a hand winch (hoist). Thank God I didn’t take pictures on Saturday. and at one time they did it on all sorts of Lada cars without any problems.
I'm thinking about the option of shooting through the bottom. both the transmission and the engine can be removed/installed at the same time without risking breaking your back every time.
Filmed/set up 3 times in the garage together with my sidekick. I stupidly welded the Sovkovskaya winch to the support beam and the rest is a piece of cake.
Anything is possible, if you have the desire, if anything, I’ll rent a winch with 2.5 ton cables.
Performance Parts from USA
and we are with SaT
oh there’s nothing to do 3 times a year we pull the motors here and there) they even removed the installation process - well, take it out in the opposite direction))) I think it was -30 when they installed
The last time we installed it we removed it with a goose on a lift - it’s easier just to climb into a hole, you don’t have to climb here and there) but it doesn’t matter
GF8
wow) it shows for me%) this is probably the case in 76rus?)
I also participated in this process. They took it out of the engine compartment, preferably with a hoist, of course. Or two strong guys, preferably with towing ropes, although many are caught with belts, ours broke.
and how much does the engine weigh? You can probably take it out the old-fashioned way, two cables and a crowbar, well, 4 hands) by the way, the radiators are removed at the same time
Weighs . well more than 80 kg for sure
hmm.. not a little, but someone here is changing the clutch by removing the engine..) like it’s easier that way))
H.Z. who does that!
I don’t recommend crowbars - it’s inconvenient and banging the engine on the side members is somehow not comme il faut. If there is no beam in the garage, and the roof is concrete, you make a hole in the roof, put a loop through it and insert a crowbar into it from above - here is a hoist hook for you. The hoist/winch is not expensive at all, or you can buy it from avid motorists. If you disassemble the engine as much as possible - remove the intake, exhaust and attachments - you can try it with strong guys, even together. But I still wouldn’t do it - this is definitely called tearing your ass =)
To remove it downwards, you need to unscrew the levers and the beam, you need a lift. In the garage, okay, you put the engine and gearbox under the car - and then what? Carry the car by hand? )
Removing the motor
Many car enthusiasts ask the question: how to remove the engine? The installed engine can be removed from the car at a car service by professional specialists or with your own hands in your garage. So, dismantling it yourself will take approximately 8-10 hours.
But, if the vehicle has a lot of electronics and the power unit is equipped with it, then it is not recommended to carry out the operation yourself, but rather turn to professionals. So, let's look at the process of removing the engine on the simplest versions of cars.
Extraction from the top
If you have a good winch or 3-4 reliable assistants, then there is no better solution on how to remove the engine from the VAZ 2114 through the top. This method differs from removal through the bottom in that it eliminates the possibility of damaging the engine itself or the car. The most important factor in the success of this operation will be your accuracy.
Jpg" alt="Removing the engine through the top" width="600″ height="404″ class="lazy lazy-hidden size-full wp-image-4747″ srcset="" data-srcset="https://vazremont .com/wp-content/uploads/2018/01/foto-15..jpg 300w" sizes="(max-width: 600px) 100vw, 600px">
The procedure for removing the engine from the top must be carried out as carefully as possible. It is important to take into account everything that can affect the engine falling off its mounts. Moreover, if you do everything correctly, this method will be the least labor-intensive. At its core, this procedure is no different except for removal from removing an engine without a gearbox.
How to remove a gasoline engine
Removing a gasoline engine, for example VAZ or ZMZ models, is quite simple. The first recommendation is that this process should be carried out with 4 hands, since it will be difficult for one person to do it. So, let's consider the sequence of actions for removing a VAZ-type unit:
- For more comfortable operations and less time, it is recommended to carry out the process on a lift, pit or overpass. Also, it is necessary to collect tools, namely: a set of keys, screwdrivers and sockets, a hoist or winch, and containers for draining liquid.
- The first thing you need to do is remove the battery and also unscrew its shelf. At the same time, you can remove the air filter housing, as well as the air ducts.
- The second stage is draining all liquids. To do this, you need to remove the motor protection (if any), and, placing containers under the drain necks, unscrew the plugs. For a standard engine, coolant (10 liter container) and engine oil (up to 6 liter container) are drained.
- After the liquids have been removed, it is worth starting to disassemble the unit to dismantle it.
- In the first stage, it is necessary to remove the generator, starter, all drive belts, and battery wiring.
- Now we begin to remove the elements of the cooling system: thermostat, water pump, expansion tank, coolant system pipes.
- Next, we dismantle the ignition system - spark plugs, wires, distributor, injector.
- After this, we disassemble the fuel system, namely, remove the carburetor or fuel rail with injectors, power supply pipes, and intake manifold.
- Another important step is dismantling the cylinder head. First you need to remove the camshaft pulley. After unscrewing the bolts, remove the valve cover, and then the cylinder head itself.
- We hook the motor to the winch and firmly fix it.
- Unscrew the gearbox from the engine. In this case, the clutch should remain on the power unit.
- We unscrew the nuts securing the pillows and lift the engine, carefully removing it from the engine compartment.
- Reinstalling the motor is carried out in the reverse order.
This is how, at first glance, it is easy and simple to dismantle the motor, but as practice shows, not everything is so easy. In the case of engines where there are many wires, you have to disconnect them from the sensors. Well, when the motor has too much wiring, then you should turn to professionals.
How to remove the engine from a car in the garage without resorting to the help of a car service
In fact, this is not such a complicated procedure as it might seem at first glance. The main task is to select tools for removing the motor.
Important! The engine weighs several hundred kilograms. Falling it can not only cause property damage, but also lead to serious injuries. Before lifting the engine from the engine compartment, the following procedures must be carried out:
Before lifting the engine from the engine compartment, it is necessary to carry out the following procedures:
- Drain all technical fluids: oil, power steering fluid, brake fluid.
- Free the cooling system from antifreeze.
- Drain the gearbox (except when you remove the engine without removing the gearbox).
- Disconnect all hoses and pipes of the fuel, brake, lubrication and cooling systems.
- If possible, remove attachments: air conditioning compressor, generator, etc.
- Disconnect electrical cables, engine control unit, injector control cables, high-voltage ignition coil wires.
- Remove the connectors from all motor sensors. It is recommended to make a list (“based on” the maintenance and repair instructions), this will help you not to miss a hidden connector.
- In most cases, you will need to remove the hood cover.
If you plan to remove the engine without the transmission, you need to unscrew all the tightening bolts and make sure that after removal the gearbox will not fall under the car. That is, you need to take care of temporarily securing the unit.
How to remove a diesel engine
Dismantling the diesel heart of the car is carried out by analogy with the gasoline one. The difference is that diesel power units are often equipped with a turbine, which must be removed before dismantling the fuel system.
Another difference is the injection system itself. So, instead of an injector, a diesel engine has a high-pressure fuel pump, which is usually located on the cylinder block itself. It's not that difficult to remove, but you shouldn't forget about it because it weighs down the engine.
Often, especially on older diesel products, the body also houses the oil and gasoline fine filters. They must be removed after draining the lubricant.
Many auto repairmen recommend removing the exhaust manifolds from the power unit, which get in the way when the engine is removed from the engine compartment. If we talk about diesel engines installed on trucks, this is done to reduce the weight of the product.
I’m removing the VAZ 2106 engine, removed the head, disconnected it...
There's almost a bare block left... I'm reading everywhere here, like removing the gearbox... this and that... is this necessary? Can’t do it without him, right? are there other methods? Even if it is necessary, the car is on the ground, there is no hole nearby, is there a lot of work under the car? or is it 5 seconds?
remove it and unscrew it from it. Then turn the engine over, insert the shaft, and you can even pull the block in by Borry himself.
Unscrew the clutch casing from the engine 4 bolts and pull out the engine, if the radiator is removed, remove the 2 bolts from the bottom of the clutch cylinder, unscrew the 2 bolts from the clutch casing. Jack up the box slightly, move the engine forward and up, that's how they usually remove it. Nikota
Conclusion
How to remove the engine from a car? Removing a power unit from a car with your own hands can be simple and at the same time difficult, since it all depends on the type of power unit, as well as the presence of heavy electronics.
In the case of VAZ, GAZ, UAZ engines, they can be easily removed, but with foreign-made engines, everything is much more complicated. Therefore, most manufacturers recommend contacting specialists who can help remove the motor and repair it.
1. Check the engine mounts, coolant and oil hoses for pores and damage. Replace them if necessary. 2. Check the ease of movement of the radial ball bearings in the crankshaft and the clutch release bearing, as well as the clutch release lever. 3. Check whether the thickness of the clutch driven disc linings is sufficient, as well as the condition of the linings. If the clutch has a long service life, it is advisable to replace it. 4. Carefully insert the engine into the engine compartment. When lowering, pay attention to the direction of the engine to avoid damage to the transmission input shaft, clutch and body. 5. Screw in the engine mount mounting nuts without tightening them. 6. Raise and place the vehicle on stands. 7. Install the manual transmission, refer to the Section Removing and installing manual transmission and AT. 8. Lower the vehicle onto its wheels. 9. Rock the engine to self-align. After this, tighten the support nuts to a torque of 45 Nm. Secure the ground cable to the right beam.
10. If the cooling compressor was removed, secure it. 11. Fasten the power steering pump, refer to the Section Fastening the hydraulic pump. 12. Put on and tension the V-belt, refer to Section Removing, installing and tensioning the V-belt. 13. Connect the plug connections of the cylinder recognition sensor and the flywheel pulse sensor DME. Connect the plug connections of the temperature sensor, remote thermometer, oil pressure indicator sensor and idle air control valve, refer to the “Removal” subsection. 14. Install the inlet pipeline, refer to the Section Removing and installing the inlet pipeline. 15. Connect all electrical wires, vacuum and coolant hoses and fuel hoses to the cylinder head in accordance with the markings. Secure the hoses and electrical wires with clamps. 16. Install the connector strip on the cylinder head and secure it. 17. Install the spark plugs. 18. Install the air supply cover and secure it with screws, refer to Section Removing and installing the windshield wiper drive/cover. 19. Secure the electrical wires to the generator, refer to the Section Removing and installing the generator. 20. Secure the generator cover. 21. Check the air filter element. If necessary, knock it out or replace it, refer to Section Removing and installing the air filter housing and air mass meter. 22. Place the coolant hoses onto the heater valve and secure them with clamps. 23. Install the radiator, refer to the Section Removing and installing the radiator. 24. Install the fan, refer to the Section Removing and installing the fan and fan clutch. 25. Install the hood, refer to Section Removing and installing the hood. 26. Check the antifreeze content in the coolant and fill it into the system. 27. Check the oil level in the engine and manual transmission. Add oil if necessary. 28. Connect the ground cable to the battery. Set the clock. Program radio stations. 29. Start the engine and warm it up to operating temperature. Check the coolant level. Check the tightness of all connections. 30. Secure the lower shield of the engine compartment.
On these machines, VAZ 2101 to 2107, the principle of engine removal is the same. If you decide to remove the engine yourself at home, without any equipment, and don’t know how to do it correctly, then this article is for you.
The engine has to be removed to overhaul it, or to replace it with another engine.
You look at the engine and the first feeling is that it is difficult to remove the engine from the car, but in fact everything is very simple, two men can easily remove the engine themselves at home and also put it in place. I will give an example of removing an engine from a VAZ 2106, although this principle is suitable for VAZ2101 to 2107.
The engine can be removed entirely, but this is much more difficult, or you can remove it without the head, this is much easier. If you decide to repair the engine yourself, then the second option is preferable, since you have to disassemble the engine anyway and why drag out the extra weight. I will describe the removal of the engine with its partial disassembly, in the engine compartment of the car.
The reason for removing the engine was that the splines on the oil pump drive gears on this six were torn off, and the driver drove on without oil pressure, and the engine jammed.
Compression test, troubleshooting
One of the main reasons for engine repair is decompression. Actually, the troubleshooting itself must be done every 30 thousand km, combining it with valve adjustment.
Signs of the need for early technical inspection of the engine are:
- power surges;
- increase in fuel consumption;
- engine tripping.
Compression measurement
If you experience similar symptoms, you need to do the following:
- Check the starter and charge the battery.
- Find a compression gauge and warm up the car.
- Remove the spark plugs and fuel supply hose.
- Insert the compression gauge into the spark plug socket of the first cylinder and depress the accelerator.
IMPORTANT! The normal pressure in the VAZ 2114 engine is 1.0 MPa in the standard configuration and 1.4 MPa on an eight-valve engine.
- We turn the key in the ignition and turn the starter for 10 seconds, watching the device, it must be interpreted as follows: a. if the pressure stops at 0.8 mPa and then stops growing or does so slowly, then the cylinder head is broken or there is a leak in the valve; b. if it just grows slowly, it means that the rings have exhausted their service life (by the way, this fact can be checked by adding oil and measuring again, if the pressure returns to normal - the rings are 100% to blame).
After the procedure is repeated for all cylinders, it is necessary to analyze the records. So, in a working engine, compression should not fall below 1 MPa and should not have a spread between the cylinders of more than 0.2 MPa. Otherwise, you will have to repair the engine.
Engine removal sequence
Immediately remove the hood of the car so that it is not in the way.
Photo. The arrow shows which nuts need to be unscrewed to remove the hood.
After removing the hood, drain the coolant; to prevent the liquid from draining onto the ground, place a basin under the engine.
Photo. The arrow shows the bolt that must be unscrewed to drain the coolant from the engine block.
Photo. Now we remove the air filter, disconnect the choke cable, remove the throttle levers, the gas line from the carburetor, the valve cover, and disconnect the radiator pipes from the block.
Photo. Unscrew the muffler and remove the stove pipe.
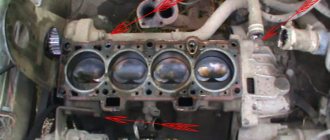
Photo. Unscrew and remove the camshaft, distributor and head.
Photo. Unscrew and remove the heater pipe and the starter.
Photo. Remove the radiator.
Photo. Remove the fuel line from the fuel pump, and the plug from the oil pressure sensors, and unscrew the nuts from the engine mounts, they are shown by the arrow.
Photo. Now unscrew the box from the engine, two bolts on top are marked with an arrow, and two on the bottom, the bottom bolts can be unscrewed with a 19mm spanner. You can crawl up from below on the left and right sides of the car. And don’t forget to unscrew the bolts from the box boot.
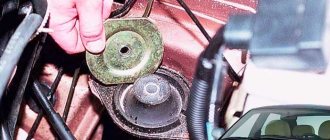
Photo. Pull the engine off the cushions by swinging it left and right and place belts or rope under the cushions.
Now everything is ready to remove the engine without the box; you can insert a pipe under the belts or rope and use it to pull the engine out. But it’s easier to pull out the engine in a different way, climb straight onto the car, but don’t stand on the wings themselves, but put your feet in the corners where the wings connect, grab the belts with your hands, and lift the engine, jerk forward, usually the engine immediately comes out of the gearbox. It rarely happens that the engine does not immediately come out of the box, you pull and swing it to the sides and the engine comes out of the box.
Photo. Removed engine from car.
Removing and disassembling the engine from a VAZ 2107. Video
Gorobinsky S.V.
Let's consider the option of replacing the engine, how the process occurs, what technical and legal aspects may arise during the replacement.
Every driver dreams of his engine being much more powerful and larger in volume. Still, there comes a time when you need to either repair or completely change the car’s engine, since it is not always possible to repair it.
It’s rare that drivers change just to get a better engine with a larger volume. The replacement process is not easy and cannot be done in an hour; at a service station it often takes a whole day; at home it can take a week. When replacing it yourself, it’s worth studying all the nuances of your car, since you’ll have to remove everything under the hood, including it.
The units can be divided into gasoline and diesel. Each type is good in its own way, each has both pros and cons. Diesel engines have greater fuel savings (read about), and they are more powerful compared to gasoline engines. In gasoline units, the advantage is the ability to install a gas unit; in diesel units, this cannot be installed. Also, the gasoline engine is less demanding in terms of fuel quality.
The disadvantage of the diesel engine is the high cost of maintenance and repair of the fuel system, about 1000–1500 dollars at best. Also, diesel units are very sensitive to temperature; in frosty weather, diesel fuel becomes thick, and it becomes difficult to start a diesel engine in cold weather. Let's consider the process of replacing a gasoline unit.
How to remove an engine from a car
At home, there is usually no professional lifting equipment, so you will have to rent it or make it yourself.
Do-it-yourself goose for removing the engine
This is a simple mechanism that resembles a gooseneck. It makes it possible to move the engine away from the engine compartment. It may have a rotating design that allows you to remove the engine without moving the machine.
The heavy internal combustion engine is simply transferred to a workbench located next to the car. In fact, it is a universal garage crane. The rack rests on long “legs” located under the engine compartment to prevent it from tipping over. A cable and a winch are used for lifting.
The gander is used both in garage conditions and in small services.
DIY engine removal lift
As a rule, this is a rolling crane, the lower part of which is placed under the front bumper. A smooth platform is required; on uneven ground, removing the engine using such a device is problematic. The lift operates using hydraulics or a tensioning mechanism like a winch. The device is simple: a stand with rolling supports, and a movable boom on which the motor is suspended. You can make a lift with your own hands from a channel or a square professional. pipes.
If there are strong wheels on supporting legs, you can quickly roll out the lift with the motor and move it to the repair area.
Engine selection
It is worth starting the entire process of selecting a new unit based on the old one, since you need to maintain not only the parameters, but also preferably the volume, all this can be done by taking the technical data from the book for your car.
It also happens that the unit is the same in volume and other parameters, but does not fit in the fasteners; this is called a generation of engines. It should also be observed, since after installation on the frame there will be problems with connecting auxiliary devices. Therefore, when selecting, try to select the engine as accurately as possible. When purchasing, pay attention to the price, as they can sell a non-working unit for an exorbitant price; usually the cost of a used engine in good condition is about 30% of the cost of the car, a new unit usually costs 50% of the cost of the car. You can buy an engine either from an official representative in a store or from a service center that services your car, at a disassembly center or a car market. With the latter, there is a big risk of buying; the unit may not work and instead of a good motor, you will buy a pile of scrap metal. After all, without installing it on a car, there is no way to check it. It is also worth considering that the engine is not light in weight, if you are going to buy it online, you will have to pay a good amount for delivery.
After you have bought the engine, do not forget that you will still need consumables, oil, filters, gaskets for the exhaust system. You shouldn't expect to replace the engine yourself. It's better to ask your garage neighbor or friend to help you with this process. In addition to consumables, we will need a winch with a canopy, or something similar, to lift the unit from the car. A good set of wrenches and screwdrivers to reduce the time for selecting and searching for the right tool.
- Read about
To make it more convenient, first of all you should remove the hood of the car, since it will be easier to remove the unit and we will not scratch the hood itself.
Now you should disconnect all the wires from the engine. First, remove the terminals from the battery, then disconnect the switch. Make sure that all wires are disconnected from the engine. If you doubt that you will not be able to put it back together, I advise you to take photographs and write down the most questionable components of the engine compartment.
The next step is to drain all liquids from the unit, this is,. If your car has a lot of electronics installed, you should be careful, as the sensors may work and you will have to buy new ones. In the worst case, all electronics will become blocked and become completely unusable. After draining all the fluids, go under the car and disconnect the exhaust system, transmission mechanism and gearbox. Now the most important point, we determine how we will remove the engine, there are two ways, the first is to pull it up using a winch and roll the car away. We fix the winch above the engine so that it is tensioned, unscrew all the engine mounts to the car frame and raise the engine or lower it under the car. Sometimes you can use a lift in another way: lower the engine onto a tray and lift the car on the lift. The latter method is much more convenient, but it is not always possible to find a lift. Having put the old unit aside, we proceed to install the new one. The procedure is in the reverse order to how the engine was removed.
Experienced craftsmen advise replacing them if they are not new, since after a while you will still have to change them.
Based on photographs taken in advance, we connect the electronics, if you don’t remember how it was installed. Some novice drivers install a video camera and record the entire replacement process, in which case you can see where they made a mistake.
After connecting all the electronics, you will need to refill all the fluids, of course, buy new ones before doing this, since the old unit is not worth using. If the engine is completely new, then there should be a service book with it, which indicates what fluids should be filled and in what quantities. If the unit is used, then it is worth taking a closer look at what fluids were used before. After filling all the fluids and connecting all the electronics, carefully check that nothing is leaking from the engine, since by connecting the electronics incorrectly or tightening the bolts incorrectly, the engine may fail and the whole work will have to be started all over again from the very beginning, not to mention the lost money on the engine .
Documentation of engine replacement
When talking about how to replace a car engine, you should understand that the engine is a numbered unit, and accordingly, its replacement should be reflected in the documents for the car, but not always. New registration rules were introduced in 2013, and according to them, the registration rules are different and depend on which engine is being replaced: with a similar one or with a different one. If the engine is changed to the same one as it was, that is, its markings do not change, then the engine number is not entered anywhere. But this number must be on the engine, otherwise, if the number is cut off or interrupted, this is a criminal offense and the car will be impounded. Therefore, it is advisable to follow all the rules, namely: the purchase of an engine must be documented, you must have a purchase and sale agreement for the engine and a receipt or other document confirming payment.
With these documents you apply to the traffic police, where your engine number is checked against the database in order to exclude the possibility that the engine was removed from a car that is on the wanted list. If everything is in order, the traffic police inspector will make a note in his database. In this case, the engine number will not be included in the Registration Certificate, because according to the new rules, the engine is not considered a numbered unit.
The registration procedure will be completely different if the engine has been replaced with another one that has different characteristics and different markings.
Such a replacement will require obtaining documents that will serve as the basis for permission to replace the engine with an engine of a different model. After installation, a technical examination will be required to confirm the serviceability and safety of the vehicle. The procedure for re-registration of a car in this case will be as follows:
- Applying to the traffic police with an application to make changes to the design of the vehicle. After reviewing the application, you will be given instructions to obtain a permit from the appropriate organization;
- Permits are issued by various organizations that have received the appropriate authority from NAMI. Including permission can be obtained from NAMI. The essence of the permit is confirmation of the ability to replace the engine with the selected model;
- Next, in a technical center that has the appropriate license to carry out such work, you must replace the engine. Completion of the replacement work is accompanied by the receipt of a declaration statement for the work performed. To re-register, you must obtain certificates from the organization that replaced the engine and a copy of its license. If you change the engine yourself, you also fill out the declaration form yourself;
- The next stage is passing a technical inspection, checking the technical condition and receiving a diagnostic card as a result;
- You present all the documents collected as a result to the traffic police along with the car for inspection.
What documents will you need from the traffic police:
- Vehicle passport and owner's passport;
- Purchase and sale agreement for the engine;
- Your application for changes to the design, signed by the traffic police inspector;
- The result of the examination;
- Statement-declaration of work performed to replace the engine;
- Result of maintenance;
- Certificates and a copy of the license of the organization where you changed the engine.
After reviewing your documents, the traffic police issues a Certificate of Compliance with the design of the vehicle and a Certificate of Registration of the Vehicle and PTS as amended.
Obviously, this process is lengthy, but it is necessary, because when you decide to sell the car, you will not be able to do so without the above documents.
Legal engine registration
Installing a new unit is not yet a completely resolved replacement problem; do not forget about the laws; the new engine will need to be included in the technical passport of the car.
Since the serial number of the unit is often indicated in the registration certificate, and if it does not match on the unit and in the document, it threatens with a fine or confiscation of the car. If the engine is replaced with a more powerful one, then this will need to be made to changes in the design of the car and there is no way to do it without an expert.
It is advised to consult with an expert before starting the replacement and find out which engines are allowed for your car.
Video of how to remove an engine on an Infiniti FX in a workshop:
What is the liability for an engine that is not properly registered?
It is considered a violation to replace the engine with one that does not correspond to the make of your car without making changes to the Registration Certificate and PTS. In the absence of registration in accordance with Art. 12.1 of the Code of Administrative Offenses of the Russian Federation, a violator is punishable by a fine in the amount of 500 to 800 rubles. If, after checking the license plate, it turns out that the engine was removed from a stolen car or the license plates on the engine were destroyed, the car will be seized, placed in an impound lot and returning it will be very problematic.
How to replace a car engine was last modified: January 23, 2022 by Master