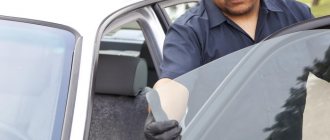
A popular way of tuning a car is tinting the headlights and windows. More and more amateurs are carrying out such transformations with their own hands, without going to a car repair shop. VAZ 2106 owners are no exception - with the help of film they not only change the appearance of their car, but also make it more comfortable and safe. And these are not empty words, since tinting a VAZ 2106 car will protect, for example, from injury from fragments of the rear or side glass during an accident. There is no point in talking about protection from the summer heat, since this is a well-known fact. But before you start tinting, you should get to know this type of tuning better.
Why do they do this?
There are several most common reasons why drivers do their own window tinting:
- It reduces interior heating by approximately 60% even in the hottest times.
- Thanks to the presence of tinted windows, virtually no harmful ultraviolet rays enter the car. This way you can protect yourself from skin cancer.
- If there is a side collision between two cars, do-it-yourself window tinting will help keep the glass from breaking into small pieces. This way, the driver will always remain protected from any cuts.
- By tinting, you can get rid of the sun's rays, reflections of snow, as well as the light of the headlights of oncoming traffic, which can dazzle while moving.
- With the help of tinting, the driver provides effective protection not only for the interior trim, but also for various plastic parts that can deteriorate quite badly under direct sunlight.
Do-it-yourself glass tinting provides all these effects.
Types of tinting
Today, there are many different types of tinting of glass and car headlights. The first was an inexpensive coating of a special composition, which strongly mirrored, did not protect against scratches and was not subject to restoration. Modern types of tinting are more effective. These include:
- film;
- athermal;
- electronic;
- automatic.
Of the above, the most popular do-it-yourself tinting method is film. Such tinting, even with your own hands, is not difficult, and if you wish, you can change the material to a new one without any problems. Having decided on tuning, the car enthusiast must arm himself with the necessary tools and the film itself.
Is it difficult to drive at night?
Many people believe that if they tint car windows with their own hands or with the help of specialists, the dark color of the film will make night driving difficult. First of all, you must understand that it is always possible to apply a film with a slight degree of darkness, and in any case it will transmit visible light through itself, despite the fact that all reflections will be reflected.
Brake pad malfunctions
The following characteristic signs indicate problems with the pads:
- sounds unusual for brake operation (creaking, squealing, grinding);
- car skidding when braking;
- the need to apply more force to the brake pedal;
- black or metal dust on wheels;
- increased braking time;
- The pedal does not return to its initial position when released.
Screech
Brake pads must be changed when the friction material thickness reaches 1.5 mm. If this is not done, a grinding (squealing) sound will occur. In addition, such sounds may be present when installing low-quality pads.
If the brake pads are heavily worn, a squealing or grinding noise may occur when braking.
Shocks when braking
The appearance of shocks during braking can be caused either by the condition of the pads themselves, or by a damaged surface of the brake disc or drum, soured pistons in the cylinders, or other malfunctions. To identify the problem, you will need to disassemble the brake mechanism and carefully inspect the parts for wear and damage.
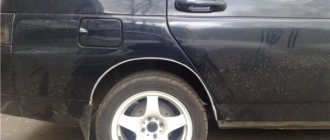
Car skidding
There can be many reasons for skidding - severe wear of the pads, damage to the discs, loose caliper mounts or suspension malfunctions.
Once a situation arose with my car when, while braking, the car began to pull to the side. It would seem that it is necessary to diagnose the brake system. However, after a detailed examination, I discovered that the cause of this phenomenon was a damaged longitudinal rod (rod) of the rear axle. It was simply torn from the eyelet. After replacing this part the problem disappeared.
Video: why a car pulls to the side when braking
Stiff or soft pedal
If you notice that the pedal has become unusually tight or, conversely, soft, then most likely the pads have become unusable and will have to be replaced. Additionally, it is worth inspecting the hoses supplying fluid to the brake cylinders and the cylinders themselves. If the piston sticks in them, then the problem with pedal stiffness may also manifest itself because of this.
Appearance of plaque
Plaque can appear both when using low-quality pads, which leads to their rapid erasure, and with normal parts. However, in the second case it should be minimal. Dust can also appear during aggressive driving, i.e. during sudden starts and braking.
The appearance of black coating on wheels can be caused by active driving.
From personal experience I can say that after installing the front pads from AvtoVAZ, I observed black dust on the discs. The plaque was clearly visible because the discs were painted white. From this I can conclude that the appearance of black dust from the process of erasing the pads is a normal phenomenon. Perhaps installing more expensive parts will help get rid of this phenomenon. However, if you are sure that the car has good quality pads and their condition is normal, then there is no reason to worry.
Pedal sticking
If the brake pedal does not move back when pressed, this indicates that the pad is sticking to the disc. This phenomenon is possible in frosty weather when moisture gets on the brake elements, but it would be useful to inspect the pads. If the car cannot be stopped for a long time when you press the pedal, then the reason lies in worn out pads or air getting into the hydraulic system. You will need to inspect the brake components and possibly bleed the brakes.
What to consider?
The film must be attached directly to the inside, because this way you can ensure its maximum protection from various damages.
If you need to tint the rear window of a car with your own hands, or you even want to tint all permissible windows, then you should first understand where this film can be installed and where it cannot. In Russia, in accordance with current legislation, tinting of front car windows can be carried out exclusively using a film in which the light transmittance is at least 75%.
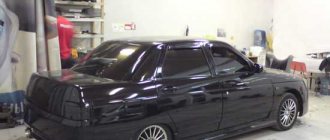
Let's sum it up
Tuning the VAZ-2106 is a common concept among owners of domestic sixes. The process of upgrading the instrument panel and dashboard of a car can be done without the involvement of specialists with your own hands. Each owner of a domestic car can choose his own version of its transformation, depending on his wishes and financial capabilities.
The VAZ “six” is considered the standard of reliability and simplicity of the Soviet automobile industry. She has “raised” more than one generation of car enthusiasts. With its simplicity and pliability, it won the hearts of many car owners. Until now, the “sixes” travel along the roads of cities and villages. To stand out from the crowd of cars, owners think about tuning, which transforms the external and internal appearance of the car. You can change the appearance of the VAZ 2106 interior with your own hands.
Glass preparation
Before tinting the rear window of a car with your own hands, you must thoroughly clean its surface, because the glass should be as smooth as possible and completely free of chips or deposits. If there are any radio or cellular antennas glued to the glass, then in this case you will have to either bypass them or completely dismantle them.
Steering wheel tuning
A comfortable and beautiful steering wheel contributes to comfortable driving. To achieve this, in the “six” you need to update the steering wheel in the following ways:
- install a steering wheel from another VAZ model;
- replace with sports one;
- retighten the steering wheel.
Installing a steering wheel from another VAZ model
The simplicity of the Zhiguli allows you to replace the steering wheel with a steering wheel from other VAZ models. Many car owners believe that it is not worth the work and effort that needs to be put in.
The steering shaft of the chisel is thinner than the classic one, and not by much, that is, it is not very easy to make an adapter for the hub. Plus the steering wheel is higher, normally it won’t engage the turn signal bump stop. In a word, you need to suffer a lot to install it properly. As for me, it’s not worth it, if you really want a normal steering wheel, then you need to go and buy it, the choice is very rich right now, but you need to look at them carefully, there are so many leftists that it’s just terrible.
https://autolada.ru/viewtopic.php?t=26289
Replacing with a sports steering wheel
A sports steering wheel will give the car a beautiful and aggressive look. You just need to know that the “six” is not intended for sudden maneuvers. The sports steering wheel has a smaller diameter and is more difficult to make turns with, so you need to get used to it.
Steering wheel reupholstery
In an auto store you can find braiding on the steering wheel for re-upholstering with your own hands. Such kits include the braid itself made of genuine leather, strong threads for sewing and a special needle.
Video: dismantling the steering wheel
Making film
To correctly apply the tinted film, in most cases, specialists carefully remove the car glass, after which they carry out all the work on a specialized work table covered with glass or smooth linoleum. In the event that you do not want to do this or you do not have such an opportunity, you can use papyrus paper attached to the car glass to further outline all the contours. After carrying out these procedures, you will have to cut out a pattern with extremely clear boundaries, and then transfer it to the tint film. This way, you can cut the film in full accordance with the shape of the car glass.
Beard tuning
The center of the car interior is the console, which is called the beard. It acts as a continuation of the torpedo and attracts the attention of all passengers.
When tuning, you can place in your beard:
- watch;
- radio;
- pocket for small items;
- armrest;
- USB sockets;
- switches;
- backlight
Typically, the beard for “classics” is made from plywood, fiberglass, or from spare parts from foreign cars.
Beard drawings can be found on the Internet or taken measurements from an old console. For the pattern, thick cardboard is used, which holds its shape well. The template is transferred to plywood and, after carefully checking the dimensions, cut out along the contour. Next, the parts are connected with self-tapping screws. The finished frame is covered with leatherette or other material in the color of the upholstery. The material is secured with a furniture stapler and glue.
Tools
Not everyone understands that tinting is not such a simple procedure, and it is not enough to just take and stick a film. You definitely need a certain number of tools in order to properly tint your car windows yourself. VAZ 2107, 2106 - these and other domestic cars are no exception, and you should not think that it is easier to apply film to our cars than to others.
In this regard, you will need the following tools:
- Film. In the vast majority of cases, a single roll of standard sized tint film is sufficient to cover all the side windows.
- Rubber spatula. Often, when you buy tint film, you will be given a specialized plastic scraper as a bonus. Of course, you can also use it when you do your own car window tinting. This tool is quite effective and convenient, but there is a risk that micro-scratches will remain on the glass.
- Stationery knife. A knife is also supplied with the film, but in fact it often becomes dull quite quickly, as a result of which the film begins to literally tear. That's why it's always better to have an extra utility knife on hand.
- Glass cleaner and warm, clean tap water.
- Completely dry cloth. It is worth noting the fact that the rag must be free of lint. This is the only way you can be absolutely sure that during the tinting process you will not cause any micro-scratches on the glass.
- Spray.
How to independently replace the front and rear pads on a VAZ 2106
Preparatory stage: a set of automotive tools, rags, new pads, liquid to remove layers of rust and corrosion.
- Place the machine on a level platform. The option with an inspection hole or road overpass is excluded due to inefficiency;
- We jack up the front wheel with a hydraulic jack, remove it, having previously installed the wheel chocks;
- Use pliers to remove the guide pins. Please pay attention to the pressure springs; they may fly out during the work;
- Using a flat-tip screwdriver, press the slave cylinder into its original position. We widen the gaps to remove the brake pads;
- We remove worn pads, carry out preventive maintenance on the brake caliper, and clean it from rust and deposits. If necessary, use a liquid like WD-40;
- Replace with new pads, assemble the structure in reverse order.
Subject to the above recommendations and the purchase of original spare parts, the service life of the brake system elements is 20 - 25 thousand km. mileage A moderate driving style and average ambient temperatures will increase the service life by 5 - 7 thousand km.
Useful tips
It is recommended to take a partner with you who will help you carry out all the procedures, because it is practically impossible to tint car windows yourself. Over the past few years, the VAZ 2110 has especially often begun to be tinted, as the car has become very popular, but many, trying to do it alone, make a huge number of different mistakes. It is also worth noting that all work should be carried out in a dust-free room, and if you are carrying out the procedure outside, then this should only be done in calm weather.
Reupholstery of the interior of a VAZ Lada 2106 car in auto repair shops in Moscow
15 car repair companies
- Afto-service
- st. Polikarpova, 27, building 3
- +7 (495) 99… show all
- The site of the company
- Stomobil
- Honda
- Apollo Motors
- Dvs
- London-auto
- Tiger box
- Autoelite service
- Gag-auto
- RF-motors
- TSM Motors
- Lr-technik
Popular companies
Instructions
Initially, you will need to remove the seals before tinting. All car windows to which tinting will be applied must be thoroughly washed with a specialized detergent. You should also rinse all corners very thoroughly. Next, tinting car windows with your own hands (VAZ 2109, 2110, 2107, etc.) is carried out as follows:
- A soap solution is prepared, which is a standard detergent or shampoo mixed with warm water, after which it is poured into the prepared spray bottle.
- The outer side of the glass that has been washed is thoroughly sprayed with a soap solution, after which a tint film is immediately applied, which is cut according to the required dimensions. It is worth noting the fact that the dark layer should be directed inward, while the transparent layer should be directed outward. Here you should be extremely careful, because the parties must never be confused. If you cannot decide which side is dark, then you should split your film very slightly from one corner. After the film is applied to the glass, careful alignment and cutting is carried out. It is best to leave a margin of one centimeter on each edge.
- Now the inner surface of the glass is covered with soap solution. After this, you should act extremely quickly, because the glass should not have time to dry. Carefully separate the dark layer of the film, and at the same time moisten it with the solution with which the spray bottle is filled. In this case, the work of an assistant is very important, because you will be able to perform all procedures much more carefully. In this case, one person will have to hold the clear layer of film, while the other will pull it and spray the dark layer.
- A dark layer is applied to the inside of the car glass. As mentioned above, while tinting car windows with your own hands (VAZ 2106, 2107, 2110 and all others), the glass must remain wet. It is also mandatory to carry out treatment with a spray gun, after which a transparent layer is applied, since the film must have effective protection from any damage. After carrying out all these procedures, you should immediately smooth the film using a rubber spatula, moving from the center to the edges. In this case, you should be especially careful, because any sudden movements are extremely undesirable. You should also completely get rid of any air bubbles.
The film should be smoothed until the transparent part falls off on its own, after which the dried transparent film can be completely removed. Now you can trim the protruding edges by running a knife along the edge of the car glass, but in this case it is extremely important to act without any haste.
If you have a hair dryer, then you can thoroughly dry the car glass along its perimeter, but if you don’t have a hair dryer, then just close the door and start working on the next glass. It is advisable that over the next two days you do not insert any seals into the doors or open tinted windows.
How to change rear pads on a VAZ 2106
replacement rear brake pads VAZ 2106-2103
replacement rear brake Gaskets should be made if the lining has reached the minimum permissible thickness of 1.5 mm, if there are all types of chips and cracks at the points of overlapping spots, the connection of the gasket with the surface of the gasket has been broken. To make it easy to replace the brake pads, the vehicle's rear wheels should be raised or raised and placed on supports. Replacement brake pads must be paired on both sides of the car.
For repairs we will need: keys “8”, “17”, a hammer, a screwdriver, a caliper, a file, two fastening blades, pliers and a wrench for wheel nuts. If that's all, we'll start replacing the gaskets.
- Remove the brake drum (see Removing and installing brake drum 2106).
- Use a wire brush and a clean cloth to remove dirt from the brake. (Do not use the brake mechanism to clean the brake pads: gasoline, kerosene, diesel fuel and other mineral solvents).
- Disconnect the ends of the compression spring from the spacers and remove the spring (see Replacing the Guard Cylinder Cover).
- While holding the clamp spring back, press the top cup and turn it a quarter turn in both directions to remove the clamp spring. Then remove the bottom cup and tighten the spring pin.
- Now you can remove the left brake pad, disconnect the lower connection spring.
- Remove the spacer.
- Now remove the right pad pressure spring in the same way and remove the pads from the brake valve.
Replacement of rear pads on VAZ 2101-2107 (CLASSIC) (Lada).
I am replacing the rear pads in the video with VAS 2107. By analogy, it changes to VAS 2101,2102,2103,2104,2105,2106.
VAZ 2106 Replacement of rear brake drums and pads
+ Change back brake drums and pads.
- Disconnect the handbrake end, align the parking brake lever pin, remove the washer, lever and drive lever pin.
- In the reverse order of removal, install the parking brake lever parts onto the new pads.
We are now starting to install new brake pads on the car.
- Conduct a visual inspection of the brake drum; the internal diameter should not exceed 251 mm. If the diameter meets the requirements, it is necessary to get rid of the clamp formed as a result of wear. To remove the clamp, attach the brake drum to the axle flange at the rear, adjust the drum along the mounting holes and secure it with two bolts. Then start the engine at minimum speed and engage first gear. The drum will rotate, raising the arm and lifting the file. Just embroider the shoulder without touching the surface of the drum, or press firmly on the file.
- Now replace the rear right brake pad in the reverse order of removal.
- Then replace the spacer bar. Please note that the panel is not symmetrical and has one slot at one end, but a double one. differently. The end of the boom, which is double cut, should be aligned with the right rear shoe.
- Attach the lower compression spring first to one end with the rear right shoe, then at the other end to the front left, and attach the lower end of the front shoe to the slot in the brake panel.
- Reinstall the front left shoe in reverse order and install the upper compression spring before removing it.
- Install the brake drum.
- Install the wheel and check its rotation.
- Press the brake pedal several times to keep the pistons in position.
This work was completed to replace the rear brake pads of a VAZ 2106.
Second option
Glass can also be tinted in another way. In this case, a 20% solution of rosin is prepared in specialized caustic soda. The rosin should dissolve until the liquid turns dark yellow. After this procedure, the prepared product is carefully filtered. A small amount of ferric chloride solution or special ferrous sulfate should be added. It is worth noting that a red precipitate of iron resinate should form, which should be separated, then washed and dried well. This precipitate can be completely dissolved in gasoline.
The prepared solution is applied to the glass using the same spray bottle. It is extremely important that tinting the rear window of a car with your own hands, as in the case of other windows, is carried out exclusively on a clean surface. In particular, you can degrease it in a soap and soda solution.
The shortest "six" from Krasnodar
The owner’s motives for making such a “cartoon” car are very difficult to understand. He would look fine in some Japan. The proportions, of course, are very unusual: a standard front hood and rear trunk, and in the middle a miniature cabin for two people, cut off at the front by the B-pillar, and at the rear at the beginning of the wheel arch.
Otherwise, this is a full-fledged VAZ-2106, and in excellent condition. And here’s the paradox: the more you look at this car, the more your vision gets used to the unusual dimensions and it seems that this is how it should be. The half-turn view from the rear looks especially harmonious - a stylish coupe from our legendary classic car.
Important
Be sure to wash the glass thoroughly and wait until it is completely dry. After this, place it in the oven for 5-10 minutes at a temperature of 60°C. If desired, you can make a film of a different color, but in this case you will need to use a different chloride. By adjusting the concentration of rosin and salt, you can change the color saturation yourself.
The main thing in this process is not to get carried away with tinting, because everything needs to be done in accordance with the current GOST. Acceptable window tinting stipulates that the windshield must transmit at least 75% of the light, while the remaining windows must transmit at least 70%.
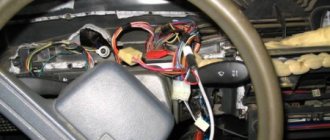
Dismantling the mechanism
- The brake drum is removed, after which the brake mechanism is cleaned from dirt with a clean rag and a wire brush. The use of mineral solvents such as gasoline, diesel fuel, kerosene, etc. when cleaning brake pads is unacceptable.
- The tension spring is disconnected from the pads and, holding its rod from the back, press the upper cup, at the same time turning it slightly in any direction, and remove the spring. After this, remove the lower cup and spring rod.
- Disconnect the tension spring of the left block and remove it along with the spacer bar. The same operation is repeated with the right block.
- Disconnect the end of the handbrake cable, remove the cotter pin securing the finger of the handbrake lever, remove the lever, along with the finger and washer.
Auto repair school – DIY car repair
Jun 14, 2022 VAZ 2101, VAZ 2102, VAZ 2105, VAZ 2106, VAZ 2107, Zhiguli, Classics by admin
Let's return to our immortal and beloved Classics! In this article we will look at the process of replacing the front brake hose on VAZ-2101, VAZ-2102, VAZ-2104, VAZ-2105, VAZ-2106, VAZ-2107, Classic cars. I hope that it will be useful to you and after reading it, you will be able (or will have information) on how to replace the front brake hoses yourself. I, in turn, will try to describe the replacement process in as much detail as possible and warn you about possible problems that may arise during operation.
Pay special attention to the list of necessary tools and the quality of purchased spare parts. In general, please...
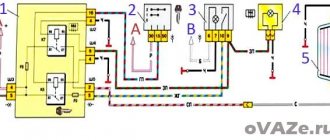
Let's start, perhaps, with the tool that you will need to replace the front brake hose on a VAZ-2101, VAZ-2102, VAZ-2104, VAZ-2105, VAZ-2106, VAZ-2107, Classic car: 14mm socket wrench, socket wrench for 10, pliers, an open-end wrench for 17, a rubber cap from the bleeder fitting (after disconnecting the tube and hose, it will be necessary to “plug” the brake pipe to prevent brake fluid leakage), special keys for unscrewing the brake fittings for 10 - split or crimped (photo 1).
The presence of at least one special key is necessary. Without it, in 9 out of 10 cases, you will not unscrew the brake pipe fitting!
What you should pay attention to when purchasing spare parts... First, we buy brake hoses from “Balakovo” or “Dimitrovgrad” production. Hoses from these manufacturers, although not cheap, are of high quality and durable
As they say - time-tested.
Included with the front brake hose you should buy two new copper sealing washers
When purchasing washers, you should pay attention to their thickness. According to the standard, the thickness should be 1.5 mm
But unscrupulous sellers may sell washers of thinner thickness (see photos 2 and 3), using which you will not be able to tightly tighten the brake hose bolt.
We can also advise you to buy a new brake hose mounting bolt. This is not necessary, but believe me, this cheap detail can save quite a lot of nerves. Since the old bolts are generally very stretched (photo 4) and even with new copper sealing washers, such a bolt will have to be pulled long and hard until there is no brake fluid leakage (and don’t forget that the threads in an aluminum brake cylinder are very easy to break).
We're done with the tools and spare parts. Now let's move on to a step-by-step description of replacing the front brake hose on VAZ-2101, VAZ-2102, VAZ-2104, VAZ-2105, VAZ-2106, VAZ-2107, Classic cars:
1. Use pliers to pull out the fixing bracket (photo 5)
2. Using an open-end wrench size 17 and a special clamp wrench 10, unscrew the brake pipe fitting (photo 6). We disconnect the hose and brake pipe, and put a rubber cap on the end of the pipe.
3. Using a 10 mm spanner, unscrew the fastening bolt securing the brake hose bracket (photo 7), if you have one, of course))).
4. Using a 14 mm socket wrench, unscrew the bolt securing the brake hose to the brake cylinder (photo 8). We remove traces of dirt and sand from the brake cylinder.
We carry out assembly in reverse order. We install the brake hose as shown in photo 9, with the bevel down. We install two sealing copper washers. When tightening the brake hose and tube, tighten the tube fitting and do not twist the hose, thereby preventing the brake hose from twisting.
When using an article or photographs, an active direct hyperlink to the website www.avtorem.info is required!
Substitutes
| vendor code | Price, rub.) | vendor code | Price, rub.) |
| Delphi 65140 | 850 | Finwhale 23593 | 800 |
| LS1219/S | 850 | VR311 | 800 |
| Bosch 17888 | 950 | TRW 26401 | 800 |
| 986487217 | 850 | GS8164 | 850 |
| HZTS 79927 | 800 | 2101-3502090 | 800 |
| Start 63275 | 800 | 21010-3502092 | 850 |
| MASTER SPORT 2103-3502093 | 850 | 030137-02332 | 800 |
The lists are presented for informational purposes. Before purchasing, be sure to consult with a specialist from a service center or auto store to determine the compatibility of the catalog article with the make/model of your car.
About light transmission standards for tinted glass
Nobody forbids tinting the windows of a VAZ 2107. However, if this is done without regard to the law, problems with traffic police officers are guaranteed for the car owner.
The higher the percentage of light transmission, the more transparent the tint film
From January 1 of this year, the Legislative Assembly intends to seriously increase fines for improper tinting of a car to 1,500 rubles. The requirements for glass for light transmission according to GOST 32565 2013 are as follows:
- there are no restrictions on light transmission for the rear and side windows of cars;
- the light transmission rate for the windshield is 70%;
- it is allowed to stick strips of colored film on the upper part of the windshield; their width can reach 14 cm;
- finally, the current GOST says nothing about so-called mirror tinting, and their use is not regulated in any way.