Applying a tinting film to the windows of a VAZ 2110 does not require qualifications and can be done independently, which is what we will talk about.
Many car owners strive to make their car not only more comfortable, but also beautiful. For most VAZ owners, tuning begins with window tinting. This does not require any extra effort - an inexpensive film for tinting plus a little time, and your ten will be transformed. This article will discuss the process of tinting a VAZ 2110.
Advantages of tinting VAZ 2110
The VAZ 2110 has a decent interior, which should preferably be protected from the sun, and tinting helps to do this. Many car owners believe that to darken the windows you need to have some specific skills that take years to acquire, but this is absolutely not the case. The tinting process is accessible to absolutely every able-bodied person.
From an aesthetic point of view, slightly darkening the windows is always good for the car. Tinted cars look more attractive. The difference is about the same as between clear glasses and sunglasses. A person wearing sunglasses looks more stylish, but most importantly, he feels more confident.
On a note
Tinting car windows has at least several advantages. Even with light tint, it becomes more difficult to see what is in the cabin. Attackers have to peer closely, and this can attract the attention of others. Of course, tinting is not a barrier for thieves, but at least it helps “not tempt”.
Please note that the same tint may look completely different depending on the lighting. In bright sunshine, even strong tinting can show through under certain conditions. At the same time, in cloudy weather with a slight darkening of the glass, the interior is practically not visible.
VAZ 2110 owners very often tint their windows with the darkest possible film, and therefore have problems with the traffic police. Some install additional side windows with electric lifters, which allow the dark glass to be raised and lowered at the right time. The solution is interesting, but requires significant financial investments. A car equipped with additional windows becomes closer to agent OO7's car.
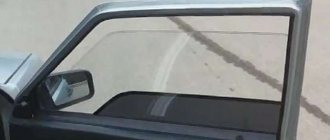
The VAZ “Ten” has flat side windows, and the rear one has a very slight bend. Gluing film to such glass is quite convenient. You can try to tint your car yourself, even if you have never had to do this before. If for some reason accurate tinting does not work out, then the losses will be minimal - a roll of inexpensive film for several hundred rubles.
Advantages and disadvantages
Pros of the car
- Available service;
- Availability of spare parts;
- Possibility of repair “in the garage”;
- Front-wheel drive;
- 16-valve injection engine;
- Improved security system;
- Low fuel consumption;
- Suspension adapted to poor-quality road surfaces;
- There is a hydraulic power steering wheel;
- The steering column can be adjusted;
- Air conditioning can be installed;
- Improved front panel.
Cons of the car
- Corrosion of metal;
- Small resource of some spare parts;
- Build quality;
- Unbalanced operation of the stove;
- Low sound insulation of the cabin;
- Constant monitoring of the timing belt;
- Equipment.
- There is little free space inside the car;
- It will be uncomfortable for three adult passengers to sit in the back.
Choosing a film for darkening
Do-it-yourself tinting of a VAZ 2110 begins with purchasing a tinting film on the market or in a store. The darkening process itself will involve gluing this film to the inside of the glass. When purchasing a film for tinting, it is advisable to use GOST or the corresponding regulatory document, which will indicate the permissible light transmittance of the darkening material.
It’s also useful to read: Anyone can apply innovative silicone film for glass tinting with their own hands
If you choose wisely, you will not have any problems with seeing the highway or with road inspectors, since this will be legal tinting on the windows. Some people also tint the windshield, which is not allowed. Any tint impairs visibility, while auto glass manufacturers are struggling to increase its transparency by cleaning the melt from iron impurities.
When choosing a film, you should pay attention to its base. Recently, silicone films have been gaining popularity, which can be repeatedly pasted and removed without any damage. Removable tinting can be recommended to lovers of radically black glasses, including many VAZ 2110 owners.
On a note
Silicone-based films are easily removed from glass and remain intact and unharmed. You can crumple them, throw them in the trunk, and then rinse them in water and stick them on again.
If you decide to darken the windows of your “ten” within the permitted transparency, then it makes no sense to buy silicone films. They are more expensive than usual, but in this case you won’t have to remove them, and therefore the main advantage of removable films remains unclaimed. Hence the conclusion: why pay more?
Lada 110 photos
Read further:
Amazing hatchback Lada X-Ray Cross: price and specifications in Russia
The interior of the Lada Vesta is not impressive
Porsche 928
Dodge Viper ACR
Buick Electra 225 Convertible
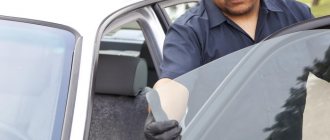
The process of gluing tint
To tint, you will need the following tools: a glass cleaning cloth, a stationery knife, scissors, a spray bottle, a soap solution and a silicone scraper. The following is the sequence of work.
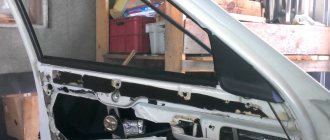
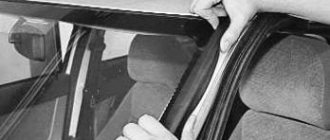
- First you need to remove the windows from the car. The rear window can be left in place, but it is much more convenient to cover it in a dismantled state.
- Then they must be washed thoroughly. Since the film is glued from the inside, it is the inside of the glass that undergoes preparation. If the car has been tinted, there may be drops of paint or varnish on the glass. You can remove them using a flat blade.
- We use the glass itself as a template. When cutting out the film, leave a margin of 1-2 cm on each side.
- Now cut out the outlined fragment.
- We choose a room with high humidity and place the glass on a prepared table covered with a soft tablecloth.
- Spray the surface of the glass with soapy water.
- First remove 1/3 of the protective film layer.
- We stick it on wet glass and spray it with soapy water on top.
- We remove the next part of the transparent film, while gluing the vacant area.
- When the entire piece is glued, remove the air from under the tint using a silicone scraper.
- Leave to dry for up to 8 hours. Do not dry the glass in a warm place or with a hairdryer (this can lead to uneven heating and wrinkles on the film).
- We cut off the excess along the contour of the glass with a sharp blade of a stationery knife.
Obviously, tinting a VAZ 2110 with your own hands is carried out using simple technology and requires almost no special skills. Using a more complex technology, adjustable glass tinting is applied. But this is a topic for a separate article.
Stories from our readers
“Fucking basin. "
Hi all! My name is Mikhail, now I’ll tell you a story about how I managed to exchange my two-wheeler for a 2010 Camry. It all started with the fact that I began to be wildly irritated by the breakdowns of the two-wheeler, it seemed like nothing serious was broken, but damn it, there were so many little things that really started to irritate me. This is where the idea arose that it was time to change the car to a foreign car. The choice fell on the melting Camry of the tenth years.
Yes, I had matured morally, but financially I just couldn’t handle it. I’ll say right away that I am against loans and taking a car, especially not a new one, on credit is unreasonable. My salary is 24k a month, so collecting 600-700 thousand is almost impossible for me. I started looking for different ways to make money on the Internet. You can’t imagine how many scams there are, what I haven’t tried: sports betting, network marketing, and even the volcano casino, where I successfully lost about 10 thousand ((The only direction in which it seemed to me that I could make money was currency trading on the stock exchange, they call it Forex. But when I started delving into it, I realized that it was very difficult for me. I continued to dig further and came across binary options. The essence is the same as in Forex, but it’s much easier to understand. I started reading forums, studying trading strategies. I tried it on a demo account, then opened a real account. To be honest, I didn’t manage to start earning money right away, until I understood all the mechanics of options, I lost about 3,000 rubles, but as it turned out, it was a precious experience. Now I earn 5-7 thousand rubles a day. I managed to get the car buy after half a year, but in my opinion this is a good result, and it’s not about the car, my life has changed, I naturally quit my job, I have more free time for myself and my family. You’ll laugh, but I work directly on the phone)) If If you want to change your life like me, then here’s what I advise you to do right now: 1. Register on the site 2. Practice on a Demo account (it’s free). 3. As soon as you get something on the Demo account, top up your REAL ACCOUNT and go to REAL MONEY! I also advise you to download the application to your phone, it’s much more convenient to work from your phone. Download here.
Tinting
Peel off the protective film from the tint . During peeling, immediately spray with soapy water. It is better to find an assistant here. One will hold the transparent layer, and the second will carefully pull off and spray the dark one. also spray the glass from inside the car . The soap solution neutralizes the adhesive on the film for several tens of minutes .
Apply tint film to the glass and make adjustments.
As long as the glue on the tint is neutralized, you can move it freely on the glass. Using a scraper, we begin to remove the solution from under the film, moving from the center to the edges. Wipe off the squeezed-out solution with napkins. The excess film at the edges is cut off (Some cut the film at an angle of 30 degrees to the glass) so that it does not reach the edge of the glass by about 1-2 mm. Otherwise, over time, the film will begin to peel up.
If the glass is tinted on a car, then the part of the film adjacent to the lower seal is not inserted under the seal by 2-5mm. This will eliminate scuffing when lowering the glass. If you have a hairdryer, dry the glass around the perimeter . If there is no hairdryer, then wait 3-4 hours in a warm place and carefully install the glass back on the car.
The film finally dries in about a day or two, depending on the weather. During this time, do not lower the windows.
Conclusion of side window tinting
How long did it take to do the tinting yourself and remove the glass:
- Removing glass 1-2 hours.
- Tinting
4-5h.
Installation of glass in cars at 2h. If you have chosen a high-quality film and are not too lazy to remove the glass from the car. If you carried out the work of tinting windows at home, and not on the street, then in 95% of cases the result of tinting should pleasantly surprise you. After tinting the side windows with your own hands, you will already be able to evaluate your strength and think about tinting the rear window. And if you don’t dare to take such a brave step, you can always tint the rear window at a car service center. The price of tinting just the rear window will be much less than tinting the entire car.
Rear window tinting
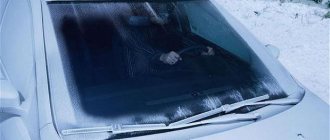
Unlike side windows, tinting the rear or windshield is more labor-intensive and requires some experience.
The whole difficulty of tinting the rear window is that it has a curved shape. Of course, the film stretches within certain limits (you can’t do without an industrial hair dryer) and in most cases this is enough for tinting. But it is unlikely that it will be possible to tint a strongly curved surface in one piece. You will have to resort to several patterns.
Let's consider the case when it is tinted without cuts , but only by stretching the film. Before gluing the film, you need to shape it into a curved surface (or called molding ). Without removing the protective layer, stretch the film onto the glass moistened with soapy water from the outside. Smooth the film with a scraper from the center to the edges, expelling air bubbles and excess solution, while heating the film in curved areas with a hairdryer. This will stretch the film and take the shape of the rear window. Afterwards, the tinting technique is the same as with the side windows . Remove the protective film, moisten it with soapy water and apply it to the glass from the inside. While the glue is neutralized, smooth the film from the center to the edges, expelling bubbles and solution. Trim the edges and dry them with a hairdryer around the perimeter.
Rear window tinting with cuts : If the bend of the rear window does not allow the film to be applied evenly, then tinting should be done in 2-3 stripes. The stripes should be glued one at a time, overlapping each other, starting from the top. At the same time, moisten it abundantly with water. To make the film joint less noticeable, you need to make a cut along the rear window heating line. After tinting, do not turn on the rear window heating for two days.
Armor film
What are the advantages of armored film over conventional tinting film:
- Armored film protects glass from mechanical damage (impacts of pebbles jumping out from under the wheel), scratches, and chips.
- Armored film has a sound and heat insulating effect.
- Armored film resists forced entry into the car
- Armored film blocks up to 99% of ultraviolet radiation
For example , the effectiveness of armor film when gluing on transparent glass 6 mm thick:
- Reduced heat gain: 46%
- Reduced heat loss: 0%
- Reducing the glare of bright light: 58%
- UV attenuation: 99%
The armor film is glued in the same way as a regular tinting film. There is no difference in technology. The only difference is in the film itself. The armor film is simply thicker (up to 300 microns) and tougher. But this makes it easier to work with her. By the way, the film can be glued to another film, thereby creating different combinations. For example, tinting + armor, or double armor, or double tinting, etc.
Art tinting
Tinting according to GOST
Conclusion
We repair the light fixture without disassembling it
You can snap the ball into place without removing the glass, through the holes of the light bulbs on the back side of the illuminator:
- We drill a hole exactly opposite the latch at the top of the headlight;
- Insert a screwdriver into the hole;
- Attach the collet to the corrector ball;
- We seal the hole we drilled;
- We attach a hinged loop from a furniture cabinet (hinges 5-6 centimeters long, with mounting holes and a cutout on top on which it is attached) to each broken corrector unit;
- We insert the canopy into the slot of the adjustment screw;
- We move the screw so that the slot is in a narrow place of the canopy;
- Holding the canopy, unscrew the screw until it stops with force. This is how the canopy is fixed, which needs to be placed in a horizontal position;
- Using an electric drill, using a 3 mm drill, we make a hole in the base of the light where there is a hole on the canopy;
- We screw a shortened screw into the hole so that it does not reach the high beam reflector. This slot secures the adjustment screw securely; it can be broken again.
Replacing headlight bulbs
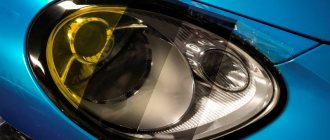
The owners' complaints about the lighting of this car mainly relate to electric lamps. An effective replacement can be found if you find and install devices that generate a luminous flux that has increased brightness and intensity. Manufacturers of these devices, both domestic and foreign, have mastered several types of such products:
- Halogen lamps. They are distinguished by a large selection of their sizes and a long period of operation, as well as reasonable cost. As a disadvantage, it is necessary to note their high energy consumption, as well as some features of their installation;
- Xenon lamps. This type of lamp has a high light beam intensity, is environmentally safe, and has a pleasant spectrum close to daylight. However, due to the high likelihood of blinding problems for drivers of oncoming cars, they were prohibited from use;
- "GT" type of lamps. They are classified as a new type of lighting devices; they embody all the best factors of previously produced devices, and therefore are very popular.
Article on the topic: “Which is better xenon or halogen.”
Protection for headlights: what varnish to apply
The goal of the product is to be able to eliminate even deep scratches and reliably protect the surface from mechanical and chemical attack. You should also take into account the refractive indices, which determine the quality of lighting in the future. Based on its composition, headlight varnish after polishing is divided into three main categories:
- Acrylic based product. One-component varnish can be completely transparent or have any shade. The ease of application allows you to perform the procedure yourself, without the need to dismantle the lighting elements. Suitable for slight deterioration in the performance of plastic headlights. Application allows you to achieve a glossy shiny effect. Not recommended for polycarbonate headlights.
- Two-component glass protection. The material is presented in different containers, one of which contains the varnish, and the other contains the hardener. After polishing, headlight varnish of this type is recognized as the most effective. When applied, the composition allows you to achieve a durable and stable coating, regardless of the material from which the headlights are made. Widely used by professionals.
- Urethane automotive varnish. A convenient solution for surface treatment after cleaning. It is available in the form of an aerosol can (spray), and is considered the most convenient when it is necessary to increase the luminous flux without removing the headlights from the car.
Restoring glass or plastic headlights using varnish after sanding requires deciding which compound is best. To achieve the best result, you should take into account the composition and type of material (glass, acrylic, polycarbonate) that was used for glazing.