The steering mechanism in the Lada Granta consists of such a list of components and systems when the failure of any of the elements will not allow the driver to further operate the vehicle. Any malfunction that appears must be corrected immediately. In some cases, you just need to adjust the steering rack.
The steering mechanism of the Lada Granta has a rack and pinion design. This unit is quite reliable, but is not without an unpleasant feature - the appearance of a characteristic knock over time. You may also find information on how to tighten your steering rack useful.
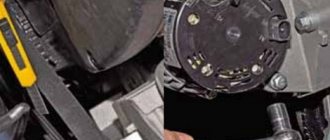
How to tighten the steering rack on a Grant with electric power steering?
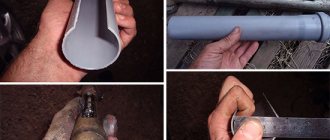
Preparing the tools:
- special key for tightening the rack;
- “ratchet” with a head set to “10”;
- head at “13”;
- screwdriver with a cross-shaped tip.
To the question of how to tighten the steering rack on a Lada Grant, there are two answers:
- If you have graceful hands, then you're in luck - you can use the fastest and simplest maneuver. Using a special key, we reach the rack in the place where the steering rod is located on the left side of the body. There must be a suitable hole for entry.
- Well, if it doesn’t work, then you’ll have to compete a little longer with repairing the steering equipment. To reach the adjusting nut, you need to remove the battery and its platform.
Let's move on to a more labor-intensive workflow.
Loosen the battery terminals and remove it.
Then it's up to the site.
After dismantling it, we try to reach the adjusting nut located on the inside of the steering rack housing.
You need to tighten the rack clockwise, but there is one “BUT”: it is installed in an inverted position, so it will be as if walking against the clock. To eliminate extraneous sounds, it is enough to turn the nut 20-30 degrees from its original position. At the same time, on the Grant model, experts do not advise tightening it too much. What can happen if you overdo it? Yes, nothing good, and specifically, when sharply manipulating the steering wheel, biting in the steering mechanism may occur, this is naturally not a safe circumstance.
Checking the operation of the steering
After the adjusting nut has been tightened, in the “parking” position of the car, rotate the steering wheel left and right, while checking the uniformity of rotation. It is worth remembering that you need to check the steering for knocking only when the car is moving at speed over road irregularities.
In custody
As a rule, malfunctions in switchgear occur due to neglect of preventive inspections. If the car enthusiast has missed such important points as: the appearance of weak oil leaks in the steering mechanism or the loss of the integrity of the protective covers, then there is a high probability that soon the notorious knock will begin to be heard from the engine compartment, indicating the impending dirtying of hands due to elementary indiscretion.
It is also worth considering the presence of a special key for adjusting the rack and pinion mechanism; it is intended for the VAZ-2110, and its cost is unlikely to exceed 150 rubles. The tool can also have a combined design: one side will be intended for adjusting the rack and pinion mechanism, the other for tensioning the timing rollers.
Last edited: Sep 10, 2017
Is this special wrench for tightening the Granta rack somehow different from a similar one, but for old front-wheel drive VAZs? I remember they tightened the rack on the “nine” in the same way. By the way, the main thing here is not to overdo it, otherwise you won’t be able to turn the steering wheel)
Sergey Vasilyevich
, I also have something rattling there, but this is not the first year I’ve been driving like this! It is clearly noticeable only when you drive on rough terrain.Sergey Vasilievich said:
↑
Is this special wrench for tightening the Granta rack somehow different from a similar one, but for old front-wheel drive VAZs?
Click to expand...
Sergey Vasilevich
, I don’t know how it differs there: you go to the market and ask everything there.
I’ll speak for myself personally: I’ve never tightened the rack, but most likely I need to!
Sergey Vasilievich said:
↑
By the way, the main thing here is not to overdo it, otherwise you won’t be able to turn the steering wheel)
Click to expand...
It depends on what kind of car: I clung to the truck with both hands, but not so on the Tavria! By driving, I mean.
sportcar
, I was once in a “nine”, and it was similar in terms of the Grants rack, as I understand it, they tightened the rack so tight that my car became like a Lawn in terms of steering force
It turns out that the steering rack can be repaired (video example)
The knocking of the steering rack on the Grant was inherited by this car from the younger model - Kalina. In fact, the design of the rack is no different and the catalog number remains the same. As for adjusting the steering rack, you can do it yourself, having the necessary tool at hand:
- special wrench for tightening the rack
- 13 mm socket - for removing the battery pad
- Phillips screwdriver
10mm socket and ratchet (for unscrewing battery terminals)
A little theory: front suspension design
Before attempting to fix any problem, there is a tendency to look at the blueprints or repair manual. It is known that the VAZ-2192 parts catalog contains the following object:
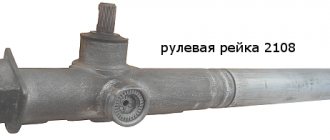
This is what the steering rack looks like in the drawing
Whether the knock will remain in the steering rack of Kalina-2 depends on the following: how accurately element “14” is adjusted. The adjusting nut, marked “14”, looks almost invisible here. But first impressions are deceiving. In the catalog, by the way, the element is called “Stop Nut”.
It is important to know that the thrust nut has external threads. And it spins clockwise. And the words “tighten the rack” mean screwing in the specified nut, and nothing more.
Now let's move on to practice and see what the node in question looks like in reality:
If you remove the rail, it looks like this
The nut has a non-standard notch, and it can only be rotated with a special tool. By the way, the recess will be closed with a cap. In the catalog it is designated by the number “15”, and now, let’s look at the appearance of the special key:
Rack adjustment key
The thrust nut is turned at small angles. We are talking about values of 10-15 degrees. What happens if you overdo it with tightening the rack? The knocking noise will disappear, but the steering wheel will turn with difficulty. Therefore, if necessary, the nut can be pulled back.
Diagnostics, repair and reassembly
Unscrew the adjusting nut. Here you need to use a special 24mm wrench, which has external edges for unscrewing. Sequentially remove the rack stop spring, the sealing ring and the rack stop. Remove the crankcase cover. After removing the bearing cage and sealing ring, remove the rack. The second element of the steering mechanism pair - the gear shaft - is dismantled.
Before reassembly, all critical connections are lubricated with a special compound. Very often, it is the insufficient amount of lubricant that leads to rapid wear of loaded parts, which violates the previously established clearance. Therefore, even a recently installed rack knocks again.
Lyrical digression
In Lada Kalina, the steering rack never makes a knock when we are talking about a new car. This is also true for the break-in period. Let's say in your case this is not done. Then, do not try to repair anything, but go straight to the dealer. According to reviews, the defect in question is covered under warranty, and most car dealers do this: the steering rack assembly is replaced with a new one.
This is what the replacement unit looks like, the rack assembly
There is a logic here. At the factory, adjustments are made correctly (this is true in 99.9% of cases). If a defect appears, the dealer replaces the assembly without expecting that adjustment will solve the problem. The owner does not need to hope for this either. The choice is yours.
Mechanism repair
Since the steering rack has a complex structure, auto repairmen rarely disassemble it and repair it. It is much easier to buy an assembled spare part and install it on the car.
Today on the market there are original auto parts and cheaper analogues. Car manufacturers recommend installing only original parts, as they fit perfectly into all car systems. But the experience of car enthusiasts says that similar spare parts also last a long time. The main thing is to choose a good manufacturer. This can be done by reading reviews on the Internet or asking advice from an experienced car enthusiast.
Do not forget to periodically change consumables - bushings, oil seals, boots. Periodically inspect the bottom of the car; if there are cracks or leaks, immediately buy a repair kit. This will extend the life of the entire device.
A thrifty and careful driver may not even think about the steering rack throughout the entire period of owning the car. Therefore, it is worth following simple operating rules: avoid potholes, slow down before bumps, and if you have the first symptoms of breakdowns, immediately contact a car service center. Then the device will serve you for a long time.
1200 rub. for the photo report
We pay for photo reports on car repairs. Earnings from 10,000 rubles/month.
Faults in a car's steering rack can not only cause driving discomfort, but also cause more serious damage and even lead to an accident. Signs of a malfunction are: an increase in mechanical force when turning the steering wheel, the hum of the power steering pump, leaking power steering fluid, knocking while driving on rough roads, rusting of the rack shaft.
Making adjustments yourself
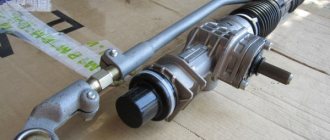
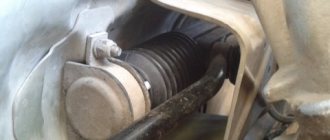
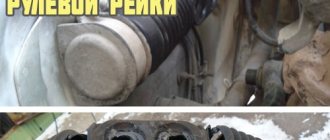
You can access the adjusting nut from the engine compartment, but to do this you will need to remove the battery, as well as the battery mounting pad. It is better to drive the car into a pit and then remove the crankcase protection (engine mudguard). If you look from under the bottom, the required element is immediately visible:
You need to turn this nut
And when you open the hood, you can feel the nut, but not see it. Its location is marked in the figure:
To make adjustments, place the key here
Before adjustment, remove the rubber cap from the recess. Its appearance is shown in the photo:
Remove the cap and install the key
If it is not entirely clear what exactly needs to be done, it is better to contact the service. The key is installed in the recess and then rotated 10-15 degrees.
When looking at the rack from above, turning the key clockwise corresponds to unscrewing it. The handle of the key comes from the center of the car - which means tightening is being done. By the way, the latter is true provided that the handle faces forward.
Preparatory actions, dismantling unnecessary parts
To remove the crankcase protection, you need to unscrew 4 screws located in one row near the bumper. Also, unscrew two screws having a standard size of M6x16. In some configurations, the protection consists of two parts, but in this case they are attached only with self-tapping screws. These words are illustrated by the following photo:
First, unscrew the “10” screws, and then the two “18” screws. In the second case, there will be more screws (eight).
Now let's look at how to remove the battery. First of all, disconnect its terminals. Then, you need to move the additional fuse box to the side. In general, actions are performed according to the photo:
Removing the steering column
If adjusting the nut does not help and the play remains, you will have to completely disassemble the rack and repair it. True, first you still need to dismantle it, which is also not easy. There are two methods: with removing the steering rods and without removing them. Preferable and easier, of course, is the method without removing the steering rods, since it takes less time. Before starting dismantling, you need to jack up the front of the car. This is done in order to completely relieve the steering rods, otherwise you simply will not be able to dismantle the steering rack. So, let's start disassembling. Inside the car, where the pedal block is located, find and unscrew the steering shaft cardan bolt. Next, move to the engine compartment and there you will find the mounting bolts on the rods and unscrew them. Don't forget to bend the locking plate first. After this, unscrew the four fixing bolts that secure the steering column to the car body. All fasteners are unscrewed, carefully move the steering column and remove it through the opening under the left wheel arch.
Wheel bolts are loose
Also an infrequent, but possible reason. It is logical that to eliminate it you just need to tighten the fastening bolts. But if the car has already been driven enough with loose bolts, then the wheel rims may become deformed and your Lada Granta will continue to make a knock when turning the steering wheel until you replace the wheel itself.
Although the Granta is our car, the wheels now cost a lot of money, so if the Lada Granta just starts making a knock when turning the steering wheel, fix the problem immediately so as not to incur unexpected expenses.
Size of the key for adjusting the steering rack of the Lada Granta
Isn't it easier to buy it?
there is a key for the 08 model, and there is a key for the 10 model, and on the old tens they installed only the mustache from the tens from the 08 model
Well, it costs 80 rubles somewhere, so why strain your brains?
45 rubles in auto49, it’s nonsense to save in this way. crazy
I saw someone who likes to save money. the housekeeper himself is the same, but do it like that, who’s against it?)
I found that the key goes to 24, but I’m also interested in the diameter of the shaft at the steering rack, since the key comes with a hole for the shaft
What are you writing about, about the rack tightening nut or the steering shaft housing cover? On the 10th there is no threaded cap for a hexagon, there is a cap for 2 screws with an internal hexagon.
Isn't it easier to buy it?
All this can be found in the directory of designer ANURYEV
Source
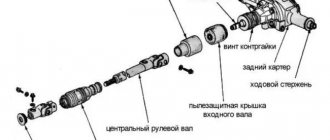
Steering of Lada Granta
It is designed to control the car while driving. Structurally, it consists of the following main elements:
The work of the mechanical part is that the driver acts on the steering wheel, the impulse through the steering mechanism and rack transmits force to the front wheels through the levers, and the car turns in the desired direction. A characteristic feature of a passenger car steering wheel is its smaller diameter (compared to a truck). The design of the mechanism also differs. The steering of the Lada Granta is complemented by an electric booster. The steering wheel can be adjusted in height. Unfortunately, there are no settings for departure.
The steering mechanism of the Lada Granta is rack-and-pinion type, the simplest and most inexpensive option.
The drive is mechanical, structurally consisting of levers, rods and hinges. For more efficient and convenient control, the Lada Granta is equipped with an electric amplifier. This is a complex mechanism that provides force through the use of electricity. An electric power steering, or simply EPS, is used to improve dynamic characteristics and controllability. And, according to some data, it allows you to save fuel by increasing the vehicle’s maneuverability.
How to determine whether a steering rack is faulty
All steering rack malfunctions can be divided into three types - knocking, humming and leaking. Leakage is typical only for devices with hydraulic booster, since the power steering operates without oil, which means it cannot leak.
There are two types of knocks: superficial and internal. The first ones appear from the tie rod end. Through a torn boot, street dirt gets into the mechanism, the tip fails and begins to knock. You can change it yourself by looking at the steps of the process in the car manual.
An internal knock indicates that the pistons and guide rails have failed. It is very difficult to independently determine the cause, since you need to disassemble the entire mechanism.
Disassembling the steering mechanism
We disassemble the steering mechanism when repairing it. Remove the steering mechanism (see “Removing the steering mechanism”). Remove the steering gear boot (see “Replacing the steering gear boot”).
Remove the steering rod support. We insert the bit into the groove of the crankcase pipe mounting nut.
We unscrew the nut, striking the beard (right-hand thread)…
...and remove the crankcase pipe.
Use a screwdriver to press out the two clamps of the bushing located inside the pipe...
...and remove the bushing.
Remove the two rubber rings from the bushing (arrows indicate the bushing clamps).
If it is necessary to replace the nut, use pliers to remove the locking rings... ...and remove the locking ring... Remove the pipe securing nut.
Remove the rubber plug from the rack stop adjusting nut. Using a scraper, remove the jammed metal in the locking areas of the stop adjusting nut.
Using a special 24mm wrench with an external octagonal head, unscrew the stop nut.
We take out the stop spring. Using a screwdriver...
...remove the O-ring.
By hitting the crankcase against a wooden block, we knock out the rack stop. Using a screwdriver...
...remove the liner from the stop. A rubber ring is installed in the groove of the stop.
Remove the rubber ring from the crankcase that seals the hole for the steering mechanism on the front panel.
Remove the boot from the gear shaft. Use a 6mm hexagon to unscrew the two screws (shown by arrows)…
...and remove the crankcase cover.
Remove the separator with the thrust bearing rollers.
Remove the sealing ring of the cover.
We remove the rack from the crankcase.
We press out the gear shaft by holding the shaft in a vice with soft metal jaw linings and pressing the crankcase upward with the mounting blade.
We remove the gear shaft with bearing from the crankcase. We pry it off with a screwdriver...
...and remove the bushing retaining ring.
We take out the gear shaft bushing assembled with the support plate.
If it is necessary to replace the needle bearing, use a drill with a diameter of 4 mm to drill two diametrically located holes in the crankcase so that they extend to the end of the outer ring of the needle bearing. Through the drilled holes, using a rod of the appropriate diameter, we knock out the outer ring of the bearing from the crankcase.
Using a puller, we press the ball bearing of the gear shaft with the inner ring of the roller thrust bearing.
Use a puller to press the inner ring of the needle bearing off the shaft.
Using a screwdriver, pry and remove the gear shaft oil seal from the crankcase cover. If the outer race of the roller thrust bearing needs to be replaced...
... use a scraper to remove the extruded metal in four places and take out the ring. We generously lubricate the bearings, rack and gear teeth, and the plastic rack bushing with Fiol-1 lubricant. We assemble the steering mechanism in the reverse order. We press the outer ring of the needle bearing into the crankcase using a mandrel of suitable diameter. To seal holes in the crankcase, you can use “fast steel” or “cold welding”. We press the gear shaft with the ball bearing into the crankcase using a piece of pipe of a suitable diameter or a high head, applying force to the outer ring of the bearing. You can press the gear shaft into the crankcase, resting the outer ring of the bearing on the jaws of a vice. Then we put the crankcase on the bearing...
...and press the crankcase with light blows of a hammer through a wooden block.
We press the gear shaft seal into the cover through a mandrel or head flush with the end of the cover. We insert the rack into the steering gear housing. We install the pipe.
After tightening the pipe fastening nut, tighten the nut.
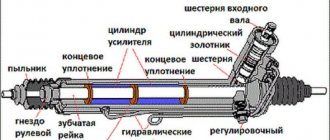
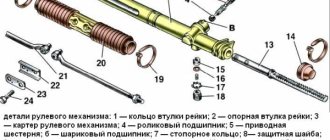
Scheme for monitoring the gap in the engagement of the rack and pinion shaft:
1 – dial indicator; 2 – indicator mounting bracket; 3 – nut; 4 – sealing ring; 5 – steering gear housing; 6 – needle bearing; 7 – gear shaft; 8 – bushing; 9 – crankcase cover; 10 – rack; 11 – liner; 12 – rack stop; 13 – indicator leg; 14 – spring
We rotate the gear shaft so that the flat on it is located on the right side. We move the rack so that the steering rod support mounted on the rack is located in the middle of the pipe groove. We insert the rack stop, the stop spring and tighten the stop nut. It is recommended to replace the stop nut with a new one. We adjust the gap in the engagement of the gear with the rack. To do this, set the rail in the middle position and block it from moving. Insert the leg of the dial indicator into the hole of the adjusting nut of the stop until the tip of the leg touches the stop of the rack. The diameter of the tip of the indicator leg must be at least 3.5 mm...
...so that the leg rests against the end surface 1 of the stop, and does not fall into its hole 2 (for clarity, shown on the dismantled stop). We apply a torque of 15 N m (1.5 kgf m) to the gear shaft, while the gear pushes the rack and stop. Based on the indicator readings, we determine the amount of movement of the stop, which corresponds to the actual value of the gap in the engagement. If it exceeds 0.05 mm, tighten the adjusting nut, achieving the specified amount of movement of the stop. After this, having unlocked the rack, we check the ease of rotation of the drive gear throughout the entire range of travel of the rack.
How to adjust the rack?
Adjusting the steering rack involves setting the correct gap in the gear connection. We recommend replacing the thrust nut with a new analogue. The rack and pinion assembly must be set to the “zero” position, which corresponds to the straight course of the car. The adjustment is carried out using a clock-type indicator mechanism. We rotate the gear-shaft and at the same time measure the readings of a special indicator. When the value is 0.05 mm, then tighten the adjustment nut to a similar amount. Upon completion of the adjustment manipulations, we check the mechanism for ease of rotation and smooth movement of the rack in the pipe. After making sure that the steering rack adjustment was correct, we fix the nut of the same name in the specified position by punching it with a special punch.
Now we can easily install the assembled unit on the LADA Granta car. Upon completion of installation on an immobilized vehicle, rotate the steering wheel several times, checking the smooth rotation and movement of the elements. It is possible to make sure that there are no knocks only while driving over uneven surfaces. The steering rack is fine.
Steering wheel tuning on Lada Granta
There are few options for upgrading the steering wheel on the Lada Granta. The most popular of them is installing a sports version. Such a steering wheel will not only make the interior more attractive, but will also increase the comfort of control, especially if it is selected correctly. You can install a multi-steering wheel, but only if the configuration is maximum, in other cases there will be nothing to control with its help.
The sports version must be injury-proof, that is, in the event of an accident it must be deformed without causing damage to the driver. Among the shortcomings, it can be noted that although there is an airbag in the standard steering wheel, the sports one does not have it. You can also modify the steering wheel by installing braid. More advanced ones install a heating thread under it.
To install the sports steering wheel, you will need to carry out the following operations.
- Align the front wheels straight (you can drive a little forward and back so that the trajectory is straight).
- Disconnect the battery terminals by de-energizing the vehicle's on-board network.
- The airbag control module must be disabled (if the Granta equipment is equipped with it). If you do not turn it off when removing the factory steering wheel, it may shoot out.
- Remove the steering wheel and install a horn on the adapter. The wiring must be stored in the adapter; to do this, carefully inspect all contacts.
- Connect the adapter to the shaft, but do not secure it with a nut.
- A sports steering wheel is installed on the adapter and secured with special screws.
You cannot throw away or sell the factory product; the sports version will raise questions when passing inspection.
How to eliminate knocking noise in the electric power steering of Lada Kalina, Granta
Many owners of Lada Kalina and Lada Granta are familiar with the problem of extraneous noise when turning the steering wheel (during short swings) or when driving on an uneven road. If the car is equipped with a geared electric power steering (EPS) manufactured in Makhachkala (catalog number 11186-3450008-00), then this may be the reason. This EUR is not installed on the Lada Priora. It is noteworthy that knocking is not observed in EUR (gearless) manufactured in Kaluga or MONDO. We'll tell you how to fix this problem.
The main reason for the appearance of knocking in the electric power steering is the presence of play , which appears during the operation of the car. If the knocking sounds resemble drumming, then most likely the bearings are not tightened properly. Most often, the smallest of the three electric drive rotor bearings, which is located on top of the conical part of the power steering housing, rattles. You just need to tighten the adjusting nut (do not overdo it, otherwise the bearing will break).
Some versions of the electric power steering do not have an adjusting nut, and if you disassemble the amplifier, you will notice adjusting washers between the bearing and the gear. In this case, the backlash can be reduced by installing additional washers , selecting them experimentally. It is worth considering that the thicker the gasket, the tighter the steering wheel will rotate, and too small the thickness of the washers will cause the EUR to knock.
With this modification of the electric power steering, you will have to remove and disassemble it. The most difficult thing will be to divide the electric amplifier into two halves. When reassembling, do not forget to apply lubricant . During assembly, do not strip the threads, they are weak.
If a metallic knock appears when you turn the steering wheel all the way in both directions, then most likely you are simply bumping into the end of the steering rack. In this case there is no cause for concern.
In some cases, it is impossible to do without repairing the electric power steering and replacing worn parts with new ones. The radical way to get rid of the knocking is to remove the EUR altogether, or replace it with a gearless one.
A knock when turning the steering wheel may not always be caused by the electric power steering; sometimes extraneous noise occurs due to the steering rack or column.
Source
Power steering and power steering: do-it-yourself installation
The electric booster first appeared on Kalina, then on Grant and on the new Priora. You can drive a car without an ESD. But if a car owner previously owned a car equipped with a hydraulic or electric booster, then, at a minimum, he will experience great inconvenience. On the Lada Granta in the minimum configuration, the manufacturer does not install electric power steering, so many owners of such cars decide to install the power steering themselves. This procedure is not the easiest, and the unit is not cheap. But its presence means a comfortable ride, maneuverability and safety.
Installation does not require any special knowledge or skills; minimal experience and a set of tools are sufficient. If, nevertheless, the question arose about installing electric power steering on the Lada Granta, then when purchasing an electric power steering unit, you should pay attention to its number.
The set of numbers contains a definition of the place of production, these are the last two digits:
- 00 – made in Makhachkala (not the highest quality, has many negative reviews);
- 04 – Korean amplifier, you can buy it in a store, a rare copy at auto wrecking yards;
- 02 – made in Kaluga, a good medium option.
To install the amplifier you will need a set of wrenches, screwdrivers and an angle grinder (grinder). Before proceeding with installation, the steering wheel, all steering column switches, the ignition switch, and the steering column with cardan must be removed. The further algorithm of actions is as follows.
- Knock out the bolts from the removed bracket in the form of a plate and cut off about 3 cm from the top with a grinder.
- Drill holes in the plate to mount the electric amplifier.
- Fix the cardan to the EUR.
- Place washers under the bracket (where the electric booster is mounted), and you can use them to adjust the steering wheel.
- Attach the electric booster, and then install the cardan into the rack.
After this, all that remains is to connect the EUR to the wiring according to the electrical diagram supplied with the amplifier. Using washers you need to adjust the steering wheel deflection in different positions. No further maintenance of the electric amplifier is required. Those who decided to replace the electric power steering with a hydraulic booster should understand that this idea is pointless. Firstly, the power steering is much more technologically advanced and modern, and secondly, installing the power steering on the Grant is a labor-intensive and expensive process that has no practical advantage.
The steering mechanism of the Lada Granta is reliable and simple to use. With timely diagnosis of faults and periodic maintenance of mechanisms, the rack and other components will last a long time without any serious problems.
Rack and pinion mechanism
If you touch on the steering mechanism on the Lada Granta, you need to notice its design aspects and characteristics.
- The steering column can be adjusted to tilt. The steering wheel itself is endowed with the ability to lock due to the presence of a special anti-rotation device, which is structurally connected to the ignition switch.
- The rack and pinion mechanism of the steering unit allows you to change the ratio of gear ratios in different operating modes.
- A mechanism based on the electrical principle of operation is integrated into the system as an amplifier.
- The electric amplifier is equipped with a unit through which self-diagnosis of the entire unit is carried out and, if a deviation from the norm is detected, it directly excludes the amplifier from the overall functionality of the system.
The principle of implementing the steering unit circuit is quite simple. The mechanism, which has a pair of gears and a steering rack, is fixed in the engine compartment using rubber supports on a specially designed shield. The reliability of such fasteners is ensured by bolts attached to the body. The ability to transmit rotational force to the wheels is carried out through a pair of steering rods, which are connected to rotary levers fixed on the bodies of the Lada Granta shock absorber struts.
The interaction of the gear pair is regulated using a gap, the value of which is set at the manufacturer’s factory. The meshing accuracy is controlled and adjusted by means of a spring stop that presses the rack to the gear.
The indicated gap value under standard conditions reaches 0.1 mm. During operation, the gap changes due to the gradual wear of individual elements of the steering unit. This may be one of the main reasons causing the previously mentioned knocking noise. We will also not ignore other factors that can cause this annoying knock for the Lada Grant owner, namely:
- the fastening of the rack itself to the body elements is weakened;
- the appearance of play in the ball joints of the rods or the tips of the steering unit;
- wear or damage to the steering shaft gear teeth.
In the first case, you need to know how to tighten the steering rack, as well as how to replace it.
How to avoid
To avoid the appearance of new knocks after repair, you must follow a few simple rules:
- Do not reach high speeds on uneven and gravel-covered roads, as well as when driving over potholes and potholes. And if you still can’t avoid this, be sure to ensure that the steering wheel is not in the extreme position at the moment the front wheels come into contact with the obstacle.
- Do not make sudden acceleration or braking when the steering wheel is in the extreme position.
- Do not drive onto curbs or high curbs.
Thanks to following these simple rules, knocks will not bother you for a long time, and the steering rack will last even longer.
Rack adjustment
If the value is 0.05 mm, then the adjusting nut should be tightened to the same amount. After the steering rack adjustment is completed, check the ease and uniformity of movement along the entire length of the rack stroke. Provided that everything is done accurately, you should fix the position of the adjusting nut by performing special core punching with a punch. When all the work has been completed, you can begin to reinstall the steering mechanism on the Lada Granta. After the mechanism has been installed back on the car, you should, even before starting to drive with the car stationary, turn the steering wheel, checking the uniformity of rotation. A check that will reveal that there is no knocking can only be done while driving on a rough road.
Removal of the steering mechanism (steering rack) on a Lada Granta car is carried out for its disassembly and repair in case of failure or complete replacement, as well as when carrying out various works in which its presence will interfere with the progress of their implementation. Prepare a standard set of tools and perform the following sequence of actions:
- Place the car on a jack and remove both front wheels.
- Remove the battery.
- From inside the cabin, unscrew the bolt of the terminal connection between the intermediate shaft of the steering column and the steering gear shaft. The wheels must first be set to a position corresponding to straight-line movement.
- We disconnect the tie rod ends from the rotary arms of the shock absorber struts.
- Next, unscrew the bolts and disconnect the steering rods from the mechanism.
- We unscrew two nuts securing the mechanism to the body studs.
- Remove the clamps from the studs.
- Then remove the rack itself by taking it out through the hole in the left wheel arch.
- Make the necessary repairs, then install in the reverse order.
At this point, the repair work to remove the steering mechanism on the VAZ 2190 has been completed.