The belt tension is determined by its length, so there is no tensioner. Accordingly, when operating the car, tension adjustment is not required. If, due to wear or oiling, the belt begins to slip on the pulleys (this causes a whistling sound), it must be replaced.
To perform the work, you need a special tool for installing the belt 67.7834-9703.
As a last resort, the belt can be carefully installed without a tool, being careful not to damage it.
An inspection ditch or overpass will be required to complete the work.
As operating experience has shown, this method, namely without the presence of a tensioning device, did not justify itself. And therefore we have to install a bracket and a tensioning device from a Lada Kalina car.
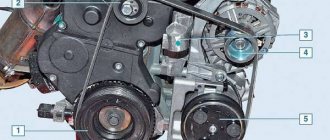
For installation, we buy a bracket with a tensioning device from a Lada Kalina car.
| 1. Install the bracket | 3. To tension the belt, put an “8” spanner on the hexagon of the tensioner adjusting pin. |
| 5. Using a 8-mm head, rotate the adjusting pin counterclockwise. In this case, the tension roller will press harder on the upper branch of the belt, tightening it. | |
| 6. Having tensioned the belt, tighten the lock nut of the stud. |
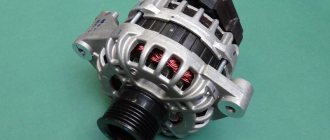
Marking of the generator drive belt is 6K 882 (the belt profile has six V-protrusions, circumference 882 mm).
You need to remember that after installing a new belt after a short period of use, you need to tighten the belt.
Technical regulations for Lada Granta cars
In order to be sure that the car will not fail on the road, you should monitor its technical condition and comply with technical regulations. Maintenance consists of diagnosing vehicle systems and components, identifying and troubleshooting problems. But even if everything is in order with the car, it is necessary to carry out the routine operations provided for in the vehicle’s operating manual.
Experts recommend doing a technical inspection when purchasing a used car and every 15 kilometers. During a visual inspection, you should check the systems and components for leaks, check the reliability of the fastenings, the tension of the belts, and their condition. If necessary, change filters, oils, working fluids, and consumables. In order to bring the car into good working order, you need to buy all the necessary consumables in advance so that they can be replaced during inspection.
The accessory strap is a consumable item that needs to be replaced periodically. In the Lada Granta manual, the manufacturer recommends replacing the belt every 30 thousand km. Experienced drivers advise checking the condition of the belt drive at intervals of 15 thousand km.
The frequency of replacement of consumables is influenced by the following factors:
- terms of Use;
- driver's driving style;
- quality of consumables;
- serviceability of components and mechanisms;
- climatic conditions.
If the machine is operated in difficult conditions, then diagnostics should be done more often. It is recommended to do a technical inspection before a long trip so that the car does not fail along the way.
Causes of premature wear of the RPM
Before you start replacing the RPM, conduct your own diagnostics and evaluate the actual condition of the parts and mechanisms. Perhaps the cause of the malfunction is in another unit adjacent to the generator.
- We open the hood, the engine must cool down so as not to damage the skin of the hand and fingers.
- We put the gear in neutral and turn the alternator belt. Rotation occurs quite easily, by hand, without special equipment.
- We inspect each area one by one.
Signs of wear on the RPM
The following will indicate the need to replace the RPM:
- fraying, side abrasions;
- peeling of rubber, thread fiber;
- other mechanical damage;
- teeth tears;
- the presence of oily traces and streaks on the surface of the belt.
If there are no comments on the RPM, we proceed to inspect the tensioner roller. Often the reason for the appearance of third-party noise is precisely this, worn-out roller bearings. We loosen the structure with our hands and check that it is working properly.
If the belt breaks on the way, it is allowed to travel on the battery's reserve energy, but not more than one hour. In practice, experts recommend no more than half an hour of free movement.
- violation of the deadlines for the prevention of technical means;
- purchase and subsequent installation of non-original, low-quality spare parts;
- violation of the rules for operating the car by the driver;
- third-party mechanical damage resulting in deformation (breakage) of the drive;
- systematic contact with the surface of engine, transmission oil, and cooling system fluid;
- manufacturing defect.
Self-check the condition of the alternator belt
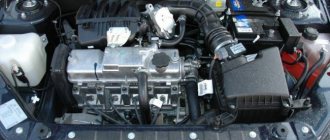
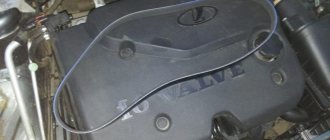
Before replacing an implement belt, drivers should perform a visual inspection to determine if replacement is necessary. To perform this, it must be placed in a stationary state. To prevent the car from rolling during inspection, clamps should be installed under the wheels. The generator belt is located in the engine compartment, and is tensioned on the pulleys of the attachment.
The entire product must be checked. Having examined one area, inspect all the others sequentially, turning the belt. You can make a mark at the place where the inspection began.
The following signs indicate the need for replacement:
- cracks and abrasions on the surface, both internal and external;
- frayed, sides;
- peeling of rubber from rubber;
- mechanical damage;
- traces of oil and working fluids are on the surface.
During inspection, you also need to check the belt tension. If it is loosely tensioned, the generator will not work at full capacity. Too much tension causes premature wear of the bearings and strap. To check the tension, press the belt in a place free from equipment. With a force of approximately 10 kg, the deflection should not be more than 7-8 cm.
If the tension is insufficient, then you need to know how to tighten the belt. The tensioner screw acts as a regulator; it is used to perform tension (video author – Remgar).
When replacing a belt, it is advisable to change the tensioner pulley, which should also be inspected. It should be free of scratches, chips, play, and deformation. The roller should rotate freely without delay. You should not neglect regularly checking the condition of the belt drive.
If the belt breaks on the way, further movement is only possible using the battery. But even if it is fully charged, you can move it for no more than one hour. Therefore, it is recommended to have a spare alternator belt in the trunk in case it breaks.
Basic faults
Failures associated with the failure of the Granta generator lead to discharge or, conversely, overcharging of the battery and its boiling. In both cases, this will make further operation of the car impossible. If the belt is overtightened, problems with high bearing wear will soon arise. If the belt tension is insufficient, slipping will occur and the battery will receive too little charge.
Normally, a working generator produces 14.5 V; exceeding this value is most often due to a breakdown of the voltage regulator. Without urgent replacement of the element, constant recharging of the battery will lead to shedding of lead plates and battery malfunction. If the unit does not produce the required voltage, and it is below 13 V, then the problem may not only be with the regulator, but also with the fact that the brushes are worn out, the diode bridge or windings are damaged.
| Analogs | |||
| GATES 6PK1113 | From 400 – 450 | LYNXAUTO 6PK0823EL | From 400 – 450 |
| GATES 6PK1123 | —/— | LYNXAUTO 6PK0995 | —/— |
| GATES 6PK745 | —/— | AYWIPARTS AW2120354 | —/— |
| LYNXauto 13X1050LX | —/— | AYWIPARTS AW2120037 | —/— |
| LYNXauto 10X938LX | —/— | LYNXauto 10X825LX | —/— |
| LYNXauto 10X750LX | —/— | CONTITECH AVX13X1050 | —/— |
| CONTITECH AVX10X750 | —/— | CONTITECH AVX10X825 | —/— |
| JP GROUP 1118005100 | —/— | FLENNOR A5361 | —/— |
| Cause of malfunction | Remedy |
| The warning lamp on the instrument panel does not light up | |
| Open circuit in the power supply between the generator, ignition switch or the lamp itself. | Check the wiring and eliminate the break. |
| The charge indicator lamp does not go out after starting the engine | |
| Insufficient belt tension. | Adjust the belt tension, replace the belt, and replace the tensioner if necessary. |
| Wear of the brush assembly, short circuit of the windings, malfunction of the diode bridge or voltage regulator. | Replace faulty components. |
| Short to ground in the power wire from the generator to the control lamp. | Insulate the power wire. |
| The generator does not provide sufficient charge | |
| The battery terminals have oxidized. | Clean the terminals and replace them or wire tips if necessary. |
| Battery failure. | Replace battery. |
| Insufficient belt tension. | Adjust the tension and replace the belt if necessary. |
| Malfunction of the diode bridge or voltage regulator. | Replace parts. |
| The battery is being recharged | |
| Failure of the voltage regulator or diode bridge. | Replace components. |
| Voltage drop in the generator-battery circuit section. | Check contact connections, clean or replace if necessary. |
The table shows the main faults. Mechanical and other damage is also possible.
DIY replacement instructions
A Lada Granta 8-valve car requires replacement of the alternator belt in the same way as a 16-valve car after identifying defects or according to the regulations. The procedure can be performed by a driver who does not have much experience in repair work. It is enough to have the necessary tools and basic knowledge of where the components that require replacement are located.
Tools and materials
Before replacing, you need to purchase a new alternator belt. In order not to make a mistake with your choice, you should look at the catalog number in the operating instructions. It should be 1118-1041020-07. The size should be 823 mm.
You should buy originals so as not to buy a fake or low-quality product. The packaging should be marked 6РК 823. You should not save money by buying a cheaper product. A low-quality belt will not last long, and the consumables will have to be changed earlier than required by regulations. High-quality belts are produced by Bosch and Gates.
You should also buy a tensioner pulley if you decide to change it too.
In addition to consumables, you need to prepare the following tools:
- a set of keys;
- TORX E-14 head;
- long screwdriver;
- jack;
- emphasis
Stages
The installation procedure on a Lada Granta with air conditioning is complicated by the fact that the strap passes through the support of the power unit. Therefore, before putting on a new strap, it will have to be dismantled.
Replacement consists of the following steps:
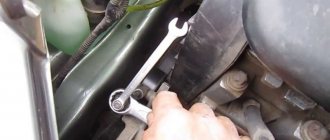
- First, using a “19” wrench, you need to loosen the lock nut of the strap tensioner lead screw. While unscrewing the locknut, hold the screw with the head at “8”.
- To loosen the belt tension, rotate the lead screw in the direction of movement clockwise. By following these steps, you can adjust the tension of the accessory drive belt.
- To replace the strap, you need to remove the right engine mount.
- Having moved under the car, you need to dismantle the right and middle protective shields of the engine compartment.
- Then unscrew the fastenings in the middle and front part of the right front wheel arch liner. Next, bend the fender liner behind the wheel brake disc.
- Using a jack, we hang the right front wheel and dismantle it. The fender liner fastenings can now be released.
- At the next stage, we place a stop under the oil pan of the power unit so that it holds the weight of the engine.
- Using a TORX E-14 head, unscrew the screws that secure the support to the cylinder block bracket of the power unit. Using the “17” socket, unscrew the two nuts and the support bolt that secures it to the body side member.
- We dismantle the engine mount with the cushion.
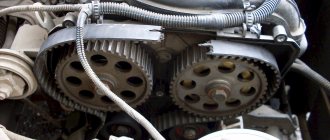
- Now, through the resulting opening, you can remove the strap from the pulleys of the auxiliary units and pull it out of the engine compartment.
- We install a new consumable in place of the worn-out product. In this case, its tension should be adjusted using the tensioner screw. The deflection of the belt in the gap between the air conditioner compressor and the power unit pulley with a force of 10 kilograms should be within 7-8 mm.
- We perform assembly in the reverse order of removal.
This completes the replacement. Now you know how to replace and tighten the generator set belt on a Lada Granta.
Photo gallery
1. Loosen the adjusting screw.
2. Unscrew the fastenings of the fender liner.
3. Remove the strap from the pulleys.
4. Check the quality of tension.
Replacing a generator on a car with a 16-valve engine
Dismantling and subsequent installation of the device on Grant modifications with a 16-valve power unit have their own characteristics: there is a belt tensioner. Therefore, the procedure for removal and installation is somewhat more complicated. As in the previous case, you will need a standard set of tools, and before starting work, the negative terminal of the battery is disconnected. It is necessary to remove the engine protection, if any. After this, you can begin to remove the unit by following these steps:
- Disconnect the wiring harness from the generator.
- Remove the cap covering the power wire.
- Using a “10” wrench, unscrew the nut that holds the wire tip.
- Use a key set to “13” to loosen the tension bar nut.
- Loosen the belt by unscrewing the adjusting bolt to the left.
- Move the generator to the right and remove the belt.
- Unscrew the adjustment bolt completely and remove it.
- Remove the tension bar.
- Unscrew the fastening nut from below.
- Remove the bushing and remove the bolt holding the lower mount.
- Remove the generator.
To install, do all the steps starting from the end, then tighten the belt.
Video “Replacing the generator set belt”
This video demonstrates how to remove and replace the alternator strap on a Lada Kalina (the author of the video is Alexander).
Most modern cars have a tensioner on the alternator belt, which requires some special features during repair work or when replacing the belt itself. But in Lada Granta models that use an eight-valve engine, the manufacturer does not provide a belt tensioner. So replacing the alternator belt needs to be done a little differently.
What tools and auxiliary materials are needed?
To successfully replace a Lada Granta car, you should stock up on the following list.
- Naturally, with a new “consumable” (belt).
- A piece of soft wire or a suitable cord.
- Socket head (13th dimension).
- Regular keys.
- With a pry bar (shovel) or, alternatively, a heavy-duty screwdriver.
Technical regulations Lada Granta
The alternator belt is located under the alternator itself
If you rely on the manufacturer’s technical regulations, then the belt should be checked at least once every 15,000 km. And every thirty thousand kilometers, this belt needs to be replaced.
That is, it turns out to be a cycle with an interval of fifteen thousand kilometers, in which the alternator belt is alternately checked and replaced.
And, given that the tensioner, as such, is not used, the belt is focused solely on one-time stretching during installation.
There are options for reusing the belt, but this practice is highly discouraged.
Let's summarize
To work with the generator and to replace the belt you need:
- set of spanners, Torx t20 and 27, ratchet with heads or wrench, knife;
- if there is no tensioner, you can assemble and install it;
- if there is no air conditioner, replacement is easiest;
- is there air conditioning? To work, you need a pit or a lift with dismantling the engine support;
- They change consumables every 30 thousand mileage according to regulations.
Write comments and share your experience.
Source
We check the condition of the alternator belt ourselves
To make sure that the belt is in good condition, you need to perform simple steps. Initially, fifth gear is engaged. On it, leaning on the front bumper, we try to push the car back. At the same time, we are trying to conduct a visual inspection of the belt along its entire length.
All the grooves have been cut off, the belt is on the verge of breaking
There, according to the general rule, there should be no cracks, even the smallest ones, as well as ruptures and peelings.
which occur due to long-term use of rubber products.
This belt is no longer any good.
If such problems are found, the belt must be replaced. Likewise.
It’s also a good idea to check the external one, as its quality raises questions. Don't forget to inspect the generator roller.
The belt is already bad, but the generator pulley is still good
Alternator belt replacement process
To carry out the replacement work, we will need the alternator belt itself, which can be purchased from official dealer representatives at a price of approximately 800 rubles.
Standard article number for alternator belt: 1118-1041020-07
- The length of this belt is 823 millimeters.
- You can find it in the catalog by name or by your own unique number 1118-1041020-07.
- The marking on the box will indicate the index 6РК 823.
In addition, prepare in advance a sufficiently long screwdriver, as well as a “13” key. You may also need a knife to remove the old belt.
After this, all that remains is to take care of tightening the lower bolt and the nut of the upper generator mounting bolt. This will be enough to set everything in place.
Alternative options
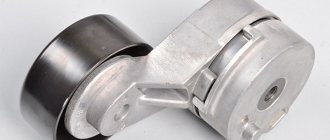
Of course, many car enthusiasts are well aware of the consequences of not having a belt tensioner. The fact is that the belt, quite often, is overtightened, which leads to too rapid wear of the generator bearing. You can recognize this problem by a characteristic sound reminiscent of a howl. This design flaw can be eliminated by installing a generator belt tensioner. The most common option is to install a tensioner from the Lada Kalina.
Installing the alternator belt tensioner
The reason for abandoning the tensioner is simple. The manufacturer tried to save additional money by making the car one of the most affordable in the world. And this is typical only (standard and), which are supplied.
To make it easier to control the belt tension, you can simply replace the generator bracket by pre-modifying it.
On the left is a bracket with a tensioner from Kalina, on the right is the standard version from Granta
In the standard bracket you will not find holes for the tensioner pulley. Instead, you can assemble a new bracket, which will be based on the base of the first generation Lada Kalina. As we already said, we will need:
- the bracket itself is from the specified car,
- tension roller,
- tensioner pulley bracket,
- as well as the alternator belt itself, all from the same Lada Kalina of the first generation.
- In addition, do not forget about purchasing a screw tensioner, the corresponding bushing and bolt.
The price of this entire set reaches two thousand rubles, for which you can significantly improve the design of the car and extend the service life of individual parts.
The replacement process itself is similar to replacing standard Lada Granta parts. However, if you do not have the appropriate technical knowledge, then you should contact a service center to assemble the structure.
conclusions
This technical “mistake” did not happen by accident. The fact is that the Lada Granta was developed with a low retail price in mind. And, given the depreciation of the ruble, this car managed to enter the top ten cheapest cars in the world. At the same time, the equipment of the Lada Grant is much higher than that of its competitors on the list.
And some problems, like the alternator belt tensioner, can be solved yourself. Only consider warranty issues that may be violated during installation.
How to change the alternator belt on a Lada Grant with your own hands
Lada Granta cars, like other vehicles, are equipped with a generator designed to power electrical equipment components while driving. If there are malfunctions in the operation of this device, first of all the driver pays attention to the condition of the belt. Below we will talk about how to replace the alternator belt on a Lada Granta car with air conditioning.
Technical regulations Lada Granta
If you decide to change the belt or belt tensioner of the alternator (RG) on a Grant with an 8-valve engine, you must follow the technical regulations of the manufacturer. According to these data, the Lada Granda alternator belt should be checked every fifteen thousand kilometers. And every 30 thousand kilometers a replacement procedure must be carried out.
White Lada Granta
In other words, the owner of an 8- or 16-valve Grant must carry out a diagnostic or replacement cycle every 15 thousand km. And if we take into account that a tensioning device, as such, is not used, then the RG is completely intended for one-time stretching during its installation. Of course, you can tighten the replaced RG on an 8-valve engine, but the manufacturer does not recommend this.
We check the condition of the alternator belt ourselves
Before replacing the Lada Granta alternator belt, car enthusiasts usually check its condition to make sure whether this is really necessary. To diagnose, you need to follow simple steps. First, you need to engage fifth gear and get out of the car, and then try to push your Grant back, working on the front bumper or side pillar, if an assistant does this. In this case, the hood must be open and while pushing it is necessary to see how the RG behaves.
Worn and damaged RG, unsuitable for use
There should be no signs of damage on the strap when pushing the car. We are talking about cracks, delamination or breaks, even the most minimal ones, although this is quite possible, especially if the vehicle is used frequently. If during the diagnostics you notice traces of damage on the RG, this indicates that it will not be possible to tighten the belt - it needs to be replaced. The timing belt is diagnosed in a similar way.
If you don’t need to tighten the RG and adjust the tension on an 8-valve engine, you can also check the condition of the generator itself. After all, if you have any suspicions about the quality of the work of the DG, it makes sense to check the device itself. In addition, during diagnostics, you can also check the generator belt tensioner pulley, with which the belt can be tensioned. If there are chips on the roller or other signs of deformation and damage, including changes in geometry, the element must also be replaced. Below are detailed instructions for replacing the bracket, as well as the alternator strap on a Lada Granta car (the author of the video is Igor Semenishin).
Replacement instructions
The procedure for replacing the RG is quite complicated and responsible. If you make a mistake during the steps, this may lead to the strap breaking while the car is moving. Of course, it will be possible to continue driving to the nearest service station or garage, but you will lose not only the money spent on the purchase of the RG, but also your own time. Therefore, think several times before whether you can do everything yourself and whether it is advisable - perhaps it makes sense to simply pay specialists at the service station. But at the same time, you will be sure that everything was done correctly, and if problems arise, you will have someone to file a claim with.
Tools and materials
New alternator belt for Granta with article marking
So, if you decide to replace the cylinder head on an 8-valve engine yourself, below you will find instructions on how to complete this process. In order to do everything yourself, prepare the strap itself. There is one more point here - the purchase of all parts and consumables for repairing an 8- or 16-valve engine must be carried out from representatives of an official dealer. Today the cost of such a RG is around 12-15 dollars or 700-1000 rubles.
Naturally, you can always go to the market and buy a strap at a lower cost, but think about it - is this advisable? Today, even parts for domestic cars are counterfeited, this is no secret. Are you sure that the 200-300 rubles saved are worth it?
If you make a purchase from officials, please note that the article number of the new RG is 1118-1041020-07:
- The length of the strap must match exactly - it is 823 mm. Do not measure the RG that was installed on your car, as if it is stretched, its length will be longer, this can be confusing.
- The strap box must be marked 6РК 823.
You only need standard tools:
- wrench 13;
- long screwdriver;
- in some cases you may need a knife to cut off the old RG.
Algorithm of actions
So, how is the procedure for replacing the RG on the domestic Lada Grante:
- First of all, open the hood - you need to get rid of the old worn out belt. If the strap is very stretched, you can simply remove it by removing it from the pulleys. If not, then use a knife and cut the RG, this option will be the most convenient.
- Next, you need to find the bolt that secures the lower mount of the generator device. Try to loosen it a little, you don't need to unscrew it completely. The bolt is unscrewed using a pre-prepared wrench.
- Using the same wrench, you need to unscrew the nut. After these steps, the screw of the upper clamp of the generator device is completely removed.
- After these steps, be especially careful. You need to try to rotate the generator device so that its upper eye can go beyond the surface of the protrusion, which is located directly on the bracket itself. When you manage to do this, the generator itself must be completely pressed against this bracket; using ordinary wire, the device must be fixed in this position. In practice, the best option would be to press the device against the cylinder head cover fixing nut.
- Then the new RG must be carefully placed on the generator pulley. The strap is also placed on the surface plane of the unit drive shaft. Do this carefully so as not to damage the belt. When the RG is in place, make sure that it is installed level; any bends in the end parts are not allowed.
- Now you need to turn on fifth speed again. Ask an assistant about this, since when you engage the gear, you need to simultaneously press the strap against the shaft itself. When this position is reached, the vehicle will need to be pushed back a little. The machine is pushed until the newly installed strap is completely in place.
- When you are sure that the generator is securely installed and fixed, you can remove the wire with which you pressed the generator to the head of the block. Using a screwdriver, the generator device is pressed away from the point of contact with the bracket. When all these steps are completed, all that remains is to replace the upper assembly fixing screw. Also, we must not forget about the lower bolt with the upper fastening nut - they need to be tightened.
As you can see, in general, the process of replacing the alternator strap on the Lada Grant is not particularly complicated, but this procedure requires a competent approach and certain skills. Therefore, the only requirement that must be observed is to be as careful and attentive as possible. And if possible, ask someone to help you - at one stage you will need an assistant.
With him
Using the E-14 head, unscrew the two screws securing the support to the engine cylinder block bracket. Using the “17” head, we unscrew the two nuts and the bolt securing the support to the body spar (shown by arrows). Using the E-14 head, we unscrew the two screws securing the support to the engine cylinder block bracket. Using a 17mm socket, unscrew the two nuts and the bolt securing the support to the body side member (shown by arrows).