As you know, the Lada Kalina generator belt (belt of attached units) gradually wears out, stretches, etc. during the operation of the car. For this reason, you should constantly check the tension of the generator belt, and also assess the condition of this element for delamination, cracks and other defects.
The fact is that if the alternator belt is worn out or loose, the alternator itself may work worse, which leads to problems with charging the battery. You can also note the appearance of extraneous noise (for example, the alternator belt whistles or makes noise). In such a situation, a worn belt needs to be changed or, at a minimum, tightened if possible. At the same time, the condition of the generator belt rollers should be checked.
It often happens that the belt itself is in good condition, without obvious defects. However, it cannot be tensioned due to the fact that the Kalina belt tensioner has failed. Next, we will look at how to replace the alternator belt on Kalina with your own hands, as well as how to change the Kalina tension roller.
Belt selection, catalog number, price
Each belt in a car has its own service life and resource, and therefore requires periodic replacement. So what kind of alternator belt should be installed on the 8-valve Lada Kalina and how is this done?
Original number and belt size:
- Knowing the original catalog number. Using it you can easily find a suitable belt, without knowing the size or teeth.
- By size and type of teeth (number of ribs = 6, size = 1018 mm). Belt marking for Lada Kalina with 8 valves – 6PK1018 .
Gates 6pk108 - ideal price/quality ratio
This is the standard size that fits this car. The teeth of the generator belt on Kalina do not run across the base of the court, but along it, having 6 strips that are installed on the corresponding pulleys.
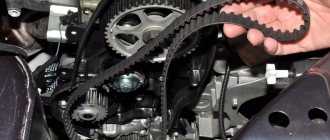
It is worth considering that the replacement of the alternator belt also includes a tension roller, which wears out along with it. When performing the replacement process, it also needs to be replaced.
When choosing a belt and roller, the motorist faces a difficult task: original or analogue. Both are good. But what should you do if you don’t have a belt with you when buying in a store?
Alternator belt items for Kalina
- The original article number for the alternator belt for the 8-valve Lada Kalina looks like this: 1118-1041020. The average cost in the Russian Federation is 750 rubles.
Analogue of the original alternator belt 1118-1041020 - 6PK1018
- The original alternator belt pulley costs about the same, about 750 rubles. and has a catalog number - 2123-1041056. In total, a set of spare parts for replacing the alternator belt with an 8-valve Kalina will cost the owner 1,500 rubles.
Old roller and new 2123-1041056 generator belt tensioner pulley
Table of alternator belt analogues for the 8-valve Lada Kalina
| Manufacturer | Catalog number | Price in rubles |
| Luzar | LB 0190 | 750 |
| Contitech | 6PK852 ELAST | 1000 |
| Gates | 6PK823SF | 1150 |
| LYNXauto | 6PK0823EL | 1200 |
All belt analogues performed quite well and won the trust of motorists.
Table of alternator belt roller analogues for the 8-valve Lada Kalina
| Manufacturer | Catalog number | Price in rubles |
| Trialli | CM 123 | 800 |
| Master-sport | 21230-1041056-10-ST-PCS-MS | 1000 |
| Pilenga | PT-P 1523 | 750 |
Replacing the alternator belt: step-by-step instructions
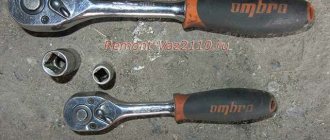
First of all, to replace the alternator belt with 8 valves, the Lada Kalina will need a tool: a 19 wrench, a 10 wrench and a 8 socket wrench. Now you can proceed directly to the replacement process:
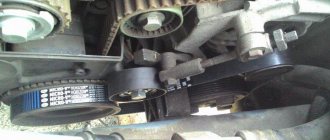
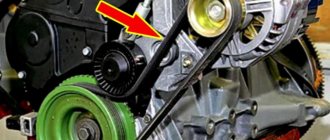
- The alternator belt is located on the left side of the engine.
- Use a wrench to loosen the tensioner to release the belt. Loosen the tensioner pulley.
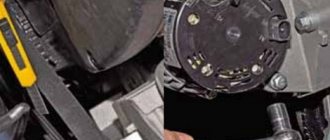
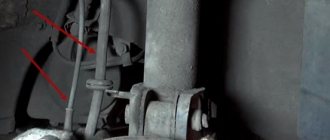
- Unscrew the adjusting rod with an 8 mm wrench. Using a 13mm wrench, unscrew the lower fastening of the tensioner mechanism.
- Pull the bar up and remove the belt. The belt tension bar is lowered.
- Now you need to remove the tensioner assembly.
- Unscrew the tensioner fastening and remove it.
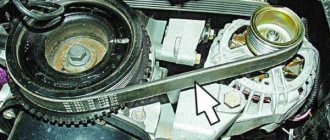
- Reassemble in reverse order. The new belt is being prepared for installation.
Loosen the tension roller.
The belt tensioner pulley is down.
The new belt is being prepared for installation.
The tightening torque must be strictly observed. Too little voltage will not allow the generator to operate at normal speed, which will lead to a drop in voltage in the on-board network. Too much - leads to “jamming” or tearing of the tape.
Russian know-how, conventional market scales for alternator belt tension force
Recommendations
Experts recommend replacing the alternator belt on an 8-valve Kalina every 25,000 km, and AVTOVAZ every 30,000 km. However, it is worth considering that the condition of the belt must be constantly checked. Because a breakdown can happen even after 10,000 km.
Gates belt - mileage 40,000 km, no cracks visible, nothing critical, but it is better to replace the belt.
Replacement of this element is not limited by time, but is determined by the condition of the alternator belt. By constantly monitoring the condition, fractures and other negative effects can be prevented. At the same time, drivers are recommended to carry a spare belt so that it can be changed at any time on the road.
Determination of malfunction and replacement time
Determining a faulty alternator belt is quite simple. Let's look at the main indicators:
- Whistle in under engine space. It appears when you increase the speed of the gas pedal, and the current in the bot network increases.
- Tightening the belt had no effect and the whistle remained.
- Cracks or elasticity in the belt.
Bad alternator belt, bad - teeth torn (torn off)
- Frame deformation, eversion.
The crack on the alternator belt is clearly visible
All these malfunctions indicate that it is time to replace the alternator belt on Kalina. Otherwise, it may break at the most inopportune moment.
Torn belt on one of the Kalinas
Let's sum it up
Taking into account the above information, it becomes clear that the Kalina generator tensioner is no less important than the belt itself. In practice, the presence of a tensioner allows you to increase the service life of the generator bearings. The main thing is to use this solution correctly, avoid over-tightening the belt, and also maintain and change the tensioner if the mechanism fails.
We also recommend reading the article on how to replace the timing belt on a VAZ 2114 with your own hands. From this article you will learn about the features of the replacement, how to replace the VAZ 2114 timing belt, as well as what subtleties and nuances you should pay attention to as part of this procedure.
As a result, let us remind you once again that the quality of the generator’s operation and battery charging will directly depend on the condition of the tensioner and the alternator belt itself. Also, if the belt slips, malfunctions in the operation of other attachments cannot be ruled out. For this reason, the generator belt must be checked regularly, as well as the belt and tensioner itself must be changed according to regulations or, if necessary, in case of emergency situations.
Recommendations for choosing a belt drive
Gates
drive as standard .
As a replacement on the first models, you can use Dayco 825
.
Here you need to take into account that elastic specimens are marked with the “ Poly-V
” symbol; if it is absent, the product has a rigid structure.
Alternative drives for VAZ 1118 with air conditioning
:
- Roulunds Rubber 6PK1015;
- Dayco 6PK1005;
- Bosch 6PK1015;
- Gates 6PK1019.
Alternative drives for VAZ 1118 without air conditioning
:
- Bautler 6PK883;
- Dayko 6PK888;
- Finwhale BP6 883;
- Luzar LB 0118 1118-3701720 6РК 884;
- Roulunds Rubber 6PK884;
- BRT 882 mm (Balakovo plant).
Drive system repair
Snapshot53252323
Marking of the drive belt for auxiliary units 6РК 995 (six-V-ribbed, length - 995 mm).
Marking of the drive belt for auxiliary units 6РК 995 (six-V-ribbed, length - 995 mm).
In order to improve visual control, remove the plastic engine casing. To check the condition of the belt, engage fifth gear in a manual transmission, push the car (or rotate the suspended wheel) and inspect the belt along its entire length. On a car with an automatic transmission, remove the right mudguard of the engine compartment and, by rotating the crankshaft by the bolt of the auxiliary drive pulley, check the condition of the belt.
With any of the gearboxes, the following method is also possible: apply chalk marks to sections of the belt and, turning on the starter for short periods of time, turn the crankshaft at small angles. We inspect the belt along its entire length, checking the areas covered by the marks.
The belt should not have cracks, tears or separation of rubber from the fabric base. A defective belt must be replaced. To do this, from the engine compartment side...
When is it time to change?
On Lada Kalina cars, the manufacturer does not regulate the replacement of this part. However, its failure is a common problem. In particular, we are talking about Lada Kalina cars. This applies to both 16-cl and 8-cl engines.
This is what a deformed element of a Kalina generator with an 8-cyl internal combustion engine looks like
Therefore, let’s look at the signs that indicate that the belt may fail in the near future:
- Whistle when moving. As a rule, this whistle appears when the electrical appliances of the vehicle begin to load. For example, if you start the car, and when you press the gas, a loud whistle is heard from the engine compartment, this indicates that the belt is loose. In this case, it must be tightened using a tensioner or replaced.
- Cracks on the strap. If you open the hood, look at the belt and see cracks on it, then you know that it’s time to change the element. Neither tensioning nor adjusting the rollers will help here. The component can be tightened, but this will not be enough for a long time. The only option left is replacement.
- Deformation. As in the previous case, neither tightening the tensioner nor adjusting the rollers will give much effect. You just need to change the element.
- Noise when the engine is running. If the element has already served its service life, this can be understood by the noise that appears when the motor is running. For example, some Lad Kalin car owners report loud knocking and even impacts when the engine is running.
The assembly is disassembled: this is what the strap looks like on the shafts
If the vehicle is equipped with a generator sensor that determines its performance, then it will be easier to identify the malfunction. For example, if you heard a whistle from under the hood, and at this time the indicator on the sensor came on, then you need to pay attention to the strap. This indicates that the belt needs to be tightened, since it may be in a weak state or that its service life has been exhausted.
One way or another, if the slipping and whistling of the strap cannot be eliminated by adjusting the belt or rollers, it needs to be changed.
Purpose of the belt
The generator is used to generate electricity, which powers the entire on-board network of the vehicle along with the current collectors while driving. This unit is also used to recharge the battery. Without these important features, the car can only function for a short time until the battery is completely discharged. This aspect prompts LADA Kalina owners to check the condition of the belt drive more frequently, so that its breakage, which suddenly occurs far from a populated area, does not cause a flurry of hysteria and frantic searches for the phone in order to call for help.
Experienced drivers here show their thriftiness when they take on board a new alternator belt, fortunately this consumable component has negligible weight and dimensions.
Our material is intended to help those owners who, due to lack of proper experience, silently shrug when asked about the purpose of the belt. In most modern engines, the generator unit is driven through such a transmission. The generator belt itself is in a tense state between the crankshaft pulleys and the LADA Kalina generator itself. With the start of rotation, electrical power is generated, which is sent through a rectifier device to all switched-on current collectors of the vehicle, including the battery.
Replacement in 16-valve version
Such Lada Kalina engines are equipped with air conditioning, which makes the replacement procedure slightly different from that previously indicated for an 8-valve engine.
- We remove the loosened and dismantled belt from the pulleys through the bottom of the engine compartment.
- For this purpose, we release one of the engine mounts.
- You will also need to lift the car and remove the right front wheel.
- After these manipulations, we dismantle the fender liner on the corresponding side and the crankcase protection of the unit.
- Now we remove the weakened support, after first lifting the engine sump with a jack (through a wooden or other gasket).
- Then carefully lower the unit until it becomes possible to remove the belt.
- We perform installation using the reverse algorithm.
conclusions
Replacing the belt and generator roller on an 8-valve Lada Kalina is very easy and simple. A wide range of product choices will not suit every consumer's taste. Moreover, even analogues of original parts are of fairly high quality. Diagnosing faults is easy and can be done by any motorist.
I didn't think it was that simple. Before, I didn’t even really look under the hood, but now I’ve changed the belt itself to a new one. Useful material.
Some kind of bullshit. A belt with a length of 1018 is for Kalina with an air conditioner, but for cars without an air conditioner the belt is shorter, I don’t remember the exact numbers. Everything in the article is mixed up. The torn timing belt was especially annoying, even though it was an alternator belt. Even on Kalina with an air conditioner, in order to change the belt, just the 1018th, you will have to remove the engine mount.
Source
Replacement cost
The cost of changing a belt on a Lada Kalina car depends on the type of engine, range of units and is:
- for a motor without a tensioner - from 300 rubles;
- engines with a tensioner without air conditioning - from 150 to 350 rubles;
- motors with tensioner and air conditioning - from 220 to 400 rubles;
- for unit 21127 - about 600 rubles.
Replacing the roller will require an additional 250 rubles. The total amount required by the car owner to purchase spare parts, in the maximum version, will not exceed 850 rubles.
What is it needed for?
As mentioned above, any vehicle is equipped with such an important device as a generator. If it fails, the operation of the vehicle will be impossible. Therefore, special attention should be paid to the performance of all elements of the device, be it a Lada Kalina with a 16- or 8-cl. engine, with or without air conditioning. What is the component size? How is the roller strap adjusted and replaced? How to tighten up? You can find out the answers to these questions in the article.
Car Lada Kalina tuning
Before answering questions that interest Lad Kalin owners, you should understand why this component is needed. Not every motorist knows what role he plays in the functioning of the car.
In modern cars, this belt is the only element that allows you to transmit crankshaft rotation to the generator. When the crankshaft transmits rotation to the device pulley, energy appears in the vehicle's electrical network, thanks to which all electrical equipment operates.
Repair technology for the auxiliary drive system
The sequence of actions is similar for both models with and without air conditioning and consists of the following points:
- Remove the engine protection.
- Remove the right wheel and fender liner.
- Remove the expansion tank.
- Jack up the right side of the engine and unscrew the mount.
- By tightening the tensioner mechanism pin, loosen the belt tension.
- Remove the drive from the roller and then from all pulleys.
- Install the new part and reassemble in reverse order.
- Adjust the tension.
Snapshot
We put the belt on generator pulley 2 and the upper part of generator drive pulley 1.
We put the belt on generator pulley 2 and the upper part of generator drive pulley 1.
We engage fifth gear in the gearbox and, pressing the belt against the generator drive pulley, push the car back until the belt fits onto the pulley. Untie the wire.
Snapshot1
... using a screwdriver, pressing the belt against the outer edge of the generator drive pulley until the belt comes off the pulley.
... using a screwdriver, pressing the belt against the outer edge of the generator drive pulley until the belt comes off the pulley.
[14 Lada Granta maintenance operations that will help you save]
[How to save money on scheduled maintenance of Lada Granta] [Maintenance of Lada Granta at 2.5 thousand km] [Maintenance of Lada Granta at 15,000 and 105,000 km] [Maintenance of Lada Granta at 30,000 and 60,000 km ] [Maintenance of Lada Granta at 45 thousand km] [Maintenance of Lada Granta at 75 thousand km] [Maintenance of Lada Granta at 90 thousand km] [Carrying out maintenance yourself - general recommendations] [Safety rules for doing it yourself carrying out maintenance] [Tools required for maintenance of Lada Granta] [Lamps used in the Lada Granta car]
Lada Granta and Kalina: checking and replacing the alternator drive belt
2302-6-01-03_cr
Holding the nut, rotate the lead screw clockwise, loosening the belt tension.
Holding the nut, rotate the lead screw clockwise, loosening the belt tension.
So far, we have shown operations that will allow, if necessary, to change the tension of the accessory drive belt. But to replace the belt, we have to dismantle the right support of the power unit, since it passes through the belt.
From the bottom of the car, remove the middle and right mudguards of the engine compartment. You can see how to do this in the article “Replacing Lada Granta coolant”. Next, we should remove the fender liner of the right front wheel or, having freed all the fastenings of the fender liner in the front and middle parts, bend the fender liner by the brake disc of the wheel.
We hang and remove the right front wheel and release the fender liner fastenings according to the diagram.