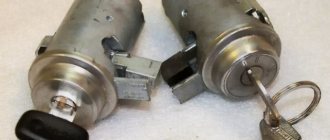
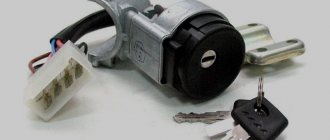
The ignition switch in cars of the VAZ family fails from time to time due to weakening of the contact posts or burning of the contacts inside it. It also happens that the cams of a plastic roller are produced. You can disassemble the lock and clean it, but it’s better to just replace it with a new one, considering that it costs pennies compared to imported locks.
But if connecting the wires together did not result in the starter operating (or it did not turn on the first time), check the solenoid relay on the starter. The contact spots on it may also burn out, which will prevent the circuit from closing normally. Alternatively, you can use a screwdriver to short-circuit the two large terminals on the solenoid relay (before doing this, put the car in neutral and use the handbrake). When closed, the starter should begin to spin vigorously. If this happens, remove and change the solenoid relay. If the starter rotates “sluggishly” when it closes, you will have to remove it and check the condition of the brushes.
All operations are performed with your own hands, without the help of car service specialists. Moreover, the price of an ignition switch on a VAZ2106 is up to 100 rubles. To replace it, you will need to know the pinout of the wires coming from it, for which the editors of the site 2 Schemes.ru have prepared a large reference material.
The ignition switch is designed not only to start the engine - it performs several functions at once:
- supplies voltage to the vehicle’s on-board network, closing the circuits of the ignition system, lighting, sound alarm, additional devices and instruments;
- at the driver’s command, turns on the starter to start the power plant and turns it off;
- turns off the power to the on-board circuit, preserving the battery charge;
- protects the car from theft by fixing the steering shaft.
Troubleshooting Methods
There are two methods for detecting faults:
- Visual;
- Diagnostic.
We suggest studying a visual method for determining a malfunction or breakdown of the contact elements of the ignition switch using the table.
| Action | The device is working properly | The device is faulty |
| Turn the key to the right position (ignition) | All electrical equipment turns on | All or part of the electrical equipment does not work |
| Turn the key to the second position | The starter is spinning | The starter does not work, the traction relay does not click under the hood |
But diagnostics allows you to get a more detailed answer. In addition, a visual inspection will not give you the opportunity to find all the reasons that could cause the ignition switch to break down.
To work, you will need a mini-tester and a multimeter in ohmmeter mode:
- Disconnect the power supply from the ignition switch. To do this, you need to remove the skin from the steering column;
- Switch your multimeter to an ohmmeter;
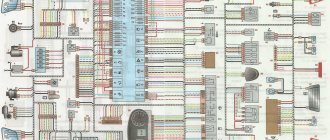
- On the block coming from the lock you need to find pins 7 and 4, which correspond to pins 15 and 30;
- Connect the multimeter probes to them;
- Turn the key to the “Ignition” position;
- On the block, find pins 7 and 3, corresponding to 50 and 30. Also connect a multimeter to them;
- Turn the key to the second position - Start the engine;
- If serviceability is present, the device will show zero resistance in both test cases.
Simple and fast
The easiest way to deal with the power source is the battery. Sometimes it tends to run out of charge, and if it started to run out recently, you might not have noticed it yet. If you have a voltmeter tester, checking is a matter of seconds. If it is not there, you can use the old-fashioned method (although it is not very approved by firefighters): remove the wires from the terminals and rub them against each other.
There is a spark (which is why the firefighters are protesting) - the battery is working. If you don’t want to violate safety rules, just listen to the car’s reaction: a slight jolt at the first stage directly indicates a low battery.
The second reason, equally common and easy to eliminate, is oxidation of the terminals or their contamination. Clean them with a wire brush (probably lying in the trunk) - and the car will start.
The next thing to check is the fuses
. They often burn out, and most more or less modern cars have an ignition control. The circuit is removed from the glove compartment and it becomes clear which one needs to be checked; if it burns out, replace it, and that’s the end of it.
Why you may need to replace the ignition switch
VAZ 2114 injector ignition switch diagram: device connection features
There may be several reasons for this problem, the most common of which are:
- The lock is broken; after all, it is constantly subject to wear and tear.
- Lost keys.
- Damage caused by attempted theft.
- Malfunction of the connector with wires.
The malfunction can be easily determined when the engine is turned on, if the sound of the starter is not heard, the relay clicks, or the electrical equipment simply does not turn on. There are several ways to determine the source of the problem:
- diagnostic;
- visual.
First you need to check the car's reaction to different positions of the key in the lock. To begin with, the key must be set to position number one, which is also the ignition. If the module is in order, all the car's electrics should work. However, in the case when all or part of the electrical system does not work, we can conclude that the lock is damaged.
In position number two of the key, the engine starts, for which the starter is turned on. If, when you turn the key, you do not hear the sounds of the starter operating (rotation), as well as the sound of the relay clicking, then either the ignition switch or the starter itself is broken. In this case, you need to run a diagnostic to get other details about the problem.
In this case, you will need a multimeter set to ohmmeter mode. Also, before removing or installing the lock, you need to remove the steering column cover.
- +12V comes for the inserted key sensor microswitch;
- the mass comes when the driver's door is open;
- +12V goes to the starter (pin 50);
- +12V goes out after turning on the ignition (pin 15);
- +12V goes out when the key is inserted to pin 5 of the BSK;
- comes +12V to illuminate the lock cylinder;
- +12V comes from the battery (pin 30);
- not used.
- The first thing to do is disconnect the ignition switch power connector.
- After this, connect the multimeter to wires four and seven, and then do the same with wires fifteen and thirty, respectively.
- Turn the key in the lock to position number one. If during testing the node is not damaged, the multimeter should show a zero resistance value.
- Next you need to turn the key to position number two. The resistance on the multimeter screen, as in the case described above, should have a zero value.
In a situation where, after checking the lock with a multimeter, the resistance value in at least one of the cases was not equal to zero, it needs to be replaced. Otherwise, the lock is working properly and other components of the car should be checked for malfunctions. It is necessary to prepare spare parts and other equipment for work.
A new ignition switch will be needed. It is quite easy to find original parts and analogues on the Internet, but it is worth considering that it is advisable to purchase the lock “assembled”.
Catalog number of the original VAZ 2114 ignition switch: 21103704010. Approximate price: 500 rubles for a used part and 1200 for a new one.
As a replacement, you can use analogues with numbers: 09401, 24370407. Approximate price: 1000 rubles (new part). In addition to the lock itself, you will need the following tools:
- spanners;
- chisel;
- pliers;
- screwdriver.
Before you begin, you must also remove the steering column cover and steering column switches.
Problem with engine starting and dashboard 2115
Hi all.
I continue the stories of malfunctions and breakdowns in my little spot. So, without having time to eliminate the engine knocking (axial runout of the camshaft), another malfunction appeared.
I'll start with some background. Yesterday I drove it, came home, parked it for the night, everything was as usual. In the morning I had to go on business, it was lightly frosty outside (-7), the car was covered in snow, I decided this time to completely clean it first and then warm it up. So, I cleaned it, sat down, started it without problems, and literally a second later it stalled and no matter how much I tried to start it, nothing worked.
2. I heard somewhere that it may not start due to a broken timing belt. I took off the cover, looked, everything is in order.
3. I looked at the spark plugs and didn’t see anything criminal either.
4. I have the last option left, this is a fuel pump, since lately the fuel level has been either Max or Min. I decided to listen to see if it works. I reclined the seat, put the key in the ignition, turned it over and nothing, no sounds... I disconnected the chip, looked, the contacts are normal. I thought, well, that’s it, screw it, the fuel pump is in trouble and needs to be replaced. And then I remembered one more moment...
5. On the passenger side, in the legs, under the dashboard, there are some relays and fuses, I began to study. I took out the topmost 15 amp fuse, I looked, and it had blown. I reached under the hood and took the turn signal fuse (15 amp), installed it, turned the key, the engine tried to catch, but it wouldn’t start and the starter just started turning again. I looked at the fuse and it was blown again. (Photo 1)
I began to study this problem on the Internet and found one piece of advice that you can disconnect the chip from the fuel pump and try to start it. If the fuse survives, then the fuel pump is damaged; if it is blown, then the problem is somewhere in the wiring. I ended up with the second option. I went to check the wires under the dashboard, and there were a lot of them there for me, I felt them, moved them, looked and decided to start it again, and lo and behold, it started.
But! The story doesn't end there. It starts up fine, but for some reason the dashboard stopped working. There is a backlight, but there is no data: no temperature, no revolutions, no speed, not even mileage, empty! (Photo 2)
It was already late and dark, I left this matter until tomorrow, I really hope that another fuse blew and replacing it solved this problem.
The problem with the dashboard is solved :) I forgot to mention that when I pulled out the turn signal fuse (F16), I didn't get it back, so it didn't work.
Source
Replacing the ignition switch on a VAZ 2115, 2114
Ignition relay VAZ 2114: principle of operation, malfunctions and replacement
Replacing the ignition switch of a VAZ 2114, VAZ 2115 may be necessary in the event of a malfunction of the contact group, jamming of the mechanism, or simply wear.
The procedure is not complicated, so let's get started.
Before the replacement itself, it is necessary to purchase bolts with break-away heads. It is not recommended to replace them with regular ones with M6 thread, because... In addition to you, car thieves can easily remove the lock.
Before replacing the lock, turn the key to the “I” position so that the latch locking the steering shaft mechanism can enter the lock body.
- It is necessary to disconnect the battery by removing the wire from the “—” terminal
- Next, remove the steering wheel. To do this, remove the decorative trim on the steering wheel and unscrew the horn cover.
- Then, having unscrewed the steering wheel fastening nut not completely, we knock the steering wheel off the splines. After this, finally unscrew the nut.
- Remove the plastic covers from the steering column.
- Disconnect the block with the ignition switch wires.
- Use a chisel to knock the heads off the old bolts holding the ignition switch in place.
- Remove the old lock and install a new one in its place. Before installation, press the locking tab into the new ignition switch.
- Check that the steering shaft is locked correctly.
- Once you have completed adjusting the position and checking the functionality of the locking mechanism, tighten the bolts until the heads are completely free. Do this using the 10 key.
- Connect the wiring harness of the new ignition switch.
- Start the engine, make sure that the ignition switch is working correctly and that there are no problems with starting. If everything is in order, then we can conclude: the replacement of the ignition switch of the VAZ 2114, 2115 was carried out successfully!
Previous posts from the category: VAZ 2114
If engine oil or coolant appears around the perimeter of the connection of the cylinder head with the cylinder block itself, it is necessary to replace the cylinder head gasket of the VAZ 2114, VAZ 2115. A leak can also occur due to a change in the shape of the cylinder head after the engine overheats.
After prolonged use of a VAZ-2114, VAZ 2115, for no particular reason, an extraneous sound may arise from the front axle area in the form of a whistle.
Typical malfunctions of VAZ 2114, 2115 injectors: -difficulty starting the engine; — unstable engine operation; — the engine stalls at idle; — increased crankshaft rotation speed at idle; — the engine does not develop full power; — jerks and dips in engine operation when the car is moving; — increased fuel consumption; - increased content of CO and CH
The clutch briefly disconnects the engine and transmission and then smoothly connects it to start moving and change gears.
Replacing the stove fan of a VAZ 2114, 2115 may be necessary if it completely fails, or if it constantly operates only at 3rd speed.
*Add article to bookmarks:
Source
https://remontysvoimirukami.ru/remont-vaz-svoimi-rukami/remont-zamka-zazhiganija-vaz-2115-svoimi-rukami.html
Emergency, the starter does not turn (Solved)
2 months ago) was on a cold one. Who thinks what? Electrical?
Thoughts on the b-pump: I have an internal debate. On the one hand, it is impossible to drive with a non-working pump (there is no gasoline in the combustion chamber), but on the other hand, fuel may well come from the main line under the influence of a pressure difference! That is, it started from the pusher and then, by inertia, the engine itself pulls out of the line. Tell me I'm wrong =((
===========*=*============ Day 4. I went out to try, as a result, the first start with half a turn, I turned it off and that’s it, attempts to start it failed. I am leaning towards the retractor relay (because this is the only part that can work according to the principle that explains the situation as simply as possible, namely, the return spring has screwed up...
===========*=*============ Day 5. The situation has already begun to get out of control, namely: I leave work at 21:15 (the car was parked from 9:50, that is, idle time for almost 12 hours, everything that could reject it should have done it) and at least henna. Not only that, in the morning I was afraid to even go to a gas station - I poured
4 liters from a canister and was driving with the BC showing a decrease from 5 liters to 0 several times (yes, I have a problem with the fuel sensor, I haven’t gotten around to it yet) and thinking that stalling in the middle of the highway or in the left lane in the city would be very cool, don’t leave yet. Thanks to the man in the cruiser for being the only one standing in the parking lot at the gribanal. I even wanted to help push him manually out of a parking space. In general, I got home with 10 liters of gasoline, according to bk xD
Day 6. Finally I went to the electrician and found him 5 minutes before lunch. He was not happy with the fact that this was my fourth day with the starter. Service station "Quartet" in Gatchina - I recommend it! And here’s why: the man removed the starter from the car, together with me in his car he went to a friend’s modest workshop at the car wash for “starter repair”, etc., they quickly found brushes for me (so that I wouldn’t have to go shopping for another two days with a chance to buy a new starter ), because the old ones were almost completely erased (actually the basis of the problems!), they lubricated the rotor (the engine was dry as a rag in the trunk) and after checking, they loaded the electrics into the car. The guy went on business, dropping me off almost home. In the evening I calmly arrived at the designated time and everything was installed in 10 minutes. During the installation process, I found out exactly where the external temperature sensor is located (I want it to work, but my search in Murzilka was unsuccessful) and the belt whistle was eliminated! *The fact is that I did not have an adjusting “corner”. At Piter-lad they asked for 1000+ rubles for its installation and work (at that time I didn’t know what it was) and to leave the car until the morning, because they didn’t have the parts. Having politely refused, I decided to ride with an unpleasant, but free sound effect. * The electrician casually found a used “corner” lying around, got two bolts and nuts for it from a colleague and screwed it into its rightful place (I thought he would just hand it to me).
Result: with the starter 600 RUR starter repair 600 RUR starter brushes 200 RUR Belt adjustment as a gift!
Source
How to check the ignition switch of a VAZ 2114
Diagram and how to correctly connect the ignition switch on a VAZ-2106
There are several ways to determine the source of the problem:
- diagnostic;
- visual.
First you need to check the car's reaction to different positions of the key in the lock. To begin with, the key must be set to position number one, which is also the ignition. If the module is in order, all the car's electrics should work. However, in the case when all or part of the electrical system does not work, we can conclude that the lock is damaged.
In position number two of the key, the engine starts, for which the starter is turned on. If, when you turn the key, you do not hear the sounds of the starter operating (rotation), as well as the sound of the relay clicking, then either the ignition switch or the starter itself is broken. In this case, you need to run a diagnostic to get other details about the problem. In this case, you will need a multimeter set to ohmmeter mode. Also, before removing or installing the lock, you need to remove the steering column cover.
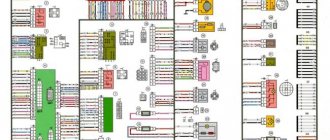
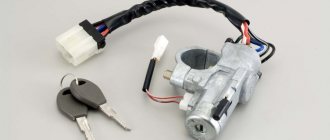
Pinout of the ignition switch VAZ-2114:
- +12V comes for the inserted key sensor microswitch;
- the mass comes when the driver's door is open;
- +12V goes to the starter (pin 50);
- +12V goes out after turning on the ignition (pin 15);
- +12V goes out when the key is inserted to pin 5 of the BSK;
- comes +12V to illuminate the lock cylinder;
- +12V comes from the battery (pin 30);
- not used.
- The first thing to do is disconnect the ignition switch power connector.
- After this, connect the multimeter to wires four and seven, and then do the same with wires fifteen and thirty, respectively.
- Turn the key in the lock to position number one. If during testing the node is not damaged, the multimeter should show a zero resistance value.
- Next you need to turn the key to position number two. The resistance on the multimeter screen, as in the case described above, should have a zero value.
In a situation where, after checking the lock with a multimeter, the resistance value in at least one of the cases was not equal to zero, it needs to be replaced. Otherwise, the lock is working properly and other components of the car should be checked for malfunctions.
conclusions
There are many reasons and signs of malfunction of the VAZ-2114 ignition switch, but you need to know them. Also, it is worth noting that in order to prolong the operation of this unit, it is necessary to remove the load from the passing current circuit. To do this, additional electrical appliances must be connected via a relay.
I encountered this problem myself. The contacts were worn out, it’s good that they were not on the road, they managed to fix it, but I spent a very long time looking for the cause, I advise you to immediately pay attention to the contacts in the event of a breakdown.
21099 why do the lights not go out? The reason may be the ignition switch. Tell me, who knows?
Agree. It is better to replace such a unit immediately than to look for something that can be replaced in it. If you are experienced, then you can, but if you are a beginner, then it is better to just buy a new one.
It is difficult for a beginner to immediately figure out what the problem was, especially without instructions like here. In general, it is easier to change, but if you like to understand, then it is better to disassemble and find the reason according to the instructions.
Source: carfrance.ru
Principle of operation
The lock works as follows. When the key is placed in the hole, its locking mechanism is deactivated. This happens due to the reverse movement of a special rod.
By turning the key to the first position, you will power the “15” and “30” contacts. This will alert (but not enable) the following items:
- ignition system;
- headlight bulbs;
- external light alarm;
- electrical equipment of the dashboard;
- windshield wipers and washer;
- cigarette lighter;
- rear window defroster;
- generator excitation winding.
If in a VAZ-2114 car the ignition switch is moved to the second position, in addition to the listed equipment, the starter will start. As you can see, a lot depends on the serviceability of the device in question. What are the symptoms of a failed ignition switch? Let's start with the fact that its malfunction can be either mechanical or electrical in nature. In the first case it is:
- lock jamming in one of the positions;
- inability to unlock the steering shaft;
- turning on the ignition with a non-original key or other object.
If the lock has an electrical problem, you may notice the following symptoms:
- the warning lights on the instrument panel do not light up or light up and go out periodically;
- the starter does not start;
- Some or all electrical appliances, the circuit of which is powered through the ignition switch, do not work (cigarette lighter, headlights, washer, wipers, etc.).
Most common defects
If your car's ignition switch won't turn on, there's a good chance you're dealing with one of the most common problems:
- the battery is low;
- the battery terminals are not in good contact with each other;
- switch malfunction;
- security system error;
- solenoid malfunction;
- When cranking the engine it still won't start.
The groups of defects we have identified can be divided into 2 groups - mechanical and electrical. They will differ in negative receptors that lead to breakdowns.
Ignition switch 2114 and the procedure for replacing it yourself
In what cases is replacement required?
There are several situations when replacement of the seal is necessary:
- malfunction of the unit itself;
- loss of keys;
- mechanical damage to the protection during theft;
- contact group malfunction.
3Z device diagram
A unit malfunction can be detected when the engine starts. When the starter does not spin, the solenoid relay does not click, and electrical equipment does not work. Failures can be mechanical or electrical.
How to determine the malfunction?
The visual method is to check the behavior of the machine at different key positions. First, the key is set to the right position - “ignition”. If the unit is working properly, then all electrical equipment works. If there are any problems with the electrical system, either all or part of the electrical equipment does not work.
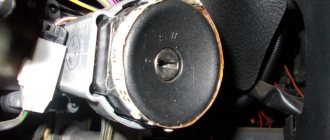
Turning the key in the lock
In the second position of the key, the starter should start. If it does not spin and you cannot hear the click of the retractor relay under the hood, then it is possible that either the starter or the starter is faulty. More specific information can be obtained using diagnostics. This is done with a multimeter set to ohmmeter mode. To carry out diagnostics, you need to remove the steering column cover.
Next you need to do the following:
- Disconnect power from the 3Z.
- Next, find pins 4 and 7 coming from the node. They correspond to pins “30” and “15”, and connect the multimeter terminals to them.
- Then the key in the 3Z turns to the first position. If the unit is working properly, the resistance should be zero.
- Then the operation of the unit is checked when the key is turned to position II. Likewise, the multimeter should show zero resistance if the circuit breaker is working properly.
Once you are convinced that the protection device is faulty, it must be replaced (the author of the video is Region 4253).
Preparation
First of all, you should prepare for the replacement procedure by preparing an electrical circuit diagram and the necessary materials and tools:
- new node;
- 4 assembly mounting screws;
- chisel;
- a set of keys;
- Phillips screwdriver;
- hammer;
- pliers.
ZZ for a VAZ car
For ease of operation, remove the cover from the steering column and switches.
Dismantling the casing is carried out step by step:
- First of all, the car is de-energized by disconnecting the negative terminal from the battery.
- Use a Phillips screwdriver to unscrew the screws securing the casing.
- Then the self-tapping screw is unscrewed, with which the housing is secured.
- Now you need to remove the screws holding the lower part of the housing to the steering column.
- At the next stage, the lever is lowered down, with the help of which the steering column is fixed at the angle, and the steering wheel.
- Next, the lower casing is dismantled.
- After disconnecting the power supply, you can remove the upper part of the casing.
- To remove the steering column switches, press the locking elements and remove the elements from their standard places.
- The switches should also be disconnected from the power supply.
Removing a faulty device
Having opened access to the protection zone, you can dismantle it. The difficulty of dismantling is that there are no heads on the 4 bolts that secure the ignition switch to the steering column on the VAZ 2114. The absence of heads prevents criminals from stealing a car without a key.
Dismantling with hammer and chisel
Dismantling of the protection zone is carried out as follows:
- you need to loosen the bolts using a hammer and chisel;
- then the loosened bolts are removed with pliers;
- then the bracket is removed from the steering column;
- the power supply is turned off;
- Now you can dismantle the unit.
The node connection diagram is simple. If it is purchased assembled, then it is not difficult to understand the diagram in order to connect the wires correctly.
Installing a new lock
The procedure for installing the ignition switch on a VAZ consists of the following steps:
- first you need to install the key in the new unit in position “I”, then the latch, thanks to which the steering wheel is locked, will hide;
- then the protection is mounted and the actions are performed in the reverse order of removal;
- After tightening the 4 bolts, you need to tighten them a little.
After installing the new unit, you need to check the steering lock. To do this, remove the key from the lock and turn the steering wheel to a small angle. If the steering wheel does not lock, you must install the unit correctly: the latch must fit into the groove located on the steering column. If the locking function works, all you have to do is tighten all the breakaway bolts until they stop. You need to tighten them until the heads are broken.
Sorry, there are no surveys available at this time.
Characteristics of a contact group
To begin with, we suggest finding out why an ignition switch contact group is needed, what its structure is and how it works.
Purpose and functions
In essence, KGZZ is used to ensure the connection of all electrical circuits of the vehicle without exception. That is, when the driver turns the key in the lock, the KGZZ closes the contacts, thus allowing the use of all electrical devices without exception.
Device
Diagram of the lock The ignition switch itself is a simple circuit breaker.
When you turn the key, the contacts are adjusted, making it possible to start the engine, power the equipment, and also stop the power unit. If you disassemble the body of the lock itself, you will see that the device itself is located inside it, as well as a large number of wires connected to each other. The wires to the lock come from the battery. The contact group of the ignition switch itself goes directly to the connection point of these electrical devices. To prevent short circuits and to delimit the contact elements themselves, the KGZZ is mounted in a plastic case.
Principle of operation
An automobile ignition system can be either battery-based or generator-based. Their fundamental difference is that battery ignition is equipped with an autonomous power source; accordingly, all electrical equipment can be turned on without starting the engine. As for the generator system, in this case, activation of electrical equipment is possible only after starting the engine.
When the driver turns the key in the lock, the electrical circuit contacts are closed from the negative terminal on the battery to the coil. At the same time, voltage begins to flow through the wiring to the lock, which is supplied to the coil through contacts, after which it returns to the positive output of the battery.
At the moment when the voltage passes through the coil, a very high voltage is generated in it, which is subsequently transmitted to the spark plugs. Ultimately, the contacts close and the engine starts. In addition to the ignition circuit itself, there are other electrical circuits in the car that conduct voltage from the key to electrical appliances. Each of the wires is responsible for connecting the contacts to each other (the author of the video is the Auto Repair and Maintenance channel).
Basic faults
Briefly about the reasons why repair of the ignition switch contact group may be required:
- Overloading of the device, which may be due to the installation of additional devices of increased power, as a result of which a higher voltage will pass through the KGZZ. For some time, the device can cope with this current, but over time, carbon deposits will begin to form on it. It should be noted that this deposit, as a rule, appears precisely inside the contact, and not on its surface, then the only way out is to replace the contact group. To prevent this problem, all additional devices must be connected via fuses or relays.
- Short circuit in the electrical network. If a short circuit occurs, this may also cause high power voltage to pass through the CGZZ, which again will cause its failure.
- Many motorists who changed the KGZZ faced the problem of abrasion of the tracks, as well as the contacts themselves. This problem usually occurs as a result of wear and tear on the lock, but in some cases the cause may be faulty.
- Mechanical failure of contact elements, as well as other components of the group.
- Overheating of the device, which can lead to damage to the design of the CGZZ. Overheating, as a rule, also occurs as a result of increased load on the device. When working in conditions of elevated temperatures, the tracks may move or even break (video author - AlexAvtoKhlam).
Source
Repair of ignition switch VAZ 2101
In any case, in order to understand the exact cause of the breakdown of the ignition switch, and also to decide whether it is worth repairing or immediately replacing, the device must be dismantled and disassembled. We'll talk about this next.
Removing the ignition switch VAZ 2101
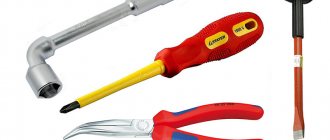
To dismantle the lock, we will need the following tools:
- wrench 10;
- a screwdriver with a Phillips blade (preferably a short one);
- small slotted screwdriver;
- nippers or scissors;
- awl.
The work order is as follows:
- We park the car on a level surface and put it in gear.
- Using a 10mm wrench, unscrew and disconnect the “-” terminal from the battery.
- Let's go to the salon. Using a Phillips-head screwdriver, remove the four screws securing the two halves of the steering column housing.
- Using the same tool, unscrew the self-tapping screw securing the casing to the steering column switch
- We remove the hazard warning light switch button from its seat.
- We remove the lower half of the casing and use wire cutters or scissors to cut the plastic clamp securing the wires.
- Remove the lower half of the casing.
- Use a thin slotted screwdriver to pry off the sealing ring of the ignition switch. Remove the seal.
- Disconnect the upper half of the steering casing.
- Using your hand, carefully disconnect the connector with the wires from the ignition switch.
- Insert the ignition key into the well
- We set the key to position “0”, shaking the steering wheel so that it unlocks.
- Using a Phillips screwdriver, remove the two screws securing the lock to the bracket on the steering shaft.
- Using an awl, we recess the locking rod through the side hole in the bracket.
- Remove the ignition switch from the bracket.
Disassembling the lock
To disassemble the ignition switch, you only need a thin slotted screwdriver. The disassembly procedure is as follows:
- Using a screwdriver, pry up the retaining ring located in the groove of the device body.
- We remove the ring.
- We remove the contact group from the lock body.
We'll talk about how to remove the larva a little later.
When is repair appropriate?
After disassembling the lock, it is worth carefully inspecting the well, the locking mechanism, and the contacts
Depending on the signs of a device malfunction, special attention should be paid to the particular unit to which it relates. If the key in the ignition switch does not turn due to a broken cylinder, you are unlikely to be able to repair it
But it can be replaced. Fortunately, they are on sale and inexpensive.
If the cause of the lock malfunction is wear or oxidation of the contacts, you can try to restore them using special anti-corrosion agents such as WD-40 and a dry, rough rag. It is undesirable to use abrasives for these purposes, since deep scratches on the contact surfaces will provoke their further burning. In case of critical damage to the contacts, you can buy the contact group itself.
But, if the locking rod breaks, you will have to buy an assembled lock, since one body is not sold. The lock is replaced in the reverse order given in the instructions for removing it.
Table: approximate price for the ignition switch, cylinder and contact group for VAZ 21201
| the name of detail | Catalog number | Approximate price, rub. |
| Ignition switch assembly | 2101–3704000 | 500–700 |
| Ignition lock cylinder | 2101–6100045 | 50–100 |
| contact Group | 2101–3704100 | 100–180 |
Replacing the contact group
To replace the group of contacts of the VAZ 2101 ignition switch, no tools are needed. It is enough to insert it into the body of the disassembled device, comparing the sizes of the cutouts on the body and the protrusions on the contact part. After this, you need to secure it with a locking ring, installing it in the groove.
Replacing the larva
But with the larva you will have to tinker a little. Some of the tools that will be useful here are:
- electric drill with a drill with a diameter of 0.8–1 mm;
- a pin of the same diameter, 8–10 mm long;
- awl;
- thin slotted screwdriver;
- liquid like WD-40;
- small hammer.
The order of work is as follows:
- Use a slotted screwdriver to pry up the cylinder cover from below and remove it.
- We find a pin on the lock body that secures the cylinder.
- We drill out the pin using an electric drill, being careful not to damage the lock body.
- Using an awl, remove the remaining pin from the hole.
- We remove the larva from the body.
- We treat the working parts of the new larva with WD-40 liquid.
- We install a new cylinder into the body.
- We fix it with a new pin.
- We recess the pin completely using a small hammer.
- We install the cover in place.
Operating principle
The sensor's sensing element can be found in the exhaust gas stream. The electrolyte, which is located in one of the exhaust gas streams, is heated to a high temperature (350°C). To speed up warming up to operating temperature, the lambda probe has a special heating element. The sensor is installed in such a way that the tip on one of its parts is in contact only with gases, and on the other with clean air.
When oxygen accumulates in the collector, a process of changing the potential difference occurs. This information is transmitted to the ECU. The system then changes the amount of fuel that is sent to the cylinders.
Step-by-step replacement of the ignition switch of a VAZ 2114
The operation involves creating open access to the installation site of the “starting” lock. The preparatory group includes the following activities:
- dismantling the steering casing;
- removal of steering column switches from seats.
To make the operation easier, you can remove the steering column switch connector and the steering wheel.
The following technique will help you carefully remove the steering casing:
- disconnect the ground from the battery;
- Using a Phillips screwdriver, remove the 3 screws holding the two parts of the steering casing (access from the lower housing, one screw on the left, two on the right);
- remove the self-tapping screw securing the housing to the connector of the steering column switches;
- Unscrew the two self-tapping screws securing the lower housing relative to the steering column;
- move down the lever that locks the steering column “at the corner”;
- lower the steering wheel down;
- remove the lower casing;
- disconnect the power supply from the emergency gang;
- remove the top casing.
When replacing a faulty ignition switch on a VAZ 2114, the steering column switches are removed one by one. First, they are removed from their seats by simultaneously pressing both latches, then they are disconnected from the power supply block.
Basics of the substitution operation
Having opened access to the lock body, it is easy to notice that the four bolts securing the lock relative to the steering column are missing heads. This fact is part of the concept of the standard anti-theft system, making it difficult to start the engine without a key.
Removing the ignition switch is done as follows:
- loosen the bolts using a chisel and hammer;
- Unscrew the loosened bolts with pliers;
- remove the bracket from the steering column;
- disconnect the power supply;
- remove the ignition switch.
Installation of a new unit is carried out in the following sequence:
- install the key in the new lock and turn it to the first position (in this position the latch blocking the steering shaft will hide);
- install the lock on the steering column;
- tighten the four fastening bolts and lightly tighten.
After installing a new lock, you need to test the steering lock. After removing the key from the lock, turn the steering wheel at a slight angle:
- if there is no locking: adjust the position of the unit - the lock latch should fit into the groove on the steering shaft;
- If the locking is functioning properly: tighten the 4 breakaway bolts until the breakaway heads break off.
For your information. Some owners prefer to use ordinary twenty-millimeter bolts with M6 threads, thus facilitating the subsequent dismantling of the unit. However, this should be done with a sufficiently high level of anti-theft protection (for example, an alarm, GPS tracker, etc.).
Having finally installed the new lock on the steering shaft, you should connect the power supply and check the operation of the unit by activating the engine.
Briefly about shift technology
The principles for replacing the ignition switch on a VAZ 2114 car, which is relevant in case of failure of contact elements, loss of keys, or intentional breakdown, are as follows:
- open access to the ignition switch by removing the steering casing, two steering column switches and, if necessary, the steering wheel and steering column switch connector;
- loosen the 4 screws that secure the ignition activator housing to the steering shaft through the bracket;
- disconnect the power supply;
- remove the defective lock;
- insert the key into the new device and turn it to position I;
- install the housing of the new unit on the steering shaft and secure it with 4 bolts;
- After checking the functioning of the steering lock, tighten the 4 bolts until their heads come off;
- Carry out further assembly in reverse order.
Sources
- mashinapro.ru/1241-zamok-2114.html
- labavto.com/vaz/2114/zamena-zamka-zazhiganiya/
- drive2.ru/l/6759775/
- luxvaz.ru/vaz-2114/126-zamena-zamka-zazhiganiya.html
Main signs of failure
Drivers need to take into account during operation that breakdowns can occur both due to failure of the mechanical part and due to problems with the electrical system. Popular mechanical problems manifest themselves in the following factors:
- the lock is stuck in one position and there is no way to unlock it without using significant effort;
- the steering column is jammed;
- an attempt was made to gain unauthorized access to the lock using a master key or other object unsuitable for this purpose.
The electrical part may also fail. This can be determined by the following factors:
- the starter does not rotate after turning the key to the desired position;
- The dashboard indicator lights do not light up or go out after a short time;
- the operation of devices activated through the lock positions is unstable or absent.
Other factors that are less common among motorists may also occur. They are resolved according to the identified breakdowns.
Let's summarize
From the step-by-step instructions we can conclude that replacing the ignition switch on a VAZ 2115 and other models is not difficult. The cost of replacing a lock at a service station will cost you from 500 to 700 rubles, so if you decide to replace the part yourself, you can save this amount.
Hi all! There have been no entries for a long time, and there’s nothing else to write about yet. Someone may ask why there is no record of installing an auto-corrector? The answer is simple, everything was installed a long time ago, BUT!
During operation, a small problem occurred regarding the ECM unit; spare parts are now of “very good quality.” And in the BUK itself the operational amplifier simply burned out or burst due to frost, one of these days the mikruha will come and make a recording. And now about the lock, about a month ago the ignition switch started acting up. The tape recorder began to cut out on bumps, why the tape recorder? Yes, because I made the power supply through the ignition switch, or rather from the sensor of the inserted key. At times everything was fine and I just thought that maybe snow got into the lock with the key, and that was what caused all this trouble. But as they say, the disease progresses. And it made me so sad that I decided it was time to solve this problem! I disassembled the steering column casing, picked up a chisel and a hammer and went ahead, tearing off the bolts. In principle, everything worked out quickly, then I disconnected the block and took it home.
The lock can be disassembled quite easily; you just need to unscrew three screws on the back plate.
Next, I carefully halved the lock; whoever will occupy the same position, carefully halve it, otherwise you might lose the ball with the springs.
I studied the design and came to the conclusion that the microswitch of the lock is to blame.
I decided to take it apart, took off the cover and saw that the rocker was broken. The trouble is, the microswitch is not sold separately, and buying a new lock for 1k is a toad.
Here is the hero of the occasion. I called for disassembly to find out if there was a 10-point lock, they said it was possible, they would call me back a little later. 2 hours later he called and said yes, yes. I immediately went there and picked up an almost new lock.
But I didn’t want to install it, I just updated my lock with the missing part and went through the secrets in the cylinder, otherwise they had become a little worn out after such a long time.
In principle, that’s all, then I lubricated the cylinder with lithol and safely installed the lock in place. I also bought new shear bolts in advance; I didn’t want to install regular ones on a turnkey basis.
Thank you all for your attention and good luck on the road! I also want to congratulate all men on February 23! Issue price: 300 ₽
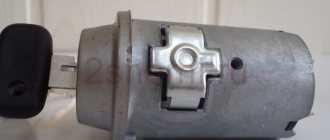
The lock cylinder (lock cylinder) is a type of lock security mechanism, in the form of a cylinder, the working part of which can be rotated in the body only when a key is inserted into the cylinder hole. The uninterrupted operation of the lock cylinder protects the car from unauthorized entry and protects the owner’s property. Therefore, a malfunction of the lock cylinder is a serious concern that requires an immediate solution, and many car enthusiasts are seriously thinking about how to change the lock cylinder of a VAZ 2114 with their own hands.
Recommendations
How to change the ignition switch on a VAZ 2110 with your own hands
Reassembling and lubricating individual parts will not work if the fragments are heavily worn. It is better to remove the cylinder from the core and install a new one. Recommendations for replacing the VAZ 2114 door lock:
- Partial repairs or lubrication will only temporarily restore life to the closing mechanism. If problems arise, it is better to replace the entire cylinder.
- After installation, it is necessary to periodically lubricate the mechanism. Experienced motorists use silicone substances for this.
- The repair procedure is carried out in a well-lit room at a comfortable temperature.
- To change the element, you will need a set of screwdrivers, pliers and lubricant.
- Sometimes the springs have to be replaced along with the cylinder. They are purchased separately.
The cylinder fragment is sold as a set. The price depends on the manufacturer. If you buy a cheap Chinese version, it will cost about 150 rubles. It is better to give preference to VAZ spare parts. The cost of such a kit is 400-500 rubles.
Installation of a new larva
Replacing the internal door lock on VAZ 2113, 2114 and 2115
To replace the lock core due to mechanical failure, remove it from the vehicle as described above. Then follow this algorithm:
- Insert the key into the slot and use a Phillips screwdriver to unscrew the 3 screws holding the 2 halves of the lock body together.
- Separate the housing while holding it with the key facing up. If you hold the lock in a different position during disassembly and do not insert the key, the insides will spill out and you will not understand how to put them back together. In this case, the ball with springs may get lost.
- Remove the locking mechanism, which consists of two spring-loaded parts, and pull out the spring itself.
- After removing the key, carefully remove the core so that the ball with the spring (located on the side of the cylinder) is not lost.
To disassemble the case, you need to unscrew 3 screws
Before replacing, it is necessary to remove the return spring from the old cylinder, since it is not sold complete with a new core. The spring is inside the part on the back side in a cocked state; it must be installed in the same form on the new cylinder. Also, do not forget to remove the thin spring from the hole where the ball is inserted.
The locking mechanism tongue peeks out from the bottom of the case
The larva must be pulled out so as not to lose the details
When installing the core, you need to move the spring for the ball into the hole and insert the part into the body. Then push the larva all the way, while simultaneously inserting the ball into the socket. After that, all that remains is to assemble the locking mechanism and tighten the housing with screws. When finished, check the operation of the ignition switch by turning the key to different positions.
The ejection spring from the old core needs to be moved to the new one
Steering lock testing
Testing the steering wheel
If you do not check the operation of the steering wheel lock, you may encounter certain problems in the future. Therefore, do not waste your time on this event. It consists of removing the key from the ignition and turning the steering wheel at a slight angle.
- If there is no lock, you will need to slightly adjust the position of the lock. Make sure it fits into the groove located on the steering shaft.
- If the locking is effective, you will only need to tighten the four installed breakaway bolts until they stop. Twist until the heads break.
It is worth noting one very important nuance. Some people don't find it necessary to use breakaway bolts. Instead, the most common fixing bolts with a length of 20 millimeters and an M6 thread are used. On the one hand, this will make it easier to remove the device in the future, if such an event is required again. On the other hand, in the absence of a reliable anti-theft system, voluntarily giving attackers access to your car is not the best idea.
When the lock installation is completed and the test has passed, do not forget to connect the device to power and start the engine. If it starts, all systems dependent on the ignition switch are working, you can fully begin reassembly. Follow the reverse instructions for removing the casing and steering column switches. It would not be amiss to check the condition of certain nodes along the way. It is quite possible that some of them also need replacement or a little preventive maintenance.
Loading …
Examination
It is a mistake to assume that damage to high-voltage wires does not in any way affect the condition of the module itself. Many people think of simply replacing high-voltage elements, but in reality they will still have to change the module.
This is explained by the fact that damaged or defective wires direct the wrong current, the configuration of which does not correspond to the necessary parameters. As a result, the spark hits inaccurately or ineffectively, causing the module to burn out and become unusable.
In general, the best option for checking the ignition module on a VAZ 2114 is to use an oscilloscope. But, firstly, not every driver has it, and secondly, few people can use them. Therefore, we will carry out the check using improvised means:
- 12-volt light bulb;
- Tester (available for little money at any auto parts store).
Let's start with preliminary manipulations with the accompanying elements of the ignition module.
- Check the wiring harness. It is disconnected and the voltage indicator is checked.
- To do this, fix the tester on contact A, and connect the other terminal to engine ground.
- In normal condition, the voltage reading will be 12V.
- If there is no voltage, most likely the fuse has blown.
- If everything is fine, transfer the terminals of your tester to contacts A and B, start the car. In this case, the starter should turn and the 12-volt light should blink.
- In the absence of these phenomena, we can talk about the presence of a break in circuit A of the contacts.
Next we go to the ignition module itself.
There are several ways to check the condition of your unit. Therefore, let's look at each of them.
- Set the tester to ohmmeter mode. Use it to measure the resistance on the high-voltage lines going to cylinders 1 and 4, and then, by analogy, to the wiring of cylinders 2 and 3. In normal condition, the device will give you readings from 5.2 to 5.5 ohms.
- Give the device a gentle tug. Thus, you will shake the wiring block and the module. Moreover, this must be done in the operating mode of the power unit. If the device works without obstruction when loosened, everything is fine, you are lucky. If not, you will again have to study the condition of the wiring.
Third way
The third method is considered the simplest, since it involves replacing your device with a similar one that works exactly. But to do this, you have to find a full-fledged twin. We are talking about an ignition module from a car similar to yours in terms of year of manufacture and power unit used. It’s just that 1.5-liter engines have modules, and 1.6-liter engines have coils.
But to replace a module with a module, you will have to first dismantle yours. This is done as follows:
- Remove the negative terminal from the battery, which will allow you to turn off the power to the car;
- Disconnect four high voltages from the ignition module;
- Disconnect the wire block. To do this, you need to release the special clamp that holds the block on the module;
- Next, unscrew the three nuts. With their help, the module is held on the bracket;
- There are three long pins on the bracket, from which the module can simply be pulled off.
Having dismantled your module, you can put another unit in its place, thereby verifying the functionality of that one and the malfunction of yours.
Preparation
Ignition module on the new generation VAZ 2114: what should you know?
At the preparation stage, you will need to collect the necessary tools near you, which will be useful in the process of dismantling and installing a new ignition switch. You will also have to remove the steering cover and steering column shifters. This is quite difficult to do, but we will tell you step by step about all the nuances of these preparatory activities. So you can easily figure out for yourself how to remove the ignition switch on a VAZ 2114.
Tools you will need:
- Phillips strong screwdriver;
- Open-end wrench 10 millimeters;
- Chisel;
- Hammer;
- Pliers or pliers;
- New ignition switch assembly;
- Lock mounting screws (4 pieces).
Now let's move on to the casing and switches. For more convenient work, many advise removing the steering column switches and the steering wheel itself.
Dismantling the casing is performed in the following sequence:
- Disconnect the negative cable from the battery. Nobody has yet canceled the requirements for personal safety and protection against electric shocks;
- Unscrew the three screws securing the two parts of the casing. A screwdriver is useful for this;
- Unscrew the screw that connects the housing to the connector of the steering column switches;
- Remove the two screws that hold the lower housing to the steering column;
- The lever that fixes the column at the corner leads down;
- The steering wheel also goes down;
- The lower casing is then removed;
- The power supply from the emergency lights must be disconnected;
- Now you can remove the top casing;
- To dismantle the steering column switches, you need to act one by one;
- Simultaneously press both latches and thereby remove the elements from their seats;
- Disconnect them from the power supply.
Possible reasons for failure of the ignition module
Before repairing the main part in the car’s ignition system, you need to understand the nature of the problem. To do this, the consumer must be aware of the signs of a malfunction, as well as the causes of the breakdown.
The main reasons for device failure
Causes of problems:
- The ignition system uses spark plugs that do not match the vehicle parameters. They may not have the gap specified by the manufacturer. Also, the spark plugs themselves may not be working or dirty; this can be determined by visual diagnostics. If there are traces of carbon deposits on the devices, they must be removed.
- Malfunctions in the operation of the MH can arise as a result of frequent spark checks. At the time of diagnosis, a high load is placed on the device. If it appears frequently, it will lead to equipment failure or incorrect operation.
- The ignition module in the VAZ 2114 operates with the high-voltage cables disconnected. This also leads to device failure. The products themselves may be damaged, which affects the functioning of the engine as a whole.
- The device operates under severe vibration conditions. Their impact may be due to poor quality fixation of the module in the seat. As a result of vibrations, the factory soldering inside the equipment structure is damaged. This leads to its incorrect operation.
- The contact inside the plug with the low-voltage cables is broken.
- Initial use of a defective device or module with poor build quality. This factory defect can only be eliminated by replacing the mechanism; repairing the equipment is pointless.
- Moisture getting inside the case. This problem is unlikely, but exposure of the device to liquid may cause it to short out and break.
Signs of coil malfunction
The main symptoms of a malfunction in the VAZ 2114 ignition module:
- Difficulties arise when trying to start the engine. Starting the car engine may be difficult due to the fact that there is no spark on a spark plug or several.
- When idling or parking with the internal combustion engine running, the speed of the power unit floats. Their change is not associated with pressing the gas pedal and other third-party factors. This happens randomly.
- There are dips in the power of the car's engine. This is especially felt when driving uphill or sharp acceleration. Problems can also occur when driving on a flat road.
- Several cylinders stopped working. Usually these devices operate in pairs, so elements 1-4 or 2-3 could fail. Non-working cylinders may be indicated by “triple movement” of the engine.
- A “Check Engine” warning light appeared on the dashboard.
If the ignition module malfunctions, problems will appear not only in engine operation, but also when starting it.
The “Simple Opinion” channel, using the Lada Priora car as an example, spoke in detail about the symptoms that appear in the operation of the ignition modules.
This is interesting: Replacing the VAZ-2112 fuel filter 16 valves - photo and video
Preparatory activities
Replacing the ignition switch on a VAZ 2106
Before you begin removing the ignition switch on a VAZ-2114, you need to stock up on a set of tools and materials. In addition to a new lock, an independent car mechanic will need the following tools:
- hammer;
- Phillips head screwdriver;
- head or horn for 10;
- pliers;
- a small chisel with a diameter of 10–12 mm.
There is no need to purchase a lock mount. Manufacturers usually include several bolts to hold the clamp in place. We recommend bringing a headlamp to illuminate the treatment area.
First of all, you will need to provide access to the fastening of the old lock. To do this, you need to get rid of the casing that hides the steering column. Next, the worn-out unit is dismantled. The following technique is often used:
- removes the negative terminal from the battery;
- use a screwdriver to unscrew several screws holding the protective plastic case;
- remove the self-tapping screw that secures the casing with switches;
- remove a couple of screws from the bottom side of the column;
- remove the lever that blocks the rotation of the steering wheel;
- lower the steering wheel down;
- get rid of the lower casing;
- We disconnect the power contacts from the emergency lights;
- it becomes possible to dismantle the upper casing.
The steering column switches are removed one at a time. After pressing simultaneously, we remove the pair from their seats, and then remove the power and connecting wires.