The design of external door handles on VAZ 2113, 2114 and 2115 cars is quite reliable if we consider the old-style handles. But there are often problems with new, so-called Euro pens. But in this article we will look at the replacement of external handles using the example of old-style cars.
In order to make this repair yourself, you will need the following type of tool:
- 8 mm head
- extension
- ratchet handle or crank
- screwdriver short flat
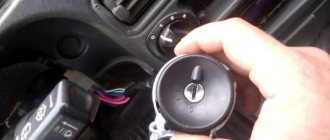
Replacing the ignition switch
The main reason a lock fails is either electronic or mechanical.
So, the car may not start, and the key simply won’t turn. But, replacing the ignition switch is a fairly simple and easy process that will not take much time.
Let's consider the sequence of actions aimed at replacing a car's ignition switch:
- We remove the “minus terminal” from the battery.
- Next, you need to remove the steering wheel.
- Remove the trim from the steering wheel, and then unscrew the steering wheel panel.
- Unscrew the nut securing the steering wheel and knock it out of the slots.
- We take out the steering wheel.
- Disconnect the electrical part, the ignition switch wire connector.
- We knock down the fastenings of the lock bolts.
- Unscrew the fastening bolts and remove the lock.
- Installing new elements.
- We connect the wire block.
- We test whether the engine starts with the key. If not, then you need to find faults.
Lock selection
2110-3704005-30 — original catalog number of the ignition switch for the 10 series of Lada family cars.
The part can be produced by AvtoVAZ, Recardo or DMZ. The average cost of a part is 1,500 rubles .
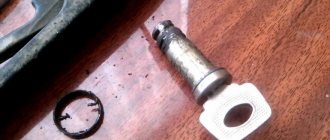
Installation of a new larva
To install a new lock cylinder, you will need to follow a few simple steps:
- Unpack the new kit, prepared for replacement, and lubricate the internal moving parts.
- Install a new return spring. Usually it is not included in the standard replacement kit and is purchased separately. When installed correctly, the key should rotate freely back when in the hole.
Installing a new return spring
- Install the pin in the end of the swivel rod.
- Reassemble the door in the reverse order as described in the previous section.
Product delivery options
Note! Below are the shipping methods available specifically for this product. Payment options may vary depending on the delivery method.
Detailed information can be found on the “Delivery and Payment” page.
Parcel by Russian Post
Available payment methods:
- Cash on delivery (payment upon receipt)
- Using cards Sberbank, VTB, Post Bank, Tinkoff
- Yandex money
- QIWI
- ROBOKASSA
Shipping throughout Russia. Delivery time is from 5 to 12 days.
Parcel by Russian Post 1st class
Available payment methods:
- Cash on delivery (payment upon receipt)
- Using cards Sberbank, VTB, Post Bank, Tinkoff
- Yandex money
- QIWI
- ROBOKASSA
Shipping throughout Russia. Delivery time – from 2 to 5 days. More expensive than regular delivery by Russian Post, approximately 50%. Parcel weight up to 2.5 kg
Express Parcel EMS
Available payment methods:
- Cash on delivery (payment upon receipt)
- Using cards Sberbank, VTB, Post Bank, Tinkoff
- Yandex money
- QIWI
- ROBOKASSA
Shipping throughout Russia. Delivery time – from 3 to 7 days. More expensive than regular delivery by Russian Post, approximately 100%.
Transport companies
Available payment methods:
- Using cards Sberbank, VTB, Post Bank, Tinkoff
- Yandex money
- QIWI
- ROBOKASSA
Delivery is possible to any locality where there is a representative office of the transport company. Delivery time – from 2 to 10 days. Sending large parcels is approximately 50% more profitable than by Russian Post.
Courier delivery in Togliatti
Available payment methods:
- Cash upon receipt
- Using cards Sberbank, VTB, Post Bank, Tinkoff
- Yandex money
- QIWI
- ROBOKASSA
Delivery time from 1 to 12 hours.
Pickup from our warehouse
Available payment methods:
- Cash upon receipt
- Credit, installments
- Using cards Sberbank, VTB, Post Bank, Tinkoff
- Yandex money
- QIWI
- ROBOKASSA
Pickup times must coincide with store opening hours.
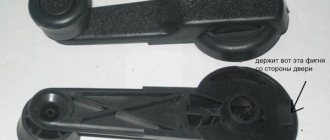
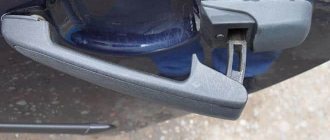
Every car owner's vehicle contains myriads of small parts that, if they break down, do not deserve due attention, although they have a significant impact on the smooth operation of all vehicle mechanisms. For example, the strength of sound depends on the frequency and speed of vibration of small particles propagating in a certain composition of the medium: liquid, gas, solid. Likewise, in a car, any inconspicuous detail fulfills its purpose in a complex of auto elements that form a single body, subordinate to a specific goal: calm and comfortable movement in various climate conditions. Car door handles are not an exclusive element from the general composition of transport components.
The car handles on the outside of the body follow the contour of the vehicle’s body. The doors of expensive cars have chrome door handles. Modern luxury cars are equipped with an electronic access system that requires scanning the owner's thumb to open the car door. Owners of domestic cars are taking small steps closer to luxury and style, replacing old handles with external euro handles, made with the latest technology and appropriate design, which will serve their purpose perfectly, providing comfort and convenience to the owner of a VAZ 14-15 vehicle.
The thought of replacing the door handles of a VAZ 14-15 comes only when they break down or components break, leaving the car owner with a non-functional door. Such a small thing can cause serious inconvenience due to a faulty door handle mechanism, be it an internal or external door handle. This element is usually made of plastic and metal, representing a curved plate that provides access to the car. It's worth considering simple door handles as one of the most commonly used car components. They may not be able to withstand harsh tugging, door slamming and other unreasonable behavior, which will result in serious inconvenience with access through a window or side door, and even worse, through the trunk. Taking care of door handles is as important as changing the oil. The price is affordable, and the benefits of unhindered access are invaluable.
Since 2005, it has been allowing you to experience the wonderful moments of a luxurious exterior when driving vehicles of the 14 and 15 VAZ models. Replacing the handles with euros will provide minor luxury, comfort and reliability in the same style and color scheme. The company has been manufacturing high-quality parts for many years, constantly testing the resistance to external influences and durability of the coating of external Euro door handles of VAZ, which indicates their reliability, high strength and carefree driving
The company's specialists pay special attention to details in the production of any product. That is why all handles are easy to install, without adjustment or alteration
Varieties
The Lynx Euro pens have a factory designation, which determines the differences between the sets.
- IN 1. This designation indicates that the package contains four handles - two rear and two front. In this case, the front larvae do not have.
- AT 2. There are also four handles, a pair for the rear and front doors. Only here the larvae are present.
Which one should I choose? The question is purely individual. On the one hand, B1 have a solid, smooth structure that is not spoiled by key holes. For external tuning they are simply perfect.
Article on the topic: Find out what and how to clean the VAZ 2114 mass air flow sensor: 3 best options
The second option is preferable for those who value quality, visual appeal, but at the same time reliability. After all, the presence of a cylinder will give you the opportunity to open the car with a key if problems arise with the alarm or key fob.
Troubleshooting
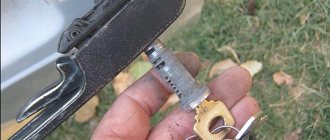
If a key or silumin rod breaks, you should not immediately buy a new block with a handle. On sale you can find special repair kits for VAZ 2108-099 door handles, which contain these parts in 2 copies.
This way you will save money and easily change the key yourself by removing the handle using the following sequence of actions:
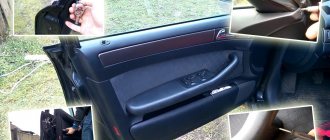
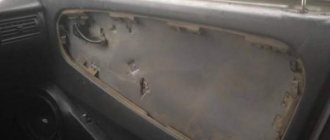
- Remove the decorative panel.
- Disconnect the rod connecting it to the locking device from the handle mechanism.
- With the glass fully up, unscrew the 2 fastenings of the handle to the door card.
- Remove the handle, replace the parts and put it back.
If the rod is disconnected, then you need to remove the inner lining and put it in place, as described above. Using the moment when the facing panel is removed, check what caused the disconnection of this rod so that history does not repeat itself when the door is slammed.
Malfunctions of the locking mechanism can only be eliminated by removing it. In a situation where the device has a lot of wear, as happens on the driver and front passenger doors, it is recommended to replace the lock with a new one.
Didn't find the information you are looking for? on our forum.
Door opening method
If the VAZ-2109 door does not open from any side, then the cause of the breakdown is difficult to determine, since there is absolutely no access to the lock mechanism.
A somewhat simplified version of the breakdown occurs when the door does not slam shut completely and gets stuck in that position. Then it is possible to reach the latch from the outside with a sharp object.
To open a jammed door, you must first perform the following steps:
- When the sash is not completely slammed, try to get to the locking device using a steel flat ruler. It may be possible to open it in a similar way to conventional door locks with a latch.
- If the door is completely closed, try to move it to the slightly open position to gain access to the lock. To do this, try pressing the inside and outside handles together or alternately, while simultaneously pushing the door from the inside.
- Try opening the back door with a helper, who will press and release it to get it into position while you try to open the lock.
When simple means do not produce results, the door will have to be opened from inside the cabin, which will require removing its trim.
Removal
Note: The door lock can be removed without removing the outer lock handle. You just need to disconnect the handle rod from the lock (see below).
2. Disconnect the wiring harness connectors for the central locking drive gear motor.
3. Using a Phillips screwdriver, unscrew the two self-tapping screws securing the gear motor.
4. Disconnect the gear motor from the lock rod and remove it from the door.
6. Using an impact screwdriver, unscrew the two screws securing the outer part of the lock.
7. Remove the outer part of the lock.
8. Using pliers, squeezing the antennae of the plastic holder of the inner handle rod, push it out of the hole in the door reinforcement.
9. Using a Phillips screwdriver, unscrew the two screws securing the inner door handle.
10. We remove the handle from the door and use tweezers to remove the rubber clamp from the tip of the rod.
11. Remove the handle from the rod.
13 mm socket wrench
Unscrew the nut securing the lock switch rod.
13. Remove the lock and rod assembly from the door.
14. If necessary, using a screwdriver, remove the lock washers from the axles and disconnect the two rods.
15. Using any available method, mark the position of the lock latch on the body pillar.
16. Using an impact screwdriver, unscrew the three screws securing the clamp.
17. Remove the clamp and shims.
What to do if the door from the outside of the VAZ-2115 does not open
Almost every modern person has his own car. This is not surprising, because having a car is much easier and, most importantly, more convenient, you can get to any place both in the city and in the suburbs. In order for your iron four-wheeled friend to work properly and not let its owner down on the road, you should definitely monitor its technical condition. And minor breakdowns can be repaired by every car owner who has at least minimal experience in repair work.
Preventing door jams
The main reason for the breakdown: long-term operation, but the service life of the part is reduced if the driver does not carry out preventive maintenance. Basic moments:
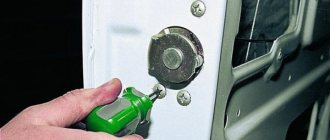
- Cleaning of internal parts, treatment with special substances.
- Power loop lubrication.
- Removing adhered dirt. The procedure is carried out at least twice a year: in spring and autumn. Active ingredients for treatment: Liqui Moly Schnell-Reiniger cleaner, Liqui Moly Wartungs-Spray weiss dirt-repellent white lubricant.
- Lubrication of hinges, internal parts, rubber seals, door stops.
Thanks to these actions, fixation improves. Lubricants with an anti-corrosion effect preserve the elasticity of parts.
The procedure is especially relevant before the winter season, when the treatment prevents the mechanism from freezing when moisture enters. Spring prevention minimizes damage to the door mechanism from ultraviolet radiation.
How to replace all door locks, rods and cylinders?
Removal:
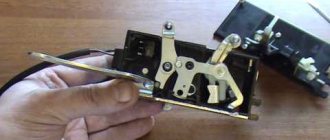
1) First, let's start with the most important thing, without this you won't be able to replace the locks, but in general you won't be able to start the operation because all the work to replace all the things that are listed in the title is carried out with the trim removed from the door, it can be removed quite easily and for more details on how to do this if you don’t already know, read the article: “Replacing a door on a VAZ” in points 1-8, and after the trim is removed, proceed to removal, let’s immediately note a couple of facts to replace the cylinder the rods will definitely need to be disconnected from it, but to replace the rods, you don’t need to remove or disconnect anything, the same with the door locks, the rods from them will also need to be disconnected and only after that unscrew the screws that secure the locks, so first with the rods themselves let's start and explain how they are removed, firstly, you can start disconnecting them from absolutely any side and from any place, for example, start disconnecting the rod first from the internal lock as shown in photos 1 and 2 (Photo 1 shows disconnecting the lock washer with a screwdriver holds the rod, and photo 2 shows the disconnection of the rod itself from the internal lock), then using a screwdriver and your hands, disconnect the other rods and continue the entire operation until the rods on both sides are disconnected, once they are disconnected on both sides, completely remove them from the car (there are several rods in the car and each one goes to the locks and there is even a rod on the cylinder, they are disconnected, as you already understood, with a screwdriver and your hands, in the beginning just disconnect all the lock washers or plastic clamps and pull the rod with your hand , disconnect it from the lock or from the cylinder, etc., but the rod is not always secured with the help of clamps, sometimes it is hooked at one end to something, in this case, also disconnect its end with a screwdriver and then completely remove the rod itself) , thus remove all the rods from the car.
2) After the rods are removed or disconnected from those things that you are going to replace, proceed to removing these things themselves, first we will look at the removal of both door locks, the internal lock and the external one are removed together, that is, if you decide to change the external lock, then you the internal one will have to be touched (You don’t even have to replace the internal lock with a new one, but you’ll just have to tinker with it even if you only need to replace the external one) and vice versa, everything is the same, to remove the external lock you will need to loosen the two screws that it is secured (Please note, loosen, the impact screwdriver does not serve anything else, we recommend that you completely unscrew the screws with a regular screwdriver) these screws are also indicated by arrows in photo 1, as soon as the screws are unscrewed, go further and pull the lock, remove it from car (see photo 2) if you also need to replace the internal lock, then in this case remove the door opening handle (read how to do this in the article: “Replacing a window lifter on a car”, everything is described in the paragraphs) and then into the internal climb up part of the door and use a screwdriver and your hands to disconnect the two rods (Those rods that you will need to disconnect from the internal lock are shown in the photo below under number 1), as soon as the rods are disconnected, pull out the internal lock and as soon as it is removed, proceed to disassembling it, to do this, remove the lock washer from it using a screwdriver that secures the internal drive rod (see. photo 3, on it the lock washer is indicated by an arrow) and then disconnect the rod itself from the lock (see photo 4), disconnect the other rod in almost the same way, it is attached to the internal lock by a plastic retainer, you just need to move it and the rod can then be safely disconnected from the lock; see the video clip at the end of the article for more details.
3) Now we’ll talk about how to remove the cylinder from the outer handle, it is inserted into the handle itself and in order to remove it, you will have to first remove the handle from the door and then remove the cylinder, this is all done as follows, from the outer handle to the inside doors, both rods are disconnected (see photo 1) and after the rods are disconnected, unscrew the two nuts that secure the handle to the door (see photo 2) and by pulling the handle with your hand, remove it completely from the car, after the handle is removed (It By the way, it will be removed with the rods), take an awl in your hands and use it to push out the side pin that holds the cylinder and the cylinder leash (see photo 3, the leash is indicated by a red arrow, when the pin for its fastening is pushed out, remove the leash completely from the cylinder), then use a screwdriver pry up the spring that secures the same cylinder and remove it (see photo 4), and finally, when the leash and spring are removed, insert the key into the cylinder and turn it, thereby you will unlock the mechanism and you can easily pull the key to remove the cylinder from external handle.
Installation:
All parts are installed in their places in the reverse order of removal, but do not forget to use an impact rotary screwdriver to tighten the screws securing the locks until they stop, but keep in mind the fact that with this screwdriver you only need to loosen the screws and tighten them until they stop, so just use it like a regular screwdriver (Unscrew the screw completely, tighten it) we do not advise you, because it is not intended for this purpose.
Causes of malfunction
If the product begins to work incorrectly, the part must be repaired or replaced. Sometimes it is enough to carry out preventive actions to avoid a malfunction. Car enthusiasts tighten the bolts of the internal mechanism, lubricate or adjust individual elements. In any option, disassembly of the door is provided to gain access to the metal of the body. Reasons for dismantling:
- Defects found: scratches, abrasions, chips, microcracks.
- Required tightening of fasteners.
- It takes force to open the door. Insufficient adhesion to the body part was noticed.
- Adjustment required.
- There was a breakdown inside: the hardware came off, a gap appeared between the door and the handle, and the device began to wobble.
- Mechanical damage was detected.
- An intruder tried to open the car.
- Due to improper operation of the handle, the door does not close properly.
- The external manipulator is damaged.
- The body was deformed as a result of the accident.
If the cause of the breakdown is related to an accident, then preventive repairs will not help. The handle consists mainly of plastic. The material is durable, but not strong enough to withstand a strong blow.