Fuel injectors play an important role in the fuel system; stable engine operation, fuel consumption and much more depend on their serviceability and performance. Today I won’t talk for a long time about the reasons why the injectors become clogged, it seems to me that everyone already knows about this, instead I propose to go directly to the work of cleaning the fuel injectors of the VAZ 2115.
For those who are not aware or are simply interested in what a nozzle is and how it works, I recommend reading this article.
Before cleaning the injectors, you need to prepare the following set of “tools”:
- Five-cc medical syringe;
- Special liquid for cleaning (flushing) the carburetor;
- Two copper wires length (~1 meter);
- Light bulb (small one from a headlight);
- Hex key at “5” and key at “24”;
- O-rings for injectors (if the old ones are finished).
From all these seemingly unrelated parts, you need to build a device for washing the injectors with your own hands. And this is done as follows, see the diagram:
Take the injector, connect the wires to it (+ and -, respectively), and set the button (breaker) to minus. It is necessary to connect the previously prepared syringe to the back side of the nozzle (input), and install the tube of the cleaner can into the thin hole of the syringe. All this must be connected to the battery. Read the operating principle of this mechanism below.
Alternatively you can do this:
Injectors - what are they?
Let's figure out what injectors are and what they are needed for. Injectors are an electromagnetic mechanism designed to spray fuel into the cylinder. Their number depends on the number of cylinders in the car. The VAZ car has 4 cylinders, therefore there are also 4 injectors.
A serviceable and clean injector sprays fuel evenly without any delays or jerks.
A clogged injector may not spray fuel at all or, on the contrary, pour it in drops. As a result, the engine cannot operate normally and correctly.
History and differences from its predecessor
VAZ-2115 is also called Lada Samara. This is a descendant of the 99 VAZ model. It was born at AvtoVAZ and is a sedan with front-wheel drive and four doors. It differs from the VAZ-21099:
- new trunk;
- rear lights and an insert between them;
- reinforced bumpers, which are now in the same color scheme as the rest of the car;
- improved trunk wing;
- added brake light;
- new sill fairings;
- door moldings;
- modernized car showroom.
In 7 years, Samara-2 went from pilot production (1997) to one hundred percent replacement of its predecessors (2004).
Since 2000, the VAZ-2115 and VAZ-2114 engines have become fuel-injected, with a volume of 1.6 liters in standard and luxury configurations. They began to install 8 valves in engines.
Symptoms of clogged injectors
Loss of dynamics is one of the main signs of clogged injectors. If they are contaminated, the car simply will not accelerate properly.
- Unstable idling, the engine at idle will operate unstably and intermittently.
- Starting difficulties can occur when there is contamination or when the injectors stop holding pressure. Fuel begins to drip into the cylinder, which can cause popping sounds in the exhaust pipe.
- Ringing fingers are inevitable when the spray nozzle is clogged; this is due to the fact that the fuel entering the cylinder is mixed with air and the concentration of fuel in this mixture is quite small, so the engine experiences detonation.
Driving with dirty injectors will not provide any driving pleasure. And driving with such a problem is highly not recommended.
Why do you need to clean or replace injectors?
Currently reading What to do if a tubeless wheel goes flat on the rim?…
Car engine cleaner, we clean the engine ourselves
The main problem is contamination of the nozzle hole when the fuel cannot be sprayed normally.
If the injector stops working completely, no fuel enters the cylinder. Another problem occurs when the injectors do not open/close completely, do not hold pressure and “pour” fuel into the manifold.
These malfunctions and problems indicate the need to clean the injector. Experts recommend performing this procedure every 40 thousand kilometers. If cleaning cannot solve the problem, then the injectors should be replaced.
Otherwise:
- the efficiency of fuel supply to the engine is impaired;
- engine power disappears;
- the quality of the fuel-air mixture deteriorates;
- the power unit operates unevenly;
- fuel consumption increases.
Causes of injector malfunctions
Normally, the injectors should work with high precision, their operating speed is also very high (opening and closing occurs several times in 1 second).
This is necessary for uninterrupted supply of the engine with the “optimal” mixture in different modes, as well as to ensure fine atomization of gasoline (for better mixing of fuel with air)
It is also important that the injector closes tightly, preventing fuel leaks into the intake manifold
However, during the operation of the car, the condition of the injector is directly affected by the quality of gasoline and the overall cleanliness of the fuel system. Even small debris can clog the injector holes, causing the spray pattern to become very poor. Also, deposits form on the nozzles, which leads to jamming, untimely and/or incomplete opening and closing, etc.
Please note that the need to replace 2114 injectors occurs much less frequently than the need for cleaning. The reason is the fairly high reliability of the injectors
As a result, problems can often be eliminated by cleaning the injectors.
When to clean injectors
Cleaning of injectors on Lada cars is carried out according to the condition of the car. If there are no problems with your car, then there is no need to clean them. Also, to find out for sure whether the injectors need to be cleaned, you first need to diagnose the fuel system. You can learn more about how to diagnose the fuel system in our article.
The manufacturer recommends cleaning the injectors every 50,000 km. Since the fuel at our gas stations leaves much to be desired, just before this mileage they begin to become clogged and flushing them will be useful. You can wash it at a service station, or you can do it yourself. Next, we will look in detail at how to wash the injectors on a VAZ car at home.
Methods for cleaning injectors
Injector flushing additives
There are a huge number of different additives for flushing the injector. Such additives are poured into the car tank and mixed with fuel. The mixture of fuel and additives enters the main elements of the fuel system and flushes them, including the injectors. But, as a rule, such washings do not bring much results, since all the dirt that was washed away to the injectors gets and settles on them, which can only aggravate the situation. Using this method is not recommended.
Source
Cleaning injectors on VAZ 2113, VAZ 2114, VAZ 2115
Welcome! Fuel injectors are needed to spray the fuel that comes from the gas tank into the car engine, and to be more precise, they pour fuel directly into the cylinders so that it mixes with air and ignites the fuel-air mixture, if you don’t already know , but on a given mixture (namely, a mixture of fuel with air), the car’s engine works, if one thing is removed (Air, for example), then the engine will no longer start, because there will be no oxygen due to which gasoline should ignite (But pure gasoline it doesn’t burn), that’s why people (Scientists) gave this mixture the name “Fuel-air mixture” on which the engine runs and thus the car drives.
Note! To clean the fuel injectors, take with you a suitable tool, these include: A set of all kinds of wrenches in which there must be wrenches, as well as take screwdrivers, buy the liquid at the auto store “For cleaning carburetors” it’s called, but you still have when purchasing with talk to the seller, because if the liquid turns out to be too toxic, it can simply damage your injectors when you clean them from the inside, and you will also need wires that will have to be led from the battery and connected to the injectors (two thin wires of normal length will do just fine or better yet, a big one so that it’s enough, about 1 meter will suit you perfectly)!
Summary:
Where are the fuel injectors located? They are located on the fuel rail, but there is one But! As cars of the Samara 2 family were produced, they were equipped with completely different engines which, in principle, are similar to each other in operating principle, but different in spare parts (Although most of the parts in them are also similar) and therefore fuel rails on the same models (VAZ 2114 for example) may be completely different, but they all have the same location, namely under the receiver they are located, so that you can understand in more detail where it is, see the photo below, on which the location of the ramp itself is indicated by an arrow.
When should you clean fuel injectors? As soon as they become clogged due to poor-quality gasoline, they need to be cleaned, just clean them, for example, every 30,000 thousand km, we do not recommend that, as some auto repairmen claim, because if high-quality gasoline was poured into the car, then even after 50,000 thousand km, they will not be clogged and remember once and for all, if the car is still driving normally, without interruptions, and also has a smooth idle, then there is no need to get into the engine at all, by the way, about the fuel injectors , they only need to be cleaned when they become clogged, because cleaning does not lead to anything good, and there are even cases when after cleaning the injectors become unusable (In a word, cleaning the injectors harms them and therefore it should be carried out only when absolutely necessary), symptoms that the injectors the following will be clogged: The car will not drive properly, jerks will be noticeable when driving, and there will also be an uneven idle, the car may still have difficulty starting, and it may simply stall at idle, well, that’s all, these are the most striking symptoms that will happen to a car when the injectors are clogged.
Carburetor. Advantages and disadvantages
Let's start with the negative points. These include:
- Such engines have not been installed on production cars for a long time. In Europe, due to environmental requirements, carburetors are blacklisted. That is, they are prohibited because they heavily pollute the atmosphere;
- At high speeds, the engine's capabilities drop significantly. Torque does not reach the desired levels. But at low speeds it is effective and allows you to accelerate well from zero to hundreds;
- When overtaking, the carburetor is a pain. It is problematic to overtake cars normally and confidently. Especially considering the power of the carburetor nines;
- High fuel consumption when compared with injection engines. On average, a nine with a carburetor in normal mode consumes about 8.5-9 liters of fuel per 100 kilometers;
- The air damper is controlled manually. The exception is some versions of the latest samples, where automatic devices have been installed. Some motorists claim that manually controlling the throttle in winter has its advantages, as it allows you to feel the engine. But only experienced drivers can understand this.
How to clean the injectors on a VAZ 2113-VAZ 2115?
Note! You probably already know that there are two ways to clean injectors, the first method is to ultrasonic clean them, a very effective method, but there have also been cases when people’s injectors simply failed, this may be due to the inexperience of car service workers in the first place (Just like that cleaning is carried out only in a car service using a special device and you can’t do it at home) and secondly, the device itself with which they perform cleaning does not work correctly (If everything is fine and the cleaning technology is followed, then nothing will happen to your injectors happens), the second method is already performed at home and also if you approach it with normal carburetor fluid (Not too caustic), then in this case nothing will happen to the injectors, we will describe this method in this article.
1) Let’s get down to the work itself, first you will need to remove the fuel rail and then you will need to remove the injectors from it, how to do all this, read the article entitled: “Replacing fuel injectors on a VAZ” (In this article to which a link is given It is also described how you can check the performance of the injectors, you will also carry out this check and perhaps you will not even need to clean them if they splash the same level of fuel into all containers), after removal, prepare a work area that should not be too dirty (It is best to use some or put a cloth and then place the injectors on it) and also prepare all the tools that will be needed, but you also take into account the fact that the battery should be nearby, so do all the work next to the car.
Note! By the way, you can also replace the battery with a charger, it will be even more convenient, in general, take any charger (it’s better to use old phones) and connect two wires to it (both contacts need to be tied to its tip with electrical tape so that they stick ) and these same two wires will go to the injector when cleaning it (more on this a little later)!
2) Now take the cleaner itself and remove the top cap from it, then place the back part of the nozzle on the protruding nipple from under the cleaner (it must be seated tightly so that the nozzle does not fly off during the work) as shown in the photo below and proceed to work , if you do all the work using a battery, then we would like to immediately note that it provides a current of 12 Volts, so be careful not to burn the injector (Just do not hold the contacts for a long time so that the injector works and everything will be fine for you, for 10-20 seconds will be enough), but if you used the charger, then we have already told you everything about how to connect it, namely in point 1 in “ Note! “We described everything, so let’s say a few words about the battery, you also need to connect these two wires to it and put one of the wires on the minus terminal, and the other on the plus, and after that you can connect these wires to the injector, read more about this in paragraph below.
3) In conclusion, these two wires will have to be connected to the contacts of the injector (There will only be two contacts on it, clearly look at the photo below), when connecting them, do not hold them for a long time (When connected, the injector will begin to spray the cleaner), otherwise you will burn the injector and it will stop working, you need to continue the operation until you see the nozzle begin to spray fuel with a normal jet (Strong), so as soon as the jet starts to beat normally, immediately stop working and move to another fuel injector.
Additional video: You can see the process of cleaning fuel injectors using a phone charger in the video below:
Note! And you can do exactly the same process of cleaning fuel injectors, but only using a battery, in another video, which is also posted below:
Source
Cleaning the injector on a domestic car VAZ 2115
No one will say that the idea that gasoline in our country is not of sufficient quality, and that is why you have to resort to a number of tricks to avoid serious technical breakdowns of your favorite car.
It is worth noting that any vehicle requires cleaning not only the gas tank, but also the engine of your vehicle. As for domestic cars that operate on the basis of an injector, it is necessary to check and clean the injector approximately every thirty thousand kilometers. The cost of work for which you need to pay for cleaning the injector in a car dealership will have to pay an amount of two and sometimes three thousand rubles. It is worth noting that in some workshops cleaning is carried out only in cases where there is no need to remove the injectors of your car.
Since the specialists in the salon have a special means that allows you to competently and efficiently clean the injector system of your vehicle. For example, for a domestic car called “VAZ-2115” we independently clean the injector. It is worth noting that when going to the salon, do not forget that the special substance that is used to clean the injector not only removes dirt, but can also damage the gaskets, since rubber is very weak in relation to this substance.
Before starting cleaning work, it is necessary to remove the old mesh, which is located on the fuel tank pump. It is worth noting that in the process of replacing and cleaning the injector, it is also necessary to carry out work regarding replacing the filter, which is located close to the gasoline tank system. If you do not do this in a timely manner, you can consider your work done poorly and for a fairly short period of time. And so, now you can begin the cleansing process itself. Firstly, it is necessary to dismantle the air draft filter housing, and along with it you can remove the air duct itself, which goes to the injector.
Secondly, we unscrew the fuel hoses, which are presented in the VAZ-2115 car, in the amount of two pieces. Remember that these same fuel pipes are mounted on special fasteners. Now you need to remove the fuel frame, which is attached to the hexagon. After this, when using a special tool, you need to unscrew this hexagon; remember that during factory assembly it is attached more than just securely to the body of your car.
And so, now you need to pull out the injectors from their places, as well as all the rubber seals and place them in a special liquid that will allow you to properly clean the injectors of your vehicle. As a result, we get the effect of removed carbon deposits; now we can clean the inside of the injectors. Here, modern innovative capabilities have made it possible to develop and put into production special cans with cleaning liquid. She is the one who will help you.
How to clean injectors on a VAZ 2114 with your own hands
The VAZ 2114 car is equipped with an injector, as well as a “Check engine” sign, which indicates problems with the car’s engine. When this icon lights up, for the sake of safety and preservation of engine operation, it is necessary to urgently diagnose the cause of the error and eliminate the malfunction in a timely manner. But if, in addition to the illuminated “Check engine” icon, there are other symptoms, then you need to rule out a problem such as clogged injectors.
Main features
So, signs of clogged injector nozzles:
- misfires at idle,
- the engine is unstable,
- fuel consumption increased sharply,
- slow acceleration of the car when the gas pedal is fully pressed.
Why is it important to identify this malfunction? The injector supplies fuel to the system and is its main element, therefore, extending its service life is of great importance for the operation of the entire engine.
Extending the life of injector nozzles
How to extend the life of injectors? At the initial stage, with low mileage, various special additives that are added to the gas tank with fuel can help out. They can be bought in specialized stores, car markets and junkyards. The cost of additives is low. This method is good if you do it regularly, and it can extend the life of the injectors, but it will not clean them completely. Some car enthusiasts, on the contrary, are against the use of chemicals, believing that additives clog the injector even more.
It is recommended to clean the injectors every 40 thousand km. Many auto repair shops provide cleaning services. The cost starts from 1,500 rubles, and the procedure is done on special equipment using ultrasound. But in order to save time and money, you can carry out this procedure yourself . Cleaning VAZ 2114 injectors with your own hands is not difficult even for a beginner. But first you need to determine the performance of the injector nozzles. If you suspect this malfunction, then how to check the injectors of the VAZ 2114? Many car enthusiasts do this on a special stand, but it makes no sense to buy it for rare diagnostics. In this article we will talk about checking without additional devices.
How to extend the life of injectors
There are essentially two main ways to ensure that the fuel cells installed in your vehicle last as long as possible.
- Use of additives. Special additives for increasing fuel quality and cleaning the system can be found in any automotive chemical store. They are poured into the gas tank. The additive costs quite little, so everyone can afford to buy it. But when starting to use additives, you should do this regularly, otherwise they will not be effective. Some people believe that additives only spoil the condition of the injectors. This statement may be true if low-grade or counterfeit chemicals are used. Good products, although they do not completely clean devices, can significantly extend their service life.
- The second method is periodic flushing. Experts recommend performing the operation approximately once every 40 thousand kilometers traveled by your car. Some people do the cleaning themselves, while others turn to auto repair shops for help. For reference, we note that the cost of cleaning injectors at a service station will be from 1,500 rubles.
Functionality check
Checking functionality yourself:
- Check the performance of the injectors on a cold engine, but with the engine running. We touch each nozzle with an ordinary hand. The working nozzle should pulsate and “tremble”. But this method is not entirely informative.
- There is another way to effectively diagnose. Add idle speed and let the car run. Then we loosen the cap nuts holding the injectors one by one, and the engine speed should decrease. When this does not happen, it is concluded that this injector is not working. If a malfunction is detected, you can clean the injectors yourself.
How can you clean the injectors on a VAZ 2114 yourself in order to reduce the cost of replacing spare parts, repairing and servicing the car? Cleaning injectors on a VAZ 2114 is quite simple. First you need to remove them. For safety reasons, turn off the engine and let it cool. Disconnect the negative cable on the battery, remove the protective casing and air filter. We unscrew the high-pressure pipeline from the nozzle and pump, remove it from the bracket supporting it.
Using a spanner, unscrew the nozzle along with the old washer and remove it. In this case, it is necessary to disconnect the electrical connector and slide the lock along the ramp. to take it out. And so all 4 pieces. Now let’s get to the main question: “How to clean the injectors on a VAZ 2114”? The injectors need to be examined first. If there are signs of leakage, it is better to immediately replace the spare parts with new ones. For the rest, it is necessary to remove the o-rings from the atomizer and body. Prepared injectors should be soaked in acetone or gasoline for a while, this will allow them to be better cleaned.
While they are soaking, you can simultaneously clean the ramp and valve cover. It is even better to blow out the ramp with a vacuum cleaner. The time has passed to begin the cleaning procedure itself. A lot of coke, resembling tar, always forms around the nozzle of the spare part itself. It definitely needs to be removed. Next, using a blunt pin or needle, carefully clean the funnel-shaped surface around the nozzle. The outside of the nozzle is clean. But the most difficult thing is internal cleaning. How to clean VAZ 2114 injectors from the inside? To do this you will need: electrical tape, a can of carburetor cleaner, a syringe, a tube.
The product is supplied under pressure through a tube, simulating injection.
It will take several such movements for each nozzle so that they break through and begin to spray the liquid evenly.
Then you need to let the injectors dry, put new o-rings on them and reassemble everything in the reverse order, while changing the fuel filter and the fuel pump mesh.
All this will extend the life of your car. “In the future, it is necessary to refuel only with high-quality 95 grade fuel at proven gas stations, as recommended in the VAZ 2114 passport.”
Do-it-yourself cleaning of injectors on VAZ-2113, 2114, 2115
An important element in the entire engine system are injectors.
They are responsible for fuel injection, which means the operation of the entire engine depends on their lifespan. Injectors can become unusable due to many factors. The VAZ 2114 injectors themselves last approximately 100-120 thousand kilometers.
However, this is provided that gasoline complies with European standards, but in Russia the standards are often not met, which is why the injectors fail after 60-80 thousand kilometers, or even earlier.
Failure of injectors can adversely affect many vehicle systems. However, the life of the injectors can be increased if they are cleaned in a timely manner.
Why do you need to clean injectors:
- to extend the life of injectors;
- Dirty injectors increase fuel consumption and reduce the vehicle's dynamic performance.
In other words, cleaning the injectors will help the car drive smoother.
Features of the injection VAZ-2115
Main parameters:
- produced at the Volzhsky Automobile Plant;
- year of production - 1997.
Auto design:
- body - four-door sedan (5 seats);
- location - front.
Engine and fuel:
- petrol;
- 1.5 and 1.6 l;
- four-stroke, 77 horsepower.
The transmission is mechanical.
Dimensional characteristics:
- length - 43.30 cm;
- width - 16.50 cm;
- height - 14.02 cm;
- ground clearance - 1.65 cm;
- rear track - 13.70 cm;
- front track - 14.00 cm;
- weight - 1.0 t.
Speed data:
- 100 km/h in 14.00 seconds;
- maximum takeoff run - 160 km/h.
Other parameters:
- gasoline consumption - 7.6 l;
- volume - 43.0 l.
Injector malfunctions
You can understand that the nozzle requires cleaning by the following signs:
- unstable engine operation;
- unexpected sharp increase in fuel consumption;
- misfires at idle;
- reducing the acceleration speed of a car when the pedal is fully pressed to the floor.
Remember that with these signs the nozzle may no longer be working, so you need to check its functionality before cleaning. This is checked this way: with the engine running but cold, you just need to touch the injectors - they should pulsate.
Replacing injectors
Of course, a car service center can replace the injectors for you. The price for this service starts from 1500 rubles. However, to save time and money, it makes sense to change the injectors yourself.
Removing injectors yourself
Here is a simple algorithm for removing injectors that all car owners can perform.
1.Disconnect the negative terminal from the battery
2.Take two 17mm wrenches and relieve the fuel pressure by unscrewing the fuel pipe fittings.
3. Separate the electrical connector from the fuel rail.
4.Take a Phillips screwdriver, unscrew the screw on the bracket on which the fuel pipes are attached, and remove it.
5.Use a 5mm hexagon to unscrew the two screws on the fuel rail mounting
6. Move the ramp in the direction of the injector axis, remove all 4 injectors from the engine and remove the ramp towards the left side of the vase.
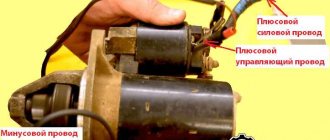
7.Press the spring clip (1) located on the injectors, move it aside, and disconnect the electrical connector (2)
8.Using a screwdriver, move the injector clamp along the ramp and remove it (on new ramps, the bracket is simply removed).
9.Remove the nozzle from the hole on the ramp, slightly rocking it from side to side.
10.Remove the O-rings that are located on the nozzle body and sprayer using a thin screwdriver
That's all, now the injectors are ready for cleaning.
Do-it-yourself injector cleaning
For cleaning you will need electrical tape (wire) to secure the joints, a carburetor cleaner in a can, a syringe and a thin tube. The cleaning algorithm is as follows.
1.Insert the tube into the cap (nozzle) of the can 2.Insert the end of the tube into the hole of the syringe (without a needle) 3.Attach the end of the syringe to the nozzle 4.Start injecting the product through the tube, simulating fuel injection.
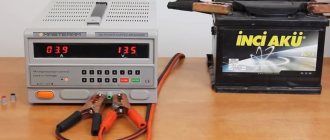
You need to inject until the coming out stream becomes smooth and clean. Then this will mean that the injector is clean.
Another way, if you have a battery nearby, you can try applying voltage to the injector with ordinary wires (polarity does not matter) simulating their operation and at the same time spraying liquid to clean the carburetor.
After this, you need to put on new O-rings and you can begin assembly, having first checked the resistance, which should be in the range of 11-15 Ohms. Reassemble the injectors in the reverse order of disassembly.
Lada 2115 ♣ Cherry Horse ♣ › Logbook › Cleaning VAZ 2115 injectors
Since our gasoline is, to put it mildly, “not very good,” I decided to clean the injectors. I don’t know who cleaned them and when, but we’ll see when disassembling them. For all these things we need: - a 5-cc syringe - carburetor cleaner - wires - light bulb - non-latching button - 5mm hex, 24mm wrench, O-rings for injectors ( if the old ones are killed)
Someone says that you need to remove the receiver, the throttle - nothing like that! Everything can be easily removed and disassembled without any unnecessary manipulations.
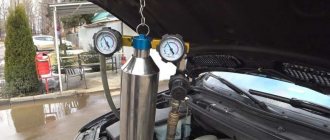
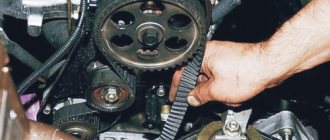
First, let's relieve the pressure in the fuel rail.
after that we remove all the chips from the injectors
Then, using 24mm wrenches, unscrew the bolt securing the fuel pipe and pull it out.
Now use a hexagon to unscrew the 2 bolts that secure the fuel rail to the engine
After everything has been unscrewed, you need to CAREFULLY, with light rocking, pull out the fuel rail along with the injectors. If, when removing the injectors, there are no rubber rings on them, then they must be removed from the place where the injectors are attached. If necessary, replace the rubber rings.
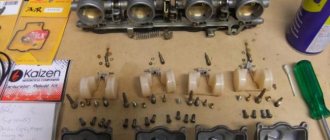
Now you need to remove the injectors themselves. They are fixed to the fuel rail with clamps. These clips just need to be moved to the side with a screwdriver and the nozzle is free. Using a gentle hand movement, pull the nozzle towards you.
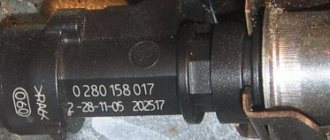
We have such a nozzle in stock. Bosch 0 280 158 502 with four spray holes.
NOW the most important thing is the process of cleaning the injectors. To clean the injectors you will need to make a small circuit. I did it in a hurry)) I think everything is clear)
I did it in a hurry)) I think everything is clear)
We connect everything according to the diagram. We press the cleaner, liquid and pressure appear in the syringe, we press the button - the nozzle opens. If the nozzle sprays randomly, it means it is clogged. It is necessary to clean until the nozzle sprays liquid in a thick cloud.
After cleaning, reassemble in reverse order. We put all the o-rings in place. Carefully insert the injectors into the fuel rail, put on the clamps, put on the wiring, snap the chips, go install the fuel pump. Next is the hardest part, since I installed all the sealing rings with new ones, the injectors refused to sit in their place for a long time. Somehow I managed to tighten the ramp, i.e. move it closer to the engine. I used a 32 wrench, a really difficult moment, it’s purely physically difficult to push the TR with one hand, and with the other try to get the hex bolt into the hole in order to screw the ramp. Somehow I managed to screw it up. Then we connect everything else, put in place all the sensors removed when dismantling the ramp. That's it! READY. Let's try to launch!
Now the feelings about the work done:
I turned the ignition twice so that the pump pumped more fuel. Started it only the second time. It started up, twitched for probably 20 seconds, the speed dropped and rose, but then everything became normal. This is due to the fact that there was a little carburetor cleaner left in the nozzles, which was safely burned in the internal combustion engine. The engine began to run noticeably smoother. The “floating speed” has disappeared. The car picks up speed faster. Fuel consumption has not yet been assessed. I’ll drive a couple of hundred kilometers and then we’ll see) in general, I’m happy with what I did).
Issue price: 56 ₽
Like 54 Subscribe