The causes of noise in the gearbox depend on the type of transmission. So, in manual transmissions, a hum may appear, for example, due to wear of bearings, shaft gears, springs on the rocker, or differential. As for the automatic transmission, most often it hums due to low oil level, due to problems with the torque converter and the lever linkage.
To eliminate noise in the area of the box, it first makes sense to check the oil level in it. If it is not enough, then you need to top it up or replace it. As a temporary solution, an anti-noise additive is sometimes used in the box (it will not completely remove it, but at least reduce the operating noise). To effectively eliminate hum, the box should be dismantled, checked and fully repaired. Read about all the causes of noise in the gearbox in the article, and for brief information on why various types of noise appear in the gearbox, see the table.
| Conditions under which the gearbox makes noise | Possible causes of noise |
| Mechanical transmission | |
| Humming noise at speed (while driving) |
|
| At idle |
|
| When overclocking |
|
| When releasing the clutch |
|
| On a certain gear |
|
| In low gears (first, second) |
|
| In high gears (4 or 5) |
|
| In the cold |
|
| In neutral gear |
|
| Automatic transmission | |
| When driving at speed |
|
| In the cold |
|
| At idle |
|
| When overclocking |
|
| On a certain gear |
|
| At low speed (up to approximately 40...60 km/h) |
|
Defects that appeared after replacing the clutch
What does it mean to replace the clutch? This action means changing the driven or driven clutch disc; often both parts are changed at once. In this case, the release bearing must also be replaced. After such an operation, side defects are suddenly revealed that were not there before the repair.
If we think logically, then there are few reasons for the appearance of new malfunctions. Typically this is:
- Unqualified repairs;
- Defect of new spare parts;
- Erroneous diagnostics, as a result of which not all or the wrong parts were replaced, and previously hidden problems manifested themselves in full.
In general, the issue of the appearance of new unpleasant signs is very difficult and is individual in each specific case, but these signs have common characteristic features.
We change the release bearing on a VAZ 2114 with our own hands - dismantling the gearbox
Advice:
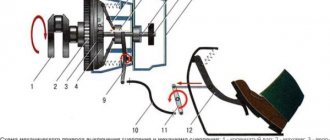
Please note that it is recommended to perform operations on a pit or a lift. The instructions provide an example of car repair on an overpass, but if there is none, then watch the video at the end of the article, where the replacement is carried out in a garage without a pit. To properly dismantle the gearbox, refer to the figures presented above.
Provide sufficient lighting above the hood of the car, put the car in first gear, and release the handbrake. If possible, ask a partner for help. Below is a detailed dismantling technology, according to the diagrams presented above.
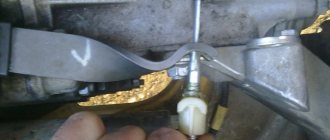
- Open the hood, unscrew the air filter mounts, disconnect the wire and remove the assembly (see photo). After this, disconnect the battery terminals, and to be safe, remove the battery.
- Now we get access to the upper gearbox mounting bolts. Unscrew the long bolt at the back, the short one at the front.
- Let's move on to the starter. We unscrew the two upper studs, then remove the terminals. Now we look for the clutch cable that comes out of the gearbox, twist the nut to loosen the tension.
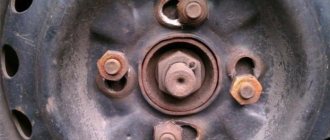
- We go down to the wheels, tighten the bolts, and remove the chassis. We tear off the nuts of the VAZ wheel bearings to remove the drive axle shaft on both sides. Use the pipe to extend the key.
- We remove the anthers (mud flaps) with a 8mm wrench, then unscrew the engine crankcase protection bolts.
- We find the suspension arm extension bracket (3.4 in the diagram), unscrew the rear nut with the lower bolts.
- Now unscrew the anti-roll bar bolt (8) on the right side, then the ball joint bolts on both sides (key 17). Then remove the lever (7) together with the stretcher (4).
- The gearbox is half disconnected, now we unscrew the plug to drain the oil.
- After draining the oil, remove the wheel drives. First, we remove the CV joint “grenades” from the hubs with the bearing, then we take the splined side of the shaft out of the box using a pry bar.
- On the side of the box we disconnect the reverse terminal. We find three bolts securing the gearbox to the engine and twist them.
- To remove the starter, unscrew the two bolts from the bottom.
- Now we disconnect the gear shift rod (10) and dismantle the rocker. The speed sensor terminal is located nearby; disconnect it (see photo).
- We unscrew the locknut to disconnect the gearbox from the side support (cushion), then use a long wrench to unscrew the two fasteners of the rear cushion (9).
- All that remains is to unscrew the two gearbox bracket bolts (2) and disconnect the unit from the engine.
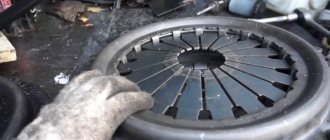
- We dismantle the assembly, hold the body with one hand, and move it with the other using a mount. After removing the assembly, we proceed to replacing the release bearing.
It is important to know:
Be sure to watch the video “How to replace the clutch release bearing on a VAZ 2114”, since the disassembly process in the video is shown in full, with additional comments from a specialist. The first video shows the replacement process without removing the gearbox.
How to change the clutch without removing the gearbox
Detailed replacement process on video
If after replacing the clutch the car jerks
For example, before the repair, the car did not pick up speed well, it was slipping, and the clutch pedal was activated at the very top. All the signs of a worn driven disc were present. After replacing the disk, the car began to jerk. What could happen after the repairs were carried out?
- The issue may be a defective part. This is not so rare when it comes to non-original spare parts. In Russian-made cars (VAZ, GAZ, AZLK, IZH), defects also occur in factory parts. That is, the driven disk is simply curved. On the clutch basket (drive disc), the pressure petals may be at different levels, then the release occurs unevenly and the car jerks.
- The car may jerk due to clutch adjustment. More precisely, it was not performed after replacing the disk. The linings of the new part are much thicker; in this case, the clutch pedal “takes at the very end”. When starting off, the car moves jerkily, and the gear shifts into gear with a crunch.
- The car jerks due to the replacement of not all the parts that needed it. In particular, the cause of jerking is the worn surface of the flywheel under the driven disk. If the flywheel has not been replaced, there may be jerking when driving, and the car may also slip.
There is an opinion that the car may jerk due to incorrect installation of the clutch disc, that is, it was installed on the wrong side. Theoretically, this is possible on some car models. But the disc is designed in such a way that even depressing the pedal normally and moving off will not work with this installation.
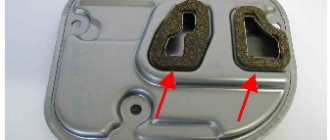
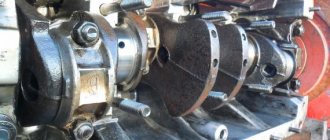
ABOUT THE DEVICE AND PRINCIPLE OF OPERATION
It is a regular roller bearing of a specific design.
In the clutch mechanism, it is destined to serve as a stop for transmitting the forces that will come from the pressed pedal. The bearing then transmits this movement to the pressure plate to break the connection between the basket and the flywheel. Without this, it is impossible to turn on the speed and start moving. Its structure can also be judged from the photograph.
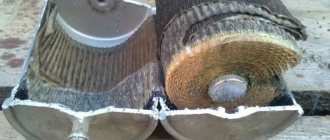
Release bearing disassembled
From the photo you can see that it consists of three main parts:
- Clip with guide bushing;
- Roller bearing;
- Fixing washer.
If there is a noise or whistle after replacing the clutch
Many car owners often complain that after replacement, a noise or whistle appears that was not there before. What could be the reasons for the extraneous sound and why does this happen?
- The new release bearing turned out to be of poor quality or does not contain enough factory lubricant. A whistling or noise appears when you press the clutch pedal. Many people mistakenly believe that the bearing makes noise when the clutch is disengaged. But this is even illogical, in this state the part does not bear the load, and accordingly the noise (whistle) in this state is minimal.
- The clutch basket has unevenness and roughness at the tips of the pressure petals. Typically, spare parts from Russian manufacturers have such a defect. It should be noted that as the parts are ground in, the whistle that appeared initially disappears. You can temporarily eliminate the noise by lubricating the petals with lithol. But this can be done without disassembly on GAZ cars; on front-wheel drive cars, to perform a similar procedure it is necessary to dismantle the gearbox.
- It is possible that before replacing parts, the car owner did not pay attention to extraneous noises such as whistling, as he was expecting repairs. But after replacing the clutch, extraneous sounds remained, which the owner of the car did not expect. Noises are often caused by the gearbox. If, when the clutch is depressed, the unpleasant sound disappears or noticeably subsides, then most likely this indicates wear on the gearbox input shaft bearing.
- The driven disc linings have roughness. A rustling noise occurs when changing gears. There is no need to worry too much ahead of time - the new parts will get used to it, and the defect will disappear during the operation of the car quite quickly.
- The input shaft bearing in the crankshaft may also make noise. When disassembling the car, you should do an external inspection of the bearing. If it is very dry, it must be lubricated with lithol or other suitable lubricant. It is better to replace a clearly worn part immediately.
Noise additives in the box
Transmission noise reduction additives can temporarily reduce the noise during operation. However, the cause of the hum will not be eliminated. Therefore, it makes sense to use additives only for preventive purposes or during pre-sale preparation of a car in order to get rid of it as quickly as possible.
Different types of additives are suitable for different problems, so when choosing one it is important to determine exactly what is humming in the box. The most popular attachments for reducing noise in manual transmissions are:
- Liqui Moly Getriebeoil-Additiv . Forms a protective film on the surface of parts due to molybdenum disulfide, and also fills microcracks. It effectively reduces noise in manual transmissions and extends the service life of the transmission.
- RVS Master TR3 and TR5 are designed for optimal heat removal during constant overheating of the unit. Which also helps reduce noise in the box.
- XADO 1Stage . This additive can be used in any transmission - mechanical, automatic and robotic. Contains boron nitride. Removes noise and vibration in the gearbox. Allows you to get to the workshop in the event of a critical loss of oil in the gearbox.
There are similar additives in automatic transmissions. Examples for automatic transmissions include:
- Liqui Moly ATF Additive . Complex additive. Removes noise and vibrations, eliminates shocks when shifting gears, restores rubber and plastic transmission parts. Can be used with ATF Dexron II and ATF Dexron III fluids.
- Tribotechnical composition Suprotek . Can be used with both automatic transmissions and CVTs. The additive is restorative, including removing vibration and noise in automatic transmissions.
- XADO Revitalizant EX120 . This is a revitalizant for the restoration of automatic transmissions and transmission oil. Eliminates shocks when shifting gears, eliminates vibration and noise.
The additive market is constantly being replenished with new compounds to replace old ones. Therefore, the lists in this case are far from complete.
Conclusion
Most often, a manual transmission is noisy because the oil level in it is low, or the oil is of the wrong viscosity or is old. In second place is bearing wear. Less commonly, wear of gears and couplings. As for automatic transmissions, similarly, most often the cause of the hum is low oil level, wear of gears and bearings, and malfunctions of hydraulic system elements. Therefore, the first thing to do when a howling or noise of a different nature appears is to check the oil level, and then look at the situation, under what conditions it occurs, how big the noise is, and so on.
In any case, it is not recommended to operate any transmission that makes a hum or shows other signs of malfunction. In this case, the box will wear out even more and its repair will cost more. The exact cause can only be found out by disassembling and troubleshooting the unit.
If there is a knocking noise after replacing the clutch
As a rule, the cause of knocking after replacing parts is defective parts. In particular, there are dangling damper springs in the driven disk. Therefore, before installing such a spare part on a car, you need to carefully inspect it. Parts of the disk may also be poorly riveted. Knocks in the clutch area can occur due to a crack in the release bearing bushing (the bushings are often made of plastic). Even at the site where the bushing fits on the flange of the gearbox input shaft, play may form, which also leads to a knocking sound.
The knocking noise occurs due to a broken clutch basket petal, but such a defect occurs infrequently. Another reason for the knocking is a broken starter housing in the Bendix area; it rattles when the car moves. A tooth on the flywheel crown may break off, and it will also knock when touching the rotating parts.
Clutch slipping after replacing all its parts
After replacing all elements, adjustment is required, but many car owners ignore this point. The cause is slipping, the car accelerates slowly, the engine speed does not correspond to the speed of the car. The engine just roars, and the car is driving quite slowly, as they say, slipping.
In cars with a mechanical clutch cable, adjustment is made by the cable itself. In hydraulically driven machines, this process is carried out using a clutch rod. In modern cars, you often come across rods that do not have adjustments. But this does not mean at all that it cannot be produced. In such cases, adjustment of the clutch pedal itself is provided, but not everyone knows about this possibility.
The machine often slips due to wear on the flywheel surface in the place where the surface works in tandem with the driven disk. The mistake of many car owners is that they first of all change the disk, while completely forgetting about the flywheel. As a result, you have to disassemble the car twice to fix the problem.
How to change the release bearing on a VAZ 2114 with your own hands - step-by-step instructions with a disassembly diagram
It was previously noted that the process of replacing the VP is difficult precisely when removing the gear shift unit, so first study the device to understand the intricacies of dismantling.
List of necessary tools for replacement:
- Two jacks and supports;
- Set of spanners with ratchet;
- Mount;
- Minus screwdriver;
- Torque wrench;
- Container for draining oil.
Vibration that occurs after replacing clutch elements
There are few reasons why vibration occurs after replacing a clutch. Vibration usually appears in two forms:
- The pressure plate (clutch basket) is not balanced;
- During assembly, the driveshaft was installed in a different position from the original installation (but this only applies to rear-wheel drive or all-wheel drive vehicles).
By and large, on cars with front-wheel drive, you can inaccurately secure the wheel drive (CV joint), and the movement of the car will be accompanied by vibration and knocking, but this does not happen often.
If the clutch basket creates vibration, you can try moving it to a different position. As a rule, the pressure plate mounts are symmetrical. On many models, the basket is attached to the flywheel with six bolts, and the basket can be placed in three positions. In one position the vibration may disappear completely or be minimal. But it is better to exchange the warranty part immediately for another one. This will be less hassle for the car owner.