Running in the engine after repair
How to properly break in an engine after overhaul? Break-in is necessary after any intervention in the engine. If the intervention was:
1. minimal (for example, replacing a chain or camshaft), running-in can be a minimum of 500 km.
2. With normal, high-quality capital, the running-in period is 1500-2000 km.
3. the block was relined and the piston rings were replaced, but the pistons themselves remained old - with such a repair, the running-in should be much more (perhaps 3-4 thousand) and in the most gentle mode, i.e. never faster than 50-60 km/h, only a very smooth start and no force of the engine at too low or high speeds, i.e. Set yourself a range of 1800-2500 and stay within it. The problem in this case lies in the fact that new, unworn rings are placed in broken piston grooves. If the pistons have lived a hard life and the grooves are badly broken (the breaking of the groove can be assessed by the old ring - if its lower supporting surface is glossy, slightly play with waviness in reflected light and when you run your finger along it from the conditional center to the outer diameter, a step of wear will be felt, then In this situation, the pistons definitely need to be replaced), there is a chance of breaking the rings even when starting the engine. The fact is that the groove in the piston is broken in such a way that its lower plane seems to tilt down. The old ring also wore out along the supporting surface with the same slope, but the new one will begin to twist and has a chance of breaking either immediately or after accumulating a certain amount of fatigue. In general, for pistons, the wear criterion is determined precisely by the breaking of the groove of the upper compression ring; everything else practically does not wear out.
Run-in - 800 km/oil change, 2000 km/oil change. Break-in oil 10W-30, further according to the manual.
Here's another, more correct one:
It is necessary to break in the engine in two cases: when the car has just left the assembly line or after a major overhaul. Run-in is carried out so that all parts and systems of the car “get used to”, thereby increasing the service life of the engine.
In case of incorrect break-in, not very pleasant surprises await you, for example: oil in the air cleaner, high fuel consumption, problems with starting the engine, and so on. Therefore, at first, after buying a new car or major repairs, you will have to follow several boring but necessary rules.
The first and most important rule is not to load the engine, that is: do not drive at high speeds, do not load the car with a large number of passengers and cargo, do not suddenly slow down, drive less in low gears. The first rule applies until the car has traveled about 1,500 kilometers. The second rule is watch your speed. Until the car has covered its first two hundred to three hundred kilometers, the maximum speed should not exceed 80 km per hour. You should (as far as possible) drive at a constant speed, no acceleration, and try not to downshift. To do this, you need to choose a route with minimal congestion and, preferably, without sharp turns. It is best to go for a run-in late in the evening, when there are few cars on the roads, this will allow you to fulfill the second rule.
After the car has traveled over three hundred kilometers, you can gradually increase the speed, within reasonable limits, of course. But still try to drive at a constant speed.
The third rule is don’t skimp on the butter. It is advisable to change the oil at least four times during the entire break-in period. The first replacement must be made when the car has traveled at least five hundred kilometers. Then after 1000 kilometers and at this time the engine should be flushed. The next replacement is after 1500 kilometers, and the last one after 2000 km. Use only natural, high quality oils recommended by the car manufacturer.
After the break-in is completed, change the oil again and flush the engine. Now you can fill in synthetic oil, this will no longer harm the engine. The next replacement can be made after 5000 - 6000 km. A machine accustomed to gentle operation should not be heavily loaded immediately. Any machine is susceptible to sudden overloads, so take care of its “health”, this will save your nerves, money and time. A properly run-in car is less likely to end up in a service center with breakdowns, saves fuel, and picks up speed faster.
When is it needed?
First, let's figure out when it is required. Naturally, the answer will be - after replacing the piston rings, but not everything is so simple here. People often argue that not in all cases it is necessary to break in the engine. For example, there is a fairly stable idea that if no grinding has been done, then running in is not required. Unfortunately, it is not. Let's look at why this is a false statement.
In any case, if you removed the piston, it means you did some work to replace parts. In our case, the piston rings were changed. Accordingly, no matter how correctly and carefully you install them, at first they will be a foreign body in the engine. This will happen until the rings rub against the piston and cylinder. You need to understand that break-in is necessary in any case when new components are installed in the engine.
Types of running-in
There are usually two types of running-in. They need to be distinguished. After all, correct use of this procedure can increase the resource by up to 20%. This is a very good indicator that will allow you to save on further engine maintenance.
Typically, break-in is understood as a procedure that is performed after a major overhaul of the engine. As a rule, in this case, all the main components are completely replaced, usually only the block and its head are left. In this case, you get an almost new motor. But in order for the parts to get used to each other, a thorough running-in is required. Large services use special stands for the initial procedure. This is impossible in a garage, so you just need to carefully monitor the operating mode of the engine while traveling.
Another point is a partial overhaul of the engine.
. This includes the break-in we analyze after changing the piston rings. Here you need to monitor the process a little less, but there are some nuances that simply need to be taken into account. Also, usually in this case, the mileage for grinding in is shorter, which speeds up the process. Below we will consider in more detail all the listed varieties, so you are guaranteed to avoid mistakes after repair.
What to do if wear occurs?
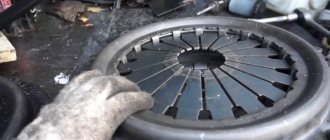
Having discovered that the problem lies in the failure of the cylinder-piston group (CPG), you can use two methods. The first is to purchase the entire CPG, but this option requires large financial investments. However, the owner will not have to waste time searching for a turner on his own and will be able to complete the replacement procedure without outside help.
On the other hand, if you have an original cylinder, it becomes possible to bore the worn-out one using turning equipment. The procedure is as follows: the owner takes the old cylinder with him to the turner. The specialist visually assesses the condition, after which he indicates the repair size. There are four in total:
- 0.25
- 0.5
- 0.75
- 1.0
These numbers indicate an increase in millimeters to the existing diameter. This amount of metal is ground down during the processing of the inner walls of the cylinder. When boring, the coefficient of thermal expansion of the metal that occurs during engine operation must be taken into account. Therefore, another fifth hundredth of a millimeter (0.05) is added to the indicated number. This will not affect the compression level in any way, and the power unit will not receive a temperature wedge. After assessing the bore diameter, you will have to buy a repair piston. Having purchased it, they pass it along with the cylinder to the master for boring.
How to do it correctly?
Before starting the process, you need to carry out a number of actions that are mandatory for any type of work. They are standard and apply in any case. At the very beginning, the following procedures are done:
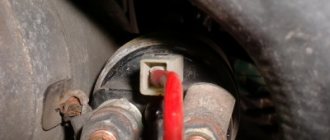
- Be sure to fully charge the battery;
- Before leaving, you need to carry out the next cycle. We start the engine, heat it to 80°C, then turn it off. As soon as it cools down to 40°C, warm it up again. In total you will need to do 7-10 cycles. During which thermal expansion of parts will occur, as well as their initial preparation;
- After all the above steps, be sure to inspect the engine for leaks of oil, antifreeze and other technical fluids. If we find such a phenomenon, we will definitely eliminate it;
- Regardless of the reason for which the procedure is performed, movement with height differences should be avoided;
- At the last stages of lapping, strictly follow the manufacturer’s recommendations regarding optimal engine operation during travel.
These rules apply to all types of engine running-in, regardless of what you did in the car.
The next 700-800 kilometers
You can drive in the same mode, but not at once. That is, you can freely use the car for business trips, but just do not load it. The last 500 kilometers adhere to the manufacturer's recommended operating mode, but at the same time avoid stressing the engine. After this, the oil and filter must be changed. Then you can safely operate the car in your usual mode.
see also
Comments 27
if the pistons are old (that is, there has been no major repairs), then 500 km is enough, and then at least until the cutoff!
and I still couldn’t get through the break-in after replacing the rings... T__T
and how does it feel without running in? how far have you run?
who the hell knows) I’ll never get around to measuring the compression) 7-8 thousand
how does it feel? and how long did it take for it to start to pile on?
I didn’t have enough patience) and the carbs at that time were not yet properly tuned, they drove normally only after 3k revolutions
okay) I just changed the rings and head on mine, in about 20 minutes I’ll do the first launch and, as luck would have it, I have to go straight to the highway and head to another city. I’m wondering how long I’ll last)))
Well, I think 90 is not too hard to go without overtaking and it will be fine
I will try. ok let's go finish it
I replaced the rings on mine, drove about 500 km, changed the oil, now I drive in normal mode, rev the engine to 3.5 in every gear, at first there were overtones after 3000, now everything has returned to normal, the sounds are gone, the car drives boldly, cheerfully...
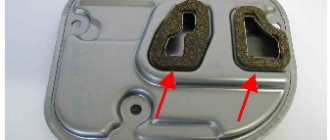
Why does the engine eat oil?
Sometimes, after replacing the oil scraper rings, grease continues to be wasted unnecessarily. In this case, the reason is probably not only in the rings. This usually happens when there are problems with valve stem seals.
This part can be found on the valves. They remove excess lubricant from them and prevent it from entering the combustion chamber. It is recommended to immediately replace the caps during any engine overhaul so as not to disassemble the engine twice.
Conclusion
. Sooner or later the engine has to be repaired. In this case, running in the engine after replacing the piston rings is simply necessary. This work must be done correctly in order to significantly increase the service life of the repaired unit.
Beginning of work
You will learn how to turn on STIHL chainsaws from this detailed description and illustrations
Please note that the first start of the STIHL saw must be carried out STRICTLY according to these instructions
Note The instructions provided for operating the chainsaw should only be considered as a supplement to the operating instructions for your STIHL chainsaw. The STIHL saw startup illustrations are for illustrative purposes only and do not apply to specific chainsaws because different types of chainsaws may have different controls. Before using the chainsaw, familiarize yourself with its design and carefully read the instruction manual. If you have any questions, please contact your dealer directly.
- Step 1 of 15: Before starting the chainsaw, apply the chain brake. To do this, press the chain brake forward (see illustration).
- Step 2 of 15: Before starting the chainsaw, be sure to remove the bar guard.
- Step 3 of 15: If your chainsaw has a decompression valve, press it. This will make it easier to start the engine and, thereby, start the chainsaw.
- Step 4 of 15: If your chainsaw has a fuel pump, press it. This will make it easier to start the engine and reduce the number of pumps.
- Step 5 of 15: Set the combination lever to the throttle/cold start position. To do this, first activate the throttle lever lock and the throttle lever itself, and then press the combined lever all the way down.
- Step 6 of 15: Place the chainsaw on a level surface before starting. The cutting attachment must not come into contact with the ground, otherwise it may become dull when starting, and you will needlessly expose yourself to danger.
- Step 7 of 15: Grasp the chainsaw lying on the ground with both hands. In this case, the left hand should be located on the handle, and the right hand should be on the starting cable. Step on the rear handle with the toe of your right foot to ensure the stability of the chainsaw.
- Step 8 of 15: Slowly pull the starter cord with your right hand until you feel resistance. After this, pull the starting cable with force several times so that the engine starts for a short time (if possible, pull up so that the cable does not rub against the fan housing).
Chainsaw startup process (1.2 MB)
- Step 9 of 15: The engine starts only briefly and then turns off again. Open the throttle by moving the combination lever up one detent position (half throttle).
Chainsaw startup process (1.2 MB)
- Step 10 of 15: Pull the starting rope again until the engine starts again.
Chainsaw startup process (1.2 MB)
- Step 11 of 15: Once the engine starts and runs, briefly press the throttle lever with your index finger. This moves the combination lever to the normal idle position.
Chainsaw startup process (1.2 MB)
- Step 12 of 15: Slowly lift the chainsaw off the ground, being careful not to touch the throttle lever.
Chainsaw startup process (1.2 MB)
- Step 13 of 15: After this, release the chain brake by pulling the chain brake handle towards you with your left hand. In this case, the left hand should remain on the handle. A characteristic click means that the chain is unlocked and can move along the bar.
- Step 14 of 15: Before you begin, be sure to check the chain lubrication system. To do this, place the saw on a light background (for example, a stump or a piece of paper laid out on the ground) and give full throttle. If oil stains appear on a light background, this means that the chain lubrication system is functioning normally and you can start working.
- Step 15 of 15: The chainsaw is ready for use. For safety instructions when working with a chainsaw, see the instruction manual.
Chainsaw startup process (1.2 MB)
When to perform break-in after replacing piston rings
Installing new components into an engine always requires a break-in period. This applies not only to piston rings. It is well known that break-in is required after a major overhaul of the engine, or if the engine is completely new.
The break-in procedure itself implies that the components “grind in” to each other. When replacing piston rings, running-in is required so that they get used to the piston or cylinder. Despite the fact that the dimensions of the parts are standard, they wear out during operation due to a number of technological features. Accordingly, by installing new rings into an engine where old parts remain, complete size matching cannot be achieved. That is, it takes some time to break in the engine so that the parts fit together perfectly.
First launch after major overhaul
The first start of the internal combustion engine is carried out according to the following scheme:
- Fill in engine oil. It will take 10 minutes for the lubricant to fill the system. The oil filter is left dry to avoid air lock.
- Connect the fuel pump or supply fuel manually.
- Open the throttle manually if there is no automatic drive.
- Start the starter.
- Spin the motor up to 2000 rpm.
- Leave to idle for 15 minutes until engine rotation becomes stable at operating temperature.
- Turn off the unit and wait for it to cool completely.
Similar article: Correctly changing engine oil in a car engine
During startup, the pressure in the lubrication system is monitored. The indicator signal for 4 s indicates incorrect engine assembly. We urgently need to turn off the engine! If the pressure quickly stabilizes, the internal combustion engine is warmed up to operating temperature.
There should be no leaks upon visual inspection. In the first 3 minutes, the engine may knock: the hydraulic compensators are being pumped or the cups are running in. In the future, the sound should become uniform, without vibration. The appearance of a burning smell and slight smoke for the first start is normal - the assembly lubricants are burning through.
If the internal combustion engine is operating stably, start running-in. In order to properly run in the engine after a major overhaul, you need to understand the nuances of the test.
What types of engine running-in are there?
Proper engine running-in is an important component of success. It is important to understand that there are several types of break-in:
- After major renovation. Run-in after a major overhaul assumes that all engine components need to be ground in, since most of them are changed (usually, after a major overhaul, only the cylinder block and its head remain). That is, in fact, a new engine appears before the driver. It is better to run it in at a service center using special equipment;
- After a partial overhaul of the engine and replacement of some components. This includes running in after replacing the piston rings. This run-in is performed directly on the road. There are rules that need to be followed and these will be discussed below.
It is worth noting that when overhauling an engine in a “garage,” drivers often perform a run-in “in combat conditions,” that is, on the road, without using special equipment. This is not entirely correct and can lead to a decrease in the service life of the motor.