Replacing the boot on the external CV joint of a VAZ 2112 car
Torque is transmitted to the drive wheel from the gearbox using the vehicle's constant velocity joint - CV joint. The operation of the running system depends on how well the unit is in good condition. Although the elements of CV joints are made of durable materials, signs of their malfunctions can appear even in cars that have recently left the assembly line of a car plant. The most common causes of breakdowns are:
- Poor quality of VAZ 2112 CV joints, use of fakes or defective parts.
- Complete absence or low quality of lubricant materials.
- Damage to the boot and, as a result, abrasive debris and moisture entering the unit.
- Aggressive car driving style.
- Poor condition of roads.
All this affects the reduction of the period when it is necessary to replace the boot of the VAZ 2112 CV joint. The article suggests how to perform the operations yourself, without the involvement of car service specialists.
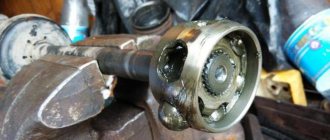
As a result, the CV joint boot wears out in the VAZ-2110
The outer CV joint boot can be replaced without removing the main element if the work is carried out on an external car grenade.
However, it should be clarified that it is the outer element that most often fails, since it is adversely affected by particles from the outside. Due to the additional sealing, internal axle shafts are subject to less wear, so these components are replaced much less frequently. The main reason for the malfunction of the VAZ-2110 CV joint boot is its wear, which leads to rupture of the element. If the protective sealed layer is broken, small particles from outside can easily penetrate the car grenade, for example:
In addition to the above particles, automotive lubricant will get onto the unprotected element, which will adversely affect the friction process of the hinge surface. As a result, other car parts, for example, knuckles, clips and balls, will become unusable much faster. A worn joint cannot be repaired, so replacing the CV joint boot in a VAZ-2110 remains the most correct solution. Replacement of a worn boot can be confirmed visually by the car owner himself. This event is required if:
Which is cheaper? Change the CV joint boot
or change
the CV joint itself?
approximate cost
In Russia, you can buy a new grenade at a price from 700 to 1300 rubles .
Approximate prices depending on the type of CV joint:
- Outdoor – from 700 rubles .
- Domestic - about 1200 rubles .
Approximate prices depending on the manufacturer:
- AvtoVAZ - about 1100 rubles .
- PRAMO - from 700 rubles .
- LGR – from 980 rubles .
- Lucas - about 1300 rubles .
- Hofer - about 1200 rubles .
- Pilenga – from 850 rubles .
An old spare part in Russia is sold for about 400-500 rubles .
List of tools that may be needed when replacing CV joints
To carry out repair and replacement of CV joints, you will need the following tools and materials:
- hammer,
- punch,
- mount,
- screwdrivers,
- powerful car lock,
- vice,
- wooden spacer,
- gasoline for washing removed components, CV joint-4 lubricant.
Replacing a CV joint on a VAZ 2109 - operating procedure
First, you should remove the handbrake handle and secure the front wheels with a stop. Then you need to unscrew the hub nut while the car is on the ground. Next, you should raise the car and support its front part. The next step is to remove the wheel and wheel hub thrust nut. Next, the tie rod end must be disassembled. Using a special puller, press the finger out of this assembly. Subsequently, you need to unscrew the ball joint mounting bolts. After the steering knuckle with the stand is moved to the side, it is necessary to remove the splined end of the outer CV joint from the wheel hub. Then, in order to squeeze out the CV joint, you need to use a pry bar.
It should be noted that if the repair work affects all CV joints on both sides of the car, then the old part should be installed instead of the removed part, otherwise during assembly you will encounter the fact that the CV joints will not be installed in their designated place.
It should also be noted that if during the operation of your vehicle you could observe oil leaks near the gearbox, then most likely you will have to replace the CV joint seal. The old part should be pulled out with a screwdriver, and the new one should be pressed into this place until it stops.
It should be understood that the entire repair process in this case is not very labor-intensive, just like repairing a steering rack, however, in this case it is necessary to take into account the recommendations of experienced motorists, which state that replacing the inner CV joint, as well as replacing the outer CV joint, should only be done with similar spare parts assembled. In this case, replacing individual elements is not recommended, unless it is possible to replace the inner CV joint boot or other similar components.
After the shaft with CV joints is removed, the following manipulations must be done: the shaft is installed in a vice, after which the cover clamps are removed. Using a drift, the inner CV joint is knocked out. A similar sequence of actions applies to the outer CV joint. But installation on the shaft is done in reverse order.
Here it should be taken into account that the right shaft is longer than the left one
Before final installation, it is necessary to check the presence of the proper amount of lubricant in the CV joints. During assembly, new clamps must be installed, and during the installation process, care should be taken to ensure that no contamination gets inside the CV joint.
Installation of the CV joint in its designated place is carried out using a hammer and a wooden spacer, and the movements should not be sharp or strong. After the CV joint is placed, the CV joint boot should be installed
During the installation process, it is very important to bend the edge of the boot with a screwdriver, thereby equalizing the pressure inside and outside this element
It should also be noted that if the described process seems too labor-intensive to you, you can always contact a car service. Since such a replacement is quite common, it will take very little time for a professional. Another operation that you can do yourself is pressing in the silent block.
Where to buy?
If a grenade is needed for a VAZ 2112, then the owner of the car should decide on the place of purchase and the type of part. Car mechanics are advised to take new original spare parts due to their ideal compatibility with the car and long service life. Such a CV joint can be purchased at an auto parts store for VAZ cars or an online store.
If you don’t have enough money to purchase a new auto part, then you should consider the old versions of grenades. They are sold at car dismantling points, at the car market, by advertisement.
Replacing the outer CV joint on a VAZ 2112
On cars with front-wheel drive, instead of a driveshaft with crosspieces, constant velocity joints (CV joints) with axle shafts are used. Both crosspieces and CV joints tend to fail. This article discusses in detail: replacing the external grenade of a VAZ 2112, visual photos for a better understanding of the process and practical advice from an auto repair specialist.
- Why does the CV joint fail? Principle and working conditions
- How to determine if a hinge is faulty? Diagnostics
- What will you need?
- Replacement
- Removing the axle shaft
- Grenade replacement
- Installing the axle shaft on the car
Design
Drive diagram If you disassemble the CV joint, it will consist of three main elements:
- Inner ring;
- A ring with holes that hold six balls - a separator;
- The hinge body together with the drive shaft.
In a VAZ 2110 car, the CV joint may need to be replaced. But which one exactly? After all, in the “ten” there are two of them - internal and external. They are necessary in order to effectively overcome all obstacles. Here one CV joint will clearly not be enough.
Internal and external
- The first grenade is internal, and it transmits torque to the shaft from the transmission.
- The second grenade is external and engages with the car's wheel hub.
Required spare parts
Each car is equipped with two grenades: internal and external. The first joint transmits rotation to the shaft from the gearbox, the second – to the hub from the shaft. Depending on the scope of the repair, you may need:
- internal hinge (article 302315, 2108-2215056);
- external CV joint (article 3107K, 2110-2215012);
- front wheel drive shaft (article 2110-2215070, 21100221507000);
- cover (article 2110-2215068, 21100221506800, 2108-2215068);
- buffer (article 2108-2215073-01);
- hinge clamp (article 2108-2215086);
- internal hinge retaining ring (article 2108-2215104, 21080221510400, 2121-2215084);
- thrust ring (article 2121-2215082);
- clamp (article 2108-2215034Ч, T-00040, 2108-2215036, 2108-2215034-31, 2108-2215034);
- protective ring (article 2108-3103060, 21080310306000).
Functionality check
The condition of the inner and outer CV joints should be examined separately, since the procedures and symptoms are somewhat different.
External grenade
The most obvious and main sign of wear of this element is the appearance of a sound similar to a crunch. It appears because the grooves have worn out and the balls do not move along them as well as before. The crunching becomes noticeable when entering turns, sharply pressing the gas pedal or passing difficult road sections.
Grenade
If you want to verify that the outer CV joint is faulty, do the following:
- When starting from a standstill, deliberately create jerks, but not strong ones;
- Try to accelerate sharply and slow down;
- Move the shaft transversely between the CV joints. If you feel any play, then the grenade is definitely worn out.
Internal grenade
It is noteworthy that the internal hinge is more durable and less subject to wear. Most often, the inner CV joint declares its malfunction when simply driving in a straight line or when passing through difficult sections. A check for play, similar to an external grenade, will allow you to verify problems.
But to understand whether an element really needs to be replaced, do this:
- Raise the drive wheels, which will allow you to bring the inner CV joint to its maximum angle;
- Start the engine;
- Turn on first speed;
- If the hinge is at the limit of wear, you will hear a characteristic crunch. This is a signal that you need to change the grenade.
Diagnostics of CV joint operation
Any part during operation is subject to wear, which is accompanied by a change in its size and the formation of gaps between rubbing parts. So:
- A CV joint is a hinge, which indicates the presence of elements that are in close contact with each other under constant load. This is something like a ball bearing, which has cages with transverse grooves that allow you to change the angle between the driven and driven axle shafts.
Over time, the formation of a hole increases the gap between the parts, which leads to the appearance of extraneous noise.
- A characteristic “crunch” appears. Most often it occurs when turning or sharply accelerating the car.
The following will help you make sure of the final condition of the CV joints:
- When starting the car or changing its dynamics, slight jerks appear.
- When the shaft located between the CV joints moves, play occurs in different planes.
Grenade replacement
Tool for the job
What is needed to ensure that the replacement of the VAZ 2112 CV joint takes place as quickly and efficiently as possible:
- Sockets and spanners
- 30mm head (not available in some sets)
- WD-40 or similar product
- Hammer
- Collar - the longer the better
- Pliers
- Jack
- Screwdriver
- Vise
- Gasoline and brush for cleaning surfaces
- Metal brush
- Attachment (bronze, copper)
- Metal brush
- Can't do without a partner
- And, of course, a CV joint complete with lubricant (if it is missing, you should purchase it - the price is reasonable)
Removing the axle shaft (wheel drive)
So, let's begin our renovation:
- The first stage is standard. We drive the car into the pit, put wheel chocks, put the car in handbrake and neutral, pray (optional) and go!
- When changing, oil must be drained from the variable gearbox housing! To do this, unscrew the required plug, place a container for the oil, wait for the drain to finish and screw the plug back.
- We remove the cap, if there is one, put a friend behind the wheel and ask him to press the brake hard.
- At this time we take a 30mm head and a larger knob. Using this tool, unscrew the hub nut, which is located in the middle of the wheel.
- The tightening force of the nut is large, therefore, the longer the knob, the easier it will be to unscrew it.
- After unscrewing the nut, the car should be raised with a jack. Raise the car and remove the wheel. Be sure to place a stand under the car in the form of, for example, hemp. Do not work on a vehicle that is on a jack!
- Unscrew the wheel bolts and remove the wheel from the car.
- We completely unscrew the hub nut, remove the metal washer and spray the splined connection of the hub with the outer grenade with WD-40 rust cleaner.
- In order to remove the axle shaft from the car, it is necessary to free the hub. Using the required wrench or socket, unscrew the two bolts securing the VAZ 2112 ball joint to the hub.
- After this, using a bronze or copper adapter, in order not to damage the thread on the outer grenade, we try to dislodge it (the grenade) from engagement with the hub, adding a rust preventative to make it easier.
- When the parts are disengaged, you can move the shock absorber strut to the side and remove the axle shaft (remember, you need to drain the oil, otherwise it will simply leak onto the floor).
We got the VAZ 2112 axle shaft, now let's start replacing the CV joint.
Removing and installing a new CV joint
So:
- The removed axle shaft must be clamped in a vice for convenience in further work.
- Using a screwdriver and pliers, you need to remove the boot. We unbend the two clamps securing the boot and tighten it onto the axle shaft.
- Now, using a head and a hammer, you should knock the grenade off the axle shaft. The attachment should be placed on the internal bearing housing of the grenade, and not on the body.
- After removing the grenade, you need to remove the old boot and put on a new one, if you plan. It is recommended to change the boot along with the grenade.
- The splined grooves on the axle shaft must be cleaned and preferably washed with gasoline. And then you should wipe it off.
- The required amount of new lubricant should be placed in the new grenade. The lubricant used is a special “CV joint”, and not lithol or others!
- The grease is stuffed inside the CV joint with your finger, rotating the bearing so that the grease is better distributed in the grenade body.
- After this, you can put the grenade on the axle shaft. The grenade is placed on the spline joint and simply snaps into place with a sharp movement of the hand.
Now the axle shaft with the new CV joint is ready for installation on the VAZ 2112.
Installing the drive on the car
Now we do everything in reverse order:
- We insert the axle shaft into the gearbox housing and get into the splined engagement in the box.
- We insert the splines into the hub.
- We fasten the two bolts securing the ball joint to the hub, thereby securing the hub.
- We put on the washer and screw the hub nut onto the outer grenade and tighten it as much as possible.
- We put on the wheel, tighten the wheel bolts and lower the car onto the wheels.
- Now you should tighten the wheel mounting bolts and also tighten the central nut using a 30mm socket.
- To do this, you will again need the help of a partner pressing the brake pedal.
- Don't forget to fill the gearbox with oil.
- After pouring oil into the gearbox housing, check for oil leaks at the junction of the inner CV joint with the gearbox.
If necessary, repair the second axle shaft in the same way, replacing the failed grenades. Keep an eye on the condition of your car and then it will be a pleasure to drive not only for you, but also for your passengers. And most importantly, even your life may depend on the technical condition of any component of the car! Good luck on the roads!
Preparation
So, damage to the boot on the VAZ 2199 has been identified. You can replace it and wash the CV joint itself in the garage, the main thing is that there is an inspection hole.
Tools you will need:
- Set of wrenches (socket wrenches, open-end wrenches);
- Set of heads and collars;
- Metal brush;
- WD-40;
- Mount;
- Hammer;
- Jack;
- Wheel chocks;
- Wooden coasters.
You will also need a new boot, CV joint grease-4, a container for collecting oil, a container with gasoline for washing the CV joint, and rags.
How to properly remove and disassemble the CV joint in your garage
AUTOSIZE
Hello, dear car enthusiasts! Front drive wheels provide car owners with many bonuses in the form of: more responsive steering, increased maneuverability, stability on slippery roads and other delights.
In return, the machine, namely its chassis coupled with the drive, will require additional attention. The front wheels are able to pull the car only thanks to the presence of a shaft connecting the hub to the variable gearbox.
However, that's not all. It would be impossible to transmit rotation from the transmission to the wheels without special devices installed at the ends of the shaft - CV joints.
A constant velocity joint is, today, the only way to transmit rotational motion between axle shafts located at an angle to each other.
In this regard, any self-respecting car enthusiast should know how to remove and disassemble the CV joint, diagnose, maintain and repair it.
How to remove a CV joint yourself without the help of a car service
Despite the apparent complexity of the front-wheel drive design of a car, regardless of its make and model, the design of this unit is quite simple and similar in all cars.
In order to remove and replace the CV joint, it is enough to have a garage with an inspection hole or an overpass to facilitate access to the lower part of the car, as well as a set of standard tools.
As a rule, experienced car enthusiasts manage their work without any special devices, but if there is a desire to speed up repair work, you can purchase a CV joint puller.
Considering that each drive wheel has two hinges, repair work can be carried out depending on the following types of failure:
- removal of the internal CV joint and its repair;
- removing the outer CV joint;
- Removal and repair includes a shaft and two joints.
How to remove the inner CV joint in the garage
Repairing an internal CV joint is an event that is quite rare, but you must have the skills to handle this mechanism, because for its long life it is necessary to carry out preventive measures, replacing the boot and lubricant.
Before describing the technology that includes removing the internal CV joint, it should be noted that in this case, an inspection hole will be simply necessary, because the joint cage is bolted (6-8 pieces) directly to the differential gears, and this is the lowest point of the transmission.
After all the fastening bolts have been unscrewed, the steering wheel should be turned to free the spline joints from moving freely. Using a pry bar, the CV joint is very easily removed from the mounting socket. Removing it from the shaft is also easy; to do this, you just need to unfasten the retaining ring and the boot clamps.
A strong recommendation to all car enthusiasts: you should not remove the CV joint from the shaft under the car and, especially, do not disassemble it. It is much more convenient and rational to remove the shaft with two CV joints at the same time, and then perform all the manipulations on the workbench with a vice.
How to remove the outer CV joint yourself
The outer CV joint, which is installed directly at the hub, although more accessible, will require more time and effort to remove. Here you will have to almost completely disassemble the front suspension.
The wheel is removed, the hub nut is unscrewed and the lock washer is removed. After unscrewing the lower ball joint, the moving strut allows you to remove the CV joint axle shaft.
Repairing CV joints can be associated with certain difficulties. The first is the inability to remove the axle shafts or shaft from the splined joint. There are several options for getting out of the situation. First you need to take a wooden or brass spacer and try to knock out the axle shaft.
If nothing could be done at this stage, you will need a CV joint puller. One of the most common and simple pullers is made in the form of a horseshoe, which is attached to the axle shaft, and the thrust bolts remove the CV joint when rotating.
It is not difficult to disassemble the CV joint itself; for this you need:
- apply marks on the holder and body for reassembly in the same position;
- tilt the shaft with the holder at the end as much as possible to one side;
- Remove the ball from the holder on the opposite side and perform the procedure with all the balls in turn.
There is an opinion among some experts that it is enough to simply wash the CV joint with diesel fuel and “fill it in” with lubricant again without disassembling it.
In this case, there is a high probability that fragments of old retaining rings or other debris will remain inside. If the CV joint has already been removed, then it is better to disassemble it, wash it, reassemble it and lubricate it.
Installation of the CV joint after replacement or maintenance is carried out in the reverse order of removal.
What is this?
By grenade, service station technicians and motorists understand a device through which torque is transmitted to the steering wheels of a car without loss of power characteristics of the power unit.
If you operate the vehicle carefully and carry out maintenance on time, the grenade will last as long as possible. But poor quality of the road surface, savings on maintenance, aggressive driving - all this leads to the rapid failure of the constant velocity joint.
The driver of a VAZ 2112 understands that the CV joint has failed by the following signs:
Sometimes a grenade can be repaired. But more often than not, its malfunction is detected already at the stage when the part is severely worn out. Auto repairmen are advised to replace such auto parts with new devices.
Self-replacement of the VAZ 2110 CV joint
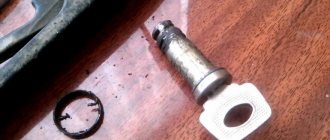
The CV joint (constant velocity joint) is shaped like a grenade. Its task in a car is to transmit torque to the wheels of the car. It includes 7 elements:
- outer ring in the housing;
- separator;
- balloons;
- inner clip;
- drive shaft;
- corrugated cover (aka boot);
- retaining ring.
Replacing the CV joint is required if there is play and crunching in the connections of the device when the wheels are turned. Before replacing it, you need to carry out diagnostics and make sure that it is the cause of the malfunction. To do this, you need to check the drive shaft play.
1 way. Grab the drive shaft with your hand and rock it. If there is a large stroke and play, the CV joint must be replaced.
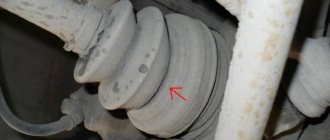
Method 2. After installing the car on the inspection hole, turn the steering wheel as far as possible to the right or left. If cracks or tears with traces of lubricant are visible on the boot, it means that the CV joint boot needs to be replaced. If this is not done, you will soon need to replace the entire part.
Algorithm for replacing the VAZ 2110 CV joint
Before you start work, you need to prepare everything. To do this, secure the car, engage 4th gear, and tighten the handbrake. Secure the rear wheels with wheel chocks. If they are not available, use bars of a similar shape. Remove the protective cap, unscrew the hub nut using an “arm” (extension) - a pipe or a pry bar. After the hub nut is removed, unscrew the wheel mounting bolts.
Also check out
- Using a jack, hang up the wheel on which the CV joint is supposed to be replaced.
- Unscrew the bolts to remove the thrust washer of the hub nut.
- Remove the 2 bolts that secure the lower ball joint of the steering knuckle.
- If the CV joint is being replaced on the right, turn the steering wheel as far as possible to the left, and if on the left, then to the right.
- Pull out the steering knuckle and strut. Remove the splined end of the outer CV joint from the hub. Using a pry bar, remove the inner joint from the gearbox.
- Fix the drive shaft in a vice, remove the clamps from the outer and inner CV joints. Turn the anthers inside out. If they are torn or cut somewhere, you can simply cut them off with a knife.
- Remove the VAZ 2110 CV joint from the shaft. You can use a hammer and a wooden or bronze adapter.
Assembly is performed in reverse order. At the same time, install a new hub nut. Upon completion of the tightening, you need to touch its edge to avoid unwinding.
- When installing the inner CV joint, a plastic plug is placed on the end of the shaft.
- Before installing the VAZ 2110 CV joint, you need to make sure that a sufficient amount of lubricant is applied. Place a retaining ring on the inner CV joint.
- After the drive is placed in the box, place it in the side gear so that it is completely locked. This can be done by lightly tapping the surface of the wooden adapter with a hammer along the entire perimeter of the shaft axis.
We recommend reading
Naturally, the idle speed controller (IAC) is responsible for the idle speed of the engine; with its help, the optimal speed required at .
Let's get acquainted with the process of replacing ball joints on VAZ 2107 cars. To replace the ball joint, you will need to put the car on a lift or.
Other articles have already described how to replace the fine filter on Lada Kalina cars. Today this procedure will be discussed on.
If the fuel used for the car is good, then the fuel filter will need to be replaced after a mileage of 20-30 thousand kilometers. Today, .
Order of Operations
If there is no inspection hole or overpass, you need to prepare a place for repairs. Raise the car with a jack, put on the handbrake, provide the work area with good lighting, and support the wheels with clamps.
Replacing the inner CV joint of the VAZ 2110 and other models is carried out in the same way as the outer joint. They are both located on the shaft drive, which you need to get to first:
- On the crankcase protection, two nuts are unscrewed at the front and rear.
- You need to drain the oil from the box - 40 percent of the total volume.
- When replacing the right CV joint on a VAZ 2110, the wheel bolts come off on the right; if the left one is changed, the wheel bolts come off on the left.
- The outer hinge fasteners are completely unscrewed.
- Now you still need to jack up the car and remove the wheel.
At this stage, two hub bolts securing the grenade become accessible; they need to be removed.
- The hub needs to be separated from the rods, this is done with a pry bar.
- The stand is pulled forward and the CV joint pin is removed from the hub.
- The shaft drive is removed and set aside.
Now you need to remove the inner grenade from the box. With the hood open, you need to insert a pry bar between these elements. Then the tool jerks the hinge towards the box. The grenade should move. If this does not happen, the operation is repeated again. If the CV joint moves, then both hinges and the shaft can be removed from the wheel arch area. - You need to remove the covers from the grenades; to do this, use pliers or special pliers to open the small and large clamps.
- The boot must be inspected for integrity. If the cover is damaged, it must be replaced. If the boot is in good condition, you can simply move it away.
Use a hammer to remove the inner hinge. They need to hit the clip hard. The grenade should fly off. The same action must be performed on the other side.The rings are removed from the shaft drive, new ones are installed in their place and the boot is put on.
- The new grenade is also installed using a hammer. It and the boot need to be lubricated.
- The covers are secured to the hinge and shaft with clamps.
- A nut is screwed onto the grenade, then the hinge is driven into the box.
- Further operations are similar to the first, but are performed in reverse order.
See this video for the sequence of replacing the outer and inner CV joints of VAZ 2110 2111 2112:
Basic faults
The most common failures of a grenade include: failure due to contamination and due to wear of the part (end of service life or defect).
A faulty grenade can itself reveal its unsatisfactory condition in the form of crunching sounds, crackling sounds when turning wheels, and body vibrations. But in this case, you will have to buy a new part, but you can notice the malfunction much earlier (at the stage of damage to the cover) and prevent serious repairs.
There are several ways to identify a breakdown:
- shake the drive shaft with your hand. If play is detected, the element should be replaced;
- Turn the steering wheel all the way to the left, and then to the right, and at each stage assess the condition of the anthers. If damage (cracks, breaks) is detected, replace them.
The CV joint is protected by anthers from getting dirt into it, which disables the part. But their service life does not last forever; regular inspection of these parts is necessary (as described above) to prevent more serious damage to the grenade.
When operating a car with a faulty joint, also known as CV joint, there is a high probability of it breaking in half. In this case, the vehicle will not be usable. This means repairs will be required and most likely (if this happens on the road) expensive tow truck services.
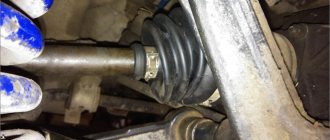
torn boot of the outer CV joint of a VAZ 2110
It is recommended to replace the grenade in a timely manner to avoid unpleasant situations.
An internal CV joint will cost an average of 1,500 rubles, an external CV joint will cost 1,300 rubles. For the anthers they will ask about 150 rubles each. Replacing anthers will cost much less.
Replacing CV joints at a car dealership will cost 1,200 rubles (600 rubles each).
It is recommended to buy a new part using an old one, so the likelihood of an incorrect purchase is minimized. In addition, the purchase of CV joints should be carried out in trusted stores. You should not buy these parts at a disassembly site; it is possible that a breakdown will occur within a few meters.
It is recommended to drive the car onto an inspection hole or overpass, put the handbrake on, engage the gears and support the rear wheels with wheel chocks to ensure safety during repairs.
We arm ourselves with the following tools: wrenches 17.19, socket 30 and 13-17, mount, wheel wrench, wrench, lift (jack), lubricant and pliers.
Both hinges, internal and external, are located on the shaft drive, which means replacing them is identical and the point is to get to this very drive.
- At the rear on the crankcase protection we unscrew two nuts with a 19mm wrench, and at the front there are also two, but with a 17mm wrench.
- Drain a little oil (less than half) from the box.
- From the required side we tear off the wheel bolts with a balloon.
- Unscrew the nut of the outer grenade using a 30mm socket.
- We lift the vehicle using a jack.
- We remove the wheel by unscrewing it first.
- Find the bolts on the hub that secure the CV joint and unscrew them using a 13mm wrench (only two bolts).
- Use a pry bar to move the hub away from the reaction rods.
- We take the grenade pin out of the hub, to do this we pull the stand towards ourselves.
- We move the shaft drive aside.
- Now you need to remove the inner hinge from the box. To do this, open the hood and, using a pry bar inserted between the parts, jerk it towards the box. The CV joint must move, otherwise we repeat the action. As soon as it works, we go down to the wheel arch and remove the shaft drive with two CV joints.
- Remove the clamps (large and small) of the protective cover from the hinges. If damage to the anthers is detected, we replace them; if the condition is satisfactory, we move them to the side.
- Using a hammer, we hit the inner clip of the inner grenade with force, making sure that it flies off. We repeat similar actions on the other side.
- We remove the old rings from the shaft drive, put on new ones and a boot.
- We install the new hinge using a hammer and lubricate it and the boot with grease.
- Using clamps, we fix the protective cover on the grenade and the shaft. We do the same with the second part.
- We drive the shaft drive into the box, having first screwed the nut onto the CV joint.
- We collect spare parts in reverse order.
Replacing the outer and inner CV joints of the drive on VAZ 2110, 2112, Kalina, Granta, Priora, 2109, 2114
Tools required for repairs.
To remove and install the VAZ 2110, 2111, 2112 CV joint, you will need the following tools:
- jack;
- keys for 17 and 19;
- pliers
- heads for 13, 14, 15, 16, 17 and 30;
- mount;
- knob;
- wheel wrench;
- lubricant;
- rags.
Do-it-yourself repairs are well justified by saving time and money. Since the price of work on replacing the CV joint of a VAZ 2110 and other models in a car service is: for an external one - 1100 rubles, for an internal one - 1300 rubles. Tariffs are valid as of 02/15/2019. And this is comparable to the cost of the parts themselves.
Dismantling drive shafts of a VAZ 2112 car
During repair work on the steering mechanism, chassis elements of a VAZ, or during a routine inspection, you can detect cracks appearing on the boot of the outer CV joint. Over time, the boot breaks and dust and dirt enter the body, which leads to the replacement of the entire hinge. The price of such a replacement is quite high and unreasonable. Timely replacement of the CV joint boot on a VAZ 2112 will prevent such operations. For work you will need:
- The key is “17” millimeters.
- 30mm wrench.
- Balloon wrench.
- Mount.
Replacing the boot on a VAZ 2112 CV joint is easier to do on a dismantled drive shaft. To do this:
- Wheel chocks are installed under the rear wheels, and the car is placed on the handbrake.
- By holding down the brake pedal (with the help of another person), the nut holding the drive shaft to the wheel hub is unscrewed.
- The bolts securing the wheels break off.
- Using a jack, the desired side is raised.
- A special support stand is placed under the car.
- The protective cap is removed by prying it off with a screwdriver.
- The engine compartment splash guard is removed.
- The plug for draining the transmission oil is unscrewed from the gearbox.
- The oil is drained.
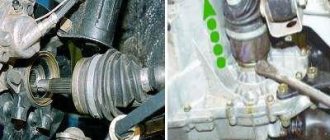
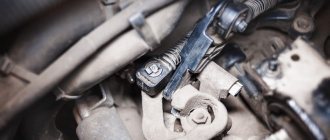
- The bolts securing the ball joint to the steering knuckle are unscrewed, as shown in the photo.
Unscrewing the bolts securing the ball joint to the steering knuckle
- The thrust washer is removed.
- Depending on the side of the repair work, the wheels are turned to the left or right extreme position.
- The outer CV joint is squeezed out of the wheel hub.
- The condition of the boot is visually checked.
https://youtube.com/watch?v=Hwzgru6JSmM
Replacing the CV joint boot on a VAZ 2112 car
To work you will need:
- Special lubricant.
- Hammer.
- Pliers for removing clamps.
- Screwdriver.
Replacement of anthers on VAZ 2112 CV joints is carried out using a bench vice.
- The drive shaft is very carefully fixed in a vice.
- Using a screwdriver, loosen the clamps holding the boots to the housings of the inner and outer CV joints.
The clamps are released from the CV joint housing
- If the boot needs to be replaced, it can be cut.
- Using a special bronze guide, the outer and inner CV joints are knocked off the drive shaft.
- The joints are washed with gasoline, kerosene or diesel fuel.
- The presence of damage is visually determined. If necessary, defects are eliminated.
- New boots are installed on the shaft.
- The outer CV joint housing is filled with lubricant.
- The housing is placed on the drive shaft.
- The hinge is hammered until the thrust ring is fixed.
- A special tool is used to clamp the clamp, which secures the boot to the drive shaft.
- The boot and inner CV joint are installed on the shaft in the same way.
- A plastic plug is installed on the end of the shaft on the side of the internal hinge.
- The boot clamps are tightened.
How to replace CV joint boots on a VAZ 2112 is clearly shown in the video.
Drive Shaft Installation
So:
- The CV joint retaining ring is replaced with a new one.
- Graphite lubricant is applied to the splines.
- Carefully, without damaging the sealing collar, the hinge is inserted into the gearbox housing.
- The shaft is finally fixed in the side gear. To do this, apply a wooden block to the shaft and apply blows with a hammer along the axis of the shaft.
- The drive shaft is installed in the wheel hub.
- Next, the operations are repeated in the reverse disassembly sequence.
If the instructions are followed when replacing the anthers, then any car owner will replace the elements correctly and quickly enough. After all the operations performed, do not forget to top up or change the oil in the gearbox.
Varieties
CV joints are divided into different types depending on the type of structure and installation location. Depending on their location, grenades are:
- External (connect the axle shaft to the wheel hub).
- Internal (connect the gearbox to the axle shaft).
According to their design features, products are distinguished:
- Ball-type (torque is transmitted using balls moving along grooves).
- Cam (consist of shaped disks and forks, can withstand heavy loads).
- Tripod (differed by the presence of spherical rollers).
- Twin cardan joints (represent two connected cardan joints).
As of now, there are grenades on the VAZ 2112:
- New.
- Used in good condition.
- Old, requiring minor repairs.
Also, similar products are classified according to manufacturer into two types:
At the place of purchase, auto parts are:
- From the online store.
- From the car market.
- From a store selling spare parts for VAZ cars.
- From the auto disassembly point.
- Purchased from an ad.
According to the manufacturer, the CV joints on the VAZ 2112 can be sold in the following brands: