string(10) “error stat” string(10) “error stat”
Drivers did not know what a constant velocity joint, or CV joint for short, was until front-wheel drive cars began to conquer the market. After all, the wheels must turn, but this is impossible to do with the help of a cardan transmission. CV joints (popularly called “grenades”) are also found on cars with all-wheel drive today—the Russian Niva 2121 is no exception in this sense. If you take care of the hinges and change the anthers on time, the factory-assembled unit can last more than 100 thousand km (it all depends on operating conditions). But sooner or later the X-hour comes, and replacing the CV joint on the Niva becomes inevitable. The process is not easy, including choosing a node in the store. But more about everything.
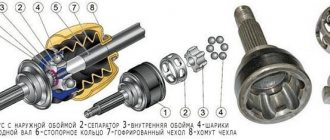
CV joint device VAZ 2121
Both hinges include fundamentally the same elements, differing only in size and cost.
Main parts:
- cup-shaped housing with driven shaft;
- “fist” in the shape of a sphere with a drive shaft, forming a CV joint cage;
- steel balls located in special grooves of the holder and made of special types of metal.
When it is necessary to make a turn, the angles of both shafts change, the balls move along the grooves and transmit physical force to the wheels of the front axle. Usually a “Rtseppa” (“six-ball”) hinge is used. It cannot transmit torque from the gearbox on its own: for this, a shaft is used - a hollow steel pipe connecting the outer CV joint with the inner one. The latter operates continuously at a rotation angle of 10 degrees. The external unit operates in the same way, provided the movement is smooth. But as soon as the wheels turn, the angle at the outer joint increases to sixty degrees.
If the car moves on an uneven road, the distance from the outer unit to the inner one changes, so the shaft is mounted in such a way that it can either move in or out.
Structure
Important! If you decide to replace the CV joint yourself completely or change its individual parts, you need to understand its design, and only then dismantle it and then replace it.
Replacing a CV joint is an expensive procedure, which in a service center will significantly affect the thickness of the car owner’s wallet. The part is made of heavy-duty materials that are resistant to mechanical stress and aggressive environments. Accordingly, these materials, like the part itself, are quite expensive.
And the cost of replacing a CV joint will be approximately half the cost of the mechanism. That is why many try to replace it themselves in order to save some money on repairs. But not everyone is born an auto mechanic, so the average person must first find out what parts the mechanism consists of. Here is their list:
- separator;
- balloons;
- fist;
- frame;
- outer and inner anthers.
The anthers perform two functions at once: they protect the hinge from dust and dirt. After all, in essence, a CV joint is an external part that is located on the bottom of the car. This means that all small particles when driving fall on the hinges in the same way as on the rest of the chassis.
On each wheel drive there are two mechanisms, which have almost the same structure, only slightly different in shape and size. As a rule, left and right CV joints are interchangeable on most car models. If you are in doubt, it is better to go to a car service center and ask if it is possible to buy left-handed hinges for right-hand drive on such and such a VAZ model for installation on right-hand drive, or vice versa.
Sometimes the entire mechanism requires repair, but more often it is the outer one that is worn out, while the inner one, as a rule, is almost eternal. But sometimes it may require replacement.
The design of the mechanism is not that complicated. The separator rotates the balls, which are located in the grooves of the fist and the outer housing. All this is covered by anthers that protect the parts from dirt and dust, as well as from leakage of lubricant. When replacing, the most difficult thing is to dismantle the mechanism itself so that you can install a new one entirely or change its individual parts.
How to remove the drive
Untimely replacement of the hinge will lead to dire consequences: in the worst case, the drive may jam, which at high speed can lead to an emergency situation. Therefore, it is more advisable to replace the unit in time. How to change the CV joint on a Niva? It is best to remove everything assembled; for this you will need:
- socket head wrench for 13 and 27 with a wrench (preferably a ratchet type);
- extension to the wrench in the form of a hollow pipe;
- hammer;
- flat screwdriver (you may also need a chisel);
- a jack and a wheel wrench for removing the wheel.
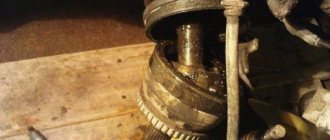
Inner CV joint
Place the car on a viewing hole, and if possible, on a lift. In the first case, you will need a jack. But first you need to remove the hub nut cap with a screwdriver and loosen it, then remove the wheel and unscrew it completely.
Further steps to replace the grenade on the Niva:
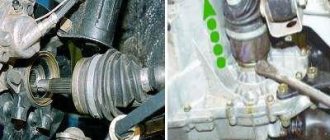
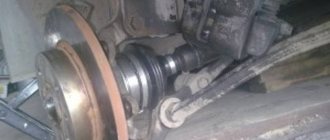
- Using a 13mm socket, unscrew the nuts securing the ball joint to the steering knuckle.
- Using a jack, smoothly lower the lower arm onto a suitable wooden block.
- Remove the shaft from the hub by moving the steering knuckle up and back (secure it with wire), and removing the retaining ring to remove the outer joint.
- Remove the 3 pressure plate nuts securing the inner CV joint. Pry it up with a flathead screwdriver and pull the internal assembly out of the gearbox.
- If it is inconvenient to remove the hinge when assembled, disconnect it.
Below see how to remove the CV joint on Niva 21213 - video.
Dismantling the drive assembly on a Niva 2121 car
As for the repair procedure, we present the main points below:
- First of all, we lift the car with a jack (it is also advisable that it is in the inspection hole).
- Using a screwdriver and a hammer, knock off the protective cap of the hub nut and unscrew it.
- Using a 13mm wrench, unscrew the nuts securing the ball joint to the steering knuckle.
Now you can remove the drive shaft from the Niva's front wheel hub. And to remove
/replace
the outer
CV joint, remove the retaining ring.
To release the internal one, you must first unscrew the three nuts securing the pressure plate.
- Then we pry up the plate with a screwdriver or a sharp chisel and pull out the inner CV joint from the front axle gear housing.
- Since the space between the shock absorber and the front suspension spring is minimal, it is not very convenient to pull out the drive assembly, so it can be disconnected.
- If necessary, defective CV joints are knocked down and new ones are installed in their place in the reverse order.
- It is imperative to apply a lubricant, such as a CV joint, to each of the grenades and securely fix the boot clamps.
- The assembled drive is installed on the Niva in the reverse order.
How to replace a grenade
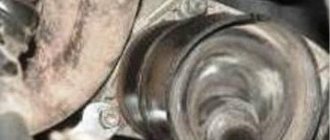
Once you have the inner grenade in your hands, collect the bearing balls if they have fallen out and place them in a container of kerosene. Remove the retaining ring from the shaft that holds the race and separator. Take a drift and, hitting it with a hammer, knock down the hinge, hitting the end of the cage. Remove the retaining ring and thrust ring. Clean all removed parts with a metal brush and rinse in kerosene.
Disassembling the hinge
Internal wheel drive joint - CV joint (removal, disassembly, boot replacement)
We carry out the work when replacing the hinge, its cover and lubricant.
READ How to remove a panel on a VAZ 2106
We clamp the drive shaft in a vice with soft metal jaw linings.
We mark the relative positions of the body, separator and holder.
... use a soft metal drift to knock down the clip.
We wash the body, separator, cage and balls. Traces of corrosion, scuffs and dents on the tracks are not allowed. If they are found, replace the hinge.
We assemble the hinge in the reverse order.
During assembly, we install a new retaining ring and rubber boot on the shaft.
We put 3 CV joint-4 lubricants into the 150 cm hinge.
We install new clamps (before tightening the clamps, release excess air from the cover by prying the seating belt of the cover with a screwdriver).
How to put it in place
Reassembly begins with lubricating the shaft and installing the boots in their original places. Next, the retaining rings are put back in place - it is better to do this in a vice. The next point is to install the hinge on the shaft: feel for the splines and lower it until it comes into contact with the ring located outside. Now, through the wooden spacer, hit the CV joint with milk so that it snaps into place. Move the part in different directions to make sure it is securely fixed. All that remains is to install the anthers with clamps.
Installation of the unit is carried out in the reverse order of removal. In this case, it is recommended to use screw clamps rather than standard ones. The hub nut needs to be installed with a new one. At the final stage, do not forget to use it to adjust the clearance in the bearings.
Chevrolet Niva CV joint boot
It will rest against the separator and will be located in it at a depth of a millimeter from the edge. To install it correctly, you need to lower it vertically into the separator to about half the depth of the groove, and only then turn it. And here miracles are observed, like magicians, the puck turns as it should, while it does NOT fall in or fall out.
Miracles of engineering and no fraud. Next, we change the boot and the fun begins. We take the housing with the separator, insert, as described above, an incomprehensible washer, put in the balls, and then insert the core.
Next, pressing the assembled structure inward with your finger, we put it on the slots, lightly tapping it with a hammer, and place it on the retaining ring. And also slightly pulling the body towards us, we seat the core completely onto the slots. Well, the final stage of the operation: We put the second part of the boot on the body, tighten it with clamps, and lubricate everything through the lid with grease. If there is a slight backlash, then the design is faulty.
There should be no backlash. With sharp movements it is necessary to rotate the shaft around its axis of rotation, while holding the hinge fork-flange with one hand. There should be no circumferential gaps.
When does a device need to be replaced? When the design of the device, so to speak, loses the balancing of the plates, or all parts of the product are replaced, then upon completion it is imperative to re-balance the driveshaft. If, after balancing, the problems with the product malfunction are not eliminated, then the shaft assembly with all elements is replaced.
Balancing the cardan is done either by visiting a service station, where specialists will perform all the related work, or independently, which will save money.
But that is another story. Removing and replacing the driveshaft Removing and then replacing the driveshaft on Chevrolet Niva versions up to a year is carried out in the following order: The vehicle is installed on the overpass.
At the gearbox, the lever is placed in the neutral position, and the parking brake is in the down position. Shoes are installed under the wheels for safety. Before removal, it is necessary to make notches on the ends of the flanges, drive axle and transfer case at the joints.
This will help return the shaft to its original position without the need for balancing. The nut of the cardan bracket is unscrewed, while supporting the bolt so that it does not rotate.
All fastening nuts are unscrewed in the same way. There are four of them on one side. The nuts are Teflon coated to prevent self-turning.
After removal, even if the shaft is not replaced, it is recommended to replace the nuts with new ones. Three fastening bolts are removed from one side, and the fourth is left to fix the product in its original position. We carry out the operations of unscrewing the nuts on the other side of the fastening. The order of unscrewing does not matter.
The last bolt is removed from one side and the cardan is removed, while its parts are reduced to the slot. The product has been removed, it is now being repaired, and if this is not possible, it is being replaced with a new one.
The installation procedure is the reverse of removal. First of all, the car is placed in neutral and the parking brake is in the down position.
A stop is placed under the transfer case, which can be adjusted. The nuts securing the side brackets of the transfer case suspension and the two rear mounting nuts are unscrewed. The box is lowered until it comes off the bracket studs. The cardan is rotated and the nuts securing the shaft to the drive axle flange are unscrewed and removed.
To unscrew the nuts, you will need to install a special blade in the hole between the flange and the CV joint. After this, the CV joint is pressed out with this blade until it moves slightly from the shaft splines and, thus, allows the nuts to be unscrewed.
Now, using two blades, you need to press the CV joint until the fastening studs come out of the slots in the drive axle flange. The transfer case, which has been removed from the studs, will allow this manipulation to be performed.
If you do not remove the transfer case, then the free play of the connection of the splines of both CV joints will be too small. Now you need to hold the shaft with one hand and with the other unscrew the four nuts securing the shaft to the transfer case flange.
How to change CV joint boots on Niva yourself
The shaft was removed from a Niva Chevrolet car. Repair or replacement with a new one is carried out, and then assembly is carried out in the reverse order of removal. You can not hold the shaft, but fix it with a strong rope to the bottom of the car, or use the help of a friend. How to properly install the boot on the CV joint?
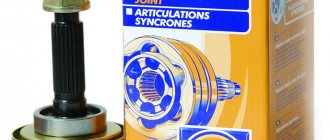
Recommendations for choosing CV joints on Niva
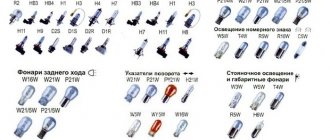
The first thing you should pay attention to is the number of teeth (splines) on the hinge. Until 2004, there were 22 of them (the hub corresponded to this number), then there were 24, but sometimes units with 22 were still installed. So you just need to count them on your machine. But if everything is clear with this point, another question arises - about the manufacturer. Most experienced Niva owners recommend purchasing factory hinges, complete with shafts. The only negative here is the huge number of counterfeit products. There are only three main large suppliers: VAZ, BelMag, Trialli. Another company, LGR, overcomes the 5% sales barrier.
Alternative manufacturers:
- Pilenga;
- STK;
- Hofer;
- Baker;
- G.K.N.
CV joint from AvtoVAZ
Which to choose
Depending on the year of manufacture, the Niva 2121 can be equipped with CV joints with 22 or 24 splines. Before 2002, the first version was distributed, after 2002 – the second. According to another version, 22-spline “grenades” were common until 2007.
The surest way to determine the type is to remove the hub washer and count by hand.
Operating experience shows that the best quality grenades for the Niva are produced by AvtoVAZ; also, if you are confident in the origin of the product, it makes sense to pay attention to the products of CORAM and Pilenga.
The main symptoms of CV joint failure on Niva
The first sign is the appearance of a characteristic crunching sound from one, or less often both, wheels while driving. An unpleasant sound appears when turning and when accelerating. The crunch is heard especially clearly during a sharp start. And another symptom is jerking during acceleration. Having realized that replacing the CV joint on the Niva is needed in the very near future, it is necessary to determine what exactly has failed.
You can do this in two ways:
- On a stationary car. You will need to move your hands, tug the shaft connecting the hinges - there should be no play. Its presence indicates the need to replace the unit. To check the inner CV joint, hang one of the wheels and turn on first gear - the faulty unit will certainly crunch when the wheel rotates.
- When moving. You need to drive on a flat road, alternately turning the steering wheel in one direction or the other. A crunching sound will be heard from the side where the outer unit is faulty. To check the internal joints, you will need to overcome small holes and bumps at low speed so that the wheel drops as low as possible. Where the crunching sound comes from is where the internal CV joint on the Niva needs to be replaced.
It should be noted: a crunch in the hinges indicates that replacing the Niva 2121 internal or external CV joint is inevitable. The hinge can still be saved if you notice it in time.
Primary signs include:
- boot rupture;
- the appearance of grease on the inner surface of the wheel due to a torn boot;
- a whistling sound reminiscent of friction against metal;
- weak jerks when moving away (the grooves of the “grenade” begin to break), sometimes weak clicks (2-5).
Let's start work.
Before starting work, be sure to install the Niva on the handbrake and insert wheel chocks under the rear wheels.
1. Loosen the wheel nuts, place the car on a jack and remove the wheel.
2. Place a secure support under the lower arm. Lower the jack and the lever will compress.
3. Remove the three bolts securing the lower ball joint and unscrew the nuts.
4. Knock the chrome hub cap through a wooden block and unscrew the nut. Make sure that the hub does not rotate; to do this, you can install some kind of stop under the wheel stud. A hammer is ideal.
Operations with a released part.
1. Wash off the dirt and remove the clamps remaining on the part.
2. Cut off the anthers that need to be replaced.
3. Move the grenade housing and boot towards the inner hinge. This will give you space to work without them disturbing you. You can wrap the parts in a bag and secure them.
4. Clamp the shaft in a vice, in a position in which the outer joint will be located towards the bottom. Remove excess grease, if any.
5. Knock down the inner race along with the hinge.