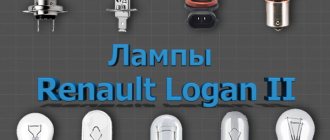
What headlights to put on a car
Thanks to the headlights and all the optics of the car, in conditions of limited visibility, the route and all objects on it are perfectly visible; in the dark, you can always illuminate the interior and other necessary parts of the car, and convey to other drivers the necessary information about what maneuver the driver is going to perform and what is being done on the road. road.
That is why a lot depends on the quality of the headlights of the VAZ 2121 Niva when driving, and each performs its own special function. A wide variety of lamps can be used in headlights. These are gas discharge, which come in the following types:
- xenon - for low and high beam;
- tungsten - inexpensive and with low light intensity;
- halogen incandescent lamps, which are most common, serve as a source of low and high beam in the headlight.
But lately, drivers have preferred LED lamps, and not only for signaling functions, but increasingly as a source of head light. They are about 3 times brighter than halogen and xenon, and the light density is much better.
LED headlights are suitable for cars that have headlights of 7 inches, including the Niva.
The latest tuning headlights are easy to install, but over time, the need to replace the headlights of the VAZ 2131 inevitably arises, including the headlights for the Niva 21214.
Lately, more and more companies have been trying to boast excellent headlights on the automotive market.
But increasingly, VAZ 2131 drivers prefer headlights, which eliminate many problems that arise with headlights, and replacing them does not require much effort. These are wesem headlights with a 178mm reflector. They are bought and exchanged for standard ones.
They are perfect for models such as Niva 21214 and VAZ 2131 to adjust the head light or to replace standard optical elements. When purchasing wesem diode headlights, you will need to buy a lamp for it - 12 or 24 volts.
Wesem fog lenses. They have very clear boundaries of light - upper and lower, and this provides an excellent opportunity to configure them so as not to violate the rules of GOST, and not to blind drivers of oncoming cars with bright light. This optical element helps improve low beam. And even the appearance of the car immediately changes when such headlights appear on it.
General information
UAZ Patriot belongs to the category of mid-size SUVs with a frame structure and all-wheel drive. The car has a brutal appearance, excellent practicality and increased cross-country ability.
After its official debut, the model did not change generations, but experienced several restylings. UAZ first showed the updated version in October 2022. As part of the modernization, the appearance was slightly changed, but the interior and technical components were significantly redesigned.
After 2 years, another update took place, which barely affected the exterior and interior, but significantly changed the filling of the engine compartment. As a result, the Patriot received a new engine and an upgraded gearbox. We also rebuilt the suspension and improved the performance of the front axle.
UAZ Patriot uses a frame chassis with dependent suspension at the front and rear. Moreover, there is a spring structure in front, and several semi-elliptical longitudinal springs are provided at the rear. The steering mechanism is rack and pinion with hydraulic booster. The front brakes are disc, and the rear are classic drums.
Despite numerous promises and statements, the second generation of Chevrolet Niva never came into being. The reasons can be called different, but the fact remains a fact. That’s why the first generation of Chevrolet Niva still remains relevant.
The first time we learned about Niva under the Chevrolet brand was in 2002. Although in 1998 AvtoVAZ presented the VAZ 2123 project, which was supposed to become a replacement for the old Niva 2121. The project turned out to be interesting, but there was simply not enough money for mass production.
The last actual restyling took place in 2022. Chevrolet updated the exterior, and also redesigned the interior and technical components. One of the main innovations was the installation of new seats.
Chevrolet Niva is an all-wheel drive crossover, which is built on the basis of a monocoque body with a front spring independent suspension and a pair of wishbones, as well as a rear spring suspension consisting of 5 rods. Disc brakes were installed in front, and drums were located at the rear. The steering is rack and pinion, supplemented by a hydraulic booster.
Replacing a low beam lamp on a Chevrolet Niva
“Niva Chevrolet” is the first result of the joint efforts of the automobile concerns General Motors and AvtoVAZ. An all-wheel drive SUV with an elegant design and high performance characteristics is perfect for driving in domestic conditions. It copes well with roads that cannot boast of high-quality coverage, and even with those that do not have any coverage at all. Hunting, fishing, a picnic in the forest, a trip to the country - if you like to be outside the city, this model is just for you.
Driving in off-road conditions can result in damage to the front of the vehicle. The headlights are the part that suffers most often. This could be mechanical damage or simply a burnt out light bulb - this happens to all cars, and the Chevrolet Niva is no exception.
Before talking about how to replace the lamp responsible for the low beam in a Chevrolet Niva SUV, let’s clarify its type, and also remember the characteristics and features.
How to choose a lamp
There are a large number of offers on the market from manufacturers that have certain advantages. Therefore, first of all, you should pay attention to the features.
First of all, it must have the following qualities:
- comfortable and bright light
- long service life
- favorable price
You also need to look at the manufacturer. Lamps from well-known brands may be more expensive, but they will use high-quality materials.
Chevrolet Niva low beam fuse
If the lamp still does not light after reinstallation, the cause may be a blown fuse. To check it, you need to open the mounting block located to the left of the steering wheel in the Chevrolet Niva interior. Low beam on the left is designated F2, on the right – F12.
In addition to this, other causes of the problem may be:
- Poor quality contact connections. Their surface has either oxidized, or they are not firmly fixed and are loose.
- There was a break in the electrical wiring on the path from the fuse box to the headlight.
- The switch has failed. The snout for the low beam could also fly. As a rule, in this case the lamps on both sides do not light up.
- The contact from the mass in the headlight block has become loose.
To determine the area of the break and fix the problem, you will need to diagnose the above locations using a multimeter.
Main conclusions
On a Chevrolet Niva car, the low beam headlights use a standard H7 12V/55W lamp. It has one filament and is installed in the corresponding block. When choosing a new copy to replace a burnt-out one, you need to pay attention first of all to its type and lighting characteristics. Based on the type of light source, they are divided into the following modifications:
- Incandescent light bulbs.
- Standard halogens.
- Halogen with quartz bulb.
- Xenon.
- Light-emitting diode.
- Gas discharge on sodium.
It is better to give preference to halogen ones, since they have a minimal price, good luminosity and flux density and do not require the installation of additional equipment when replacing. In addition to the burnt-out lamp itself, the reason why the low beam on a Chevrolet Niva stopped working could be a fuse and problems with the on-board wiring.
If you have additional information about choosing and replacing low beam lamps on a Chevy or simply want to share useful knowledge, be sure to write in the comments.
Periodic failure of light bulbs in car lighting devices is common, and such a malfunction can be eliminated without the services of a specialist. In this article we will look at how to independently replace the low beam lamp on a Chevrolet Niva.
Replacing a low beam lamp on a Chevrolet Niva
Chevrolet Niva is the most popular among budget SUVs. In addition to the comfortable body, the Chevy Niva has good characteristics. It turned out this way because it was developed for movement on domestic roads. As a result, the Niva can confidently drive not only on asphalt, but also on unpaved surfaces and off-road. The “poor old lady” Niva has many problems, but one of the biggest is the light, the optics on the Niva, which does not light up at all, this is what our article is dedicated to. Niva cars have their own peculiarity: the light shines somewhere, but not on the road.
In this case, damage to the front of the car can often occur as a result of stones or branches. First of all, headlights on a Chevy Niva suffer, as they are the most fragile part. Impacts can damage not only the housing, but also the lamps themselves. They can burn out as a result of damage to the spiral.
From the factory, the car comes with two types of light bulbs. H7 is used for the low beam of the Chevrolet Niva and H1 for the high beam. These lamps are able to provide good lighting at night due to the optimal placement of the filament point.
What types of lamps are there?
Lamps with different parameters are produced. So, they choose not only the brightness, but also the light temperature in order to get optimal lighting when driving on a wet road, in fog or on a snowy road.
The low beam lamp of the Chevy Niva standard H7 consumes 55W. You should not install too powerful ones, as there will be a risk of overheating of the lampshade and wiring. Also, when using such light sources, there will be an increased discharge of the battery.
In addition to the quality of light, they are also distinguished by the type of device:
- LED
- xenon
- halogen
Initially, headlights for the Niva were developed to use halogen lamps. They are distinguished by low cost and good light. Usually this type is enough for many Chevy Niva drivers, since they have a good resource and do not require connecting additional expensive components.
The Niva Chevrolet low beam lamp is a glass bulb with a spiral enclosed inside. Gas is pumped inside, which slows down the oxidation processes of the spiral and maintains its condition longer. One of the disadvantages is the high temperature during operation. This affects the rapid failure of optical elements. But according to experts, this type of lamp is optimal.
Tail lights
Light tuning must be done very carefully so as not to be prohibited and not to violate traffic rules. When purchasing sidelights, you can also switch to new samples; they can be a more uniform color, yellow or white. The sidelights (headlights) on the Niva 21214 are also easy to change yourself. It is better to install sidelights on the Niva in a single color. Niva sidelights last quite a long time. Tail lights when driving a Niva are also subject to less damage and have a long wear life.
How to choose a lamp
There are a large number of offers on the market from manufacturers that have certain advantages
Therefore, first of all, you should pay attention to the features
First of all, it must have the following qualities:
- comfortable and bright light
- long service life
- favorable price
You also need to look at the manufacturer. Lamps from well-known brands may be more expensive, but they will use high-quality materials.
Do not install lamps with increased functionality, for example, the most durable ones - this is usually achieved by reducing the brightness, which can be unsafe in the dark.
It is better to install standard taillights on the Niva, since other types do not fit into the grooves. The taillights are mostly the same.
LED headlights
Niva 4x4 can be ordered from China. Diode headlights fit the Niva without any problems. The lamps are sent in a special box with an adapter, one for the H4 lamp, the other two small connectors for the circumference of the headlight, the so-called angel eye. For our region, you can take two colors, yellow and white, so that when you turn the white color of the circle goes out and only the yellow color blinks.
To install such headlights on Niva 21214, you need to modify the standard places. To install Beijing headlights, it is necessary to enlarge the factory slots for installing headlights in order to install a rim that directly holds the headlight itself when driving. Then we connect the headlights to the terminals and check the lighting on the road.
If the lamps still don’t light, look for where the fuse is located.
If, after replacing the low beam bulb, the headlights still do not come to life, it is likely that the fuses supplying them have blown. To check their serviceability, you need to get to the fuse box, which is located to the left of the steering column and is closed by a cover, which, in turn, is secured with two screws. Unscrew the screws and remove the cover.
Location of the fuse box on the Chevrolet Niva
As I said earlier, in 2009 a restyling was carried out, which also affected the mounting block of the car. If we have a Niva produced before 2009, then we focus on the following photo:
Fuse box on Niva until 2009
Here, fuses F2 and F12 are responsible for the left and right low beam lamps, respectively. On models produced after 2009, the fuse numbering has remained the same, but their location has changed. In the photo below I marked F2 and F12 with arrows.
Fuse box on Niva after 2009 release
That's all about replacing low beam lamps in a Chevrolet Niva. After reading this article, you can easily fix this minor problem yourself.
Chevrolet Niva is a budget SUV with good performance. The car body is comfortable, the engine is powerful, and the equipment is of high quality. The manufacturer took into account the peculiarities of our roads and offered a car that drives confidently both on asphalt and off-road.
Owners of Chevrolet Niva, as a rule, operate it in difficult conditions. Falling stones or branches negatively affect the condition of the headlights, because they are one of the most vulnerable parts of the vehicle. Not only the body is damaged, but also the internal part of the structure. As a result, the light bulbs fail faster.
Two types of lighting elements are installed as standard: H7 and H1. The first provides low beam, the second high beam. The channel points in them are optimally placed, which allows you to get a good luminous flux at any time of the day.
When choosing a light bulb, it is important to take into account the manufacturer's recommendations. He pays special attention to two parameters: the type and power of the light bulb. You can find out which devices are best to use in a Chevrolet Niva from the table below.
Don't confuse the direction
In addition to head lighting devices, the machine is equipped with marker and turn indicators. Front and rear turn signals are equipped with PY21W elements. When in working condition, the lights glow with a bright yellow light, and when turned off they acquire a silvery tint. A suitable element for tuning.
Similar news
The front position signal and side direction indicators operate on SDL W5W devices. Since LEDs are sensitive to on-board voltage surges, the W5W is equipped with current stabilizers.
The P21W source with one filament is installed in the reversing light indicator.
The state license plate is illuminated by a lamp with SDL C5W. These same products are placed in the salon.
The front position signal and side direction indicators work on SDL W5W devices. Since LEDs are sensitive to on-board voltage surges, the W5W is equipped with current stabilizers.
The rear position lights, low-visibility driving lights and brake signals are equipped with a P21/5W LED lamp with 2 tungsten filaments.
The municipal license plate is illuminated by a lamp with SDL C5W. These same products are placed in the salon.
Instrument panel elements
All components of the Chevrolet Niva instrument panel can be divided into two groups:
The instrument panel is supplemented with two liquid crystal displays that display parameters such as total mileage, daily mileage, time and ambient temperature.
Devices
Pointer-type devices that convert electrical impulses coming from the corresponding sensors.
- The speedometer is located in the central part of the panel. It receives a signal from the speed sensor, which is located in the transfer case. The device division price is 10 km/h. The speed limit is 200 km/h.
- The tachometer is used to measure the crankshaft speed. On the Chevrolet Niva panel, the tachometer, like the speedometer, is located in the center. On its scale the zone corresponding to values above 5500 rpm is marked in red. It is not advisable to operate the engine in such modes.
- On the right side of the panel there is a fuel level measuring device. The scale has divisions corresponding to the value 0, ½ and 1. These values indicate the amount of fuel in parts equal to the tank capacity.
- On the left side of the panel there is a device indicating the coolant temperature. The instrument scale is graduated so that the minimum value corresponds to 50 degrees. There is a “red zone” in which engine operation is prohibited.
Lamps
Indicator lamps are located on the bottom of the panel. Unlike measuring instruments, each light bulb operates in two modes: on and off. Lamps that correspond to critical faults were initially decided to be painted red, but today these requirements are only partially met. It should be noted that each light bulb is displayed on the panel as an icon. These icons correspond to international standards, that is, when driving a foreign-made car, you can see familiar icons.
- Low oil pressure lamp (red). When the ignition is turned on, it lights up and goes out immediately after the engine starts. However, if the lamp comes on while the engine is running, the machine cannot be operated.
- Parking brake lamp (red). Lights up when the car is put in handbrake.
- Battery charging lamp (red). Lights up when the ignition is on. After starting the engine it goes out.
- Check Engine Light (orange). Lights up when a control system error occurs. It should be noted that only some errors initiate the operation of the alarm, however, there are errors that are not duplicated by this lamp.
- High beam lamp (blue). It turns on when the steering column switch is switched to the “high beam” position or when the light alarm is turned on.
- Emergency lamp (red). Indicates insufficient brake fluid in the system.
- Dimension switch lamp (green). Lights up when the side lights are turned on.
- Low fuel level lamp. It duplicates the instrument readings and lights up when the instrument needle enters the red zone. It is believed that it is impossible to operate a car with a burning lamp, since the fuel pump must be cooled by fuel.
- In the central part there are direction indicator lamps (green), made in the form of arrows.
- Indication of all-wheel drive connection (on cars manufactured after 2009)
There is one control element on the panel. This is a button with which you can reset the odometer and set the time.
An integral part of the instrument panel are backlight lamps and light filters. To replace them, you need to dismantle the panel. On the back, special cartridges are inserted into the board, which can be removed by turning them half a turn.
Source
Replacing a low beam lamp on a Chevrolet Niva
Chevrolet Niva is the most popular among budget SUVs. In addition to the comfortable body, the Chevy Niva has good characteristics. It turned out this way because it was developed for movement on domestic roads. As a result, the Niva can confidently drive not only on asphalt, but also on unpaved surfaces and off-road. The “poor old lady” Niva has many problems, but one of the biggest is the light, the optics on the Niva, which does not light up at all, this is what our article is dedicated to. Niva cars have their own peculiarity: the light shines somewhere, but not on the road.
In this case, damage to the front of the car can often occur as a result of stones or branches. First of all, headlights on a Chevy Niva suffer, as they are the most fragile part. Impacts can damage not only the housing, but also the lamps themselves. They can burn out as a result of damage to the spiral.
From the factory, the car comes with two types of light bulbs. H7 is used for the low beam of the Chevrolet Niva and H1 for the high beam. These lamps are able to provide good lighting at night due to the optimal placement of the filament point.
What types of lamps are there?
Lamps with different parameters are produced. So, they choose not only the brightness, but also the light temperature in order to get optimal lighting when driving on a wet road, in fog or on a snowy road.
The low beam lamp of the Chevy Niva standard H7 consumes 55W. You should not install too powerful ones, as there will be a risk of overheating of the lampshade and wiring. Also, when using such light sources, there will be an increased discharge of the battery.
In addition to the quality of light, they are also distinguished by the type of device:
- LED
- xenon
- halogen
Initially, headlights for the Niva were developed to use halogen lamps. They are distinguished by low cost and good light. Usually this type is enough for many Chevy Niva drivers, since they have a good resource and do not require connecting additional expensive components.
The Niva Chevrolet low beam lamp is a glass bulb with a spiral enclosed inside. Gas is pumped inside, which slows down the oxidation processes of the spiral and maintains its condition longer. One of the disadvantages is the high temperature during operation. This affects the rapid failure of optical elements. But according to experts, this type of lamp is optimal.
Tail lights
Light tuning must be done very carefully so as not to be prohibited and not to violate traffic rules. When purchasing sidelights, you can also switch to new samples; they can be a more uniform color, yellow or white. The sidelights (headlights) on the Niva 21214 are also easy to change yourself. It is better to install sidelights on the Niva in a single color. Niva sidelights last quite a long time. Tail lights when driving a Niva are also subject to less damage and have a long wear life.
How to choose a lamp
There are a large number of offers on the market from manufacturers that have certain advantages
Therefore, first of all, you should pay attention to the features
First of all, it must have the following qualities:
- comfortable and bright light
- long service life
- favorable price
You also need to look at the manufacturer. Lamps from well-known brands may be more expensive, but they will use high-quality materials.
Do not install lamps with increased functionality, for example, the most durable ones - this is usually achieved by reducing the brightness, which can be unsafe in the dark.
It is better to install standard taillights on the Niva, since other types do not fit into the grooves. The taillights are mostly the same.
LED headlights
Niva 4x4 can be ordered from China. Diode headlights fit the Niva without any problems. The lamps are sent in a special box with an adapter, one for the H4 lamp, the other two small connectors for the circumference of the headlight, the so-called angel eye. For our region, you can take two colors, yellow and white, so that when you turn the white color of the circle goes out and only the yellow color blinks.
To install such headlights on Niva 21214, you need to modify the standard places. To install Beijing headlights, it is necessary to enlarge the factory slots for installing headlights in order to install a rim that directly holds the headlight itself when driving. Then we connect the headlights to the terminals and check the lighting on the road.
Chevrolet Niva colors - photos of real cars and descriptions of the pros and cons of colors
Greetings to all fans of the Niva Chevrolet car, and if you are choosing this particular SUV, then for you I dug up some high-quality photos of the colors. Agree, looking at photos on specialized sites where the pictures are drawn is not at all the same. But live photos, and with the right lighting, are much nicer and clearer.
Otherwise, it will be difficult to compare, for example, black and dark blue metallic offhand. The collection of colors will gradually be replenished and you too, if you want, make your contribution - add a photo of your Chevy in the comments and don’t forget to say about the color))
All photos in the article can be clicked to enlarge!
So here's what I dug up:
Black-blue metallic (Milky way)
Brutal color for real men)) Black boomer, black boomer. No, Shevik. It looks great, and if you add special protective pads, it will be absolutely super. More black, but the blue tint is noticeable. Overall super in my opinion.
Dark blue metallic (Asteroid)
It's also a very nice color. But the taste and color, as they say... Personally, I like dark tones, while others, on the contrary, like light ones.
From another angle it seems completely black, but the blue tint is noticeable:
And what a view from the back)) I really want to jump into my Chevy right now and go for a ride in nature)) It would be desirable if there was more dirt))
Quartz
It looks like silver, but you can feel the difference. For lovers of light colors and those who like to frequent car washes)) The correct name is metallic gray. But you can really feel the quartz tint))
Front view for a better “understanding” of color:
Here's another photo of another car with black trim:
Gold metallic
When I was looking for a Shevik, one of the good options was golden color. But personally, it seemed to me that this was “too much”)) I prefer minimalism, but here I am driving in a gold Shevik, well, no, thank you)) It looks rich, but the smallest scratches will immediately appear. It’s clean to drive around the city in this way, certainly not for rides)) In general, check out the photo:
It's the same, only in sunlight - it doesn't seem so bright.
Light brown metallic (Lavender)
Unusual color, I've never seen anything like it in real life. It looks...unusual, and therefore very cool. Why didn't you see it? But because Chevys in this color appeared in 2022, and in our city the majority drive used cars)) The town is small))
Back view:
Well, here's another photo from the front:
Silver (Snow Queen)
A classic of the genre, as they say)) I remember the boom in silver-colored cars, albeit for puzoterki, but it was something, people seemed to go crazy, everyone wanted to drive a silver-colored car. According to Shevik, dirt will be visible after every little trip somewhere further than an asphalt road. The splashes of dirt especially stand out, which only add brutality on dark colors)) So purely for the city - Yes, for off-road - NO. I already wrote about scratches, they will also be visible here. Of course IMHO.
Side view:
Shevik is silver in color with black “linings” - as an option, it looks better to me. IMHO of course:
Gray-green (Auster)
I really liked this color, primarily because the car would not stand out so much in a forested area. For those who don’t like to “shine” and “scorch,” this is it. Plus, even for off-road conditions, the coverage is normal, dust deposits will not be noticeable at all, just like mud stains. You can avoid washing your car longer))
Back view:
Dark gray-green (Sochi)
It's dark and it's buzzing. Although I personally prefer the dark blue one (which is what I actually bought for myself), this one is also good. Dirt and dust are not visible on the body, which means those who like to often drive off the asphalt should like it. Well, for camouflage in the forest, I’ll add another plus. The forest is green and the car is the same color. The main thing is that if you’ve gone far, don’t lose the car later)) Put the car’s location on the navigator right away))
Front photo:
Bright Red (Extravaganza):
Where would we be without the defiant red color? )) For those who do not seek compromises! For those who love adrenaline - this is the Chevy, although you won’t be able to accelerate to 200 km/h on it, after all, it’s not a sports car)) But if you love this color, then it’s up to you. The downside, for me, is that the camouflage is only one, this color can be seen from kilometers away. Also visit car washes regularly. A typical urban option like “golden”. But it looks really cool in the sunlight))
Well, these are the colors of the Chevy Niva you looked at on the example of real cars, three more are missing (graphite, white and wild plum), I will add soon. And you, too, post photos of your Chevy in the comments so that we can enjoy the whole range of color palette of the body of this wonderful car.
Tuning of optical elements of Niva 21214
In many cars, including those like the Niva 4x4, quite often it is necessary to replace only the glass on the headlight or the headlight reflector.
But if the contacts are completely burnt, and the headlight has acquired a cloudy color, then it must be changed completely. You can do the tuning yourself.
To do this, remove the headlight from the VAZ 2121 Niva, for which you need to remove the rim, and very carefully, so as not to damage it, remove the reflector. To do this, you will need to unscrew 3 screws and unscrew 4 bolts, then the housing can be easily removed. The steps are as follows:
- after the Niva tuning is completed, mandatory light adjustment is necessary, and it is advisable that this work be carried out by a specialist;
- if tuning of the VAZ 21214 Niva taillights was done, then you can connect them yourself;
- only first you need to examine the rear light; it must have a seal in the area where the body and body come into contact;
- if it is missing, a sealant is required.
Rear fog lights, after tuning has been done, are connected quite simply.
The plastic panels on the trunk are removed and the electrical connector is disconnected.
There is an optical element inside the body, and you need to unscrew the nuts that secure it. Install a new headlight by screwing it to the body. Now you need to connect the connector to the on-board electrical network.
There is such an excellent device for the VAZ 21214 - an electric corrector for headlights. It is designed to change the angle of the light beam depending on the load of the machine. This optical element includes a regulator that fixes the position of the headlights, several mechanisms that contain O-rings, and electrical wires. When installing it, it is secured like a regular hydraulic one. It is more reliable and can work in very cold seasons and when the air temperature is high.
https://www.youtube.com/watch?v=I2HkKqdiCog
Headlight glasses are installed on the Niva, usually they are transparent, made of polycarbonate, but there are special ones for lensed modules, with a 1-mm thickness - reinforced, which greatly increases their performance.
When tuning is completed, the optics should look perfect. Niva drivers often replace standard optics with xenon lenses. Some misunderstandings may arise in this case, as the headlight may turn out to be longer. In this case, the rear part is cut out, to which the headlight itself is attached.
Tail lights
Light tuning must be done very carefully so as not to be prohibited and not to violate traffic rules. When purchasing sidelights, you can also switch to new samples; they can be a more uniform color, yellow or white. The sidelights (headlights) on the Niva 21214 are also easy to change yourself. It is better to install sidelights on the Niva in a single color. Niva sidelights last quite a long time. Tail lights when driving a Niva are also subject to less damage and have a long wear life.
Types of headlights
LED headlights
Niva 4x4 can be ordered from China. Diode headlights fit the Niva without any problems. The lamps are sent in a special box with an adapter, one for the H4 lamp, the other two small connectors for the circumference of the headlight, the so-called angel eye. For our region, you can take two colors, yellow and white, so that when you turn, the white color of the circle goes out and only the yellow color blinks. To install such headlights on the Niva 21214, you need to modify the standard places. To install Beijing headlights, it is necessary to enlarge the factory slots for installing headlights in order to install a rim that directly holds the headlight itself when driving. Then we connect the headlights to the terminals and check the lighting on the road. Of course, diode optics shine on the field an order of magnitude brighter than usual, which has a very positive effect on traffic.
Lensed headlights
They also have an angel's eye on the rim and a lens in the center. We buy a xenon lamp separately for the lens. The included H4 lamp does not shine at all, even worse than the factory one. Therefore, to achieve good light, you need to replace the new optics with the old one and insert an LED lamp inside, the light will be very good. But there is one big problem: such light is prohibited from being installed on our roads.
Crystal headlights
Hella on the field, size 169 mm. This headlight fits many 80's cars, such as Ford or Galenwagen. This headlight is universal and will fit even on a Hamer. The headlight is universal, but the quality differs from similar ones, since it was made in Germany, and Germans are Germans. The headlight has a chic amalgam, reflective properties are 92%, this is a very good indicator. The quality of light is incommensurate with our optics.
With all its advantages, the cost of the headlight is 1,700 rubles. For the headlight it is better to take a special lamp, also German H4+90, where plus 90 means an increase in light due to the overheated filament. Great focus and brightness appears. You can also add additional Komi 500 fog lights to the main Hella headlight, which fit perfectly with the main Hella headlights.
Fog lights 160 mm. They will be very useful for drivers who buy a Niva to cope with our modern reality. These headlights illuminate the roadside very well. Illumination diagonally 160 degrees, with a lighting range of 30 meters, a very decent distance for off-road conditions. The lamp kit includes both bulbs and real German wiring. Such a kit can be bought for around 3-4 thousand rubles.
LED headlights for the field
DRL mode, turn signal mode, smooth lighting of DRL and turn signal. Ice headlights are a new breakthrough in light on the field, 3 powerful LEDs that perfectly illuminate the road. Ice headlights are a new breakthrough for the Niva car. IP67 waterproof housing. Tuning headlights requires careful preparation for the Niva, but it is better to contact a service center. Optics for the Niva 21214 car, can be selected as desired.
H4 car lamp tests
1. Which lamps are the brightest were determined by the Test Lab channel (June 2020). The rating is as follows:
- OSRAM Night Breaker
- Philips X-Treme Vision
- Philips Vision
- Philips Vision Plus
- Philips Longlife Ecovision
- OSRAM U37R
- Narva
- OSRAM Cool Blue
- GE 50440U
Out of the standings:
- MTF Argentum
- OSRAM Super Bright
2. Test of H4 automobile lamps “Behind the Wheel” in the laboratory and on the roads (March 2022):
| Zone III (measuring direction: 0°-0°), OK | Counter. point B50L (measurement direction: 34′ up, 3°26′ left), lx | Counter. point 75R (measurement direction: 34′ down, 1°09' to the right), lux | Counter. point 50R (measurement direction: 52′ down, 1043′ to the right), lux | Notes | |
| Standardized values, lux | 1,00 | <0,60 | >9,60 | >9,60 | |
| Standard Philips H4 lamps | 1,00 | 0,60 | 9,60 | 9,60 | the light is visually white |
| ClearLight X-Treme Vision H4 | 1,00 | 0,34 | 15,30 | 26,50 | the light is visually white |
| Narva Xenon White H4 | 0,64 | 0,22 | 8,00 | 12,40 | light visually blue |
| MTF Light Aurum H4 | 2,04 | 1,00 | 12,88 | 28,40 | the light is visually yellow |
| LED MAS H4 | 1,20 | 1,20 | 1,40 | 1,40 | no cut-off line |
| DLED H4, 270 lm | 0,40 | 0,40 | 0,40 | 0,40 | no cut-off line |
| DLED H4, 900 lm | 7,60 | 4,24 | 7,20 | 5,70 | no cut-off line |
All about low and high beam lamps on a Chevrolet Niva car
Replacing low beam lamps on a VAZ 2110 on your own
Chevrolet is a popular SUV in the budget segment. The car was developed taking into account long trips over rough terrain and adapted for the city.
Until 2009, lensless designs were used in head optics. Since 2009, the Niva Chevrolet low beam lamp is a single-filament halogen design with a power of 55 watts.
The luminous element is installed statically, which allows the use of a 99% reflective surface.
When replacement is necessary
The factory equipment assumes the installation of halogen class H7 12v/55W. The marking stands for:
- base 7;
- works from an on-board network of 12 volts;
- power 55 W.
Low beam lamps provide comfortable lighting at dusk and provide optimal illumination in rain and snow. Since the Niva car is designed for driving on difficult roads, reinforced plastic is installed in the optics housing, which is less susceptible to scratches and chips.
During typical operation, the front part of the Niva is subjected to significant mechanical loads: shaking, driving over potholes, etc. Constant increased vibration reduces the life of the running lights. Part that will need to be replaced:
- if the power of the element has decreased and the road is not illuminated enough;
- the element flashes periodically;
- The consumable is completely non-functional.
Change the bulbs in both headlights at the same time. After replacement, it is recommended to adjust the optics unit.
Lamp selection
Among the large assortment, it is easy to determine which lamps are on the Chevrolet Niva. The car is standardly equipped with a lamp with an H1 socket, 60 W for long-range lighting, and a halogen H7 standard, with a power of 55 W for low beam. The service life of each element is 3500 hours.
Optics from different manufacturers differ in brightness level and color temperature: white, yellow light. The lamps illuminate the road well in fog, rain, and snowfall.
The near-halogen lighting from Philips H7 12 55 has a precisely calibrated filament point placement, which allows for good visibility at night. Popular manufacturers of low running lights:
- Osram H7 12;
- Philips H7;
- Bosch H7 55W.
General characteristics for all classes of low beam lamps:
- service life more than 2,500 hours.
- easy to install by yourself;
- clear fixation of the light beam;
- full power until the end of operation.
It is not recommended to install fluorescent lamps with a power of more than 55 W on the Niva: the lampshade may overheat and the wiring may burn out. In addition, the battery efficiency increases, the battery discharges 20% faster.
In addition to standard halogen ones, LED and xenon lamps are installed in Niva optics. When installing xenons, the wiring is completely re-equipped and an ignition unit is installed in the engine compartment. Replacing halogens with xenon and LEDs is prohibited by traffic regulations.
DIY lamp replacement
An advantage in car maintenance remains replacing the low beam lamp on a Chevrolet Niva yourself. The work takes up to 20 minutes both for self-installation and in a car service. To work you will need:
- open-end wrench 10;
- rags;
- flashlight, mirror (if replacement is being done for the first time).
When replacing the optics, it is recommended to check the contacts and operation of the Chevrolet Niva fog lamp, which is also easy to replace with your own hands. The process of installing a new element step by step:
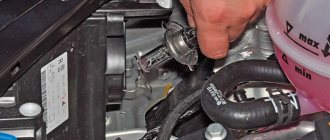
- Using a 10mm wrench, unscrew the nut and remove the terminal from the battery.
- Unscrew the washer reservoir clamps and move it to the side.
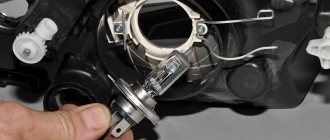
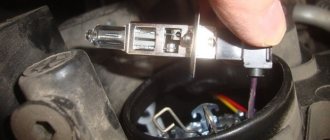
- Clean the protective cover of the headlight unit.
- Remove the cover.
- Disconnect the lamp contacts and remove it from the housing.
- Install new one.
To properly disconnect the contacts, pull on the connector, then disconnect the wire ends from the terminal. At the same time, the latch moves up, the spring latch moves back.
When installing a new consumable, proceed in the reverse order:
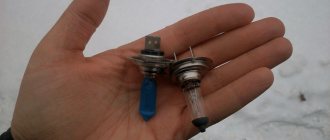
- Hold the lamp only by the base.
- Install the element exactly into the groove of the diffuser.
- Tighten the latch.
- Connect contacts.
- Secure with latch.
- Connect the wiring to the battery and check operation.
Self-replacement does not require any skills
It is important to follow the procedure for assembling or disassembling the headlight and not touching the glass with your hands. A microscopic fingerprint will remain on the bulb, which sooner or later will lead to incorrect operation of the optics
Replacing the fuel pump mesh
The situation becomes most tense at the moment of intense intensity. Signs of a malfunction In the arsenal of automotive tools of any caring driver there should be, along with the keys, a tester, even if in the form of a simple warning lamp and two wires.
Accordingly, all attempts to start the engine in this case will not be successful. In any unclear situation, remove the terminal. Very useful advice, by the way! The driver will be very lucky if a very simple method helps, which should be taken first.
To do this, remove the terminal from the battery for a while, and then put it back in and secure it. Perhaps the fuel pump will start working again.
Checking the power supply at the fuel pump terminals Well, if this does not happen, continue to look for the fault. Why do you need to replace the fuel pump mesh? After trying, I gave up and went to work in a Peshkarus.
Replacing the fuel pump mesh on the injector with your own hands. Replacing the Chevrolet Niva fuel filter.
Replacing the fuel pump mesh. When removing the module, try not only to drain the gasoline from the glass as carefully as possible, but also not to damage the FLS float. The turn switch lever is stuck.
Yesterday I tried to drive it and the engine doesn’t turn over even up to speed. There was a suspicion that it was the fuel filter or the fuel pump mesh.
Still, the mileage has exceeded, I didn’t particularly choose gasoline all this time - I refueled wherever I had to, and the fuel pump grid and fuel filter on my Chevrolet NIVA have not yet been changed and have never been serviced in any way.
Since I can’t get to the fuel filter without a hole in replacing the mesh on the Chevrolet Niva fuel pump, and I don’t really want to lie on the ground at -7 outside, I decided to start with the fuel pump mesh.
Replacing a Chevrolet Niva fuel pump grid The fuel pump is located under the right rear passenger seat, which is diagonal from the driver’s seat.
Replacing Chevrolet Niva headlight bulbs - low and high beam, dimensions and direction indicators
Replacing Chevrolet Niva headlight bulbs can be caused not only by burnout, but also by replacing serviceable bulbs with new ones with different characteristics.
Naturally, few people want to send their car for service, waste time and pay specialists to perform this operation, just as in the case of fog lights.
That’s why it’s worth figuring out how to do everything yourself. In this case, the work is demonstrated using the example of the right headlight. As for the left, everything is done the same way.
Other possible faults
If the low beam headlights on a Chevrolet Niva do not light up after replacing the lamps, then the causes of the malfunction may be the following:
- Blown fuses;
- Poor contact of the connectors - in this case, the connector is easily put on the contacts and is poorly fixed, or there is noticeable oxide on the contacts;
- Break in the car wiring in the area from the headlight to the fuse box;
- Faulty low beam switch or relay - unlike previous cases, with such faults two headlights do not light up at once.
- Poor contact of the ground wire in the headlight itself - in this case, all light sources in the headlight do not light up.
Diagram of how to connect correctly
If you have a question about how to connect correctly, below is a diagram of how to do it correctly.
This device is your guarantee of safe driving on roads with poor visibility. And even if for some reason they are missing from your SUV, you can always complete it, since everything is provided for this in it.
Chevrolet Niva is definitely a foreign car 2 How to install fog lights. repair results.
Installation is much easier if you remove the wheel. The wiring with a chip is brought out for connection through the underwing holes of the body to the front bumper. I didn’t cut it, I just rolled it up and hid it behind the fuse box.
Now you can remove the latter from the housing, for which you need to turn it counterclockwise. The light from a xenon lamp pierces even thick fog due to the intensity of the flow. By the way, the “-” wires seemed to be short from the standard kit, it was a shame that I had to increase the missing 10cm.
Mon Jun 03, A — the “-” button backlight is missing. The preparation includes ready-made wiring, places for installing relays, buttons and a place on the bumper.
I didn’t get into the fuse box only because it was too difficult to disassemble it. I hung the extra relay plug from the kit; there is just the right place for it. Then everything follows according to the scheme, if anyone is interested. Plug 1 Ш1 of the fuse block has 8 contacts. A useful option for safety. Chevrolet Niva fog lights are not present in all trim levels - the L and LC versions do not have them.
If this useful option is not available, the car can be completed by contacting a dealership or any other specialized service. It definitely won’t be superfluous, since sacrificing your safety is a thankless task. We crawl to the mounting block. We simply insert the yellow cable with the already crimped female terminal into the empty slot in the relay block.
Video: Replacing the Side Light Bulb on a Chevrolet Niva
With indoor lighting, fig. 55, replace the burnt-out lamp 2 by removing the diffuser 1, and using your fingers, press it into the center of the diffuser and pull it down. The lamp is held in the shade by spring contacts.
Blowing lamp 3, fig. 56, in the light of the license plates, change only after removing it from the car, to do this, unscrew the screws 6, insert a screwdriver into the groove 4, press the latch 5 with your finger to the center and carefully remove the diffuser 2 with a screwdriver. The lamp in housing 1 is held by spring contacts.
To replace the turn signal lamp, fig. 57, remove it from the car. The socket is held in the socket by spring clips. Then remove the protective rubber cap 1, remove the lamp socket from the housing 2 and remove the lamp.
To replace signal lamps 1 and backlight lamps 2 in the instrument cluster, fig. 58, remove the housing and unscrew the mounting screws. Then pull the unit towards you and disconnect the wiring harness from the blocks 3. Turn the lamp you want to replace counterclockwise and disconnect it.
To replace a burnt-out lamp in a personal lighting lampshade, you must remove its switch. To do this, press the switch on the sides, unscrew the protrusions of the axis with holes in the fixed part of the lampshade, and then pull the switch down. To replace the bulb in the glove box lamp, remove it from its socket by carefully sliding it from the top with a screwdriver. Remove the base in the lamp by pressing the latch and replace the burnt out lamp. Replacing a bulb on a trunk light is similar to replacing a bulb on a light-colored glove.
Step-by-step replacement of lamps
Having prepared everything you need, you can safely begin replacing the low beam sources on the Chevrolet Niva in the following sequence:
- Using a 10mm car key, unscrew the negative terminal on the right side of the battery.
- The glass washer tank is removed from its place and moved to the side.
- The protective casing is cleaned of debris and dust and carefully removed.
- Slowly pull back the base of the lamp base to disconnect the contact.
- After applying slight pressure, you need to slide the lock up and immediately release it. This step will help to fully open the latch.
- Taking the old lamp by the base, we remove it from the so-called socket.
- When inserting a new lighting element in place of the old one, you need to hold it only by the base, making sure that your hands do not touch the bulb. If contact does occur, the flask must be wiped with a clean rag soaked in alcohol.
- Using a small mirror, check whether the base fits into the groove provided in the diffuser.
- When installed correctly, the base is secured in place using a clamp.
- The contacts are put into place, the protective casing is also installed in its original place.
Features of DIY replacement
Before you begin replacing or repairing fuel lines, you must relieve the pressure in the gasoline supply system to the engine. To do this you will have to perform the following steps.
- It is necessary to de-energize the fuel pump, which supplies gasoline to the engine injectors. The fuel pump power relay is located in the passenger compartment on the driver's side. When you remove the front dashboard cover, a block consisting of four relays opens. The fuel pump relay is the third in a row.
- After turning off the fuel pump, you need to “burn” the fuel remaining in the system. To do this, you need to start the engine and leave it running until it stalls due to lack of gasoline.
- For a final check, try to start the engine again by turning the starter for a few seconds.
Removal of flexible hoses is carried out from the engine compartment.
- The location where the hoses are attached to the inlet tube is indicated by a yellow warning mark. You need to remove the hose from the tube by disconnecting the plastic clip and pulling the hose in the opposite direction.
- The second end of the hose is connected to the fuel filter with a fastening nut. You can unscrew it with a 10 key.
- After inspecting the fastening points, they begin installing a new hose. It is attached in a similar way - the end connected to the fuel line is attached to the fixing nut, the other end is attached to the plastic retainer.
In the same way, change the hose connecting the outlet tube and the fuel line of the gas tank.
Replacing metal elements may require the use of a lift or inspection pit. The fuel lines are located underneath the vehicle, so you will need a flashlight to inspect for damage.
As already mentioned, if the damaged area is small (no more than 15 cm), then it can be cut off with a grinder and replaced with a hose. Only reinforced hoses made of petrol-resistant rubber, marked Fluroelastomer (fluoroelastomer), are suitable. The hose fits over the fuel line, so its inner diameter must be equal to the outer diameter of the pipe.
If the size of the removed damaged area exceeds 15 cm, a metal tube is used for replacement. The connecting elements are pieces of reinforced hose, which are placed on the metal ends of the pipeline and connecting tube. The length of each hose section should not exceed 10 cm.
If the damage to the fuel pipes of the Chevrolet Niva is larger, then their repair is impractical. In this case, you will have to replace the fuel lines with new ones.
The outlet and inlet pipes of the fuel line are removed quite simply. To do this, you do not need to use a lift or inspection hole - all work is performed from the engine compartment.
- De-energize the vehicle by disconnecting the negative terminal of the battery.
- Disconnect the rubber hose attached to the tube with a clamp.
- Unscrew the second end of the tube from the fuel filter using a 10 mm wrench.
The main fuel lines connecting the gas tank to the fuel filter are removed after installing the Chevy Niva on the inspection hole.
- Lower the gas tank slightly so that it does not interfere with dismantling. To do this, use a mounting tool, which is used to press the gas tank until it comes slightly off the mounting hinges.
- Disconnect the flexible hose connecting the line to the fuel filter. If the outlet line is changed, disconnect the hose connecting it to the outlet pipe.
- The line is connected to the gas tank using spring clamps. To disconnect, pull the tube in the opposite direction. After the clamp has been released, pull the line out by hand.
- Install a new handset. If the fuel supply line is changed, then its long end is inserted into the engine compartment and attached to the connection hose with the fuel filter. The other end is connected to the gas tank using spring clips.
- When replacing the outlet line, one end of it is attached to the gas tank with clamps, the other is screwed to the hose connecting the line to the gasoline outlet tube.
Low beam lamp for Chevrolet
Low beam headlight.
From the factory, this car is equipped with halogen bulbs H1 and H7 (H7 - low beam, H1 - high beam). Due to the fact that they have a fixed gap between the flange and the spiral, this allows you to create a good filament point that will provide good light in the dark.
The H7 light bulb can operate at a voltage of 55 W. But today there are other types of them that can operate from increased voltage. These bulbs are recommended for use only in SUVs.
Light sources can be of three types:
- LED.
- Xenon.
- Halogen.
Xenon bulb standard H7
Halogen bulb standard H7
LED bulb standard H7
In the Chevrolet Niva, as already mentioned, mainly halogens are used. Their difference: low cost, as a result of which they are popular among drivers. They also provide good illumination of the space in front of the car and do not require the use of any other devices to operate.
The lamp consists of a bulb made of hard-alloy glass. Inside it there is a filament and gas. The disadvantage of such a lamp is the high temperature during operation. This can also cause the optics to wear out faster. Nevertheless, experts say that H1 lamps are the optimal solution for cars such as the Chevrolet Niva today.
Bulb selection: type
When the low beam light on your car stops shining, the cause is probably burnt out. Therefore, before replacing, you have to select and buy a new device.
| Type | Characteristics |
| H4 | 2-filament (low and high beam combined) |
| H7 | 1-strand |
Our case involves an H7 low beam bulb. In the Niva Chevrolet, the headlight unit is divided into 2 compartments, which means that separate single-filament lamps are used for both low and high beam.
Tuning ideas
Tuning Niva Chevrolet headlights and flashlights allows you to give your car an attractive, individual appearance. Alternative optics can change a car beyond recognition. The stylish look of the car is given by headlight covers, trunk spoilers, and door sill covers.
As for optics, there are many opportunities to tune your car. This does not involve large costs. For example, to give the car a more aggressive look, the front optics are darkened. An option for tuning headlights for Chevrolet are angel eyes or eyelashes, this is achieved using headlight covers. The covers give the car an original look.
Tail light covers
One of the options for tuning lighting is to replace the standard optics with an alternative one, headlight lining. Xenon is installed in the headlights; LED lights are often installed in PTFs. If xenon optics are installed, then it is necessary to equip the car with headlight range control. The headlight range control is used to adjust the light.
Tuning includes installation of DRLs
The use of LEDs in a brake light increases safety, since the LED light attracts attention. To protect the Chevrolet Niva headlights and radiator, many drivers install a grille. Do you change the optics on a Niva Chevrolet yourself?
Do you change the optics on a Niva Chevrolet yourself?
Survey
- Yes
- No
Loading …
Pinout diagram for 13-pin socket
- Left side turn signal.
- Rear fog lamp.
- Ground for terminals 1 to 8.
- Right side turn signal.
- Left side of dimensions and number plate illumination.
- Brake light lamp.
- The right side of the dimensions and number plate illumination.
- Reversing lamp.
- Constant voltage 12 volts 35 amps.
- The voltage is 12 volts 35 amps, supplied after the ignition is turned on.
- Ground for terminal.
- Signal wire.
- Ground for terminal 9.
When the car is not equipped with a modern electronic control unit. Thanks to this, electrical wires can be directly connected to existing electrical circuits. That is, the wires that come from the connector are connected to those connected to the rear lighting equipment.
Selecting lamps for low beam
So, we choose between standard lamps and lamps with increased brightness or service life.
- DiaLUCH H7-12- 55 12557 from 90 RUR (China)
- LIGHTHOUSE H7-12- 55 52720 from 80 RUR (China)
- VOSKHOD H7-12-55 80517 from 75 RUR (China)
- PHILIPS H7-12-55 +30% Vision 12972PRC1 from 240 RUR (Germany)
- KOITO H7-12- 55 W Other Brand 0701 from 320 RUR (Japan)
- GE H7-12-55 58520U from 170 RUR (Hungary)
- NARVA H7-12-55 48328C1 from 160 RUR (Germany)
- OSRAM H7-12-55 64210 from 180 RUR (Germany)
- BOSCH H7-12-55 Pure Light 1987302071 from 170 RUR (Germany)
- EVO H7-12-55 VISTAS 3200K 93367 from 120 RUR (China)
- AVS H7-12-55 Vegas A78143S from 90 RUR (China)
If there is not enough light from standard lamps, you can install lamps with increased light output
- PHILIPS H7-12-55 +150% RACING VISION 3500K from 1000 rub. (Germany)
- PHILIPS H7-12-55 +130% X-TREME VISION 3700K from 900 rub. (Germany)
- GE H7-12-55 +90% (PX26d) Megalight Ultra set 58520SXU from 700 rub. (Hungary)
- NARVA H7-12-55 +110% RANGE POWER set 48062S2 from 1200 rub. (Germany)
- AutoSvet H7-12-55 +80% More Light (Px26d) 32720ML+80 from 200 RUR (China)
- BOSCH H7-12-55 +90% set 1987301075 from 900 RUR set. (Germany)
- VOSKHOD H7-12-55 (PX26d) Super Nova +100% 80517 from 650 RUR (China)
- DiaLUCH H7-12- 55+100% PX26D 5000K EcoLight Sirius 12557 ELS DUO from 600 RUR (China)
- OSRAM H7-12-55 +110% NIGHT BREAKER UNLIMITED from 1300 RUR (Germany)
- OSRAM H7-12-55 +130% NIGHT BREAKER LASER set 64210NBL_HCB from 1400 RUR (Germany)
Above is a large selection of lamps, which will make the low beam on a Chevrolet Niva better. However, it should be remembered that the service life of such lamps is lower than that of standard lamps.
Read more: Turn signals do not light up 2114
Instructions for self-replacement
You can replace the low beam lamp on a Chevrolet Niva as quickly and technically competently as possible by following the following instructions:
- Open the engine compartment and disconnect the terminals from the battery.
- For convenience, when working with the left headlight, you can completely remove the battery, and from the right - the windshield washer system tank.
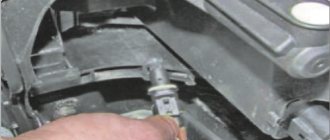
- Remove the wire clip above the headlight compartment.
- When the casing is removed, you need to disconnect the block with wiring from the base part.
- Then you should remove the latch holding the base in the headlight (squeeze it with your fingers and pull it out).
- Replace the old lamp with a new one.
- Next you need to install all the elements in reverse order.
- After connecting the battery, check the serviceability of the installed light source.
Important! When installing low beam lamps on a Chevrolet Niva, you should not grab them by the bulbs with bare hands or dirty gloves.
How to replace lamps in headlights and lanterns of Lada Niva (Chevrolet)
During operation, the lamps in the headlights or rear lights may burn out.
You can replace them yourself. To avoid breaking anything, it is recommended that you read the instructions contained in the vehicle's owner's manual. Attention!
Wear gloves when installing a halogen lamp to avoid leaving marks on the lamp bulb.