Measuring pressure: several ways
ATTENTION! A completely simple way to reduce fuel consumption has been found! Don't believe me? An auto mechanic with 15 years of experience also didn’t believe it until he tried it. And now he saves 35,000 rubles a year on gasoline! Read more"
There are several ways to determine the pressure in the ramp. So, you can purchase special equipment that diagnoses fuel pressure. This is a kit that, in addition to the pressure gauge, includes an adapter and a drain. The price for such an assortment is only 1.5 thousand rubles, but there are so many benefits.
The second option is to go to a service station and ask the workers to measure the pressure. In Moscow, such diagnostics cost no more than 500 rubles.
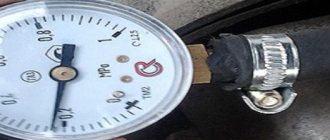
The third option is to measure the pressure using a tire air pressure gauge. Its only drawback is that the initial values of the scale cannot be considered as accurate. As a rule, pressure gauges are equipped with a scale of up to 16-20 atm, and the measurement limit for fuel is only 5-7 atm. Measurements in this case may be inaccurate due to the error falling into the initial scale values. For this reason, it would be more correct to use a pressure gauge with a scale no higher than 7 atm.
Pressure is measured as follows:
- take a tire pressure gauge;
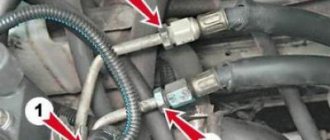
- a fuse is wound onto the nozzle and an oxygen tube with a diameter of 9 mm is inserted (securely secured with clamps);
- Be sure to protect the generator with something (a damp cloth) so as not to cause a fire hazard;
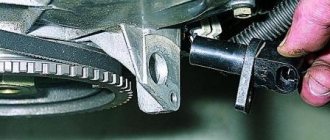
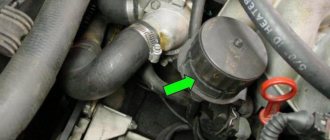
- provide access to the fuel frame fitting by unscrewing the internal nipple;
- To prevent gasoline from splashing out, it is recommended to relieve the pressure in the system in advance by removing the required fuse;
- Place the second end of the oxygen tube onto the ramp fitting and secure with a clamp;
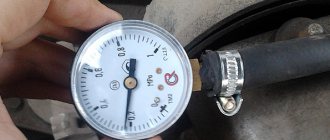
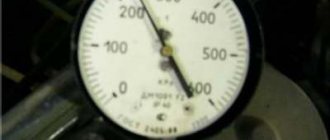
- Start the engine and take pressure readings.
2.8-3.2 atm is normal.
There are other ways to measure pressure. Here's one of them.
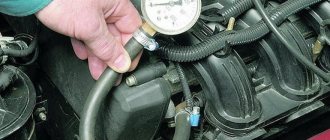
- Provide access to the fuel pump module fitting. You will need to insert a tube with an internal diameter of 8 mm into the fitting;
- The other end of the hose is put on the pressure gauge.
- Take readings.
- Take a pressure gauge with a hose from the compressor.
- Unscrew the cap from the fitting to check the pressure in the fuel system.
- Unscrew the spool valve from the fitting, doing this carefully so that the fuel does not splash too much (you can initially release the pressure).
- Pull the pressure gauge hose with a clamp onto the fitting and tighten it with a screwdriver until it stops.
- Start the engine and, looking at the pressure gauge scale, take readings.
Checking and replacing the fuel pressure regulator
As you can see, a malfunctioning pressure regulator has symptoms very similar to a malfunctioning fuel pump or a clogged fuel filter. At the very beginning, we note that if problems with this element are detected during the inspection, then it is preferable to replace the RTD with a new one. The fact is that replacing individual parts, cleaning attempts and other manipulations often do not allow the device to return to proper functionality. Considering that the price of a fuel pressure regulator is quite affordable, then any repair attempts can be considered impractical.
Measurements should show changes in pressure in the system within a certain range. The fuel pressure should increase, being within the range of 0.3 - 0.7 Bar. If this does not happen, then first you can try replacing the vacuum hose, and then repeat the measurements. To check the fuel pressure at the end of the ramp, you will need to unscrew the fitting plug. This plug also has a special ring for sealing. The specified ring should be checked for integrity; the element should remain elastic. If there are defects, then the ring or the entire plug also needs to be changed at once.
- After inspecting the ring, you can unscrew the umbrella from the fitting. Many drivers use a metal wheel valve cap to loosen it. Now the hose and the pressure gauge connected to it need to be connected to the fitting, after which the structure is additionally secured using clamps. Next, the engine can be started and measurements taken. Normally, the indicators should be about 2.9-3.3 kgf per cm2. Afterwards, you can disconnect the hose from the RTD, observing the pressure gauge readings. The pressure indicator should increase from 20 to 70 kPa.
- If the fuel pressure regulator still produces a low or zero reading, then you can think about replacing the device. Changing an RTD is not a difficult task, that is, you can do the replacement yourself in a garage. At the beginning of the procedure, you need to “bleed off” the pressure in the engine power supply system. To solve the problem, you need to unscrew the nut that secures the fuel pipe. Now you can unscrew a couple of bolts that usually attach the regulator to the fuel rail on most fuel-injected cars.
- The next step is to carefully remove the regulator fitting from the hole in the fuel rail and its final dismantling (the fuel pipe must be completely disconnected in advance). The final stage is the installation of a new or known-good element into the ramp, after which the functionality is checked in the manner described above using a pressure gauge. Finally, we would like to add that it is also recommended to additionally lubricate the O-rings with gasoline before installing a new RTD or in case of replacing the said rings.
About pressure drop
When it comes to pressure problems, it looks something like this:
- when the engine is running in idle mode, 2.8 atm is displayed, stable pressure, builds up quickly;
- after turning off the engine, the pressure instantly drops to 2.5 atm;
- after a minute or two it drops again to 2 atm;
- after 10 minutes – 1.6 atm.
Why does the pressure drop? There are definitely problems in the fuel system, and, as a rule, this is due to the fact that the check valve of the pump does not hold. This is why the pressure drops so quickly after the ignition is turned off.
In extreme cases, it is possible that the DDT pressure sensor fails. Methods for checking both options are given below.
The process of checking the pressure in the fuel system
You will need: an air (or preferably a water) pressure gauge, onto which you need to put a hose with a diameter of 12 mm and tighten it with a clamp. The engine should be cold and the generator covered with a rag.
- Unscrew the cap of the control fitting on the fuel rail (fitting). Near the timing belt (on the right in the direction of travel), or on the left near the oil filler neck (for the VAZ 21129 engine);
- Unscrew the spool from the fitting using the wheel valve cap. At this moment, due to the residual pressure in the rail, gasoline will splash out (you can first relieve the rail pressure by removing the fuse from the fuel pump with the engine running and wait until it stalls).
- We put the pressure gauge hose on the ramp fitting and secure it with a clamp;
- Turn on the ignition. The fuel pump will turn on;
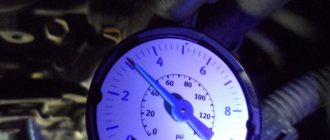
- We check the readings on the pressure gauge.
What pressure should be in the fuel rail? On VAZ 2110, 14-15, 99 models it should be in the range of 2.8 - 3.2 bar. On modern engines (Priora, Granta, Kalina, Vesta, XRAY, etc.) the pressure should be 3.6–4.0 bar. The process is also shown in the video:
Useful tips
These tips will come in handy when measuring blood pressure.
- If the pump is working, then it makes sense to check it for normal pressure supply. You can do this, as mentioned above, by connecting a pressure gauge, or you can use another method. For example, measure the current at the pump terminals. It must be equal to the voltage of the machine's on-board network. In other words, 12 V for cars and 24 V for trucks.
- It is always recommended to relieve the total system pressure before diagnosing pump or rail pressure. This helps release residual pressure, which improves accuracy. As mentioned above, it is reset by turning off the fuse and starting the engine for 3-5 minutes (this is enough for the pressure in the system to drop to 0).
- In some cases, the fitting on the fuel frame may be missing and then measuring the pressure becomes more difficult. But there is another way out - connect the pressure gauge to the fuel hose through an adapter.
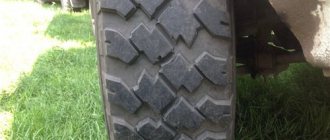
- When measuring pressure, it is recommended to pay attention to the behavior of the pressure gauge needle when the internal combustion engine is operating in idle mode. The arrow should tremble a little, but not oscillate at full strength. The latter indicates a clogged coarse mesh or a malfunction of the DDT.
Video: low fuel pressure
Forget about fines from cameras! An absolutely legal new product - Traffic Police Camera Jammer, hides your license plates from the cameras that are installed in all cities. More details at the link.
- Absolutely legal (Article 12.2);
- Hides from photo and video recording;
- Suitable for all cars;
- Works through the cigarette lighter connector;
- Does not cause interference to radios and cell phones.
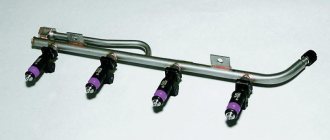
The fuel line and the injector ramp that supplies the engine injectors operate under a pressure of about 3 bar. Since gasoline is supplied by an electric pump, the system uses a special valve that limits the fuel pressure. Otherwise, the nozzles will leak and the engine will choke on the over-enriched mixture. To avoid problems with fuel supply, you need to promptly diagnose the signs of a malfunction of the fuel pressure regulator (abbreviated as RTD) and know how to eliminate it.
Fuel pressure regulator malfunctions
Problems in the engine power system can vary. For this reason, during diagnosis it is necessary to look for certain signs of a malfunctioning fuel pressure regulator. Most often, the main symptoms are considered to be when the engine does not pick up speed and does not develop full power, and also stalls in different operating modes. In the list of main signs, experts note:
- unstable operation at idle, the unit stalls at idle;
- loss of power, noticeable increase in fuel consumption;
- slow reactions to pressing the gas pedal;
- jerks and dips during acceleration, at the moment of throttling;
- the car does not accelerate, does not gain momentum;
Note that the malfunction of the RTD on gasoline cars is similar in symptoms to common problems with the fuel pump or its strainer. For this reason, when determining faults in the power system, a mandatory check of the fuel pressure regulator is necessary.
In other words, if the car stalls at idle, the engine power is lost, dips appear, the car jerks during acceleration or when changing gears, significant fuel consumption is noted, then the problem may not only be in the fuel pump grid, the motor or its relay, but also in the fuel pressure regulator.
Regulator malfunctions usually come down to the fact that the spring loses the required force, as a result of which the fuel is prematurely drained into the “return”, and the engine simply does not have enough fuel when you press the gas and increase the speed, as well as in transient modes. It turns out that the pressure in the fuel rail when the fuel pressure regulator spring is faulty is low, as a result of which the engine runs unstably, engine power decreases, the ECU is not able to correctly adjust the mixture composition for different operating modes, etc.
Failures in the operation of the RTD are also possible when the pressure regulator in the fuel rail begins to jam at certain intervals. In such cases, pressure drops occur in the fuel supply system, and the car begins to twitch. Let us add that the most common reasons for regulator failure, which results in signs of malfunction of the fuel pressure regulator on a diesel or gasoline car, also include wear and tear of the materials inside the device, that is, the valve simply wears out its service life over time. The service life and condition of the regulator are affected by the quality of the fuel and the content of various impurities in it, long periods of vehicle downtime without starting the engine, etc.
Operating principle of RTD
The valve design and operating principle depend on the type of fuel system of a particular vehicle. There are 3 ways to supply gasoline from the tank to the injectors:
- The pump together with the regulator is installed inside the tank; fuel is supplied to the engine through one line.
- Gasoline is supplied through one tube and returned through another. The fuel system check valve is located on the distribution rail.
- The circuit without a mechanical regulator provides for electronic control of the fuel pump directly. The system contains a special sensor that registers pressure; the pump performance is regulated by the controller.
In the first case, the return flow is very short, since the valve and electric pump are interlocked into a single unit. The RTD, located immediately after the supercharger, dumps excess gasoline into the tank, and the required pressure is maintained throughout the supply line.
Reference. The first scheme with a regulator inside the gas tank has been implemented on all Russian-made VAZ cars.
The second option is used in most foreign cars. A valve built into the fuel rail allows excess fuel to flow into the return line leading to the tank. That is, 2 gasoline pipes are laid to the power unit.
There is no point in considering the third circuit - instead of a regulator, there is a sensor whose functionality is checked using a computer connected to the diagnostic connector.
A simple fuel pressure valve installed in the fuel pump unit consists of the following elements:
- cylindrical body with pipes for connecting the supply and return lines;
- a membrane connected to a locking rod;
- valve seat;
- spring.
The amount of pressure in the supply line depends on the elasticity of the spring . While most of the fuel goes into the cylinders (high load on the engine), it keeps the membrane and valve stem closed. When the crankshaft speed and gasoline consumption decrease, the pressure in the network increases, the spring compresses and the membrane opens the valve. The fuel begins to be discharged into the return line, and from there into the gas tank.
The fuel pressure regulator installed in the rail operates on a similar principle, but reacts faster to changes in load and gasoline consumption. This is facilitated by connecting an additional pipe of the element to the intake manifold. The higher the crankshaft speed and the vacuum on the spring side, the stronger the membrane presses the rod and closes the passage of fuel into the return line. When the load decreases and the speed drops, the vacuum decreases and the rod releases - the return flow opens and excess gasoline begins to be discharged into the tank.
Why is prior pressure created in the gas tank?
The story is long-standing - it lasted 2 years. When driving, pressure then formed in the tank, and then a vacuum. The reason is the lack of ventilation of the tank; the ventilation system, which is located in the rear arch of the car, is clogged. I didn't want to get there at all. As a result, the tank began to play, it was either pulled in or pushed out, which was clearly visible from the fold that formed on the bottom of the tank. The apocalypse came over the weekend. I left the store, looked at the car from behind and saw a puddle under the car, and dripping from under the bottom. Approaching the car, I immediately realized that there was gasoline and the smell was excellent. As a result of playing with the bottom of the tank, the tank cracked, fortunately only a small one. But enough for the gasoline to spread across the entire bottom of the tank and drip onto the ground. I rode the rope home; I didn’t want to start it up and repeat Gastello’s feat. In the evening I went out to check how much had spilled onto the ground, and everything was dry there and the bottom of the tank was dry! By evening, the temperature outside dropped, the gasoline in the tank cooled down, what leaked out created a slight vacuum inside the tank and the flow stopped. I decided to cover the area of the supposed crack with Poxypol, covered it up, smoked, waited, unscrewed the tank cap and... get it, it started dripping again. In short, I didn’t guess where the microcrack itself is located. It all ended with replacing the tank, and also the fuel pump.
But I received a lot of useful information for the future.
1. If during refueling you notice that a vacuum is created in the tank - air is sucked into the tank when the cap is unscrewed, check the ventilation system. In deep vacuums, which can occur during prolonged movement and when air temperatures drop day and night, the tank may bend.
2. When the remaining gasoline in the tank is below half the level or less, intense heating of gasoline occurs due to its passage through the fuel rail of a hot engine and the return line, which leads to an increase in pressure in the tank to a significant extent, even during short trips, especially in the summer. . If the ventilation is faulty, when you unscrew the cap, it rushes out of the tank so that the cork pops out, like a cork from a champagne bottle.
3. When the pressure in the tank increases, at low gasoline levels, an increase in engine response may be observed due to the formation of excess pressure, which in turn indicates a decrease in the performance of the fuel pump due to the natural wear of gears over time. In this case, pressure measurements in the fuel rail may give normal readings.
Symptoms of element failure
During the operation of the car, a car owner may encounter two types of RTD failure:
- The pressure drop in the rail is below the permissible level - the regulator directs most of the fuel through the return line to the gas tank.
- Increase in pressure to maximum - the element does not allow fuel to flow into the return line.
Note. As a rule, the first malfunction is accompanied by a rapid drop in pressure in the system after the electric fuel pump is turned off.
It is quite simple to track the signs of the first malfunction - the power unit is sorely lacking fuel for normal operation in all modes. Symptoms appear as follows:
- cold starting is difficult, the engine runs extremely unstable until it warms up;
- “dips” during acceleration and jerks when moving uphill;
- the car often stalls at idle;
- Gasoline consumption per 100 km increases.
Why do you need a fuel pressure regulator?
As mentioned above, this regulator maintains the required fuel pressure necessary for normal operation of the injectors, taking into account one or another operating mode of the power unit. In other words, the RTD affects the amount and intensity of the fuel supply that enters the engine cylinders through the injectors.
Simply put, the amount of fuel supplied to the engine at the time of injection depends on the pressure that is created inside the fuel rail (rail), as well as on the pulse duration for opening the injector and the vacuum in the intake manifold.
Causes and Troubleshooting
If the above symptoms are detected, you should check the performance of the RTD using one of the suggested methods:
- measure the pressure in the fuel rail, its value should be at least 3 bar;
- find the return hose and carefully press it with pliers while the engine is running;
- disconnect the vacuum pipe leading from the manifold from the regulator.
The most reliable way is to measure with a pressure gauge. The device is connected to the fitting on the fuel rail, the test is performed with the engine running. If the pressure is below 3 Bar, additionally check the fuel pump - the unit may have lost performance. For diagnostics, you will need a tee with a pressure gauge embedded in the supply line. If the pump produces 3 Bar or more, change the RTD.
The reasons for valve failure look like this:
- the spring has lost its elasticity and allows the membrane to bypass fuel at low pressure;
- pollution with low-quality gasoline;
- rod jamming.
Due to the design features (the element body is rolled), repairing the fuel pressure regulator is impossible in most cases; the part will have to be replaced. The option of washing and blowing helps only with blockages inside the element.
Squeezing the return line is done at idle speed of the engine, preferably “cold”. If engine performance stabilizes, there is a problem with the RTD or pump. To determine the “culprit”, you will still need to measure the supply pressure. Try removing the vacuum tube from the manifold at higher speeds - if the valve has become unusable, the behavior of the power unit will not change.
Topic in the “Audi Repair” section, created by Audi RT, April 25, 2007.
You are using an outdated browser. This and other sites may not display correctly. You need to update your browser or try using a different one.
The pressure in the fuel rail drops quickly
23.02.2020
23.02.2020
21.02.2020
21.02.2020
21.02.2020
- $ega Guest Jun 13 2009, 10:45
- $ega Guest Jun 13 2009, 10:50
- bomber 888rc Guru Jun 13 2009, 11:05
- $ega Guest Jun 13 2009, 11:08
- A-Lex 88 Guru Jun 13 2009, 13:35
21074 ghiguli-edet i uge ho-ro-sho
- SamurayAuto Foreign reference book Jun 13 2009, 14:26
- HotRus Immo, mileage. SRS airbag, Chip tuning, removal of particulate filters Jun 13 2009, 14:34
- idiot Guru Jun 13 2009, 15:05
- Sanek Guru Jun 13 2009, 22:06
- Aleks_N Guru Jun 13 2009, 22:36
- Sanek Guru Jun 14 2009, 00:13
- $ega Guest Jun 14 2009, 08:32
- Sanek Guru Jun 15 2009, 00:40
Once (the fuel seemed to be rather bad), the RTD began to jam (jerks, all sorts of things started, the engine became comatose.). Well, we returned this stupid valve to its place using a simple old-fashioned method. I clamped the rubber return hose with pliers and turned it on. While I was accelerating, I clamped the hose and released it again. The RTD experienced pressure drops and stopped jamming.
Post edited by Sanek
— Jun 15 2009, 00:40