How to check fuel pressure in the rail - step-by-step instructions
The main indicator of a malfunction of the engine power system in VAZ 2110, 2111 and 2112 vehicles is the fuel pressure in the fuel rail.
So, if the fuel pressure is insufficient, the following symptoms occur:
- the engine stops at idle;
- unstable engine operation;
- reduced or increased crankshaft speed at idle;
- poor car response;
- dips or jerks in engine operation while it is moving.
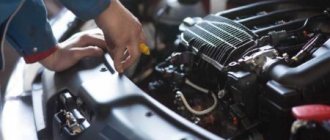
The first thing to do in this case is the reliability of the electrical contacts of the injection system, which are responsible for supplying fuel to the system (injectors, fuel pump).
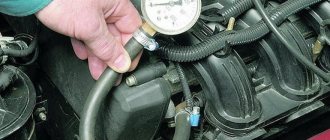
The fuel pressure in the rail can be checked using a pressure gauge with a hose and an adapter for connecting to the rail.
So, let's move directly to the process of checking the pressure:
- The first thing to do is turn on the ignition and wait a few seconds for the fuel pump to start working. If you do not hear the sound of the fuel pump, then you should check the electrical power circuit of the pump.
- Next, reduce the pressure in the power system. In order to check the fuel pressure in the rail, you must connect a pressure gauge with a measurement limit of at least 5 kgf/cm2.
- We start the engine and check the pressure.
- fuel pump malfunction;
- Fuel pressure regulator malfunction.
- We turn off the engine and reduce the pressure in the power system.
- Disconnect the pressure gauge from the ramp control valve and screw on the valve cap.
Source
Checking the RTD
So, your sensor is already in order, but there is excessive fuel consumption and other problems indicating that the regulator is acting up. First of all, check it.
This is done like this:
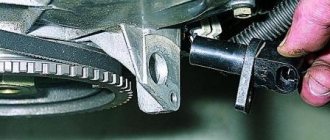
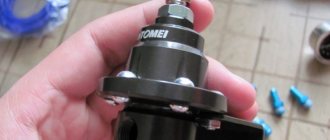
- You need to unscrew the plug of the fitting responsible for controlling the fuel pressure. Look, if the seal ring is torn or simply no longer elastic, it (or even the entire plug) needs to be replaced;
- Unscrew the spool from the fitting, this is done in exactly the same way as in any tire;
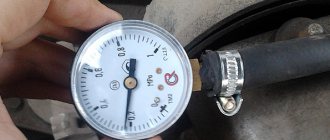
- Using a tire pressure gauge secured with a clamp to the fitting, measure the pressure while the engine is running. It should be within normal limits;
- When disconnecting the vacuum hose of the regulator, the pressure should increase slightly (by 0.2 - 0.5 kgf/cm2). If this does not happen, then there is only one solution for your VAZ 2110 - you need to replace the RTD. On average, the price of a standard RTD fluctuates around 300 rubles; an analogue of the SOATE RTD costs about 600 rubles.
Fuel pressure is an important parameter that must be constantly monitored. Its value directly affects the efficiency of the motor, its power and behavior in various modes. Consequently, every car owner who cares about the technical condition of his own car should periodically check the pressure. How to do this, read further in the article.
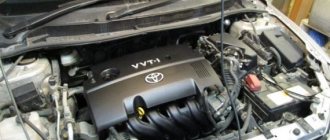
Fuel injector rail
The fuel rail (rail) is a mandatory element of the fuel system of an internal combustion engine with distributed injection. It is a section of a hollow tube, the ends of which are closed on both sides and are distinguished by the presence of bends for connecting tubes of smaller diameter. Through these tubes, fuel flows to the nozzles that are located on it. In addition, there is a pressure regulator on it. The fuel that enters the ramp is moved through injectors into the intake pipe. In addition to the outlet pipes, this design also contains a shut-off fitting and a hole.
What should be the pressure in the fuel rail on a 16-valve VAZ-2112: measure the pressure
In order to find out more about the pressure in the fuel system of your car, you need to go to a car repair shop and pay 500 rubles. Or you can purchase a fuel pressure gauge and adapter for about 1,500 rubles and do this whole operation yourself. And you can also farm! More details below.
The video below measures the pressure in the fuel rail using a conventional tire pressure gauge:
Possible malfunctions of the RTD
Considering that the design of the pressure regulator is mechanical, malfunctions in its operation can occur quite often. The most common device malfunctions include:
- weakening of the membrane spring;
- valve jamming;
- regulator clogging;
- violation of the tightness of the junction of the regulator and the ramp body.
When the diaphragm spring weakens, the valve cannot cope with the air pressure coming from the intake manifold. As a result, the pressure and amount of incoming fuel are reduced.
Valve jamming leads to an uncontrolled supply of fuel to the manifold and its “waste” into the fuel line. In this case, gasoline consumption increases, and the engine stops starting normally due to interruptions in the fuel supply.
Similar signs of malfunction can be observed when the regulator is clogged. Dirt and deposits reduce the throughput of the system, as a result of which the fuel pressure decreases significantly, the engine “chokes”, and normal idle speed disappears.
If the seal between the regulator and the ramp is broken, the air pressure may drop, which again will lead to a decrease in fuel pressure.
Measuring pressure using improvised means
Homemade design for measuring pressure in the fuel rail using a conventional tire pressure gauge
It’s easy to measure the pressure using available tools; you just need to have a regular tire pressure gauge on hand (which is used to monitor tire pressure - approx.). All you have to do is follow our instructions exactly. We will tell you how to carry out this operation correctly, and what the correct pressure should be in the fuel rail of the VAZ-2112.
Replacement
Replacing the RTD on a VAZ 2110 is not a complicated process when using our instructions. Even an amateur can cope with this task. Before starting work, you need to prepare the tool and vehicle.
Necessary tool
- Open-end wrench 24 mm;
- 6mm hexagon;
- Rags;
Preparing the car
Before starting work, it is necessary to relieve the fuel pressure in the system. To do this, remove the fuel pump fuse (F15), it is located under the panel on the passenger side. We start the engine and let it run until it stalls.
Next, we remove the negative mark from the battery to avoid fire, since we will be working with flammable substances, such as gasoline.
Step-by-step instruction
- Using a 24mm wrench, unscrew the nut securing the return tube to the RTD and remove it.
- Remove the vacuum tube from the RTD
- Using a 6 mm hexagon, unscrew the two bolts securing the RTD
- Carefully remove the RTD from the fuel rail.
- Installation of a new RTD is carried out in the reverse order. Before installing a new regulator, it is recommended to replace the sealing collar and lubricate it with gasoline before installation, so as not to damage it during the process of connecting the RTD to the ramp.
Preparatory work
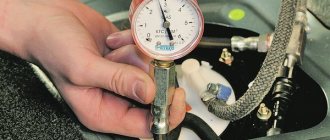
- We take a pre-prepared pressure gauge, and to prevent fuel spills and air leakage, we wrap flax or fum tape around the tip.
- We are preparing a hose with a maximum internal diameter of 9 millimeters, and clamps will be needed to secure them.
- We place the prepared rags on the engine in such a way that the hose and pressure gauge fixed on it cannot roll off the surface. This is done to prevent excess fuel from spilling over the surface of the engine.
- We wrap flax or tape around the pressure gauge, then fix the hose on it and tighten everything with a clamp.
- On the ramp, unscrew the spool valve from the nipple (in this case, fuel splashes are possible due to the presence of residual pressure - approx.).
A regular wheel cap came in handy.
Pressure gauge with pipe assembly.
We place the pressure gauge on a previously prepared rag, and the preparatory work can be considered completed.
Measurement procedure
Before you start working, you can try to relieve the pressure in the fuel system. To do this, remove the fuel pump fuse (which is located on the right side of the panel, under the front passenger’s left foot - approx.). Where 3 relays and 3 fuses are located. In the photo below it is located under the number “5”. After removing the fuse, turn on the ignition and check by ear that the fuel pump is not pumping. We start the car and wait for the engine to stall.
- After everything is ready, we check the already attached end of the pressure gauge with the hose for a secure connection.
- Next, start the engine and look at the readings that appear.
Thus, we diagnose the results that appear and compare them with the results of the norm.
After all the work has been done, unscrew the hose with the pressure gauge, screw in the spool and return everything to its original state.
Note!
The peculiarity of measuring pressure using a pressure gauge is such that its initial value on the scale has a certain inaccuracy. That is, when the air analogue has a measurement period of 15-20 atmospheres, and for fuel control the required maximum value is 5-7 atmospheres, then all measurements taken will have an error equal to the initial values on the device. Therefore, pressure testing should be carried out on a pressure gauge with maximum values of up to 8 atmospheres.
Malfunction of the fuel pressure regulator VAZ 2114
Be sure to pay attention to the operation of your car, because... if something is faulty in the system, the machine will let you know, the only thing left to do is to identify the cause of the fault
If the VAZ fuel pressure regulator is faulty, we will determine the problem accordingly based on the following signs:
- Increased fuel consumption.
- The engine, idling, suddenly stops.
- When driving, low power is provided.
- The engine is difficult to start.
The regulator valve has failed, as a result, excess fuel is not poured back into the tank, and the level of fuel pressure in the system increases above the required 2.5 kg/cm2, this is reflected in the amount of fuel penetrating into the combustion chamber through the nozzles. As a result, not all gasoline is burned.
The valve cannot withstand it, while the fuel moves unhindered throughout the entire system, and as a result, the pressure decreases; accordingly, when the speed increases, there simply is not enough fuel. The engine power drops; when the engine is stopped, the pressure must be maintained, but given the fact that the valve cannot contain it, before starting the engine you have to turn the starter for a long time, creating more or less the necessary pressure for the engine.
Identifying the problem
In order to accurately identify a malfunction in the fuel pressure regulator, it is necessary to carry out a proper test.
If you have experience, you can probably check the sensor yourself, otherwise you will have to visit a service station.
To determine the quality of operation of the regulator, it is necessary to measure the pressure level in the fuel system; a pressure gauge is perfect for this purpose.
- We measure the level when the ignition is turned on.
- We measure the level at idle.
- We measure the level with the tube removed from the fuel pressure regulator.
- We measure the level with the return current tube pinched.
- During idling 2.5 Atm.
- During ignition, at least 3 atm.
- When the vacuum tube was removed, the vacuum was 3.3 atm.
- When the return current tube is pinched, 7 atm.
- During gas supply, the pressure increases to 3 Atm and decreases to 2.5 Atm.
The pressure gauge is connected in the gap between the fuel hose and the fitting, while the vacuum hose is disconnected.
If the pressure does not increase, replace the vacuum hose and measure it again. But if these manipulations have no effect and the pressure does not increase, it means that the regulator is faulty and must be replaced.
For information: on the surface of the valve there are the values of the required readings; be sure to compare them with the results obtained during the test.
A regulator malfunction may occur as a result of:
- Prolonged downtime of the machine, without operation.
- Poor quality fuel, heavily diluted with water.
- We pump fuel into the system, then turn off the ignition and watch the pressure gauge. According to the norm, the pressure should drop to 0.7 Bar and settle at this value, but if it drops to 0, then the regulator is faulty, or there is a problem in the fuel pump motor valve.
- We increase the speed to 3000 and watch the pressure gauge readings; a drop in the needle means the fuel pump has failed and needs to be replaced.
- If the fuel pump builds up pressure for a long time, the problem lies in a clogged fuel filter or a clogged tank mesh.
The process of checking the pressure in the fuel system
You will need: an air (or preferably a water) pressure gauge, onto which you need to put a hose with a diameter of 12 mm and tighten it with a clamp. The engine should be cold and the generator covered with a rag.
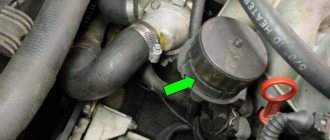
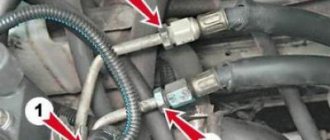
- Unscrew the cap of the control fitting on the fuel rail (fitting). Near the timing belt (on the right in the direction of travel), or on the left near the oil filler neck (for the VAZ 21129 engine);
- Unscrew the spool from the fitting using the wheel valve cap. At this moment, due to the residual pressure in the rail, gasoline will splash out (you can first relieve the rail pressure by removing the fuse from the fuel pump with the engine running and wait until it stalls).
- We put the pressure gauge hose on the ramp fitting and secure it with a clamp;
- Turn on the ignition. The fuel pump will turn on;
- We check the readings on the pressure gauge.
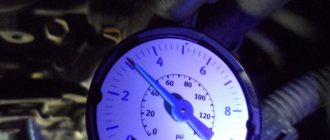
What pressure should be in the fuel rail? On VAZ 2110, 14-15, 99 models it should be in the range of 2.8 - 3.2 bar. On modern engines (Priora, Granta, Kalina, Vesta, XRAY, etc.) the pressure should be 3.6–4.0 bar. The process is also shown in the video:
Signs of regulator malfunction
Prolonged operation of the vehicle, without inspection and minor repairs, causes a more serious malfunction in the operation of its systems. As for the fuel pressure regulator, most often after a certain period of time its spring begins to sag, which accordingly does not create the required force and the fuel returns back to the tank. In turn, this process helps to reduce the pressure in the fuel rail and leads to a loss of engine power.
We recommend: Tread depth of winter and summer tires - permissible height
Moreover, this is not the only problem that may arise. Very often, when idling, engines stall, losing power, and when changing gears, the car refuses to accelerate. Also, often, when jerking occurs (while driving), the engine seems to choke, not responding to the gas pedal. Another reliable sign of a breakdown in the fuel pressure regulator is a sharp increase in fuel consumption and, believe me, you definitely won’t miss this indicator.
Simply put, there are the following possible indicators of a fuel pressure regulator failure:
uneven operation of the motor;
stopping idling;
a sharp increase (or decrease) in crankshaft rotation speed;
loss of engine power;
complete or partial lack of response to the gas pedal;
poor vehicle acceleration when changing gears;
frequent jerks during movement;
rapid increase in fuel consumption.
If you notice at least one of the described factors, it is worth checking whether everything is in order with the fuel pressure regulator.
Among the types of its breakdowns, the main ones are:
weak valve holding the required pressure,
the fuel begins to move freely throughout the system, thereby reducing its pressure, and ultimately returns to the tank. As a result, when the speed increases, the engine lacks fuel and its power drops significantly;
complete blockage of the regulator or limited fuel supply.
Leads to the engine stopping while the car is moving, and fuel begins to pour out of all accessible cracks;
valve malfunction
(they say “the valve is sticking”) happen due to pressure changes, which results in the car “jerking.”
But the most common problems with the fuel pressure regulator, nevertheless, are expressed in mechanical damage to its parts or their clogging. In addition, often the reason lies in the wear and tear of the materials used to create the mechanism, and even after eliminating the problem that has arisen, you will no longer be able to achieve the original standard indicators.
Also, there are some other subjective reasons that affect the proper operation of the pressure regulator - low-quality fuel (diluted with water), prolonged absence of vehicle operation, valve malfunction. We called them subjective because problems can be avoided through each driver’s responsible attitude towards his car, including timely repairs and quality service.
Troubleshooting
No pressure in the fuel rail? Causes:
If the pressure in the fuel rail gradually drops, the cause may be:
- leaking fuel pump connections;
- leaking injectors;
- fuel pump malfunction.
Let's check it like this. We clamp the leading rubber hose of the fuel rail:
- the pressure has become stable - the fuel module is leaking or the pump is faulty;
- the pressure drops - the injector(s) are leaking.
Checking the RTD. Connect the pressure gauge hose to the outlet fitting of the fuel pump and turn on the ignition:
- the pressure is low but stable - this means the RTD is faulty and is releasing pressure too intensely.
If the pressure in the fuel rail is within normal limits, we look for the causes of engine malfunctions elsewhere.
Share on social networks:
Found an error? Select it and press Ctrl+Enter..
Source
Operating principle of RTD
The valve design and operating principle depend on the type of fuel system of a particular vehicle. There are 3 ways to supply gasoline from the tank to the injectors:
- The pump together with the regulator is installed inside the tank; fuel is supplied to the engine through one line.
- Gasoline is supplied through one tube and returned through another. The fuel system check valve is located on the distribution rail.
- The circuit without a mechanical regulator provides for electronic control of the fuel pump directly. The system contains a special sensor that registers pressure; the pump performance is regulated by the controller.
In the first case, the return flow is very short, since the valve and electric pump are interlocked into a single unit. The RTD, located immediately after the supercharger, dumps excess gasoline into the tank, and the required pressure is maintained throughout the supply line.
Reference. The first scheme with a regulator inside the gas tank has been implemented on all Russian-made VAZ cars.
The second option is used in most foreign cars. A valve built into the fuel rail allows excess fuel to flow into the return line leading to the tank. That is, 2 gasoline pipes are laid to the power unit.
There is no point in considering the third circuit - instead of a regulator, there is a sensor whose functionality is checked using a computer connected to the diagnostic connector.
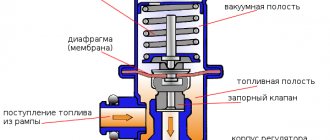
A simple fuel pressure valve installed in the fuel pump unit consists of the following elements:
- cylindrical body with pipes for connecting the supply and return lines;
- a membrane connected to a locking rod;
- valve seat;
- spring.
The amount of pressure in the supply line depends on the elasticity of the spring . While most of the fuel goes into the cylinders (high load on the engine), it keeps the membrane and valve stem closed. When the crankshaft speed and gasoline consumption decrease, the pressure in the network increases, the spring compresses and the membrane opens the valve. The fuel begins to be discharged into the return line, and from there into the gas tank.
The fuel pressure regulator installed in the rail operates on a similar principle, but reacts faster to changes in load and gasoline consumption. This is facilitated by connecting an additional pipe of the element to the intake manifold. The higher the crankshaft speed and the vacuum on the spring side, the stronger the membrane presses the rod and closes the passage of fuel into the return line. When the load decreases and the speed drops, the vacuum decreases and the rod releases - the return flow opens and excess gasoline begins to be discharged into the tank.
How to check fuel pressure in the rail - step-by-step instructions
The main indicator of a malfunction of the engine power system in VAZ 2110, 2111 and 2112 vehicles is the fuel pressure in the fuel rail.
So, if the fuel pressure is insufficient, the following symptoms occur:
- the engine stops at idle;
- unstable engine operation;
- reduced or increased crankshaft speed at idle;
- poor car response;
- dips or jerks in engine operation while it is moving.
The first thing to do in this case is the reliability of the electrical contacts of the injection system, which are responsible for supplying fuel to the system (injectors, fuel pump).
The fuel pressure in the rail can be checked using a pressure gauge with a hose and an adapter for connecting to the rail.
So, let's move directly to the process of checking the pressure:
- The first thing to do is turn on the ignition and wait a few seconds for the fuel pump to start working. If you do not hear the sound of the fuel pump, then you should check the electrical power circuit of the pump.
Note: if you turned on the ignition 3 times in a row and did not turn on the starter, then once again the fuel pump may not work - this is quite normal and is not a malfunction; it will start working simultaneously with the engine starting.
- Next, reduce the pressure in the power system. In order to check the fuel pressure in the rail, you must connect a pressure gauge with a measurement limit of at least 5 kgf/cm2.
- We start the engine and check the pressure.
How to check the fuel pump for pressure and performance - Auto Moto Special
Cars of the VAZ family are equipped with carburetor and injection engines, the fuel pumps of which are fundamentally different from each other. Let's consider in order how to check the fuel pump of both types.
Mechanical fuel pump for carburetor engine
A mechanical fuel pump was installed on the VAZ 2109 and earlier models, and currently on the VAZ 2110, 2111. It pumps up a pressure of 20-30 kPa, pumping at least 60 liters per hour.
Gasoline pumps for carburetor and injection engines are fundamentally different
To check the functionality, disconnect the hose between the fuel pump and the carburetor - gasoline under slight pressure should spray out. Then direct the hose into any container and turn the engine with the starter - if it pumps half a liter in 30 seconds, then everything is in order. If not, then you need to restore the system.
To do this you need:
- Bleed the fuel line with compressed air (between the pump and the gas tank)
- Check the cleanliness of the valves and filter mesh in the fuel pump
- Remove the adjusting shim from under the fuel pump
THIS IS INTERESTING: How to remove the front bumper on a Priora
Injector
The two main causes of failure are electrical and mechanical.
There are several basic options for checking the fuel pump at home:
- Using a light bulb (checking power supply)
- Using a pressure gauge (check for mechanical wear)
- Using a measuring container
- Checking wiring with a light bulb (electrical)
If the fuel pump does not produce characteristic sounds when you turn on the ignition, you must first check whether voltage is supplied to it. A regular 12 V light bulb connected between the gray and black wires at the fuel pump terminal should light up when the ignition is turned on.
lesson on checking the fuel pump
If the light bulb does not light up, or does not light up at full intensity, you need to check all contacts:
- Plug blocks
- Relay
- Circuit breakers
Often the reason lies precisely in the little things. To check, the relay and fuse can be swapped with a known good one. The contacts in the plug blocks may have broken off or oxidized. It is advisable to clean them and test them with an ohmmeter.
On VAZ 2112, 2114, 2115, etc., with an injection engine, an alarm can be installed that turns off the power to the fuel pump. In this case, you can turn on the pump directly from the battery or dimensions (turn on the light - it works).
Using a pressure gauge
If in the event of a malfunction with the electrical supply of the fuel pump, everything is clear - either it works or not, then mechanical wear is more difficult to determine. There are several techniques for this.
The fuel pump may be faulty for two reasons - mechanical and electrical.
You can estimate the fuel pressure if you unscrew the fuel rail plug and drain gasoline from the spool. There should be a powerful jet. Next, we unscrew the spool itself and connect a pressure gauge, preferably a fuel one, but you can also use one that measures the air pressure in the tires. Turn on the ignition and see how much the pump has pumped. It must be at least 280 kPa, on some models 380 - 400 kPa. To make it clearer, this is 3.8 - 4 kgf/cm2.
Using a measuring container
If you don’t have a pressure gauge at hand, the performance of the gas pump can be assessed by the amount of gasoline pumped per unit of time. Also, having unscrewed the spool, we connect a hose to the ramp, which we lower into a container for measurement. On Kalina and Grant, the pump should pump 35 liters per hour, or 0.5 liters. in a minute. VAZ 2110 pumps 1 liter. in a minute.
If the result is unsatisfactory, all filters must be checked. Under the bottom, next to the gas tank, there is a high-pressure filter. It is recommended to change it every 20 - 40 thousand km. mileage But it may turn out that replacement will be required much earlier - it all depends on the quality of gasoline.
Another filter that needs to be checked is located in the tank on the fuel module.
In order to get it, you need:
- Raise the rear seat and unscrew the hatch
- Remove the fuel pump power wires
- Start the engine (to release the gasoline under pressure in the system)
- Remove the ground terminal from the battery
Only after the above steps can you finally disconnect the fuel module and remove it from the tank.
An important detail: if before the repair you refueled the car to capacity, you need to spend 10 - 15 liters before unscrewing the fuel module. Since the gasoline level will be higher, it will still spill onto the ground.
It is best to replace the intake mesh with a new one every 50 thousand km. vehicle mileage.
These are the main points regarding fuel equipment that every owner needs to pay attention to during maintenance of their car.
The process of checking the pressure in the fuel system
You will need: an air (or preferably a water) pressure gauge, onto which you need to put a hose with a diameter of 12 mm and tighten it with a clamp. The engine should be cold and the generator covered with a rag.
- Unscrew the cap of the control fitting on the fuel rail (fitting). Near the timing belt (on the right in the direction of travel), or on the left near the oil filler neck (for the VAZ 21129 engine);
- Unscrew the spool from the fitting using the wheel valve cap. At this moment, due to the residual pressure in the rail, gasoline will splash out (you can first relieve the rail pressure by removing the fuse from the fuel pump with the engine running and wait until it stalls).
- We put the pressure gauge hose on the ramp fitting and secure it with a clamp;
- Turn on the ignition. The fuel pump will turn on;
- We check the readings on the pressure gauge.
fitting in the fuel rail of Lada cars connect the hose to the fitting in the fuel rail of Lada cars How to check the pressure in the fuel rail of Lada cars
What pressure should be in the fuel rail? On VAZ 2110, 14-15, 99 models it should be in the range of 2.8 - 3.2 bar. On modern engines (Priora, Granta, Kalina, Vesta, XRAY, etc.) the pressure should be 3.6–4.0 bar. The process is also shown in the video:
Troubleshooting the fuel injector system
In this article we will look at the faulty state of the injector control system using the example of a car’s fuel system.
How the fuel system works
Fuel is supplied to the ramp under excess pressure (6 atmospheres), which is created by a fuel pump. The pressure regulator on the nozzle maintains a constant pressure drop of 3 atmospheres. At constant pressure and a linear characteristic of the injector, the amount of fuel injected is determined by the duration of the injector control pulse. This is a theory. On a real engine, the pressure drop can be from 2.8 to 3.2 atmospheres. This is an acceptable range for which there are no deviations in engine performance. Why is diffusion possible under pressure? This is determined by variations in the characteristics of pressure regulators.
How to check?
We connect the pressure gauge to the fuel rail. With the fuel pump on and the engine off, the pressure should be 2.8-3.2 atmospheres. If the engine is idling, the pressure should drop to 2.2-2.5 atmospheres. During gas regeneration, the pressure gauge needle should deflect in the zone of 2.8–3.2 atmospheres. Now let's check the operation of the injectors. With the engine stopped, create the required pressure in the rail (2.8–3.2 atmospheres), then, using diagnostic equipment, apply a series of test pulses to the first injector, monitoring the change in pressure. The above procedure must be done for all injectors. The pressure drop should be the same in all cases. If the fuel pressure test results are the same as above, the fuel system is operating normally. What happens if the fuel pressure in the rail is low (less than 2 atm) or high (more than 4 atm)? The amount of fuel injected will change in proportion to the pressure deviation from the norm. In other words, the air-fuel mixture will become lean or rich. This will be especially painful in engine management systems without oxygen sensor feedback, as the controller is unaware of the fault and continues to calculate fuel delivery for the normal fuel pressure value. In oxygen sensor control systems, the controller can compensate for changes in the air-fuel ratio, but only within reasonable limits. If the fuel pressure is incorrect, problems arise with starting the engine, failures occur when the vehicle moves, and fuel consumption increases.
Troubleshooting
Let us recall the composition of the fuel supply system. It consists of: a fuel tank with an installed submersible fuel pump, a fuel filter, fuel lines (supply and return), an injector distribution rail and a pressure regulator. Failure of any component can result in incorrect fuel pressure. Let's try to list common failures for each component.
Fuel tank. Through a special pipeline, the gas tank communicates with the atmosphere, which prevents its deformation (flattening). If communication with the atmosphere is interrupted, a vacuum is created inside the gas tank. In this case, you can reduce the pressure in the fuel rail. Fuel pump. There are several malfunctions:
- the fuel pump does not develop the required pressure, resulting in low fuel pressure;
- the check valve of the fuel pump does not hold pressure, as a result: a sharp drop in pressure after turning off the ignition;
- contamination of the fuel pump filter network, as a result - a decrease in pump performance, which affects the dynamic operating conditions of the engine.
Fuel filter. A dirty fuel filter can result in low fuel pressure due to reduced flow in the fuel line. If the fuel filter is damaged (torn), dirt can enter the injectors with all the ensuing consequences. Fuel lines. Fuel lines may be pinched. If this happens to the fuel line, the fuel pressure will be reduced, if it happens to the exhaust line, it will increase. In addition, the use of low-quality gasoline with a high tar content can lead to reduced fuel line consumption. Checking fuel pressure. There are regulators with a jammed diaphragm in the open or closed position. In the first case, the fuel pressure in the system will be low, in the second - increased. Injectors. The following types of faults are typical:
- the injector does not open, as a result: the air-fuel mixture is lean;
- the injector is constantly open, resulting in: an enriched air-fuel mixture;
- the injector works, but its characteristic has “flyed away”, as a result: the fuel-air mixture is incorrect.
On-board diagnostics to identify faults
A malfunction in the fuel system will result in a pressure deviation in the fuel rail. As a result, the amount of fuel supplied to the cylinders differs from the calculated one, and the air-fuel mixture becomes depleted or enriched. In engine management systems with an oxygen sensor, the controller monitors the current air-fuel ratio. If the air-fuel mixture deviates significantly from the set value, the controller perceives this condition as a malfunction, and one of two error codes is corrected in the controller’s memory:
- P0171 - fuel system too lean;
- P0172 - Fuel system too rich.
High or low fuel rail pressure is just one of the reasons why codes P0171, P0172 may be registered in the controller memory. The cause of a significant depletion or enrichment of the air-fuel mixture may be faulty mass air flow sensors, oxygen sensors, or injectors. Air leaks lead to depletion of the air-fuel mixture. The fuel pressure reading may be out of range, but the OBD will not register anything. A very real situation: on-board diagnostics are not omnipotent.
In any car, or rather in most of its systems, there is pressure, without which normal operation of the car is impossible. For example, there is pressure in the brake, lubrication and power (railway) systems. If not for the first incident, the car would not have been able to stop at the right moment. And the lack of pressure in the lubrication system would lead to rapid engine failure. The same can be said about fuel. In order for the engine to operate stably at any speed throughout its entire service life, you need to know how to control the pressure in the fuel system and when to do it, and for this you need to understand its design and operating principle.
Troubleshooting
No pressure in the fuel rail? Causes:
- Clogged fuel filter;
- Clogged fuel pump filter;
- Fuel pump malfunction;
- Malfunction of the fuel pressure regulator (FPR). And with high blood pressure too.
If the pressure in the fuel rail gradually drops, the cause may be:
- leaking fuel pump connections;
- leaking injectors;
- fuel pump malfunction.
Let's check it like this. We clamp the leading rubber hose of the fuel rail:
- the pressure has become stable - the fuel module is leaking or the pump is faulty;
- the pressure drops - the injector(s) are leaking.
Checking the RTD. Connect the pressure gauge hose to the outlet fitting of the fuel pump and turn on the ignition:
- the pressure is low but stable - this means the RTD is faulty and is releasing pressure too intensely.
If the pressure in the fuel rail is within normal limits, we look for the causes of engine malfunctions elsewhere.
Why is a control valve needed?
The fuel supply system of most passenger cars requires continuous operation of an electric fuel pump. It constantly pumps gasoline into the fuel line and ramp, raising the pressure to the maximum (5–7 Bar depending on the brand of car). But such performance is needed only under increased load on the engine, when it develops high speeds and consumes a lot of fuel mixture. In normal mode, a fuel pressure at the injectors of 3–3.5 bar is sufficient.
The fuel pressure diaphragm valve, installed in the engine power system after the fuel pump, performs 3 main functions:
- Limits the fuel pressure in the line at low engine loads, dumping excess fuel back into the tank through a separate tube.
- When the gasoline consumption of the power unit increases, the return flow is partially or completely blocked by the regulator. In this way, the valve maintains the minimum pressure required for normal operation of the motor.
- Maintaining pressure for a long time after stopping the power unit.
How to check the fuel pressure on a VAZ-2110?
Fuel pressure is an important parameter that needs to be given special attention and kept under control. Its value directly affects the efficiency of the engine, its power, and behavior in different modes. Therefore, a good driver should check the pressure from time to time. All that remains is to find out how to do it correctly.
Features of measuring fuel pressure on a VAZ-2110
I would like to immediately note that this parameter can be measured in several ways. One of the most popular is to purchase a special kit, which includes a special adapter for connection, a pressure gauge (it is with this that the measurement is made), as well as a drain. You will have to allocate about 1,500 rubles to purchase such devices. You can do it differently - go to a service station, where specialists will carry out the necessary measurements for 300-500 rubles.
But there is a more sophisticated method that does not require additional costs - measuring fuel pressure using a regular pressure gauge, which is used to check tire pressure. In this case, for measurements it is better to use pressure gauges with a minimum limit (about 6-7 atmospheres). In this case, the error will be minimal.
But how to check? The sequence of actions will be as follows:
- Prepare a pressure gauge with a limit of 6-7 atmospheres and wind the foam directly under the pipe.
- Prepare an oxygen tube with a diameter of 9 mm and put it on top.
- Secure the fasteners on both sides with clamps.
- Cover the generator with something to prevent fire.
- Reduce fuel system pressure to a minimum. It's easy to do. Remove the fuse that powers the fuel pump (in the “ten” it is located under the trim near the control unit, on the far left side), start the engine and wait until it stalls.
- Twist off the plastic cap installed on the fuel rail.
- Look inside the cap - there will be a standard hole and nipple. Take the cap from the car wheel and unscrew it. Be prepared for a slight surge of fuel (this is caused by residual pressure).
- Now put the second edge of the hose onto the ramp outlet and then secure it with a clamp.
- Remove the “protection” from the generator and start the engine (don’t forget to put the fuse back in place).
How to check the operation of the fuel pump?
First, you should check the fuse. To do this, check the instructions for its location. Next, you should check the voltage at the pump. Before doing this, be sure to check if everything is in order with the battery. The voltage at the fuel pump terminal must be checked using a multimeter or tester. The instruction manual always indicates the required voltage.
Using a tester, check the voltage supply to the fuse. Often this is where the electrical circuit breaks.
If the search does not yield results, then the voltage should be checked on the contacts themselves. All contacts must be in place and connected to ground. A broken contact or its oxidation leads to failure of the fuel pump system. If no broken contacts are detected, but the voltage drops by more than 1 volt, then the problem is in the wiring or oxidation of the contacts. There should be no short circuit in the wiring.
If, after checking the voltage, contacts and fuse, you do not find any problems, then the problem lies in the fuel pump itself. In this case, the fuel pump will most likely require replacement. In practice, it most often turns out that replacement is a last resort. First, you should try to restore and test the fuel pump again.
Before you check the fuel pump, you need to remember that, as mentioned above, pressure is the most important characteristic of the fuel pump, so it is worth measuring its level.
How to check the pressure in the fuel rail?
You will need a pressure gauge that measures pressure in the range from 7 to 10 atmospheres. If you choose a pressure gauge with a large margin, you risk getting less accurate measurement results. Specialized stores sell a kit for measuring pressure, but you can also design your own device.
If you want to assemble the device yourself, you will also need a hose with an internal diameter of 9 millimeters. You will also need plumbing tow, with which you can seal the connection between the pressure gauge and the tube. All parts are connected and tightened using a clamp. You will also need a car spool. Next you need to perform a series of actions:
- Place the car on a level surface that is prevented from rolling, turn off the ignition and open the hood.
- Check that the injection nozzles have access to the fuel rail.
- Find the fuel pressure plug and remove it. Then you should unscrew the nipple using the spool.
- Prepare an empty container (a regular bucket will do) and a clean rag. This is necessary to collect residual fuel, which under pressure can splash out in different directions. Therefore, take care of the safety of your skin (especially your face and eyes).
- Connect the device to the fitting and begin checking the mechanism.
Checking the pressure in the fuel rail should occur in four operating modes of the power unit:
- when the ignition is on;
- at idle engine speed;
- code the fuel pressure regulator tube is reset;
- when the drain tube is compressed.
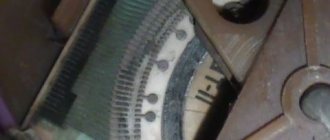
Fuel rail pressure measurement results
The results may vary slightly for different car models, but in general they should be as follows:
- when the ignition is turned on, the pressure must be at least 3 atmospheres,
- at idle engine speed - at least 2.5 atmospheres,
- when the pressure regulator tube is reset - at least 3.3 atmospheres,
- when squeezing the drain tube - at least 7 atmospheres.
Fuel rail pressure fluctuates slightly during preparation. When you press the pedal, it suddenly takes on a value of 3 atmospheres; when you release the pedal, it drops to 2.5 atmospheres. When fuel enters the fuel system, turn off the ignition and begin observing the pressure gauge. The pressure in this case should drop to 0.7 bar and remain unchanged.
If the pressure drops to zero, there may be a problem with the fuel pressure regulator. In this case, the regulator must be replaced immediately. The cause could also be the fuel pump check valve.
It is necessary to observe the behavior of the pressure gauge even at 3,000 engine speeds. A drop in pressure will indicate a faulty fuel pump. Sometimes the fuel pump cannot reach the required pressure for a long time. In this case, the problem lies in a clogged fuel filter, which needs to be replaced, or in a dirty fuel pump mesh (read more about where the fuel filter is located).
If the above methods do not reveal a malfunction of the fuel pump, you will have to diagnose other units (DPZD, IAC, mass air flow sensor, compression in the engine and some other indicators and parts).