In a modern gasoline engine, the combustible mixture is injected into the cylinders by injector nozzles at the command of the electronic control unit. Typically, diagnostics of the engine fuel supply circuit is carried out in a car service center, although the car enthusiast can determine obvious problems on his own. To find the cause of the malfunction, you need to check the pressure in the fuel rail and other points in the system.
Signs of regulator malfunction
Prolonged operation of the vehicle, without inspection and minor repairs, causes a more serious malfunction in the operation of its systems.
As for the fuel pressure regulator, most often after a certain period of time its spring begins to sag, which accordingly does not create the required force and the fuel returns back to the tank. In turn, this process helps to reduce the pressure in the fuel rail and leads to a loss of engine power. Moreover, this is not the only problem that may arise. Very often, when idling, engines stall, losing power, and when changing gears, the car refuses to accelerate. Also, often, when jerking occurs (while driving), the engine seems to choke, not responding to the gas pedal. Another reliable sign of a breakdown in the fuel pressure regulator is a sharp increase in fuel consumption and, believe me, you definitely won’t miss this indicator.
Simply put, there are the following possible indicators of a fuel pressure regulator failure:
uneven operation of the motor;
stopping idling;
a sharp increase (or decrease) in crankshaft rotation speed;
loss of engine power;
complete or partial lack of response to the gas pedal;
poor vehicle acceleration when changing gears;
frequent jerks during movement;
rapid increase in fuel consumption.
If you notice at least one of the described factors, it is worth checking whether everything is in order with the fuel pressure regulator.
Among the types of its breakdowns, the main ones are:
weak valve holding the required pressure,
the fuel begins to move freely throughout the system, thereby reducing its pressure, and ultimately returns to the tank. As a result, when the speed increases, the engine lacks fuel and its power drops significantly;
complete blockage of the regulator or limited fuel supply.
Leads to the engine stopping while the car is moving, and fuel begins to pour out of all accessible cracks;
valve malfunction
(they say “the valve is sticking”) happen due to pressure changes, which results in the car “jerking.”
But the most common problems with the fuel pressure regulator, nevertheless, are expressed in mechanical damage to its parts or their clogging. In addition, often the reason lies in the wear and tear of the materials used to create the mechanism, and even after eliminating the problem that has arisen, you will no longer be able to achieve the original standard indicators.
Also, there are some other subjective reasons that affect the proper operation of the pressure regulator - low-quality fuel (diluted with water), prolonged absence of vehicle operation, valve malfunction. We called them subjective because problems can be avoided through each driver’s responsible attitude towards his car, including timely repairs and quality service.
What should be the pressure in the fuel rail?
Gazelle tire pressure table.
Gas tire pressure 32213 Unlike the internal combustion engine cycle of a Diesel with a Common Rail injection system, in the fuel rail of a gasoline engine with distributor injection the pressure on the valves rarely exceeds 5 Atm. A working fuel pump is capable of delivering up to 7 Atm., but the RTD will dump excess gasoline back into the tank.
What does too low fuel pressure in the rail indicate?
- The fuel pump needs to be replaced. On VAZ cars with a power supply system without return, it is possible to measure the pressure before the RTD. Therefore, when checking, you can eliminate the possibility of a regulator malfunction. The pump can also be checked after removal. It is enough to connect the device to the outlet fitting, place the housing in a tank with gasoline, and then supply power to the pump from the battery.
- Clogged fine fuel filter or fuel inlet mesh in the tank. In winter, there is a risk of water freezing in the fuel tank. Due to the reduced capacity of the filter element, after turning on the ignition, the pressure will increase slowly. In some design options, it is impossible to replace the coarse fuel filter separately, so you will have to change the fuel pump module assembly.
- Leaks at the fuel hose connection points. You will easily notice puddles of gasoline under the car, but if there is a leak in the fuel pump module, then the fuel will drain into the tank.
If, after turning off the ignition, the pressure gauge needle begins to drop quickly, the system is leaking. Most often, the cause is a faulty pressure regulator, which, after stopping the engine, should prevent gasoline from quickly draining into the tank. Also leading to a rapid drop are leaky injectors, which begin to leak fuel into the cylinders, and a faulty fuel pump fuel return valve.
How to check the fuel pressure in the fuel rail yourself
Computer diagnostics of diesel engines - fuel system, power supply and equipment
The next step is to check the fuel pressure in the fuel system (fuel rail). The stability of the engine when driving in various modes directly depends on the fuel pressure. For such diagnostics, you can purchase a special device, which consists of a special pressure gauge and various adapters for connecting to the fuel rail (ramp).
Before starting work, you should take into account the increased risk of fuel fire, which may spill into the engine compartment.
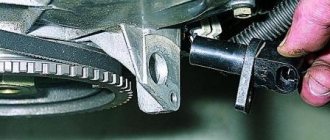
To minimize risks, it is necessary to take precautions, and it is also recommended to cover the car generator and other elements under the hood with thick cloth or other available material. Then you will need to relieve the fuel pressure in the system by turning off the fuel pump fuse. The specified fuse is located on the fuse panel
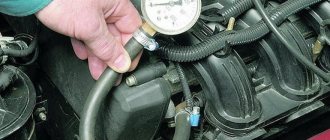
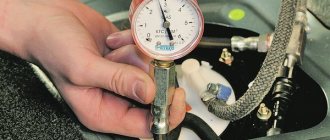
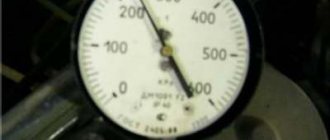
To accurately detect the element, it is necessary to study the operating manual of the specific vehicle. Then you need to start the engine with the fuel pump turned off. The engine will stall after using up the remaining fuel in the system. The next step is to connect the pressure gauge to the fuel rail. The connection point is most often closed with a plastic plug that needs to be unscrewed. After unscrewing, access to a special valve will open. This valve resembles a nipple installed on the wheels of a car. Then the fitting must be removed. It is worth considering that when you try to remove it, gasoline may leak, so you should prepare rags in advance. Now you can connect the pressure gauge hose to the ramp, checking the reliability of its fastening. After this, the pressure gauge itself should be brought out through the edge of the hood onto the windshield. Next, the fuel pump fuse is installed in place and the engine is started. After turning on the ignition, the pressure gauge readings are recorded. Different car models may have different fuel pressures in the fuel system. For example, injection 1.6-liter VAZ units have a pressure indicator in the fuel rail of about 4 atmospheres. At normal pressure in the rail, the pressure gauge readings should be within the range of about 300-380 kPa. Next, you will need to accelerate the car to 40-50 km/h in third gear, paying attention to the pressure gauge readings. With normal fuel pump performance, they should remain at the same level as when the engine was started.
It should be added that a regular pressure gauge, which is used to measure the air pressure in car tires, can also be used to measure fuel pressure. It is worth considering that such pressure gauges are initially intended for measuring high pressure up to 16 atmospheres, while fuel pressure gauges are limited to a limit of about 6 atmospheres. Also, the air pressure gauge may have a noticeable error.
Diagnostic instructions
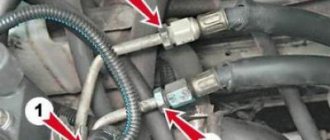
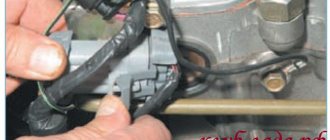
The first step is to free access to the ramp and fitting installed at the end of the manifold. Remove elements that interfere with measurements - air duct, filter housing, crankcase ventilation pipe, etc. (the list of parts depends on the car model). Proceed to measuring, following the instructions:
- Unscrew the protective plastic cap from the diagnostic fitting on the ramp.
- Place a cut-off plastic container and use a cap to unscrew the spool valves to release the pressure previously pumped up by the pump. You can press the valve or turn the spool 2-3 turns.
- Place one end of the gasoline hose onto the pressure gauge fitting and secure with a clamp. Unscrew the spool from the manifold, pull the second end of the hose onto the pipe.
- Turn on the ignition, and the electric fuel pump will pump fuel into the system. Make sure there are no leaks at the joints of the diagnostic tool.
- Start the engine and record the fuel pressure in the rail using the pressure gauge.
Advice. It is better to take readings from the device twice - after turning on the ignition and starting the engine. If you notice a difference, you need to additionally check the regulator and fuel pump.
Reasons for measuring
- After idle time, the engine must be turned with the starter for a long time to start. A clear sign that the fuel pressure in the ramp is too low when cranking.
- The engine does not start, but the fuel pump in the tank turns on. The reason may be a drop in pump performance, as a result of which sufficient pressure is not created in the ramp to start the engine.
- The car idles due to the mixture being too rich or lean. In this case, the Check Engine light will most likely light up on the dashboard.
- The engine does not develop speed, stalls when you sharply press the gas, the car jerks during acceleration.
- After warming up, the car loses power and stalls. Most likely, the deviation in the fuel system from the nominal values is due to overheating of the fuel pump.
Effect on engine operation
How to measure engine compression
To understand the purpose of measuring fuel pressure in the rail, it is enough to know the principle of dosing a portion of fuel on engines with an injection system. The amount of gasoline supplied to the cylinders is controlled by the duration of opening of the injectors. The opening time is calculated by the ECU based on the values at each operating point of the engine (load, amount of incoming air and other parameters).
Accordingly, if the pressure in the fuel rail is two times lower than required, then for an equal time of opening the injectors, half as much fuel will enter the cylinders.
The fuel rail is just a storage tank for gasoline. Therefore, pressure measurement is primarily used when diagnosing the fuel pump and checking the fuel pressure regulator. The RTD is designed to maintain constant pressure in the rail. It can be installed in the tank (power system without return) or built into the fuel rail (excess gasoline enters the tank through the return hose).
When should measurements be taken?
The operation of the power system is structured as follows:
- An electric fuel pump located in the tank pumps fuel along the line into the fuel rail and further to the injectors.
- The regulator limits the gasoline pressure at a certain level, releasing excess into the tank through the return pipeline.
- The injector mixes fuel with air, then the mixture is directed to the nozzles, which open at the command of the controller.
When the wear of the regulator (abbreviated as RTD), pump or injectors reaches a critical level, the pressure in the gasoline circuit will change towards a decrease or increase. There are 2 possible scenarios: there is not enough fuel mixture for normal engine operation, or there is an excess of it - the spark plugs are literally flooded with fuel.
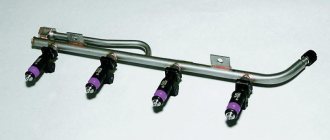
In both cases, checking the pressure in the fuel rail located next to the cylinder head will help identify the problem. The element is a manifold with branches for injectors, to which the main gasoline line is connected.
The fuel pressure in the manifold should be measured if the following symptoms occur:
- the car accelerates poorly, after sharply pressing the accelerator pedal, jerking and deceleration are felt;
- the engine of a loaded car “does not pull” and starts poorly when cold;
- shots are periodically heard in the exhaust manifold;
- a warm engine does not start after a short period of parking (especially in summer); the starter needs to be turned for 20–40 seconds.
The first two signs indicate a clear lack of gasoline, resulting from a drop in pressure in the ramp. The third case is unburnt fuel entering the exhaust manifold with subsequent combustion (a popping sound is heard). The fourth symptom indicates leaking injectors when the cylinders are filled with pure gasoline during parking. Until the pistons release excess fuel, the engine will not start.
Signs of a malfunctioning fuel pressure regulator. Everything you need to know
- The engine is extremely unstable. And it doesn’t “trouble”, as with problems with candles; the sound of the engine is uneven - not rumbling, but like a train rumbles at the junctions;
- At idle speed the engine may even stall. It is clear that this symptom is characteristic of many diseases: improper installation of the drive belt, flooded spark plugs, clogged carburetor... So if this is the only one present, you will most likely have to check many components;
- When driving, the engine runs jerkily and “sinks” are observed;
- abnormal consumption of gasoline (or diesel fuel). Again, a symptom can indicate different problems, so it is advisable to “make a diagnosis” based on the totality of symptoms;
- the level of carbon monoxide in the exhaust gases is exceeded (which is checked with an appropriate device or simply “by smell”);
- When switching to a higher gear, acceleration is weak and slow. The car loses its characteristic throttle response;
- the response to the gas pedal is delayed and weak (if this is not a characteristic feature of your car - for some VAZs and Chinese cars this behavior is quite normal).
- Those who are unsure of themselves can drive up to a service station with a new part, but believe me, nothing complicated will be required of you. Take a 24mm wrench and a five-point hexagon and begin the repair work;
- The fitting plug at the end is unscrewed. There is an o-ring there. If it is torn, cracked or stretched, replace the seal or the entire plug;
- The spool is unscrewed from the fitting. It is similar to the tire one, so you will recognize it;
- The vacuum pump is removed from the regulator;
- The nut is twisted - fastening the fuel drain pipe;
- The bolts are removed - 2 pieces - with which the RTD is fixed to the fuel rail;
- The regulator fitting is pulled out of the ramp hole, and the regulator itself is removed from the drain tube. It happens that the sealing ring gets stuck in the ramp. You need to carefully get it out of there; if intact, put it on a new RTD; if torn or cracked, replace it with a new one.
AutoFlit.ru
General design of fuel injection pump [edit | edit code]
- Frame.
- Lids.
- All-mode regulator
- Injection advance clutch.
- Booster pump.
- Camshaft.
- Pushers.
- Plungers with drivers or toothed bushings,
- Plunger sleeves.
- Plunger return springs.
- Discharge valves.
- Fittings.
- Rail.
Operating principle of fuel injection pump [edit | edit code]
The cam shaft receives rotation through an injection advance clutch and a gear transmission from the crankshaft. When the cam shaft rotates, the cam runs up against the pusher and displaces it, and it, in turn, compresses the spring and lifts the plunger. When the plunger is raised, it first closes the inlet port and then begins to displace the fuel above it. The fuel is forced out through the discharge valve, which is opened due to pressure, and enters the injector.
At the moment the plunger moves upward, the screw channel located on it coincides with the drain channel in the sleeve. The remaining fuel located above the plunger begins to be drained through the axial, radial and screw channels in the plunger and the drain in the sleeve. When the plunger is lowered, the inlet channel opens due to the spring, and the volume above the plunger is filled with fuel from the booster pump.
Changing the amount of fuel supplied to the injector is carried out by turning the plungers from the rack through an all-mode regulator. When turning the plunger, if the screw channel coincides with the drain channel earlier, then less fuel will be injected. When turning back, the channels will coincide later, and more fuel will be injected.
On some fuel injection pumps (for example, the fuel injection pump of the T-130 tractor), some sections are turned off at idle speed, and accordingly, some of the engine cylinders are also turned off.
Additional fuel injection pump units [ edit | edit code]
Injection advance clutch
— serves to change the injection advance angle depending on the speed. According to the principle of operation, it is a mechanism that uses centrifugal force. Device:
- Drive coupling half.
- Driven coupling half.
- Loads.
- Weight tension springs.
- Weight support pins
The principle of operation of the coupling is as follows. At minimum speeds, the loads are pulled to the center due to the springs and the position between the couplings is the original one, while the injection advance angle is within the adjusted parameter. As the speed increases, the centrifugal force in the weights increases and moves them apart, overcoming the resistance of the springs. In this case, the clutches rotate relative to each other and the injection advance angle increases.
All-mode regulator - serves to change the amount of fuel supplied depending on the engine operating modes: starting the engine, increasing/decreasing speed, increasing/decreasing load, stopping the engine. Device:
- Frame.
- Lids.
- Holder.
- Loads.
- Clutch.
- Levers.
- Backstage bracket.
- Adjustment screws.
- Tension springs.
The operating principle of the regulator is as follows:
- Starting the engine: before starting, the rack is in the position of maximum fuel supply due to the spring, so when starting, the maximum amount of fuel is supplied to the engine. This promotes quick startup. As soon as the engine begins to develop speed, and the centrifugal force in the weights begins to increase, they, overcoming the resistance of the springs, will begin to diverge to the sides and with their internal levers put pressure on the clutch, which will act on the lever, and the lever will pull the rack in the direction of decreasing the fuel supply. The speed will be set in accordance with the spring tension.
- Increasing speed: when you press the gas pedal, a spring is tensioned, which acts on the rack lever and clutch. The coupling and rack are displaced, and the centrifugal force in the loads is overcome. The rack shifts towards increasing the fuel supply, and the speed increases.
- Increasing load - with increasing load and the same position of the gas pedal, the speed decreases, and so does the centrifugal force in the loads. The weights add up and allow the clutch, lever and rack to move in the direction of increasing fuel supply. As the load decreases, the revolutions begin to increase, the centrifugal force in the loads too, the weights begin to diverge and the internal levers move the clutch, lever and rack in the direction of decreasing the fuel supply. At the same time, turnover stops growing.
- Stopping the engine - when the engine stops, the bracket rotates, the bracket link acts on the lever, and the lever acts on the rack. The rack moves so much in the direction of decreasing feed that the feed stops and the engine stops
Fuel pressure regulator design
Structurally, the device consists of the following parts:
- RTD housing;
- membrane;
- spring;
- check valve
The following are connected to the body through fittings:
- vacuum hose;
- fuel supply line;
- fuel return line.
At idle, the check valve of the device is open, since the vacuum in the engine intake manifold is maximum. Since the fuel pump has a constant output, and for stable operation of the engine, smaller portions of fuel must be supplied to the cylinders, most of the pumped fuel is returned to the tank through the return valve. The pressure regulator is selected in such a way that the pressure in the ramp is maintained within the established limits (as the speed increases, the pressure increases slightly).
Checking the pressure in the fuel rail yourself
Measuring rail pressure is very simple; the principle of measurement is almost the same as when checking tire pressure. To do this you need:
- A pressure gauge with maximum readings of 8-10 atmospheres, 6 is possible, since the device has small errors.
- An ordinary piece of hose with a diameter of about 8-9 mm.
- Tow.
- A couple of clamps.
Using these materials, you can create your own computing device or buy it in a store.
Before taking measurements you should:
- Carefully check the fuel system for leaks and the tightness of all clamps.
- Turn off the ignition in the car and unlock the hood.
- Find the injector ramp.
- Remove the pressure connection plug.
- Unscrew the nipple using the spool. Be careful as there may be some splashing due to residual pressure, get yourself a rag and a bowl.
- Attach the pressure gauge hose to the fitting and secure it well with a clamp.
- Attach the purchased pressure gauge to the other side of the hoses.
- Take pressure measurements. To do this, record the indicators at different engine operating modes:
- When the ignition is turned on, the indicator should be above 3 atmospheres;
- When the engine is idling, the mark should be in the range of 2.4–2.5 atmospheres;
- With the hose tube removed from the fuel pressure regulator, the measuring device should show approximately 3.2–3.3 atmospheres;
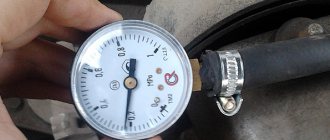
- At the moment of squeezing the drain tube of the hose, provided that the ramp is working correctly, the pressure gauge arrow should show 7–8 atmospheres;
- When you press the gas pedal, the needle should reach 3 atmospheres and drop to 2.5.
Advice! Before testing a vehicle in different modes, check the fuel for holes, otherwise all measurements taken will be incorrect and distorted.
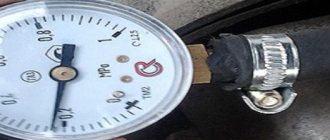
Analyze all data obtained during measurements. Turn off the ignition and check the pressure gauge. If everything is in order with the ramp, then the needle will not fall below 0.7 atmospheres. When it drops to 0, then either the pressure regulator is faulty and it will be necessary to completely remove it, or replace the RTD, or the check valve in the fuel pump motor has failed.
Increase the engine speed to 2900–3000; if at this moment the pressure gauge reading begins to decrease, then the problem is with the fuel pump. And if pressure is created over a long period, then, most likely, the fuel filter is clogged or the mesh for rough cleaning is clogged.
If all the measurements taken are not confirmed, it will be necessary to carry out a more in-depth check at a service station.
Advice! Before you start checking the pressure, read the instructions, acquire the necessary devices and tools, and most importantly, look at what parameters are typical for normal operation of the device
Measuring devices
To check the pressure of the fuel pump with your own hands, you need to prepare a set of simple devices:
- a pressure gauge designed for a maximum pressure of 10 Bar (1 MPa), a suitable device for checking tires;
- gasoline hose with an internal diameter of 8 mm;
- a cap for unscrewing spool valves from wheel valves;
- clamping clamps 10–15 mm – 2 pcs.
To take measurements at other points in the fuel supply circuit, you will need homemade adapters to connect a gasoline hose with a pressure gauge. If the line is assembled with quick-release plastic connections, you need to buy one such clamp with a fitting. To connect to a threaded joint, purchase the appropriate tube with nuts and cut it into 2 parts.
How to check the pressure in the fuel rail with your own hands Several good ways
Before taking measurements, we visually check the fuel system for leaks and see if all the clamps are tightened well. If there is the slightest depressurization, you no longer have to rely on the accuracy of the readings;
Turn off the ignition and open the hood. We find the ramp; Removing the pressure fitting plug
We take the spool and unscrew the nipple (attention: when unscrewing the nipple, splashes from residual pressure are possible, so you need to prepare a rag and a bowl just in case); Pull the hose onto the fitting and secure it with a clamp; We connect the purchased pressure gauge to the hose on the other side.
- We take pressure gauge readings in four positions;
- When you turn the key, trying to start. Readings are approximately 3 atmospheres;
- With the engine running at idle. It should show about 2.5 or slightly higher;
- Gas pedal. In this case, the readings are approximately 3 bar, and then drop to 2.5;
- Try squeezing the drain hose. In this case, if the ramp is working properly, the pressure should jump to 7 or even 8 bar.
AutoFlit.ru