The task of the fuel system is high-quality, timely and complete supply of gasoline to the engine, as well as storage and purification of fuel.
Structurally, the system consists of a fuel filter, injection system, fuel pump, tank and other elements connected by conductors.
In this case, the main function is performed by the fuel pump - it creates the necessary pressure in the fuel rail. If it decreases, serious malfunctions in engine operation are possible.
Checking the pressure in the fuel system of the VAZ 2115
The pressure in the fuel system of the VAZ 2115 is one of the important parameters when diagnosing a car.
The behavior of your car in different modes depends on this parameter. The main signs by which you can determine the presence of malfunctions in the fuel system:
- “Trippling” of the engine or interruptions in operation.
- The idle speed fluctuates, the engine stalls at idle speed.
- Excessive fuel consumption.
- Increased CO content in exhaust gases.
Confirmation (or refutation) of the assumption that the vehicle’s fuel system is faulty is possible after checking the pressure in it.
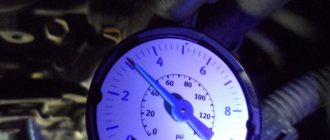
To measure the pressure in the fuel system, you can buy a special fuel pressure measuring device. This is a ready-made kit consisting of a fuel pressure gauge, adapter and drain. The second option is to measure the fuel pressure at a service station. There is an option to check the pressure yourself.
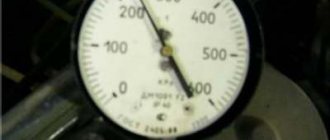
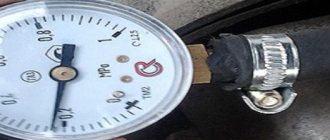
Checking the pressure in the VAZ 2115 ramp in your garage does not require special devices. To check the pressure you will need a regular mechanical pressure gauge. Moreover, if the pressure gauge has a scale, for example, up to 16-20 atm., the result of measuring the pressure in the fuel system of the car can give a large error. This is due to the fact that for fuel the limit is much lower and amounts to 5-7 atm. It is correct to check the fuel pressure with a pressure gauge with a maximum value of 10 atm. (ideally 6-7 atm.). You also need to have a fuel (or oxygen) hose with a diameter of 9 mm, tow (to ensure a tight connection) and clamps.
To make a device under the pipe, we wind tow, put on an oxygen hose and tighten it with clamps.
Before starting to measure pressure, it is very important to make sure that the fuel system is intact and that there is no depressurization, otherwise your measurements will not be accurate.
Preparatory work
We place the pressure gauge on a previously prepared rag, and the preparatory work can be considered completed.
Measurement procedure
Before you start working, you can try to relieve the pressure in the fuel system. To do this, remove the fuel pump fuse (which is located on the right side of the panel, under the front passenger’s left foot - approx.). Where 3 relays and 3 fuses are located. In the photo below it is located under the number “5”. After removing the fuse, turn on the ignition and check by ear that . We start the car and wait for the engine to stall.
Additional block
- After everything is ready, we check the already attached end of the pressure gauge with the hose for a secure connection.
- Next, start the engine and look at the readings that appear.
Thus, we diagnose the results that appear and compare them with the results of the norm.
After all the work has been done, unscrew the hose with the pressure gauge, screw in the spool and return everything to its original state.
Note!
The peculiarity of measuring pressure using a pressure gauge is such that its initial value on the scale has a certain inaccuracy. That is, when the air analogue has a measurement period of 15-20 atmospheres, and for fuel control the required maximum value is 5-7 atmospheres, then all measurements taken will have an error equal to the initial values on the device. Therefore, pressure testing should be carried out on a pressure gauge with maximum values of up to 8 atmospheres.
We measure the pressure in the system without a check valve
If it happens that your engine does not have a check valve, then you need to know that in such a ramp there is a constant pressure from 3,6
up to
4.0
atmospheres. But the order of measurements in general is completely similar to what is described above.
Preparatory stage when checking the pressure in the fuel system of the VAZ 2115
- Open the hood and turn off the ignition.
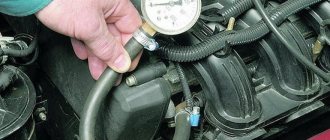
- Unscrew the plastic cap from the fuel frame (if it has not been unscrewed for a long time, you may need pliers).
- If the car has just been turned off, the gasoline in the ramp is still under pressure. By pressing the spool with the cap from the wheel, release the pressure (after laying down a rag or placing some kind of container for residual fuel). Unscrew the nipple.
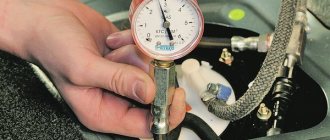
- Connect the hose of the mounted pressure measuring device to the fitting and secure it using a clamp.
The pressure in the fuel system is checked in four different operating modes of a car engine:
- with the ignition on
- at idle
- with the tube removed from the fuel pressure regulator (RDT)
- with a pinched return line.
- when the ignition is on, the pressure should be about 3 atm. (not less),
- at idle speed - about 2.5 atm.,
- with the RTD tube removed - about 3.3 atm.,
- with a pinched drain pipe (return) - about 7 atm.,
- when adding gas, the pressure increases to 3 atm, then drops to 2.5 atm.
Checking the pressure in the fuel rail on VAZ and Lada cars with an injection engine
≡ 4 November 2015 Category: Repair
The article will describe a testing technique that does not require special devices.
From the tool you will need:
- Any mechanical pressure gauge with a maximum reading from 6 to 10 atmospheres (0.6-1.0 MPa)
- 8 or 9 mm fuel or oxygen hose
- Cap for unscrewing nipples on the wheel
- Two clamps
- Pliers
1. We took a regular gas pressure gauge with a scale of up to 1.0 MPa. It has a threaded connection and screws perfectly onto a 9 mm oxygen hose. You can use a mechanical one to check tire pressure. They are usually inserted into the fuel hoses by 8 mm.
2. Screw it into the hose and tighten it with a clamp:
3. Unscrew the plastic cap from the fuel rail. It should unscrew by hand, but if it hasn’t been touched for a long time, you may need pliers:
4. If the car has just been turned off, then the gas in the ramp is under pressure. First, it is recommended to release the pressure by pressing on the spool and placing a rag or a plastic “bottle” with the neck cut off. It is more convenient to bleed using a wheel cap.
5. Unscrew the nipple with the cap. It is similar to a wheel nipple:
6. We put a hose with a pressure gauge on the threaded part and tighten the connection with a clamp:
7. Start the car and first of all make sure that there are no gasoline leaks from the connections. Then we look at the pressure gauge readings.
8. For fuel systems with “return” (a pressure regulator is installed on the fuel rail, from which a tube goes back to the tank), a pressure of 2.7 atm is considered normal (when re-gasping it should jump up to 3 atmospheres). However, a pressure of 2.5 atm is also acceptable. If the pressure is less, then the fuel system is faulty. Pressure pulsation (0.2 atm) indicates a clogged coarse mesh (located in the tank with the fuel pump).
9. Next, we check the pressure regulator. To check, disconnect the hose going from the regulator to the intake manifold. The fuel pressure should increase to 3.2 atm (at 2.7 initial). Up to 3.0 atm is also acceptable. If the pressure has not changed or changed only slightly (0.1-0.2 atm), then you need to check the fuel pump.
10. The maximum pressure developed by the pump is checked. To do this, use pliers to pinch the return fuel line (coming from the regulator). Different pumps show different pressures, but a new one should have at least 6 atm. A pressure of 5 atm indicates severe wear, but will still serve. If the pressure is less than 4.0 atm, the pump is faulty or the pipeline with the fine filter is clogged. If the fuel pump is working properly, and the pressure in the rail drops after the “return” is restored to less than 2.5 atm, and/or does not change when the regulator hose is disconnected, then the regulator is faulty. If, when the return line is pinched, the pressure rises slightly, and engine performance deteriorates significantly, then there is a high probability of injector leakage.
11. To eliminate the influence of the injectors, it is better to measure the pressure on the supply line itself by disconnecting it from the ramp and inserting it into a hose with a pressure gauge. If the pressure has risen to 5-6 atm, and with the “return” compressed it is significantly less, then the injectors are allowed to pass through. It is necessary to remove the ramp and check the condition of each individually.
12. You can check for clogging of the pipeline as follows. Remove the rear seat and unscrew the hatch. We see the fuel pump assembly underneath it. If the pipeline has quick-release connections, then we buy such a connection in the store (50 rubles).
13. If the pipeline is installed on threaded connections, you will have to buy the entire tube and cut off the tip:
14. Connect it to the pump outlet, and put a hose with a pressure gauge on the other end. Let's check the pressure again. If the pressure gauge readings increase to the normal 6 atm (after pumping gasoline several times by turning the key), then change the fine fuel filter and bleed (or flush the entire system).
15. Replacing the fuel filter is shown here: replacing the fuel filter on Lada Priora, Kalina and Granta cars. The only difference is that after removing the filter, we direct the fuel supply hose into a plastic bottle (preferably transparent) and turn on the ignition with the key (the fuel pump turns on and fuel spills into the bottle). We inspect the condition of the fuel in the bottle. Then we install a new filter, remove the hose from the ramp and direct it into the bottle. We turn on the ignition several times and spill gasoline. We inspect the fuel in the tank again. If dirt is found after the filter, then washing the injectors is also required. We assemble the entire system and measure the pressure readings again. If the readings have not changed, then check the correct clamping of the “return” (you can try connecting a pressure gauge to the output of the regulator). If this does not help, then perhaps the blockage is serious and requires blowing with air under high pressure. It would be a good idea to check the entire pipeline from the tank for mechanical damage (dents, kinks).
16. Fuel systems without a return line are diagnosed in almost the same way. The main difference is that here the fuel regulator is located on the pump body. The fuel goes from the pump to the fine filter, and then goes to the regulator. Near the body, the fuel pipe bifurcates. One tip goes to the regulator, and the second goes to the fuel rail.
17. The main difference in the readings is the normal pressure at the ramp is 3.8 atm. When over-gassing it should jump up to 4 atmospheres. If the pressure is less, immediately check the pump. We connect a pressure gauge to the pump outlet and check the pressure. The pressure should also be at least 6 atm for a new one.
18. If the pressure is working, then check if the fuel filter is clogged. To do this, we restore the fuel line from the pump and connect to the tube suitable for the regulator. The easiest way to do this is to cut off the old tip from the fuel filter, install one end of it in a clip, and put a hose with a pressure gauge on the other. If the pressure is identical to the pump pressure, then the filter is clean. If a significant drop is visible, the filter must be replaced.
19. Next, we check the supply line to the ramp. Shut off the fuel supply to the regulator. It is easier to do this by inserting a soldered (twisted/crumpled) tip from the filter into the quick-release connection. If there is no difference here, then change the regulator. If losses are detected, then we check the entire pipeline - there may be leakage or crumpling of the pipeline, it is also possible that nozzles are leaking.
Please rate the article
( 142 votes, average rating: 4.59 out of 5)
There were 6 comments left on the post “Checking the pressure in the fuel rail on VAZ and Lada cars with an injection engine.”
- Ildar:
04/07/2015 at 19:43
I have a question: the pressure in the ramp at idle is 2.7-2.8, and when you disconnect the tube from the RTD, my pressure rises to the point of failure of 7-8 atm... is this normal or should the RTD be changed??? auto vaz 2109 injek thank you
Answer
- Novel:
10/16/2016 at 21:45
When checking the pressure in the rail, the needle does not rise so quickly, but quickly drops when the ignition is turned off, although it should remain there. Who can tell me what.
Answer
- Sergey:
03/20/2017 at 19:11
It must stand or fall very very slowly. Check connections and injectors for leaks.
Answer
- Andrey:
30.11.2016 at 18:00
Very useful article, written in an accessible way. Thank you !
Answer
- Vladimir:
04/01/2017 at 12:00
thank you very instructive
Answer
- fanil:
08/04/2018 at 19:15
I don’t quite understand point 19, if the taxiway is turned off and the pressure in the ramp is abnormal (low) - what does the taxiway have to do with it?
Answer
Leave your comment
Click to cancel reply.
Checking the pressure in the fuel rail of VAZ 2115
The task of the fuel system is high-quality, timely and complete supply of gasoline to the engine, as well as storage and purification of fuel.
Structurally, the system consists of a fuel filter, injection system, fuel pump, tank and other elements connected by conductors.
In this case, the main function is performed by the fuel pump - it creates the necessary pressure in the fuel rail. If it decreases, serious malfunctions in engine operation are possible.
How to remove the fuel rail on a VAZ 2115 - step-by-step instructions
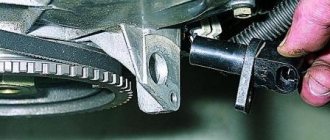
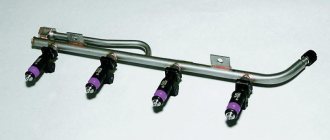
Hi all. Today we’ll talk about the fuel rail, for your attention step-by-step instructions on how to remove the VAZ 2115 fuel rail with your own hands . A few words about rail is . This device is a bar with a pressure regulator into which fuel injectors are installed.
The fuel rail is mounted on the intake manifold with two bolts. Through this ramp, fuel is supplied to the injectors, and then through them into the intake pipe. The pressure in the fuel rail is adjusted using a fitting located on the fuel rail housing.
The need to remove the fuel rail usually arises when it is necessary to clean the injectors or replace the pressure regulator. In order to avoid any problems with removal during work, we will tell you how to remove the VAZ 2115 fuel rail quickly and easily.
Symptoms of a problem
As a rule, checking the pressure in the fuel rail is required in the following cases:
- If malfunctions occur in the operation of the power unit at XX. In such a situation, the car may stall at the most unpredictable moment (even at a traffic light);
- the motor begins to stall, obvious instability appears in its operation;
- Significant excessive consumption of gasoline is noticeable. Consumption can generally increase by 30-50%;
- the volume of carbon monoxide in the exhaust increases.
This problem may “pop up” during inspection at stationary points and lead to a serious fine.
Please note that the symptoms we mentioned can also be caused by other problems - a clogged filter in the fuel system, a defect (malfunction) of spark plugs, bad fuel, and so on.
But if the initial inspection does not produce results, and the ECU does not generate errors, then checking the pressure in the ramp is mandatory.
Checking the pressure in the fuel rail of VAZ 2115
To take measurements, you do not need to go to a service station - do everything yourself. All you need to do is take a few simple steps. Find (buy) the necessary equipment.
To check you will need:
- Pressure gauge with a limit value of 8-10 atmospheres. It makes no sense to use a device with a larger scale due to the large error. The readings of such a pressure gauge will be distorted (especially if the pressure in the system is very low);
- a small piece of hoses with a diameter of 8-9 mm;
- tow (you can buy the most common product that is used in plumbing repairs).
From the materials listed above, make your own pressure measuring device. If there is no desire to “handicraft”, then you can buy a ready-made device (but here you will have to spend money).
What pressure should be in the fuel system
Take measurements in four modes (while recording what pressure in the fuel rail the pressure gauge shows):
- When turning the key in the ignition. In this case, the pressure should be about three atmospheres (not lower);
- when the engine is running at idle. The device should show about 2.4-2.5 atmospheres;
- when removing hoses and pressure regulator. In this mode, the pressure gauge readings should be around 3.2-3.3 atmospheres;
- when squeezing the drain hose. If the ramp is working properly, then the pressure should reach 7-8 atmospheres;
- when you press the accelerator pedal, the pressure gauge readings should jump to three atmospheres, and then drop to a level of 2.5.
Analyze possible problems in the system. Turn off the car and watch how the pressure gauge readings change. If the fuel rail is intact, then the readings should not fall below 0.7 atmospheres.
If the pressure drops to “0”, then the pressure regulator is most likely faulty. In such a situation, there is only one way out - the unit must be removed and replaced. At best, you can get by installing a new check valve on the fuel pump engine.
Raise the speed to 2800-3000 and carefully watch the movement of the needle. If the pressure decreases, then we can talk about a clear malfunction of the unit we are interested in.
If the pressure in the system takes a very long time to build up, then there may be two reasons - the fuel filter is too clogged or the coarse mesh is clogged.
In a situation where all assumptions remain unconfirmed in practice, you cannot do without high-quality diagnostics.
Here you will need to check a whole range of sensors - mass air flow sensor, air flow sensor and air pressure sensor. In addition, it would not be superfluous to measure the engine compression.
That's all. Before checking the pressure in the fuel rail, be sure to read the instructions, stock up on the necessary equipment and find out what parameters are normal for a “healthy” device.
Therefore, do not panic if the symptoms described above appear, but simply take a series of simple measurements. This will save you money, nerves and maintain the functionality of the car.
How to check fuel rail pressure yourself
This procedure will require a pressure gauge, the maximum value of which is 7-10 atmospheres. It is not recommended to use a more powerful pressure gauge, since the error when measuring a small pressure will be too large.
You also need to have a hose with an internal diameter of 9 millimeters and tow used for plumbing work (it can be used to ensure a tight connection). After this, all joints should be strengthened with special clamps. If possible, you can facilitate and speed up this process by using a ready-made device for measuring pressure in the ramp
.
Be careful!
Before checking the pressure of the fuel system, you need to make sure that it is intact and there is no depressurization, otherwise the measurements will be inaccurate. First of all, you need to open the hood, then turn off the ignition.
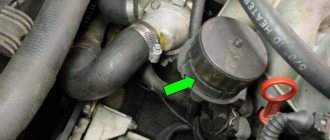
- Find the injector fuel rail.
- Remove the fuel pressure fitting plug and unscrew the nipple using a spool valve.
- Using rags and containers, remove any remaining fuel. Be careful to avoid contact with eyes.
- Connect the device hose to the fitting and secure it using the same clamp.
The pressure that should be in the fuel system:
- at the moment the ignition is turned on - at least 3 atmospheres;
- with idle speed - about 2.5 atmospheres;
- with the fuel pressure regulator tube removed, approximately 3.3 atmospheres;
- when adding gas, the pressure should increase to 3 atmospheres and drop to 2.5.
- After fuel enters the systems, turn off the ignition and monitor the pressure gauge readings. If the ramp is working properly, the pressure should be about 0.7 bar, and then stabilize at this mark.
- If the pressure drops to zero, this is a sign of a faulty fuel pressure regulator (FPR). It will be necessary to remove and replace it or install a new check valve for the fuel pump motor.
- Raise the rpm to 3000, watching the pressure gauge needle. If the arrow goes down, there is a problem with the fuel pump.
- If the fuel pump does not provide the required pressure, the strainer is probably clogged, and maybe the fuel filter of the pump is clogged.
- If the above signs are not confirmed, it is necessary to check the TPS, IAC, mass air flow sensor, and engine cylinder compression.
We measure the pressure in the fuel system (ramp) of a VAZ 2114: a pressure gauge to help
The car is not always in good working order; it happens that it stops moving normally. The engine runs intermittently, jerks, and sometimes the car does not start at all. The cause may be a clogged fuel filter, a non-working pressure regulator, or a faulty electric pump located in the gasoline tank. To find out all these faults, you need to measure the pressure in the fuel line.
Measuring pressure in the fuel system
How to remove the fuel rail of VAZ 2114, 2115 injectors - step-by-step instructions
1. First, you need to relieve the pressure in the fuel system; to do this, you need to turn off the fuel pump. To quickly turn off the fuel pump, simply remove the fuse that is responsible for this device from the socket in the fuse block. Next, you need to start the engine and let it run until it stalls. If you don’t want to go to the fuses, then you can try to turn off the power to the fuel pump in another way, for example, by disconnecting the fuel pump power supply.
2. Next, turn off the ignition.
3. Disconnect the negative terminal of the battery.
4. Disconnect the air receiver hose, as well as the vacuum hose from the pressure regulator.
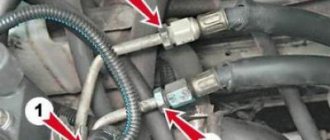
5. Using a wrench set to “17” (some have a wrench set to “22”), unscrew the fittings and move the tubes to the side.
6. Then disconnect the fuel rail power wires.
7. Next, remove the clamping bar securing the fuel pipes.
8. Take the hexagon at “5” and use it to unscrew the two bolts securing the fuel rail.
9. Remove the injectors from their sockets, while slightly pulling the ramp along the axis.
10. Now you can remove the fuel rail from the car. Be extremely careful and careful not to damage the contacts of the injector connectors and sprayers. Make sure that nothing, such as dirt or dust, gets into the channels or fuel lines.
11. When unscrewing the union nut, hold the fitting using a second wrench.
12. Cleaning the ramp from dirt should be done exclusively with a special liquid for cleaning fuel cells (ABRO, WD-40).
This completes the removal procedure, all that remains is to carry out repair work, replace faulty parts and reassemble everything in reverse order. Thank you for your attention, see you again at VAZ Repair!
PRESSURE IN THE FUEL LINE VAZ 2114
The pressure in the fuel line of an injection engine is an important parameter - if it is low, normal injection by injectors into the cylinders of an internal combustion engine (ICE) will not be ensured. And its high degree is also dangerous - fuel can flood the entire engine compartment, and then a fire will occur.
Car owners may have a question about how to check the pressure in the fuel rail, within what limits should the readings be, what is used to check it, and how to determine what may be faulty in the fuel line? So, in order.
First you should know how the fuel system (TS) works and what elements it consists of. The vehicle includes (elements in order, starting from gasoline intake to its direct injection):
- Gas tank (in the VAZ model 2114 it is located under the bottom of the trunk);
- Electric fuel pump (located in the gas tank);
- Coarse filter (represents a mesh that is located on the intake part of the pump);
- Fine filter (located immediately after the gas tank, located below the trunk, between the rear of the muffler and the fuel tank);
- Fuel rail or rail (TR), it distributes gasoline among the cylinders, it can be steel, aluminum or plastic;
- Injectors (there are four on model 2114);
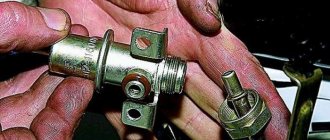
- Fuel pressure regulator (it maintains the required gasoline pressure in the system for normal injection through the injectors into the cylinder).
All elements are connected to each other by a fuel line, and in the entire chain, after the pressure regulator (RDT), there is also a return hose through which excess gasoline is discharged into the tank. After the ignition is turned on, fuel passes through the system to the injectors (therefore, there is pressure in the system even when the ignition is on), and when the engine starts, the electronics send a command to the injectors, and gasoline enters the cylinders.
HOW AND WHAT TO CHECK THE PRESSURE IN THE VEHICLE
They check the pressure in the fuel rail of the VAZ 2114 with a pressure gauge - it is most convenient to connect it on the ramp, and not somewhere else in the line. At the rear of the ramp, in the direction of travel of the car, there is a fitting with a thread and a valve, closed with a plastic cap. When measuring, the pressure gauge adapter is screwed onto the fitting. The pressure gauge is easy to assemble yourself. For this you will need:
- The measuring device itself with an arrow - a tire pressure gauge with a maximum reading limit of 6 to 10 kgf/cm² is suitable;
- A piece of gasoline hose 50-70 cm long;
- A fitting for checking the pressure, which will be screwed into the ramp;
- Two clamps.
We assemble all the elements, tighten the clamps, and the pressure gauge is ready for use. That's it, now you can take measurements. To do this you will need tools:
- Wheel valve cap.
- Thin screwdriver or metal pin;
- A wrench with a fitting size (usually 17 mm):
- Pressure gauge.
To measure the pressure in the fuel rail, you need to:
- Turn off the engine, turn off the ignition;
- unscrew the cap, relieve pressure in the VAZ 2114 fuel rail by pressing the valve with a thin screwdriver;
- Unscrew the spool with the valve using the wheel valve cap. A rag will come in handy - when you dump it, fuel will spray out of the valve. To relieve pressure, you need to press the valve smoothly, releasing the pressure;
- secure the pressure gauge fitting with a wrench to the rail. Now you can start the internal combustion engine and measure the pressure in the fuel rail.
conclusions
After reading this article, you can easily take measurements in the fuel rail and compare the results with standard indicators of serviceability in the fuel system.
The article will describe a testing technique that does not require special devices.
From the tool you will need:
- Any mechanical pressure gauge with a maximum reading from 6 to 10 atmospheres (0.6-1.0 MPa)
- 8 or 9 mm fuel or oxygen hose
- Cap for unscrewing nipples on the wheel
- Two clamps
- Pliers
1. We took a regular gas pressure gauge with a scale of up to 1.0 MPa. It has a threaded connection and screws perfectly onto a 9 mm oxygen hose. You can use a mechanical one to check tire pressure. They are usually inserted into the fuel hoses by 8 mm.
2. Screw it into the hose and tighten it with a clamp:
3. Unscrew the plastic cap from the fuel rail. It should unscrew by hand, but if it hasn’t been touched for a long time, you may need pliers:
4. If the car has just been turned off, then the gas in the ramp is under pressure. First, it is recommended to release the pressure by pressing on the spool and placing a rag or a plastic “bottle” with the neck cut off. It is more convenient to bleed using a wheel cap.
5. Unscrew the nipple with the cap. It is similar to a wheel nipple:
6. We put a hose with a pressure gauge on the threaded part and tighten the connection with a clamp:
7. Start the car and first of all make sure that there are no gasoline leaks from the connections. Then we look at the pressure gauge readings.
8. For fuel systems with “return” (a pressure regulator is installed on the fuel rail, from which a tube goes back to the tank), a pressure of 2.7 atm is considered normal (when re-gasping it should jump up to 3 atmospheres). However, a pressure of 2.5 atm is also acceptable. If the pressure is less, then the fuel system is faulty. Pressure pulsation (0.2 atm) indicates a clogged coarse mesh (located in the tank with the fuel pump).
9. Next, we check the pressure regulator. To check, disconnect the hose going from the regulator to the intake manifold. The fuel pressure should increase to 3.2 atm (at 2.7 initial). Up to 3.0 atm is also acceptable. If the pressure has not changed or changed only slightly (0.1-0.2 atm), then you need to check the fuel pump.
10. The maximum pressure developed by the pump is checked. To do this, use pliers to pinch the return fuel line (coming from the regulator). Different pumps show different pressures, but a new one should have at least 6 atm. A pressure of 5 atm indicates severe wear, but will still serve. If the pressure is less than 4.0 atm, the pump is faulty or the pipeline with the fine filter is clogged. If the fuel pump is working properly, and the pressure in the rail drops after the “return” is restored to less than 2.5 atm, and/or does not change when the regulator hose is disconnected, then the regulator is faulty. If, when the return line is pinched, the pressure rises slightly, and engine performance deteriorates significantly, then there is a high probability of injector leakage.
11. To eliminate the influence of the injectors, it is better to measure the pressure on the supply line itself by disconnecting it from the ramp and inserting it into a hose with a pressure gauge. If the pressure has risen to 5-6 atm, and with the “return” compressed it is significantly less, then the injectors are allowed to pass through. It is necessary to remove the ramp and check the condition of each individually.
12. You can check for clogging of the pipeline as follows. Remove the rear seat and unscrew the hatch. We see the fuel pump assembly underneath it. If the pipeline has quick-release connections, then we buy such a connection in the store (50 rubles).
13. If the pipeline is installed on threaded connections, you will have to buy the entire tube and cut off the tip:
14. Connect it to the pump outlet, and put a hose with a pressure gauge on the other end. Let's check the pressure again. If the pressure gauge readings increase to the normal 6 atm (after pumping gasoline several times by turning the key), then change the fine fuel filter and bleed (or flush the entire system).
15. Replacing the fuel filter is shown here:. The only difference is that after removing the filter, we direct the fuel supply hose into a plastic bottle (preferably transparent) and turn on the ignition with the key (the fuel pump turns on and fuel spills into the bottle). We inspect the condition of the fuel in the bottle. Then we install a new filter, remove the hose from the ramp and direct it into the bottle. We turn on the ignition several times and spill gasoline. We inspect the fuel in the tank again. If dirt is found after the filter, then washing the injectors is also required. We assemble the entire system and measure the pressure readings again. If the readings have not changed, then check the correct clamping of the “return” (you can try connecting a pressure gauge to the output of the regulator). If this does not help, then perhaps the blockage is serious and requires blowing with air under high pressure. It would be a good idea to check the entire pipeline from the tank for mechanical damage (dents, kinks).
16. Fuel systems without a return line are diagnosed in almost the same way. The main difference is that here the fuel regulator is located on the pump body. The fuel goes from the pump to the fine filter, and then goes to the regulator. Near the body, the fuel pipe bifurcates. One tip goes to the regulator, and the second goes to the fuel rail.
17. The main difference in the readings is the normal pressure at the ramp is 3.8 atm. When over-gassing it should jump up to 4 atmospheres. If the pressure is less, immediately check the pump. We connect a pressure gauge to the pump outlet and check the pressure. The pressure should also be at least 6 atm for a new one.
18. If the pressure is working, then check if the fuel filter is clogged. To do this, we restore the fuel line from the pump and connect to the tube suitable for the regulator. The easiest way to do this is to cut off the old tip from the fuel filter, install one end of it in a clip, and put a hose with a pressure gauge on the other. If the pressure is identical to the pump pressure, then the filter is clean. If a significant drop is visible, the filter must be replaced.
In this article we will consider the faulty state of the injector control system
and as an example, consider the fuel supply system.
How the fuel system works
Fuel is supplied to the ramp under excess pressure (6 atmospheres), which is created by the fuel pump.
Using the pressure regulator on the nozzle, a constant pressure drop of 3 atmospheres is maintained. At constant pressure and a linear characteristic of the injectors, the amount of fuel injected is determined by the duration of the injector control pulse. This is a theory. On a real engine, the pressure drop can be from 2.8 to 3.2 atmospheres. This is an acceptable range within which no deviations in engine operation are observed. Why is pressure variation possible? It is determined by the spread in the characteristics of pressure regulators.
How to check the fuel system?
Let's connect the pressure gauge to the fuel rail.
With the fuel pump turned on and the engine not running, the pressure should be 2.8-3.2 atmospheres. If the engine is idling, the pressure should drop to 2.2-2.5 atmospheres. When over-gassing, the pressure gauge needle should deviate into the zone of 2.8-3.2 atmospheres. Now let's check the operation of the injectors. With the engine not running, we will create the required pressure in the ramp (2.8-3.2 atmospheres), after which we will apply a series of test pulses to the first injector, monitoring the change in pressure. The above procedure must be carried out for all injectors. The pressure drop should be the same in all cases. If the results of checking the fuel pressure correspond to those described above, the fuel supply system is working properly.
What will happen if the fuel pressure in the rail is low?
(less than 2 atm.) or increased (more than 4 atm.)? The amount of fuel injected will change in proportion to the pressure deviation from the norm. In other words, the air-fuel mixture will become lean or rich.
It will be especially painful in engine control systems without oxygen sensor feedback, since the controller does not know about the malfunction and continues to calculate the fuel supply for a normal fuel pressure value. In control systems with an oxygen sensor, the controller can compensate for changes in the composition of the air-fuel mixture, but only within reasonable limits.
If the fuel pressure is incorrect, problems arise with starting the engine, dips appear when the vehicle moves, and fuel consumption increases.
Troubleshooting the fuel system
Let us recall the composition of the fuel supply system.
It includes: a fuel tank with a submersible fuel pump installed in it, a fuel filter, fuel lines (supply and drain lines), an injector ramp and a pressure regulator. Failure of any of these components may cause incorrect fuel pressure. Let's try to list the most common malfunctions for each component of the fuel supply system. Gas tank.
Through special pipelines, the gas tank communicates with the atmosphere, which prevents its deformation (flattening). If the connection with the atmosphere is broken, a vacuum is created inside the gas tank. In this case, the pressure in the fuel rail may be low.
Gasoline pump.
There may be several malfunctions:
- the fuel pump does not develop the required pressure, resulting in low fuel pressure;
- the check valve of the fuel pump does not hold pressure, as a result - a rapid drop in pressure after turning off the ignition;
- contamination of the fuel pump mesh filter, as a result - reduced pump performance, which affects the dynamic operating conditions of the engine.
Fuel filter.
A dirty fuel filter can lead to low fuel pressure due to reduced fuel line capacity. If the fuel filter is damaged (torn), dirt can enter the injectors with all the ensuing consequences.
Fuel lines.
Fuel lines may be pinched. If this happens to the supply line, then the fuel pressure will be reduced, if it happens to the drain line, it will be increased. In addition, the use of low-quality gasoline with a high tar content can lead to a decrease in the capacity of fuel lines.
Fuel pressure control.
There are regulators with a stuck diaphragm in the open or closed position. In the first case, the fuel pressure in the system will be reduced, in the second - increased.
Injectors.
The following types of faults are typical:
- the injector does not open, resulting in a lean air-fuel mixture;
- the injector is constantly open, resulting in an enriched air-fuel mixture;
- the injector works, but its characteristic has “floated away”, as a result - the air-fuel mixture is incorrect.
On-board diagnostics to identify faults
A malfunction of the fuel system leads to a deviation in pressure in the fuel rail.
As a result, the amount of fuel supplied to the cylinders differs from the calculated one, and the air-fuel mixture becomes depleted or enriched. In engine management systems with an oxygen sensor, the controller monitors the current composition of the air-fuel mixture. If the air-fuel mixture deviates significantly from the desired value, the controller perceives this condition as a malfunction, and one of two fault codes is recorded in the controller’s memory:
- P0171 - fuel system too lean;
- P0172 - fuel system too rich.
Increased or decreased pressure in the fuel rail
is just one of the reasons why codes P0171, P0172 can be recorded in the controller’s memory. The cause of a significant depletion or enrichment of the air-fuel mixture may be faulty mass air flow sensors, oxygen sensors, or injectors. Air leaks lead to an over-lean air-fuel mixture.
The fuel pressure value may be outside the permissible range, but the on-board diagnostics does not record anything. It’s a very real situation - on-board diagnostics are not omnipotent.
The vehicle's fuel system is designed to store, clean, supply fuel to the engine, create a fuel-air mixture and deliver it directly to the engine cylinders for combustion. Since the most important component in this process is the fuel-air mixture, the vehicle’s fuel system also includes an air purification system, which is supplied to the injectors through the intake pipe.
Measuring pressure in the VAZ fuel rail
Signs of a fuel system malfunction
Low or excessive pressure in the fuel rail leads to the following consequences:
- unstable engine operation;
- not smooth idle;
- engine tripping;
- increased consumption;
- power drop;
- the engine stalls at idle;
- increased CO content in exhaust gases.
If you encounter one of these problems, and ECU diagnostics do not give any results, then the first thing you need to do is measure the pressure in the fuel system.
The pressure in the fuel rail is measured according to the same principle as in the tires.
Purpose and principle of operation of the VAZ 2114 fuel rail
Injection car engines on the VAZ 2114 are power units with distributed injection, which occurs through injectors installed on the fuel rail. The ramp itself is a tube, or a hollow bar with ends welded on both sides. It is attached to the intake pipe on the engine intake manifold with two bolts. There is a separate line for draining excess fuel from the RTD into the tank.
The pressure in the VAZ 2114 fuel rail in front of the injectors is maintained by a fuel pressure regulator. The fuel pressure must always be higher than the intake manifold pressure, because otherwise the fuel from the injectors cannot be injected to create the mixture. Moreover, the pressure in the intake manifold changes depending on the speed and the driver’s work with the gas pedal. And in TR this figure should be constant - no less than 2.9 kg/sq.cm. and no more than 3.3 kg/sq.cm.
The RTD on the engine is located above the ramp, and it is structurally designed in such a way that when the power plant stops and the ignition is turned off, it closes completely and cuts off the gasoline supply. As a result, a constantly high pressure is maintained in the TP tube for a long time. Therefore, when starting, gasoline is supplied to the injectors under pressure and starting occurs without delay.
Attention! If the fuel pressure regulator is faulty, the pressure is released during prolonged parking and is insufficient for normal starting. The RDM is beyond repair and must be replaced.
The driver can become aware of the occurrence of malfunctions in the vehicle engine when the following signs appear:
- The power plant stalls at idle
- At idle the engine speed starts to fluctuate
- During the movement, unstable operation of the internal combustion engine is felt, which is expressed in floating speeds
- the engine starts to stall
- increased gasoline consumption is noticed
- When the ECU is working properly, engine power drops
- increased carbon dioxide content in the exhaust
One of the first actions that the driver must do is measure the pressure in the VAZ 2114 ramp.
We take a measurement in the fuel rail.
To work we need a “pressure gauge”. But not every pressure gauge is suitable, it all depends on the pressure limit that it can measure. In our case, we need a pressure gauge with a measurement limit of up to 7 atmospheres. If you have a pressure gauge measuring up to 17 atmospheres, then such a device will show incorrect data, because it has too much error at low pressure.
In addition to the pressure gauge itself, we will need “plumbing flax”. We wind flax under the pressure gauge nozzle and put a hose with an internal diameter of 9 mm on it. Next, we tighten the whole thing with a clamp. Our device is ready for use.
In a store, such a device with a hose and drain will cost you about 1200 rubles. Measuring the fuel system at a service center will cost you about 200-300 rubles.
- Open the hood, turn off the ignition, find the fuel injector rail.
- We unscrew the plug of the fitting for fuel pressure, then use a spool to unscrew the nipple that appears, carefully placing a container or rag, because gasoline will spray due to remaining fuel pressure.
- Place the pressure gauge hose over the fitting and secure it with a clamp.
You need to check the pressure in 4 operating modes:
- measure the pressure when the ignition is turned on;
- measure the pressure at idle;
- measure the pressure with the tube removed from the fuel pressure regulator;
- measure the pressure with the return pipe pinched.
Tips that may be useful when measuring blood pressure
- When purchasing a measuring device, you should not take a pressure gauge with a large upper pressure limit (there are pressure gauges designed for 16, 25 kg/cm² and higher). In this case, the accuracy of the device readings will be insufficient, with a large error.
- When relieving pressure in the ramp, you need to stock up on rags and also cover the generator with a rag. so that gasoline does not get on it.
- When tightening the pressure gauge fitting, it is advisable to wrap a little tow on the threaded connection, which is used when carrying out plumbing work. The tow will create a tight connection and prevent gasoline from leaking while the engine is running.
Fuel rail removal procedure:
- The first step is to relieve the pressure in the pipeline.
- Then you need to remove the receiver.
- Disconnect the wires from the injectors.
- Using a 17-mm open-end wrench, unscrew the ramp fitting. In this case, you need to keep the end of the fuel line hose from twisting.
- We take the hose tip away from the fuel rail fitting and use a screwdriver to remove the O-rings from the ends of the tubes. We check the rings - damaged ones need to be replaced.
- Using a 5mm hex wrench, unscrew the 2 bolts securing the fuel rail to the intake manifold.
- Remove the fuel rail from the car.
Disassembling the fuel rail:
- Using a screwdriver, remove the lock.
- Remove the nozzle from the ramp.
- In the same way, remove the remaining 3 injectors.
- We check the O-rings at the junction of the injectors with the fuel rail and with the intake manifold. Damaged rings must be replaced.
- If necessary, use the cap from the wheel nipple to unscrew the spool of the diagnostic fitting.
Assembly and installation of the fuel rail:
- Before assembly, coat the O-rings with a thin layer of oil.
- We assemble and install the fuel rail in place in the reverse order.
Leave a Reply Cancel reply
Similar articles
How to replace the rear engine mount on a VAZ 2114
How to replace the front engine mount on a VAZ 2114
What pressure should the fuel system have?
A normal fuel system should have the following indicators:
- at idle 2.5 atm;
- ignition – not lower than 3 atm;
- when removing the vacuum tube 3.3 atm;
- when squeezing the drain tube - 7 atm;
- when accelerating, it jumps to 3, then drops to 2.5 atm.
Important! Make sure that the fuel line does not contain any holes: fuel is not leaking anywhere, otherwise the pressure measurements will be false.
- After we have pumped fuel into the system, turn off the ignition and look at the behavior of the pressure gauge. The pressure in the rail should drop to 0.7 bar and remain at this level, but if the pressure immediately drops to 0, then the problem is in the fuel pressure regulator (how to remove and replace the RTD), or the check valve of the fuel pump motor.
- We raise the engine speed to 3000 and look at the pressure gauge readings; if in this mode, the pressure gauge needle drops, the problem is a dying fuel pump.
- If the fuel pump takes a long time to build up pressure, the fuel filter or strainer in the tank may be clogged.
If, after replacing the fuel cells, your problem remains, then check other systems: IAC, TPS, MAF, compression in the cylinders.