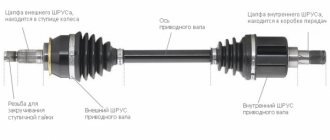
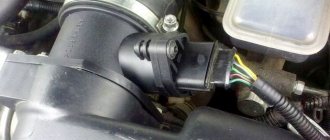
Angular velocity joints (CV joints) transmit torque from the engine to the drive wheels. Thanks to their special design, this is achieved regardless of the location of the wheels on the same axle. In shape, these elements resemble a grenade, which is why among motorists this is what they are called.
Each wheel is connected to one inner and outer joint. The first of them is installed in the gearbox. Its purpose is to transfer the motor energy to the external joint, which rotates the corresponding wheel through the hub.
External and internal grenade (CV joint): differences and features
So, before checking the CV joints, it is necessary to separately take into account a number of features. First, the hinges can be internal or external. So, they rarely fail at the same time. In fact, the outer CV joint breaks more often. However, it cannot be ruled out that the problem is not, for example, the left internal grenade or the right internal hinge.
At the same time, to an inexperienced car enthusiast, both internal and external CV joints may seem the same. In fact, they differ in terms of design, experience different loads, have different operating modes, and the very signs of their malfunctions are somewhat different from each other. Let's figure it out.
- The design of the outer and inner CV joints is somewhat different due to the different operating modes of these hinges. The outer CV joint is connected to the hub, and its main task is the need to transmit torque at any angle of rotation or inclination of the wheel.
- In turn, it is important for the inner joint to compensate for the misalignment of the transmission and the drive shaft, thereby partially relieving the outer CV joint. At the same time, the internal joint ensures complete “integrity” of the shaft, provided there is a large suspension travel. In other words, it is the inner CV joint that allows the drive shaft to become slightly longer or shorter under certain conditions.
- If you compare the hinges visually, the body of the inner CV joint is larger than the outer one. Due to this, the inner race of the CV joint can move along with the shaft and balls inside the housing along the tracks. Also, the inner hinge can be rotated at an angle, although less than the outer hinge. If we consider the outer CV joint, it is rigidly fixed to the shaft and is more responsible for the ability to turn. On some cars, the outer grenade is so firmly attached to the shaft that it must be cut off to remove it.
Let’s also add that a special lubricant for the CV joint is placed in the joint cavity. This lubricant protects the element from moisture and shock loads. Please note that the CV joint cannot be filled with lubricant of unsuitable properties and type. In this case, the constant velocity joint will quickly fail.
Also note that front-wheel drive cars have a transverse engine, that is, the gearbox is shifted to the left. The result is that the left drive shaft will be shorter than the right one. So, the longer right shaft is not always solid. There are options when it is made of two parts, which are connected using a suspension support (suspended bearing).
The fact that on some cars a tripod is used as an internal joint, rather than the usual type of CV joint discussed in the article, deserves special attention. In any case, the operating principle of the tripod is still similar and there are no fundamental differences.
Differential diagnostics and repair
The VAZ 2110 differential often requires repair. Very often the malfunction depends on the bearing and the degree of its wear. The process of replacing a part can be done at home, and it consists of pressing the box from the axle. In this case, the separator is no longer suitable for use; the part cannot be reinstalled. When diagnostics are carried out, it is important to carefully examine the teeth of the satellites, gears and splines for wear and mechanical damage. If this is the case, the parts will also have to be replaced.
Repairing a differential is almost impossible without replacing the bearing. The work process begins with unscrewing and removing the automatic transmission. This is labor-intensive work that requires a lot of time and physical effort. First of all, disconnect the selector cable from the automatic transmission, oil supply hoses and electrical connectors. Remove the front of the machine to expose the drive shaft. It is better to hang the engine, unscrew the longitudinal ski and box cushions. Remove all fasteners associated with the motor. Remove the box and diagnose and replace damaged elements. Bearings must be replaced. To ensure high-quality work in the future, it is important to clean the old parts and lubricate the component parts with new sealant before assembly.
To diagnose the differential, it must be removed from the vehicle. Next, we will consider the differential elements, the requirements for their permissible wear and repair, one by one.
- Remove the differential from the transmission.
- Having turned 90° around the axis of the satellites, remove the side gears from the differential housing.
- Next, remove the retaining ring from the satellite axis.
- Remove the pinion axle and both pinions from the differential housing.
- Remove the bolts securing the driven gear to the differential housing.
- Press the driven gear off the differential housing.
- Inspect the working surfaces of the satellites, the axes of the satellites, side gears and the spherical surfaces of the differential housing in contact with them. Remove small irregularities with fine-grained sandpaper. Replace parts that have obvious defects immediately.
- Then assess the condition of the driven gear of the gearbox. If there are chips, chipping or significant wear of the teeth, replace the gear with a new one. Main gears with different gear ratios are installed on the car. The number of teeth on the driven gear 1 and driven gear 2 is stamped on the driven gear. The final drive gears are selected in pairs at the factory based on noise and contact patch. Therefore, when replacing the driven gear, also replace the drive gear: they are sold in pairs. To check, count the number of teeth on the drive gear.
- Inspect the bearing seats on the differential housing. If these areas are significantly worn out, replace the differential housing. If there is pitting (sinks) on the raceways and rolling elements, traces of indentation of the rolling elements on the raceways, or damage to the cages, the bearings must be replaced.
- To replace the bearings, use a puller to press them off the differential. In this case, the bearings are destroyed. Then…
- ...press the outer rings out of the gearbox and clutch housings with a special puller. If there is no puller, press out the axle seals first. Please note that in this case the seals are damaged and must be replaced (for more details, see subsection 3.2.10). Press out the bearing rings from the outside of the crankcases with a punch.
- Please note that there may be an adjusting ring under the ring installed in the gearbox housing, which must be re-selected before pressing in new rings (see “Selecting the differential bearing adjusting ring”).
- If you need to replace the speedometer drive gear, you can compress the bearing (without destroying it) using two screwdrivers, applying force to the inner ring of the bearing. The gear will be destroyed, but it still needs to be replaced.
- Reassemble the differential in reverse order. When assembling, lubricate all parts with transmission oil. Attention! The driven gear is installed with the teeth markings facing out.
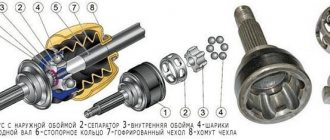
Internal CV joint device
The internal constant velocity joint is designed to transmit torque from the transmission to the outer CV joint. It differs from the external one in size (increasingly) and cost, although it consists of the same parts:
- Bowl-shaped housings with a driven shaft.
- The inner race is a spherical fist with a drive shaft.
- A separator in the form of a ring with holes to hold the balls.
- Metal balls.
The roller type of hinge is characterized by the presence of a support, which, using three rollers, moves along tracks cut into the inside of the body. The balls or rollers are located in the grooves of the housing and are held by a cage, which is connected to the drive shaft by a splined joint. When the angle of the drive and driven shafts changes, the balls move along the grooves, continuously transmitting force.
Development of a tripoid in a needle bearing
Tripod CV joints come in two types: regular and with an external race. The main reason for failure of both types is wear. In a simple version, at certain angles the tripoid begins to slide rather than spin. With an external roller, the bearing rotates at any angle of rotation, operates more smoothly and wears out noticeably longer.
On some models, the tripoid housing is located in the gearbox. In this case, it is made of higher quality metals and carries more load. If your car has a choice between a ball and tripod CV joint, then it’s definitely worth paying extra for the latter.
Service life and maintenance
A grenade in a car is a consumable item. It will have to be changed quite often. Fortunately, the cost of the unit and repairs is usually not the highest.
How much a factory part costs depends on three factors:
- Driving manners;
- Machine models;
- Timely service.
The first factor is critical. Grenades are especially afraid of the trigger falling down when the steering wheel is turned to the extreme position. At such moments the node experiences maximum load.
If you mostly move calmly, then you can look for a resource for your car on thematic forums. There are cars in which a standard product can cost more than one hundred thousand.
Timely maintenance means periodic inspection of the boots, their timely replacement and filling with lubricant. If a crack appears in the rubber, the death of the CV joint will occur in just a couple of weeks. And in rainy weather this can happen even faster. This is due to water, which, when it gets into the assembly, leads to corrosion and leaching of the protective lubricant.
Surely you will be interested to know that in addition to grenades, absolutely all ordinary cars have a TV! Be sure to read our article on this so you can be a knowledgeable car owner.
A torn boot is a typical malfunction.
Boots, by the way, are quite inexpensive. The lubricant is also cheap and is called tritely - “CV joint”. When purchasing, do not forget to check that the anthers come with clamps for tightening them.
Advice on how to extend the life of a grenade:
- Do not press the pedal to the floor when turning, especially when starting off
- Change boots and lubricant in a timely manner
The lifespan of external and internal grenades is very different. The first is subject to great effort, since it is forced to turn at significant angles, and therefore makes itself felt more often.
The internal part may well not be bothered for the entire service life of the car.
Cut or broken spline part
The worst-looking damage is when the CV joint simply collapses along the metal. The first reason for such destruction is the purchase of a low-quality CV joint, the production of which was defective or low-quality raw materials were used. The second reason is making changes to the design of the car, usually a lift (increasing the ground clearance) of SUVs. In this condition, the CV joint becomes in a non-standard position, turns at non-standard angles, and sometimes touches other parts of the car.
Not often, but there is another problem - overtightening of the hub nut, which leads to destruction. It is usually determined in the first meters of movement after leaving the lift or when moving through pits. An obvious mistake by the installer.
Sounds and symptoms of breakdown
There are several signs of a hinge failure:
- Anther rupture. It is enough to go to a service station, where the faulty element will be replaced, and the need to repair the CV joint itself will disappear.
- The sound of a grenade. The sound is very reminiscent of the friction of brake pads worn down to metal.
- Jerks. When the car starts moving, the driver may feel slight shocks. This behavior indicates broken grenade grooves.
- Clicks. They appear at the moment of movement, and their number varies from 2 to 5. When moving, the unpleasant sound disappears, but the next time you try to move, it appears again. This also indicates a malfunction of the grenade.
- Crunch. If the sound appears directly when moving, then this is an alarming signal. The CV joint is not only worn out, it is about to seize. Driving with such damage is dangerous, so it is best to call a tow truck and send the car to a workshop.
If at least one of the listed symptoms of a malfunction appears, then it is better to send the car for diagnostics. Experienced drivers can inspect the joint themselves and identify the source of the problem.
Production of rolling balls
Most often, this is either a consequence of damage to the boot and the problems described above, or simply aging of the metal due to high mileage. It is manifested by the appearance of extraneous sounds from the suspension, clicks in turns, microvibrations and jerky starts. It can only be eliminated by replacing the mechanism. It is worth noting that a faulty CV joint can lead to damage to the mating components, so you should not put off replacing it for long.
Inner CV joint: signs of failure are difficult to see
Structurally, there are two grenades per drive wheel, that is, two CV joints - internal and external. The outer one transmits force to the wheel hub from the axle shaft, and the inner CV joint rotates the shaft from the gearbox.
Even though CV joints are one mechanism, the outer CV joint fails earlier because it bears more load and is also smaller. To understand that the outer CV joint has worn out, you need to turn the steering wheel all the way to one side and drive off. At this moment, there will be a maximum angle between the axle shafts and the CV joint will crunch if it is faulty.
But the internal CV joint is checked differently; it begins to make sounds while moving in a straight line. And if you drive into a hole at the same time, the crunch will be very clear. In addition, the first signs of a CV joint failure on a Priora or any other VAZ can be clearly seen if you lift the car on a lift. You can also engage first gear on the lift and press the gas so that the wheels begin to rotate.
When the car is in a suspended state, the internal grenade will be strongly bent and the sound of a worn CV joint will be clearly audible. This is how signs of a malfunction in the CV joint of a VAZ 2114 or VAZ 2115 are revealed. After detecting these signs, you can safely go and buy new grenades and prepare for replacement.
Next in the video there are signs of wear on the inner CV joint - a crunching sound appeared in the wheel:
The simplest diagnostic methods
The driver needs to determine which CV joint has become unusable. For this, there are several verification algorithms that you can carry out yourself.
Outer
The test must be carried out on a site with a flat surface, but a regular road surface will also work. The wheels of the car must be turned all the way in one direction.
To provide more load to the hinge, you should move sharply. If you hear a familiar sound, the CV joint is faulty.
You can listen on your own by opening a window or inviting an assistant.
The second option is especially relevant if you suspect a malfunction of the right CV joint, since the sound from the distant side reaches the driver worse. By turning the steering wheel to the left, you can test the right CV joint, and turning the steering wheel to the right - the left one.
Interior
Diagnostics of internal hinges occurs differently. Instead of a smooth road, you need to find an area with deep potholes and drive along it. If the CV joint is faulty, then it will definitely make itself felt.
There is a second method, which involves significantly weighting the rear of the car. It is necessary to seat passengers and fill the trunk so that the front of the car rises and the axis of the inner CV joint bends as much as possible. When moving, a faulty part will definitely make a familiar sound.
Why does the CV joint crunch?
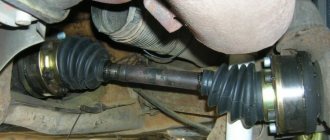
Video of replacing the outer left CV joint
Experienced drivers are able to determine the location of a car breakdown by ear. Such skills are acquired over time, but the crunch of a CV joint cannot be confused with anything.
In order to understand the nature of this characteristic noise, you should remember how the CV joint is designed. The task of the CV joint is the transmission of rotation from one axle shaft to another, provided that the angle between them continuously changes.
This property is due to the need not only to rotate the drive wheel, but also to give it the ability to turn and move up and down on a spring.
The CV joint consists of the following main elements:
- outer body in the form of a bowl with six semicircular grooves inside and a semi-axis outside;
- the inner race is in the form of a spherical fist and also has six grooves and a splined connection for the axle shaft;
- Between the inner walls of the bowl and the holder there are 6 balls in the separator.
All elements are made so precisely that they have no play when assembled. The cage transmits force through the balls to the body and rotates it, and moving the balls along the grooves makes it possible to change the angle between the axle shafts.
Over time, a hole forms at the point where the balls come into contact with other elements and a backlash appears. The free movement of the balls (rolling) generates a sound that is very similar to crunching.
Considering that CV joints are installed two on each wheel, when alarming symptoms appear, it becomes difficult to find out which CV joint is crunching: inner or outer, right or left.
Development on the spline part
This damage is typical for CV joints with an intermediate shaft (extension). Actually, in the articulation mechanism, abrasion or breaking of the splines occurs. This happens due to either a design defect or the same aging of the metal. Over time, the articulation mechanism begins to rust, wear appears and, as a result, play, which leads to vibrations. The most annoying thing is that the CV joint itself may be completely serviceable, but the entire assembly will have to be replaced.
Debugg
The detection of even small defects in the boot indicates that the joint is filled with dirt and lack of lubrication. The CV joint cannot be operated in this condition, so it is necessary to remove the boot and fill the hinges with new lubricant.
Before applying fresh lubricant, the part is disassembled, thoroughly cleaned, and dirt is completely removed. Then the mechanism parts are washed with gasoline, dried and new lubricant is applied. For the internal hinge, 100–110 grams of lubricant are used; for the external hinge, 70–80 grams are sufficient. The CV joint is installed on the wheel and covered with a boot.
Experts recommend installing new, original boots after lubricating the hinge, since old parts lose elasticity and may crack after a short period of time. Non-original anthers do not fit perfectly at the mounting points, so a new portion of dust and water will quickly fill into the gaps.
You can fix the problem yourself
An important condition for the successful operation of CV joints is the choice of high-quality lubricant. Experts advise giving preference to compositions based on molybdenum disulfide, which minimize friction in the components and effectively protect them from corrosion, and also have a minimal destructive effect on the boot.
It is important! It is contraindicated to use graphite lubricant for CV joints. It cannot protect the part from increased loads, and therefore leads to accelerated wear.
What happens if you don't change the CV joint?
It is possible to operate a car with problems in the CV joint if a slight crunch is heard when turning: it is enough to replace the damaged boots and renew the lubrication of the part. When driving a car with a slightly damaged joint, you must reduce your speed when turning.
If vibration is observed when accelerating and a crunching sound is heard even when driving straight, the CV joint must be replaced urgently. A faulty CV joint can fail completely, causing the wheel to suddenly seize. If this happens at high speed, you can expect the most dire consequences.
It is important! On some vehicle models, significant wear or breakage of the tripod CV joint causes the bearing needles to be thrown into the gearbox housing, from where they are lifted along with the oil and ground by the gears. Repairing such an engine costs almost the same as buying a new car.
Video: what can happen if you don’t change the CV joint boot in time
The CV joint is one of the main chassis parts of a front- and all-wheel drive vehicle, and driving comfort and safety depend on its condition. If there are signs of a joint failure, do not delay diagnostics and repairs - otherwise it is unlikely that it will be possible to “cure” the drive.
Causes of CV joint failure
The experience of service stations shows that CV joint malfunctions occur even in new cars with low mileage. There are several causes and symptoms of failure:
- Lack of lubrication. As a result of friction, metal without lubrication begins to wear off.
- Incorrect CV joint installation.
- Damage to the boot. Through the holes, water and abrasive particles enter the mechanism, which accelerate the wear of the balls and grooves.
- Aggressive driving or towing heavy trailers. High load on the unit, resulting from fast driving on a bad road, accelerates wear of the joints.
- Low quality parts. Defective or counterfeit parts do not last long.
- Mechanical damage. As a result of an accident or a wheel falling into a deep hole, parts may be destroyed.
- Ball joint play. Loose wheels increase the load on parts.
- Natural wear and tear.
What is needed to replace the CV joint?
Are you planning to change the “grenade” (it doesn’t matter - external or internal) yourself? Stock up on the following tools:
- hammer, screwdriver, pliers, jack;
- a set of keys and sockets;
- bench vice;
- with a mount or a long enough pipe.
You will also need new cuffs, boots, a hub nut with a stopper and a lubricant. These consumables are usually provided with the new grenade.
Is it possible to diagnose grenade malfunctions yourself?
Since the grenade is a simple hinge, it can easily fail. The principle of its operation is very similar to the operation of a bearing - two surfaces, between which balls made of durable metal are located. The difference is that grooves are cut out on the surfaces, due to which you can change the position of the drive axle shaft relative to the driven one. If you take a used CV joint, you can rotate the two axle shafts with your hands without much effort and see how the unit works. You won’t be able to turn them on the new one, since there are no gaps and you need to make a lot of effort to turn them.
How to replace a grant
The first question: “should I change it myself or at a service center?”
In principle, for most budget cars (VAZ, Chevrolet, Hyundai, etc.), if you have experience in repairing the vehicle's chassis and tools, replacing the hinge is not that difficult. You can even do without a hole. But you will have to sweat.
Typically, it is precisely these spare parts that make up a kit for replacing a grenade in a store: boot, lubricant, grenade, boot clamps, retaining ring for the axle shaft
For expensive cars, without experience and tools, for cars under warranty or insurance - definitely the way to service.
The second thing that car enthusiasts often encounter is the locksmith’s phrase “if one grenade crackles, then both need to be changed at once.” Moreover, some insist on replacing the external-internal pair. Others persuade you, when one of the outer ones cracks, to replace the second one and leave the inner ones.
The motivation is simple: if one part is broken, then the second one will soon fit. You decide. And although we have already said more than once that the consumables are inexpensive, but with a mass replacement, the repair will cost a pretty penny.
But no one can know when the working joints “crack”. And practice shows that they can travel for more than one thousand kilometers.
Therefore, answering the question “do both grants need to be changed?” We think it's not worth it. Let the details finish in due time and save your budget. Moreover, before the “explosion”, the grenade itself will warn you in advance with light clicking sounds.
Video about replacing a grenade on a VAZ 2108, 2109, 21099
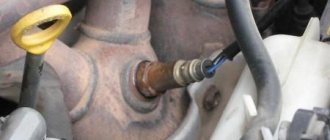
Destruction of the ABS system ring
Another additional part is sometimes installed on the CV joint - a toothed ring of the ABS system, from which a special sensor reads the rotation speed. Due to age, this ring rusts, becomes damaged or even bursts, after which the entire ABS system goes into emergency mode or is completely deactivated. It all depends on the specific design of the CV joint - sometimes the ring can be changed separately, and sometimes you will also have to buy the entire assembly.
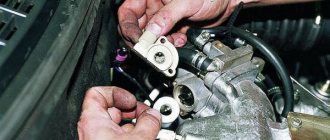
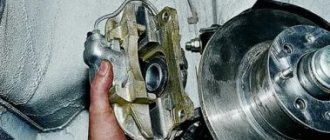
Replacing the outer CV joint
An experienced car owner with practical skills will not encounter any problems when taking on the task of replacing the outer CV joint. The list of tools necessary to carry out the “operation” has already been presented above. In addition to tools and supplies, there are a few other things worth doing. Before removing the wheel, drain a little oil from the gearbox - this will make it easier to work with. You will also need a pry bar - it will serve as a lever when removing the drive shaft.
Let's assume that the problem is on the right. Replacing the right CV joint begins with removing the wheel. We unscrew the hub nut, remove the brake disc, caliper, ball joint and steering tip. We take a pry bar or crowbar and remove the splined drive shaft. Using light blows of a hammer (a support, such as a wooden block, will come in handy), we knock out the outer hinge. Next we perform the following steps:
- It is necessary to remove the hub nut and tear off the wheel bolts. We put stops under the rear wheels.
- We jack up the car, hang it up and then remove the wheel.
- Remove the bolts holding the steering knuckle to the ball joint.
- Turn the steering wheel all the way. Pulling back the steering knuckle, we pull out the outer half of the hub along with the old CV joint. If the grenade does not budge, hit it lightly with a hammer.
- We remove the old boot and clamps and throw them in the trash.
- We remove the CV joint with hammer blows, rotating it along the axle shaft.
- We fix the installed new hinges in the hub together with the boot.
Replacing the left CV joint is carried out in the same way. When returning parts to their place, the above procedures should be done in reverse order. When knocking down a CV joint with a hammer, hit it clearly - some models are equipped with an ABS ring, which does not like strong blows to it. Don't forget to add gearbox oil. When installing the wheels back, be extremely careful to avoid falling apart.
Wear of the support bearing
Since the drives for the left and right sides are of different lengths (depending on the design and placement of the engine and gearbox), an intermediate shaft is used on one side, on which an additional support bearing is placed.
This is an ordinary closed type bearing, which sooner or later simply wears out. The main problem is that the “support”, as a rule, is of non-standard sizes and often changes - again, assembled together with the CV joint, even if it is intact.
How to extend the life of grenades
It’s very simple, follow three basic rules and your car’s drive will last a very long time:
- Never leave your place! With a sharp start, the torque is significantly higher than when driving. Due to heavy loads, grenades quickly become unusable;
- Do not accelerate with the steering wheel turned. When the hinge is rotated at a large angle relative to the axis, the load on its elements increases greatly, which contributes to faster wear of the CV joint;
- Check the condition of the anthers on the grenades (if dirt, sand and other foreign bodies get in, the grenade mechanisms quickly wear out).
How to restore the performance of a CV joint with your own hands
The performance of spherical angular velocities is disrupted for various reasons. Some of them are quite simple, so fixing the problem in such cases is quite simple.
Here are several important points where malfunctions may occur:
- The rubber boot broke. This problem can be easily identified by oily spots on the inside of the tire. Rupture occurs due to excessive mechanical stress, extreme hypothermia, and abrasion. Frequent off-road driving contributes to this condition.
- Critical wear of the support bearing. The consequences of this may be the need to replace not only the worn element, but also the entire internal “grenade”.
- Production of rolling balls, tracks or joint cages. This situation often occurs due to rupture of the anthers, sand and dirt getting into the lubricant.
When the first signs of problems appear, you can try to solve the problem on your own. To do this you need to proceed as follows:
- Place the car on an overpass or inspection pit to check the integrity of the rubber boots and traces of lubricant on adjacent surfaces.
- If ruptures or oily stains are detected, it is necessary to remove the angular velocity joint, disassemble it, thoroughly wash all internal parts, completely replace the lubricant and rubber boot.
- You can try to sand damaged work surfaces. On the other hand, in case of severe damage, it is best to completely replace the CV joint.
When performing work, it is better to enlist the support of a more experienced motorist or car mechanic. This will prevent possible errors.
How to solve a problem
Having determined which part is faulty, it must be removed, disassembled, washed thoroughly and carefully inspected. If there are visible damages, defects and play, you will have to buy a new CV joint, since repair in this case is impossible. Moreover, simultaneously with the installation of the new part, the CV joint boot will also have to be replaced.
But when the hinge is in order, its integrity is not compromised, after washing it must be coated with CV joint lubricant and installed in its original place. By the way: the new part also needs to be filled with lubricant, placing it under the boot.
Lubrication of the moving part of the hinges is a prerequisite for their effective operation. According to generally accepted standards, when assembling a part for the inner CV joint, it is necessary to use about 100 g. There is a little less lubrication on the outside.
Do-it-yourself replacement or professional help
So, knowing how to check the CV joint and being sure that it is the one that is faulty, the car enthusiast has a question about how to fix the breakdown. It is irrational to repair CV joints; such parts must be replaced. If you have a convenient garage and all the necessary tools, you can carry out the repairs yourself.
If you have doubts about your own abilities, or do not have an experienced mentor or the necessary tools, then it is better to seek help from a car service center. Otherwise, there is a risk of incorrect installation and damaging the new part.
Where to buy quality CV joints
In order to change worn-out CV joints as rarely as possible, you need to competently approach the issue of their choice. There are several brands that have been tested by motorists and service center workers and have proven themselves to be excellent. Among them is the company IBERIS. CV joints from this manufacturer are distinguished by:
- excellent quality of materials used;
- high-precision assembly;
- adequate price;
- big choice.
You can purchase IBERIS products (and not only) in the IXORA store. Managers-consultants will certainly help you make the right choice, and the quality of the product will certainly leave the most demanding buyer satisfied.
>
Types of lubricants for CV joints
Over the years of the existence of all-wheel drive and front-wheel drive cars, many types of lubricants for CV joints have been created. In fact, all of them are able to effectively cope with friction, as well as reduce the loads that fall on the transmission elements. But many of them may exhibit aggressive properties towards polymer compounds or are not able to combat pitting.
Lithium greases
The most common lubricant for transmissions and other elements that are subject to very high loads. It is made on the basis of a foamed lithium solution in organic acid. It is a consistent yellowish composition of high viscosity, becoming even thicker at low temperatures. Lithium compounds cope well with friction and can reduce the load on the elements of the drive mechanism by tens of times.
Their conservation properties should also be highlighted - they protect metal elements from moisture, neutralize dust and other pollutants that get inside. But not all lithium lubricants are able to combat cavity corrosion of CV joints, so experts advise checking drive system components after 50-60 thousand km. mileage The exception is Litol-24 lubricant - Russian car manufacturers allow it to be replaced after one hundred thousand kilometers.
Lithium-based compounds are resistant to most types of polymer coatings that are used in the manufacture of CV joint boots. But some vehicle manufacturers use modern high-strength organic-based plastics to create such protective components - Litol and its analogues can dissolve them. In this case, read the vehicle operating instructions - it should tell you which lubricants are best to use to protect CV joints.
Today, domestic manufacturers maintain world leadership in the production of products for lithium-based CV joints. Most foreign companies are abandoning them as a result of the emergence of new technologies that can provide transmission elements with better protection. But the following brands of lithium-based CV joint grease are still found on the market:
- RENOLIT.
- Very Lube.
- XADO.
Disulfide-molybdenum based lubricants
Although lithium CV joint solutions are highly effective, experts were looking for a new solution that would be ideal for all vehicles. This resulted in new lubricants to which molybdenum disulfide was added. The main difference between such compositions is their high corrosion resistance. According to the reports of the specialists who carried out the tests, even after one hundred thousand km. mileage "grenades" do not show symptoms of serious wear. But such a lubricant does not last forever - even under ideal conditions of use it needs to be changed every hundred thousand km. or five years after the initial packing of the unit.
These lubricants fight friction just as effectively as their lithium-based counterparts. In addition, the reduction in the content of organic acids, replaced by a metal salt, resulted in a decrease in aggressiveness towards any polymer surfaces. Molybdenum disulfide lubricants for CV joints can be used in virtually all cars - this recommendation is given by the manufacturers.
But such products have one significant drawback - they are afraid of moisture getting into the CV joint when the seal of the boot is broken. The consequence of this minor damage may be an absolute loss of lubricant properties, which will cause destruction of the unit. Some of the best are lubricants from the following manufacturers:
- CV joint-4.
- ESSO.
- Mobil.
- Texaco.
- Liqui Moly.
- B.P.
Barium lubricants
The main advantage of barium-based products is increased resistance to moisture. For example, after a boot rupture, it is not necessary to change the barium grease, unless, of course, a huge amount of contaminating materials has accumulated in it. In addition, the barium composition can fight all types of corrosion, thereby preventing premature failure of CV joints even when the vehicle is operated in particularly aggressive conditions. The advantages of barium compositions also include a neutral chemical composition in relation to any polymers. But such means are still poorly distributed due to their complexity of production and high cost. Another significant disadvantage is their poor resistance to low temperatures. The only domestic barium-based product is ShRB-4.