So, I finally got to the injectors. Mileage 58,000. It is recommended to clean them at this mileage, but I was too lazy and there was another set available. Opening the hood, I realized that I had to remove the receiver to get there. Also lazy...I decided to try to remove the ramps without removing the receiver. Going forward, I want to say that everything was a success. Well, let's start... First, remove the decorative trim of the valve cover, unscrew the Breather and put it aside,
move the air filter to the side. Use a hexagon to unscrew the fuel rail mounting bolts, disconnect the contact chip, unscrew the fuel line nut and move the tube to the side. We slightly pull the ramp towards ourselves by the edges to remove it from its seats. Then we begin to carefully pull it towards the radiator pipes (to the right). I can say right away that you can’t do without dancing with a tambourine, but it’s possible to take it out. To make it easier, I unscrewed two more nuts securing the receiver to the valve cover. They are located at the top. Pulling the receiver slightly towards us, we try to extend the ramp. You don't need to pull too hard, just move it a little. For convenience, you can also unscrew the oil dipstick mount. Just don’t take it out under any circumstances...then it will be difficult to put it back in. Just loosen it and leave it. In general, if you don’t rush and don’t get nervous, then everything will work out.
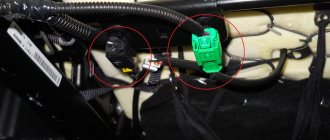
Well, replacing injectors is not difficult. We simply pull out the retaining rings and the injector is released from the ramp. Insert new ones in reverse order. Just don’t put on the injector of the fourth cylinder. We will insert it when the ramp is almost in place... Otherwise, the nozzle will rest against the radiator pipe. I advise you to unfold the wires that go to the injectors as in the photo so that the chips do not rest against the probe, etc... In general, so that they do not interfere
We also move and carefully insert everything back. By the way, it’s easier to put it in than to take it out. The injector of the first cylinder stuck just short of reaching its intended place. Pressing a little harder, she slipped through. Then everything is simple, we set the injectors in their proper places and carefully insert them back. Next, we assemble everything in reverse order.
For information, the injectors were very dirty and didn’t work as well...
There are no longer carburetors under the hoods of cars that were familiar to old drivers. Now fuel enters the cylinders through the injector system. The jets, diffusers, and floats have disappeared. Everything was replaced by a computer-controlled distributed injection system. Cars, including Priora, are now called cars equipped with an ECM (electronic engine control system). How can the driver now take care of the injectors that have replaced the usual carburetor?
General principle of operation of Lada Priora injectors
Gasoline is pumped into the fuel rail using a gasoline pump, to which the injectors are connected. Based on a signal from the electronic control unit (ECU), an electric current is supplied to the injector coils, their cores are drawn inward, opening the fuel channels. Gasoline is sprayed into the combustion chambers and ignites under the influence of enormous pressure created by the upward pistons.
The design of Lada Priora injectors is quite complex
How to check and adjust the pressure of the Priora fuel pump
Normal pressure of the Priora fuel pump is necessary for the process of supplying the combustible mixture to the carburetor and its normal spraying through the nozzles. The slightest disruption in the operation of this system leads to the fact that either an excessively saturated or lean mixture is supplied to the combustion chamber, which is why the engine operates abnormally. How to check the fuel pump pressure, and what should be done if it is abnormal?
Checking the fuel pump pressure
The first thing to do is to specifically check the operation of the pump. To do this, just turn the ignition key not to the extreme position and listen to whether the electric fuel pump turns on (and this is exactly the variation that is installed in the Lada Priora car). If you hear a noise for a few seconds, followed by a click, everything is fine.
Using a pressure gauge, the check is performed on the ramp - this is where the protective valve cap is hidden, which does not allow air to get in, but presses the fuel out with pressure. The first step is to unscrew the cap and check whether the rubber in it is broken - this may be the main reason for the inoperability of the fuel pump. If it is damaged, it is better to completely replace it; fortunately, it is cheap. Then the spool is twisted. Next, a pressure gauge is connected to the outlet of the safety valve from the pump. Normal pressure is in the range of 380-400 kPa. If it is lower, then either the pump has failed or there is a blockage in the system. If it is more, then it is quite possible that the internal pressure gauge of the fuel pump is faulty and it is simply pumping fuel excessively to the carburetor. Replacing it is easy.
Naturally, before checking the pressure, the ignition is turned on, but the engine itself is not. The pump itself will equalize the pressure to the desired parameter. If this is not done, then the pressure will be at the level of 1 atmosphere with a slight deviation, because pumping is not performed.
It should also be taken into account that all manipulations are carried out at reduced fuel pump pressure. To do this you will need:
- remove the rear seat and gain access to the pump (by removing several screws on the rubberized cover);
- release the lock and let the fuel run out completely (the engine will be in neutral gear and will stall literally after a few seconds);
- Next, you need to turn on the ignition and equalize the pressure;
- It is also recommended to turn on the starter for 2-3 seconds and immediately reset the ignition key to its original position (turn off the ignition).
What happens if the pressure deviates from the norm?
If the pressure in the fuel pump is too high, too much fuel will be supplied to the carburetor.
The air will mix with it through the filter and burn in the cylinder. But if there is a lot of fuel and not enough oxygen, the mixture will not burn completely. At the same time, black smoke comes out of the exhaust pipe, and fuel drips from its end (may even be mixed with soot).
If the pressure in the system is very low, the mixture will be lean. There is too much oxygen. At the same time, the engine power is radically reduced; at idle speed the engine simply stalls, and the choke, of course, will not help, since it only regulates the operation of the throttle valve in the carburetor.
It is interesting that the on-board computer will not report a breakdown of the fuel pump - this is truly a huge mistake by VAZ engineers. In Priora, you can only read indicators when you connect a computer to the EMU unit, but not everyone can do this. And the indicators may not be true if the on-board computer itself is damaged. That's why checking with a pressure gauge on the ramp is the best option for checking pressure.
https://www.youtube.com/watch?v=QaJwthsYi3Q
Injectors installed on Priora
The Lada Priora car is equipped with imported injectors manufactured by the German company BOSCH. These devices are highly reliable. Their service life can reach 160 thousand kilometers. However, car service specialists strongly recommend changing injectors every 120 thousand km.
Almost all Prioras are equipped with German injectors from BOSCH
Injectors for 8 and 16 valve engines
You should know that the injectors of the 8-valve Priora engine are no different in appearance from the injectors of the 16-valve engine. These are all the same devices from BOSCH, consisting of a housing, a coil, a diffuser and a fuel grid. When choosing injectors for a Priora, you need to think not about the number of valves in the engine, but about its volume. Because the markings of injectors for 1.5 liter engines are different from the markings of injectors for 1.6 liter engines. In the first case, the BOSCH injector should be marked 0-280-158-110, in the second - 0-280-158-502. You can clarify the markings in the car’s operating instructions, at the end of which there is a summary table with digital designations of all BOSCH injectors depending on engine size.
The following material is devoted to the repair and replacement of injectors in VAZ 2110-2112 cars:
Table of applicability of injectors for VAZ cars
Cleaning procedure
Cleaning injectors can provide the car owner with the following benefits:
- restoring the original functionality of the device;
- reduction of fuel consumption;
- optimization of motor operation.
That is, in case of contamination (use of low-quality fuel), it is possible to flush and clean the valves in order to restore them to functionality.
Open the hood and make sure all vehicle systems are working properly
Checking Lada Priora injectors
As mentioned above, both the fuel system ECU and the injector itself can fail. To carry out a complete diagnosis of the ECU, special software is required, which the average motorist simply does not have. Therefore, the only option is to diagnose the machine at a service center. The program, connected to special equipment, will quickly detect ECU errors and correct them.
A full check of Priora injectors is possible only on a special stand
And if problems arise in the mechanical part of the injector, then the diagnostic program will be useless. The maximum that it can do is indicate which cylinder is not working correctly. After this, the car owner can only replace the failed injector on the specified cylinder, since these devices cannot be repaired.
In order to clean the injectors in VAZ 2114/2115 cars, it is recommended that you familiarize yourself with this material:
Supply system
If the Priora engine (16 valves) is tripping, the reasons may be trivial. When there is no flash in the cylinder, perhaps there is simply no fuel there. If it has a normal compression ratio, it is worth diagnosing the power system. You should pay maximum attention to the air filter and the pipe. It is necessary to make sure that the clamps are securely tightened, whether the purifier body itself is intact, and whether there is any air leakage from the outside
Also pay attention to the tubes. They must be tightly secured to the throttle assembly
Fuel leaks, cracks, and broken plastic may indicate that some parts are faulty.
5.18.11 Removal and installation of the fuel rail / VAZ 2170
The fuel rail is removed to replace injectors and repair the cylinder head, as well as when replacing the rail itself. You will need: a 5mm hex wrench, a flat blade screwdriver, a 17mm wrench (two). 1. Reduce the pressure in the fuel system (see “Reducing fuel pressure in the engine power system”). 2. Remove the wire from the negative terminal of the battery. 3. Remove the decorative engine casing (see “Removing and installing the decorative engine casing”). 4. Remove the air filter (see “Removing and installing the air filter”). 5. Remove the throttle assembly from the intake manifold (see “Removing and installing the throttle assembly”).
6. Remove the intake manifold (see “Replacing the cylinder head cover gasket”).
| 7. Squeeze the latch... | 8. ...and remove the injector wiring harness block. Similarly, remove the pads from the remaining three injectors. |
9. Perform an initial check of the injector windings. To do this, connect an ohmmeter one by one to the contacts in the injector connectors and in each case measure the resistance of their windings. It should be 11–15 ohms. If, when measuring an injector, the resistance value differs from the specified value, then this injector is faulty and must be replaced (see “Checking and replacing injectors”).
| 10. To replace the injector wiring harness or fuel rail, you need to cut the mounting clamps with side cutters. This operation is not required to replace injectors. Later, for clarity, the wiring harness was removed. | 11. Unscrew the fuel supply pipe fitting... |
| Helpful advice: Use a special “17” wrench to unscrew the tube fittings. |
| Warning Be sure to hold the fuel rail tip nut with a second open-end wrench. |
| 12. ...and disconnect the fuel pipe from the ramp. | 13. Remove the two screws securing the fuel rail... |
14. ...and remove the ramp along with the injectors.
Note Please note: the connection between the tube and the ramp is sealed with a rubber ring. Be sure to replace a heavily compressed, hardened or torn ring.
| Warning If, when removing the fuel rail, any injector remains in the engine intake pipe, replace its O-rings and retainer. |
15. Install and secure the fuel rail in the reverse order of removal, lubricating the injector O-rings with engine oil or WD-40.
| Note: When installing the fuel rail, to ensure that the injector wiring harness does not touch the engine, secure it to the rail with new plastic clamps. |
16. Having installed the fuel rail, connected the fuel line and connected the wiring harness block, secure the minus terminal on the battery, turn the ignition key 3-4 times to position “I” (ignition) at intervals of 2-3 s between turns on and check for leaks pipe connections and injector seals. 17. Install all removed parts in the reverse order of removal.
removing the VAZ 16 valve ramp without removing the manifold
Removal of injectors from the ramp and assembly
removing injectors on Priora (Lada 2170, VAZ 2112)
Priora se removal of receiver and injectors with fuel rail 16 v
How to remove the fuel rail from a Priora in 5 minutes.
Dismantling
How to remove a torpedo on a Priora
Before replacing or cleaning the injectors, they will need to be removed from the fuel rail. To achieve this, the following activities are carried out:
- Make sure the engine has cooled down properly. It is not safe to work on a hot engine;
- Disconnect the power wires from the fuel pump to de-energize the device;
- Try to reduce the pressure in the engine power system as much as possible. To do this, the engine starts, and then you need to wait until it stalls at idle speed;
- Repeat this procedure several times until the car simply stops responding to turns of the ignition key;
- That's it, now our goal is the fuel rail. To remove it, you must first remove the terminals from the battery, turn off the power to the ramp itself, disconnect the fuel supply hoses, and also disconnect all electrical appliances going to it. These are pressure, idle, throttle position sensors;
- If you have an 8-valve engine, then you do not need to remove the receiver. This step is relevant for engines with 16 valves;
- Experts do not recommend removing the intake manifold without dismantling the throttle valve and the hose going to it. It is better to unscrew and disconnect everything at once, which will allow you to continue working more conveniently;
- Cover the exhaust manifold openings with something to protect them from foreign objects;
- Using a hex wrench, you can unscrew a couple of bolts and remove the fuel rail along with the injectors;
- Make sure that there are no distortions when removing the ramp, otherwise problems may arise with the dismantling processes;
- We remove the injectors. To do this, remove the mounting brackets that hold the electrical connector. You also need to remove the bracket that holds the injector in its seat.
After dismantling the elements, be sure to close the seats to prevent debris and other objects from getting in, and place the nozzles themselves on a table or floor, after laying down a dry rag.
Here you can decide whether to change or clean the elements of the fuel system. If replacement is required, install new injectors in place of the old ones and follow the assembly procedure.
Cleaning
Here proceed as follows.
- Remove the rubber rings from the injectors, and when cleaning is finished, replace them with new seals.
- The cleaning process should begin with the nozzles, on which various deposits form as the car is used.
- Be sure to thoroughly clean the funnel-shaped surfaces where tar deposits accumulate.
- The next step is the fuel mixture supply channels.
- To open the solenoid valve to supply fuel, you will have to trick the device with a 5-7 V power supply.
- Some use stabilized voltage sources, phone chargers, or even a car battery. If using a battery, the voltage should be supplied through the light bulb. It will play the role of a current damper. Otherwise you risk burning the winding.
- Electricity is supplied through two wires, in the gap of one of which a button is installed. It will close and open the network. This creates an imitation of the operation of an injector in an engine due to the influence of a pulsed electric charge.
- You can supply the cleaning liquid to clean the injectors through a can of carburetor cleaner. Inexpensive and effective, even better than specialized chemicals.
- Be sure to tightly connect the cylinder and nozzle with a rubber tube, clamps and any other means.
- All is ready? You can then apply electricity to open the injector. At the same time, press the button on the cleaning agent canister.
- Soon the torch of the liquid jet, which will exit through the fuel atomizer of the injector, will change its “clumsy” direction and will begin to uniformly exit the nozzle. This indicates that you have removed all carbon deposits.
Purification process
Cleaning the nozzles itself should be done on a clean surface - for this you can cover the working surface with a piece of cloth.
Prepare a hose and a spray can for. To flush, secure a plastic hose clamp at the inlet of the nozzle (make sure the length is at least 20 cm). The nozzle will need to be turned on, and the end of the hose itself will need to be lowered into the liquid that is used to flush the carburetor. Cleaning can be carried out by any of the proposed ones - RunWay, Liqui Moly or Hi-Gear.
But there is no need to add cleaning additives advertised on the market to the fuel: it very often happens that they harm the engine. The acidified dirt itself after such cleaning can create a blockage that will prevent normal access to the fuel-air mixture. Otherwise, fuel access may be blocked.
Cleaning is complete. Now do the installation in reverse order.
Important nuances
There are a few things to keep in mind when cleaning your injectors. Here they are:
- You cannot save on flushing fluid. The injector is a very important part of the engine. And it is extremely sensitive to the quality of the flushing fluid. The optimal choice for washing Priora injectors is a product from Wynns, developed specifically for injection engines. The cost of a liter bottle is 700 rubles;
Flushing fluid from Wynns is the best option for Priora injectors
The plastic bottle must be removed carefully after washing the Priora injectors.
Replacing injectors is a long procedure. Nevertheless, it is quite within the power of a novice driver if he has at least a vague understanding of the structure of an injection engine. When cleaning the injectors, the situation is much simpler: you just need to be able to use a drill and know where the main fuel hose is located.
