How to bleed the clutch control system?
For the operation of the box, it is fundamental that there is no air in the system, which is why pumping is done. The procedure is similar to bleeding the brakes. An assistant is needed to complete the work:
- Fill the reservoir on the master cylinder with brake fluid.
- Place a rubber hose of the appropriate diameter onto the fitting. Place the other end of the hose in a container with some liquid.
- Ask an assistant to press the pedal 5-6 times and hold it in the pressed position.
- Using a “10” wrench, unscrew the fitting half a turn and release air bubbles, then tighten the fitting and repeat the procedure until the air in the liquid completely disappears.
During work, it is important to monitor the fluid level in the tank and replenish it in a timely manner.
Clutch drive adjustment
Adjusting the clutch drive consists of ensuring clearance between the pusher and the master cylinder piston and between the clutch release bearing and the friction ring of the thrust flange.
The gap between the pusher and the master cylinder piston should be 0.1–0.5 mm, which corresponds to a clutch pedal free play of 0.4–2 mm.
This clearance is adjusted by the pedal travel limiting screw. The gap (2 mm) between the clutch release bearing and the friction ring of the thrust flange is determined by the free play (4–5 mm) of the working cylinder pusher.
Press the clutch release fork, resting your finger on the pusher of the working cylinder.
The movement of the fork relative to the pusher should be 4–5 mm.
In the case when you need to adjust the gap using the “13” and “17” keys, loosen the lock nut.
and, holding the pusher with an “8” key, adjust its free play by rotating the adjusting nut
After all adjustments have been made, the free play of the clutch pedal before the clutch starts disengaging should be 25–35 mm
Device location
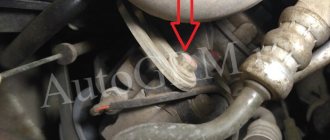
To find the clutch slave cylinder on a VAZ classic, you need to look for it directly in the area where the gearbox is located. The device is attached with two bolts to the gearbox housing.
The mechanism can only be seen from below or in the very depths of the engine compartment on the driver’s side. Repair work related to dismantling and replacing the clutch slave cylinder can be carried out “from under the hood,” but it is much more convenient from an inspection hole or on an overpass. The video below shows the location of this unit. What function does this product perform and is it possible to do without it? We'll find out more about this later.
Features of operation
The operating principle is very simple. Below is a diagram where the slave cylinder is indicated by a green arrow.
According to this diagram, we can say that the RCS performs an important function, or rather, it activates the fork, which is connected to the clutch drum. The main element of the RCS, or rather the piston, is activated by the resulting fluid pressure coming from the main cylinder through the hose when the clutch pedal is pressed. The brake fluid pushes the piston, which in turn drives the fork, which acts on the drum, pushing the disc away from the flywheel. Many people wonder why brake fluid is used in the system? The reason is that brake fluid is incompressible, which is why it is used in such important systems as brakes and clutches.
Replacing the clutch slave cylinder
We carry out the work on an inspection ditch or a lift.
Using pliers, remove the cotter pin from the end of the pusher.
Using a 17mm wrench, loosen the fastening of the hose tip in the cylinder plug.
Using a 13mm socket, unscrew the two bolts securing the cylinder to the clutch housing.
Holding the hose tip with a 17" wrench and rotating the cylinder with your hands, disconnect it from the hose
To reduce fluid loss, immediately screw a new cylinder onto the hose tip
Next, install the cylinder in the reverse order of removal and adjust the gap between the pusher and the fork.
After installing the new cylinder, we bleed the clutch hydraulic drive system (Washing machine. Replacing fluid and bleeding the clutch hydraulic drive).
General information
In order for the replacement of the VAZ 2107 clutch slave cylinder to be justified, it is good to know its purpose and the first signs of a malfunction. The torque transmission system on classic VAZ models is driven by a hydraulic drive, the main task of which is to transmit force when pressing the clutch control pedal.
In turn, the hydraulic drive consists of two cylinders: the main and the working. When the pedal is applied, pressure is created in the main center, as a result of which the brake fluid is pumped through the valve into the working cylinder (WC). The latter activates the rod, which squeezes the fork, thereby selecting gears.
Traditionally, the control center is located on the gearbox housing and secured with two bolts, so it can only be reached from under the bottom of the car. The operation of both cylinders depends on the presence of brake fluid, so you need to monitor its level, especially since this is not difficult to do - the container is located in the engine compartment.
Tools and materials
To replace or adjust the VAZ 2107 clutch you will need:
- pliers;
- thin screwdriver;
- set of wrenches;
- knife;
- brake fluid;
- container and hose for bleeding;
- syringe.
Lada 2105 engine crackles and does not start
adjust the terminal on the battery... both terminals... clean and tighten... check the ground on the body and on the engine...
The solenoid relay on the starter does not work. Here either the contacts in the ignition switch are worn out and there is a large voltage drop on them (the solenoid relay does not have enough voltage to operate normally), or the relay itself is not working properly. In the first case, you can directly apply +12 from the battery to the retractor with the ignition switch on.
As a last resort, you can start with a tow, but this is not recommended... You need to install an additional relay to relieve the contacts in the ignition switch
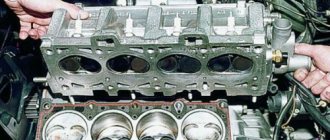
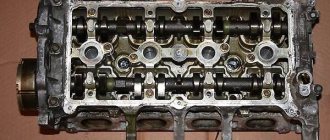
The designers incorporated several innovative technical solutions into the VAZ 2105 engine. Firstly, the valve does not bend when the transmission breaks, and secondly, rotation is transmitted to the timing camshaft by a toothed belt.
Removing the master cylinder
Before dismantling, you will need to drain the fluid from the expansion tank and remove the pipes. Then you will need to do the following:
- Using a special “10” wrench, loosen all pipes.
- Unscrew the tubes completely using a regular key to “10”. It is advisable to place a rag underneath so that the brake fluid does not get on the body parts.
- After disconnecting the GTZ from the system, it is necessary to unscrew the nuts using a wrench set to “13” that fasten it to the vacuum booster housing.
This completes the dismantling. The brake cylinder must be replaced in exactly the reverse order. But if it is possible to make repairs, disassemble the cylinder.
Tips and tricks
As the main advice when choosing this unit, you should mention the quality of materials when purchasing. The purchased parts must have the manufacturer's markings and series and batch numbers. Many enterprises have their own information resources where you can check the originality of a part by simply checking the batch numbers and the specific part.
Also, in the process of replacing the VAZ 2104 clutch slave cylinder, it is necessary to strictly follow the sequence of actions and accurately calculate the tightening torque of the hoses and pipes from the fluid tank to the main part in order to avoid cracking of the rubber and plastic parts of the body.
Also, once every few thousand kilometers, it is necessary to carry out an inspection of the entire assembly, since the vast majority of cars of these models have significant mileage, the likelihood of unexpected breakdowns is quite high.
Product location
The master cylinder on a VAZ 2107 is located under the hood, directly on the wall separating the interior from the hood, near the driver’s feet. Directly above it is the expansion tank, and next to it are the vacuum booster and the brake master cylinder. Usually, simply looking at the product is enough to determine the problem. The presence of a leak indicates that the part is faulty and requires repair or replacement.
Purpose of the device
Cars are equipped with clutch master and slave cylinders, without which the operation of the mechanism is impossible. The VAZ 2107 clutch master cylinder is designed to push out brake fluid. Below is a diagram from which you can visually find out the operating features of the unit.
When you press the clutch pedal, the piston moves in the device in question, thereby pushing out the brake fluid. This liquid enters the working cylinder through a tube, where the reverse process is observed (the liquid pushes out the piston). Brake fluid drives a piston, which is connected by a fork to the clutch disc. As a result, the clutch disc and flywheel are separated, allowing you to change gear. The GCS is also called the main one, since it is with its help that force is supplied from the pedal when it is pressed.
The need to replace the device: when required
Like all parts of any car, the GVC tends to wear out, resulting in the need for repair or replacement. The simplest breakdown of a product is wear of the boot, which can be determined by the characteristic signs of a fluid leak.
To identify a cylinder malfunction, an initial visual inspection is required. It is possible to repair a failed main circulation system on a VAZ 2107; for this you can look for repair kits, but this is not always rational due to the quality of modern spare parts, so it is easier and faster to replace it entirely. The malfunction can also be determined by the characteristic loss of pressure in the system, which is determined by pressing the pedal. Let’s take a closer look at how to change a faulty VAZ 2107 mechanism.
We change it ourselves
Replacing the VAZ 2107 clutch master cylinder begins with the need to pump out the brake fluid from the hydraulic reservoir. This can be done using a syringe or a rubber bulb. Together with this socket or a 10mm wrench, unscrew the bracket securing the expansion tank and move it to the side to gain access to the cylinder.
The next step involves removing the clutch expansion tank hose. To do this, you need to loosen the hose clamp, then disconnect the hose and position it so that it does not interfere with further work. If you want to remove the tank completely, this is done very simply.
Further actions are performed in the following sequence:
- Using a “10” wrench, you need to unscrew the pipeline securing nut to the device. Once the nut is unscrewed, the tube can be moved to the side.
- There is a hose nearby near the steel pipeline, which also needs to be disconnected from the main device. This can be done by loosening the fixing clamp.
- The GCS is fixed to the body using two fastening nuts. To unscrew them, you will need to use a wrench with an extension and a “13” socket. After unscrewing the two nuts, you can remove the product and drain the remaining brake fluid from it. If it is not possible to dismantle the unit, you can press the clutch pedal, as a result of which it will move.
- But repairs are usually not rational, so after removing the old one, a new unit is installed in its place. Installation is carried out in the reverse order of removal. After installation, it is necessary to carry out the process of pumping the hydraulic drive, first pouring fuel fluid into the tank. You can find out how the system is pumped from the relevant material on the website.
After the work is completed, you can test the operating features of the new GVC. If necessary, the RCS (working cylinder) should also be replaced, but you can find out more about this in the corresponding material.
Cars of the Volzhsky plant models 01-07 have a hydraulic clutch drive. The main actuator of this mechanism of the VAZ 2107 is replaced in the event of its breakdown or failure. The cylinder is secured to the engine compartment shield on the driver's side with two studs and nuts, and a reservoir with brake fluid is installed in the upper part. A pipeline is laid from it to the working unit.
Hydraulic drive installation
Replacing a mechanism involves purchasing it in a retail network or via the Internet. Installation work is performed in the following sequence:
- The clutch master cylinder of the VAZ 2107 is put on the studs and pushed all the way to the base.
- The nuts are screwed onto the fasteners and tightened with a wrench to “13”.
- The union nut of the pipeline laid to the working hydraulic drive is screwed into the main cylinder.
- The rubber tube is connected to a plastic connecting element and secured with a clamp.
- The expansion tank is filled with brake fluid, which enters the main and slave cylinders of the clutch through tubes. Replacing the fluid in the system is mandatory due to wear products.
Upon completion of installation of parts, it is necessary to inspect and check the tightness of the nuts. Replacing the main or working clutch drive of a VAZ 2107 car ends with bleeding the system.
Preparatory work
In order to replace the clutch on a VAZ 2107, you will need access to the gearbox and engine from below, so you need to use a special lift or a so-called inspection hole. Before starting work, be sure to remove the negative terminal from the battery and you can proceed.
First remove the air filter and unscrew the starter.
Now we can work on the gearbox on the VAZ 2107. We will need to dismantle its lever. We will not remove the box itself. Press it with a screwdriver and pull out the locking sleeve located in the groove of the lever rod. You can take it out, unscrew the bolts and dismantle the front floor.
Communities › Auto club VAZ and Lada Classic. › Blog › How to replace the clutch master cylinder of a VAZ-2107
If you begin to notice that there are visible leaks from under the cuff on the side of the clutch pedal, and there is a wet mark under the hood at the place where the cylinder is attached, while there is a sharp decrease in the brake fluid level in the reservoir, and the clutch is not being released well, then it’s time to change the clutch master cylinder.
Full size
Leaking from under the cuff
We buy a new clutch cylinder and find time for repairs - with good skill, you can do it in an hour.
Full size
So, we need to arm ourselves with: - An open-end wrench for 8 and 13 - A socket wrench for 13 with an extension - A flat and figured screwdriver - VD-40 or an analogue, a metal brush - A medical dropper or hose for pumping - A rubber bulb or syringe for pumping liquids— Clean jar for liquid
To begin with, use a bulb or syringe to pump out the liquid from the tank.
Full size
Then we disconnect the expansion tank and move it to the side so that it does not interfere. Using a 13 mm wrench and a screwdriver, unscrew and remove the pipeline nut, as well as the tank hose and also move it to the side, having previously cleaned the area with a brush and sprayed it with VD.
Full size
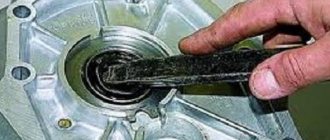
Now use a socket head to unscrew the two bolts securing the cylinder to the body and remove it, not forgetting to hold the engraving washers so that they do not fall.
Full size
It's difficult to climb, but it's possible
We scrape off the old sealant from the seat and wipe everything thoroughly. Now you can install a new cylinder. But first we check the presence of grease under the boot - everything is normal.
Full size
From the passenger compartment, we position the piston pusher in the center of the opening; it should fit into the hole in the cylinder cuff without any problems.
Full size
The tip sticks out
We coat the flange of the new cylinder with a thin layer of automotive sealant, let it dry a little and insert it into place.
Full size
We install new engraving washers and tighten the bolts. Press the clutch pedal and make sure that the pusher is in place and the cylinder is working. We return the pipeline and hose to their place.
Full size
We fill the reservoir with drained brake fluid and begin bleeding the clutch. According to the standard instructions you need to: 1. Place one end of the hose onto the clutch bleeder fitting, and lower the other end into the jar.
Full size
2. Sharply depress the clutch pedal 4-5 times at intervals of 2-3 seconds and keep it pressed.3. Using a size 8 wrench, unscrew the fitting approximately 3/4 of a turn; liquid with air bubbles will begin to come out of the hose.
Full size
4. After the flow of liquid stops, tighten the fitting and repeat operations 2 and 3 again until the bubbles stop completely. In this case, it is necessary to ensure that the liquid level in the tank is above the minimum and, if necessary, add it.5. Tighten the fitting, remove the hose, and put on the protective cap.
Now, pressing the pedal, we check the clutch - the moment of pressing the clutch should be clearly felt, the pedal should not “fall through”. We check the connections between the hoses and the pipeline for leaks, add fluid to the tank to the required level and close the lid.
Let's disassemble the old cylinder and see why it started leaking. First, use a small screwdriver or awl to remove the retaining ring.
Full size
We do this carefully, since the piston inside is spring-loaded and can suddenly fly out along with the remaining brake fluid.
Full size
We inspect the piston - surface wear and small scuffs are clearly visible, especially at the edges.
Full size
The same is true on the pusher piston; accordingly, the cylinder mirror is also worn out, the rubber rings do not press tightly.
Full size
Replacing the o-rings may help, but not for long, which is why it is recommended to replace the cylinder completely, especially since it has already reached its 10-year mark.
The main symptoms of a malfunction of the control center
The following symptoms indicate problems with the cylinder:
- the fluid level in the tank decreases, spots form under the car;
- the pedal begins to fail when pressed, the clutch does not work normally;
- There are difficulties with switching or turning off speeds; adjusting the drive does not help at all.
Masters recommend first of all paying attention to the operation of the pedal. Its soft movement or failure should immediately alert you, although this is not a reason for immediate repair of the hydraulic drive. But the reason for diagnostics is that you need to bleed the clutch
If there are air bubbles in the brake fluid, it is necessary to determine their “nature”. In 99 cases out of 100, air gets inside the RCS or GCS rods due to a violation of the tightness of the cuffs.
But the reason for diagnostics is that you need to bleed the clutch. If there are air bubbles in the brake fluid, it is necessary to determine their “nature”. In 99 cases out of 100, air gets inside the RCS or GCS rods due to a violation of the tightness of the cuffs.
Clutch master cylinder VAZ 2107
The VAZ 2107 hydraulic clutch drive is the best option for rear-wheel drive vehicles. An important role in the hydraulic drive system is played by the clutch master cylinder (MCC).
Purpose of the GVC
The GCS converts the force of pressing the pedal into working fluid pressure (WF), which is transmitted through pipelines using the working cylinder piston (WCC) to the fork rod. As a result, the latter rotates on a hinged support and moves the pressure bearing, turning the clutch (MC) on or off. Thus, the GVC performs two functions:
- converts pressing the clutch pedal into fluid pressure;
- transmits pressure to the working cylinder.
Operating principle of the GCS
To create pressure in the hydraulic system you need:
- working environment;
- cylinder with piston;
- the force that causes the piston to move.
The VAZ 2107 MS drive uses brake fluid (ROSA DOT-4 is recommended), which practically does not compress and does not have a negative effect on rubber products.
The piston moves through a rod connected to the clutch pedal. The pressure in the system is created by analogy with a medical syringe due to the fact that the piston and the hole through which the gas is ejected have different diameters. The system differs from a syringe in that the GCS provides for the forced return of the piston to its original position. In addition, the heating of the fluid and moving parts during operation is taken into account.
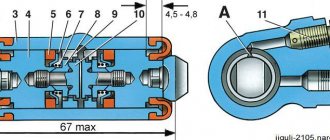
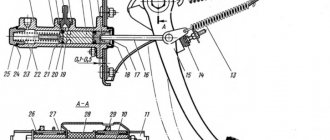
The GCS works as follows. Working fluid through hole 19 is supplied from the tank into the working cavity 22 in front of the piston. When you press pedal 15, pusher 16 moves and, resting against piston 7, moves it forward. When the piston closes holes 3 and 19, the pressure of the liquid in front of it will begin to increase sharply and will be transmitted through the pipelines to the RCS piston. The latter will turn the fork through the pusher, and its front ends will move the clutch with the release bearing (VP) forward. The bearing will press on the friction spring of the pressure plate, which, moving towards the VP, will release the driven disk, and the clutch will disengage.
When the pedal is released, the reverse process will begin. The pressure on the piston will disappear, and due to the return spring 23 it will begin to move to its original position. At the same time, the RCS piston and the fork return spring will also begin to move in the opposite direction and create pressure in front of it, which will be transmitted back to the RCS through the pipeline. As soon as it becomes greater than the force of the return spring of the GCS piston, it will stop. Through the bypass channel in piston 21, the inner surface of the floating sealing ring 20, which acts as a check valve, will be under pressure. The ring will flatten and block the bypass hole 3 in the cylinder body. As a result, a slight excess pressure will remain, which will remove all the play resulting from wear of the pushers, fork eyes and release bearing. As the temperature in the working chamber of the cylinder increases, all parts and working fluid will expand. The pressure in front of the piston will increase, and it will move back a little, opening compensation hole 3, through which excess liquid fluid will flow into the tank.
This explanation is necessary in order to understand how important it is to monitor the serviceability and cleanliness of the GVC. If the compensation hole in the piston or housing becomes clogged, the temperature inside the cylinder will quickly rise, which will create excess pressure in the master cylinder
It can squeeze out the gaskets and fluid will begin to leak. The pedal will become stiff and the O-rings will wear out faster.
Location of the GVC
Since the pusher must be positioned horizontally and fit exactly into its piston, the GCS is mounted on the front partition of the engine compartment on the left side. It is impossible to install it any other way - it is screwed onto two studs welded to the partition. No additional conditions are required to dismantle it. Access to the fastening nuts, pipeline fittings and reservoir hoses is provided by simply lifting the hood lid. At the same time, the main brake cylinder should not be confused with the main brake cylinder (MBC), which is located nearby, a little further from the sidewall of the left wing. The GTS is larger and more complex; more tubes fit into it.
Clutch kit price
Take a look at the friction linings: they should all be uniform in composition and free of cracks. Another point is the quality of the riveting. The key to quality here is the identical dimensions of the flange. Try to swing the damper springs; if there is play, then you should refuse the purchase. And the last thing worth paying attention to is the presence of markings on the damper plate.
Removing the driven disk and flywheel housing
- After this, to further secure the flywheel, you need to use a 12-mm wrench to turn a special bolt, which is located directly on the flywheel housing. Thus, in addition to additional fixation, the structure itself is weakened, which will make it possible to dismantle the drive and driven disks.
- Then, by unscrewing the bolts securing the hinged casing, you should separate the casing together with the driven (pressure) disk, thereby gaining access to the internal structure of the entire unit.
- The final dismantling procedure involves removing the drive disk, which is secured with 5 bolts to the main system. The bolts are located in the central part, and if properly secured using a centering wrench, unscrewing will not cause any major problems.
Adjusting the clutch release drive of the VAZ 2105 Zhiguli
- Repair manuals
- Repair manual for VAZ 2105 (Zhiguli) 1980-1992.
- Adjusting the clutch release drive
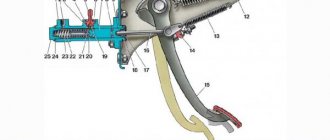
Clutch pedal and master cylinder
| 1 – main cylinder body; 2 – bypass (compensation) hole; 3 – fitting gasket; 4 – fitting; 5 – lock spring washer; 6 – piston of the main cylinder; 7 – sealing ring; 8 – pusher piston; 9 – hook; 10 – pedal axis; 11 – bracket for clutch and brake pedals; 12 – clutch pedal servo spring; | 13 – clutch pedal release spring; 14 – clutch pedal travel limiter; 15 – clutch pedal; 16 – piston pusher; 17 – protective cap; 18 – retaining ring; 19 – inlet; 20 – sealing ring (ring valve); 21 – piston bypass hole; 22 – working cavity of the cylinder; 23 – spring; 24 – gasket; 25 – plug |
EXECUTION ORDER ↓ Comments ↓ 1. Vehicle operation 1.0 Vehicle operation 1.1
Starting the engine 1.2 Controlling the gearbox 1.3 Driving the vehicle 1.4 Braking and parking 1.5 Operating a new vehicle 1.6 Adjusting the ignition timing 1.7 Precautions when operating the vehicle 1.8 Caring for the body 1.9 Storing the vehicle
2. Vehicle maintenance 2.0 Vehicle maintenance 2.1 Maintenance operations 3
General data 3.0 General data 3.1 Technical characteristics of vehicles 3.2. Controls 3.3. Control of interior ventilation and heating 3.4 Tightening torques for threaded connections 3.5 Tools for repair and maintenance 3.6 Used fuels, lubricants and operating fluids 3.7 Basic data for adjustments and control 4. Engine 4.0 Engine 4.1 Possible malfunctions, their causes and methods of elimination 4.2 Removal and engine installation 4.3 Engine disassembly 4.4 Engine assembly 4.5 Engine bench testing 4.6 Checking the engine on a car 4.7. Cylinder block 4.8. Pistons and connecting rods 4.9. Crankshaft and flywheel 4.10. Cylinder head and valve mechanism 4.11. Camshaft and its drive 4.12. Cooling system 4.13. Lubrication system 4.14. Power supply system 4.15. Carburetor 2105-1107010 4.16. Carburetor 21051-1107010 5. Transmission 5.0 Transmission 5.1. Clutch 5.2. Gearbox 5.3. Cardan transmission 5.4. Rear axle 6. Chassis 6.0 Chassis 6.1. Front suspension 6.2. Rear suspension 6.3. Shock absorbers 7. Steering 7.0 Steering 7.1 Possible malfunctions, their causes and methods of elimination 7.2. Inspection, check and adjustment of the steering 7.3. Steering mechanism 7.4 Rods and ball joints of the steering mechanism 7.5 Bracket for the pendulum arm 8. Brakes 8.0 Brakes 8.1 Possible malfunctions, their causes and methods of elimination 8.2. Checking and adjusting the brakes 8.3 Clutch and brake pedal bracket 8.4 Vacuum booster 8.5. Main cylinder 8.6. Front brakes 8.7. Rear brakes 8.8. Rear brake pressure regulator 8.9. Parking brake 9. Electrical equipment 9.0 Electrical equipment 9.1 Possible malfunctions, their causes and methods of elimination 9.2 Circuits protected by fuses 9.3. Battery 9.4. Generator 9.5. Starter 9.6. Ignition system 9.7. Lighting and light signaling 9.8. Sound signals 9.9. Windshield cleaner 9.11. Heater fan electric motor 9.12. Control devices 9.13. Carburetor pneumatic valve control system 10. Body 10.0 Body 10.1 Possible malfunctions, their causes and methods of elimination 10.2. Doors 10.3. Hood, trunk lid, bumpers 10.4. Body glazing, windshield and headlight glass washers 10.5 Instrument panel 10.6. Seats 10.7. Heater 10.8. Body frame repair 10.9. Paint coatings 10.10. Anti-corrosion protection of the body 11. Vehicle modifications 11.0 Vehicle modifications 11.1. Features of repair of VAZ-21051 and VAZ-21053 cars 11.2. Features of repair of VAZ-2104 and VAZ-21043 cars 11.3 VAZ-21044 cars with a fuel injection system 11.4. Design of the central fuel injection system 12. Electrical diagrams 12.0 Electrical diagrams 12.1 Interactive electrical diagram of the VAZ-2105 car 12.2 Electrical diagram of the VAZ-2104 car 12.3 Electrical connection diagram of the injection system 12.4 Connection diagram of the instrument cluster 12.5 Connection diagram of the brake system warning lamps 12.6 Connection diagram of the headlight cleaners and washers 12. 7 Connection diagram for the electric motor of the heater fan 12.8 Connection diagram for the windshield wiper and washer 12.9 Connection diagram for the turn indicators and hazard warning lights
Bleeding the clutch of a VAZ 2106 with the help of a partner
Replacing the cylinder or any other manipulations with the clutch inevitably leads to depressurization of the hydraulic drive and air getting into the clutch hoses. To normalize clutch operation, this air will have to be removed by bleeding. Here's what's required:
- 0.5 liters of new brake fluid;
- a piece of rubber hose 30 cm long;
- open-end wrench 8 mm;
- empty brake fluid container.
Sequence of work
For normal pumping you will have to use the help of a partner. It is simply impossible to do everything alone.
- When the clutch slave cylinder is repaired and installed in its original place, brake fluid is added to the reservoir. Its level should reach the upper mark located near the neck of the reservoir. The fluid in the clutch reservoir must be added to the mark next to the neck
- The clutch cylinder has an air valve with a fitting. One end of the hose is put on the fitting. The second is lowered into an empty container (a regular plastic bottle is best suited for these purposes). The second end of the hose attached to the fitting is lowered into a plastic bottle
- After this, your partner must press the clutch pedal six times. After the sixth press, he should keep the pedal completely recessed into the floor.
- Unscrew the air valve fitting two or three turns using an 8 mm open-end wrench. After unscrewing, a characteristic hiss will be heard and bubbling brake fluid will begin to flow into the container. You need to wait until the bubbles stop appearing and tighten the fitting.
- Now again we ask the partner to press the clutch pedal six times, unscrew the fitting again and bleed the air again. The procedure is repeated until the liquid flowing from the fitting stops bubbling. If this happens, the pumping can be considered completed. All that remains is to add fresh brake fluid to the reservoir.
- https://bumper.guru/klassicheskie-modeli-vaz/stseplenie/rabochiy-tsilindr-stsepleniya-vaz-2107.html
- https://bumper.guru/klassicheskie-modeli-vaz/stseplenie/glavnyiy-tsilindr-stsepleniya-vaz-2107.html
- https://bumper.guru/klassicheskie-modeli-vaz/stseplenie/rabochiy-cilindr-scepleniya-vaz-2106.html
- https://remont-torpedo.ru/remont/remont-glavnogo-tsilindra-stsepleniya-vaz-2107.html
- https://carnovato.ru/cilindr-sceplenija-rabochij-remont-zamena/
- https://fb.ru/article/427467/tsilindr-stsepleniya-vaz–ustroystvo-printsip-rabotyi-zamena-i-remont
- https://automanya.ru/remont/rabochij-cilindr-scepleniya.html
How to adjust the clutch?
The clutch is adjusted by a special bolt with a lock nut, which is located at the end of the cable.
The pedal stroke is adjusted by turning the nut and should ultimately be 12-13cm. The increase or decrease in stroke is adjusted by screwing and unscrewing the nut from the tip.
To check whether the required distance at which the pedal is from the floor has been reached, it is recommended to press it several times and take a measurement. The adjustment continues until the desired distance is reached.
Clutch adjustment:
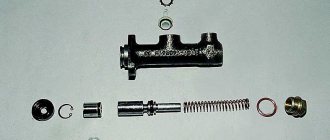
Installing the clutch master cylinder repair kit
VAZ-2106, main brake cylinder operating principle, design, repair It is not difficult to determine when it is necessary to repair the main cylinder; the main signs of its malfunction are:
- Insufficient clutch release (clutch drives)
- Any type of leakage, whether from under the nuts securing the hose and tubes, or from the end from under the rubber seals
- Master cylinder stuck in pressed position
In my situation, the main leak was due to a worn out sealing ring, in other words, fluid flowed down the clutch pedal into the passenger compartment.
I started the repair by dismantling the reservoir hose, unscrewed the clamp on the main cylinder and quickly removed it from the main cylinder, turned it up and pinched it behind the reservoir cap so that the liquid did not flow out of the reservoir. Next, I unscrewed the tube that goes to the working cylinder, I did this with a special key, it’s a pity there is no photo, but you can buy one without any problems at any auto store. All that remains is to unscrew the main one itself, it is secured with two 13 nuts and remove it from under the hood.
Main removed
The boot was removed and it was noticeable that fluid was flowing from here.
Having picked up the boot with a screwdriver, I saw exactly where the liquid was flowing from; the assumption was absolutely correct.
Next, you need to wipe the cylinder, remove dirt and rust.
After cleaning the dirt, you can begin disassembling. To do this you will need an awl or similar object.
Corkscrew ring
Corkscrew ring
We take out the ring
Next, you need to carefully remove the insides, keeping in mind that the piston is under the action of a spring.
This is what it looks like
Next, you need to clean the master cylinder body, you cannot scrape the parts with a screwdriver, sandpaper, etc., this is just in case, I use a rag with brake fluid. In repair manuals, I often came across such expressions that if rips, scratches, etc. appeared on the parts, then it is unusable. But despite all this, practice shows that despite all the risks, provided that a high-quality repair kit is installed, the master cylinder works without problems. I used this kit:
Repair kit for clutch master cylinder VAZ
We remove the old rings, clean all the grooves and holes. There should be no dust or debris there.
The ring is removed, clean the piston, install a new one
Pure "Innards"
And by the way, here is the reason for the clutch cylinder leaking:
The ring is not worn evenly
After cleaning and replacing the rings, you can assemble the cylinder, below is a photo of what should be there and how:
Here is a photo not cleaned, I added it here to show the correct assembly
Having assembled the cylinder, install the corkscrew ring
Bleeding the clutch on a VAZ 2106
After the repair has been made, it is necessary to bleed the clutch. In all repair manuals you can find standard instructions for bleeding the clutch, but it may not always help.
- The first bleeding option is standard; it consists of filling the tank with liquid, unscrewing the bleeding fitting, putting a hose on the fitting, and lowering the other end into a container with clean liquid. Then, by pressing the pedal, we monitor when the air stops being released, and also do not forget to control the level in the tank.
- The second method is to use an assistant - one person presses the pedal 4-6 times and keeps it pressed to the floor. The second unscrews the bleeder fitting; air bubbles should come out of the fitting; as soon as they stop coming out, you need to screw the fitting in and then release the pedal. And so on until normal operation of the pedal is restored and air bubbles stop coming out.
- There is also the simplest method of pumping, but which does not always work - to implement it you just need to pour liquid into the reservoir and unscrew the fitting on the working cylinder. The liquid will flow by gravity through the entire system and when it begins to flow steadily out of the fitting, it can be closed and the pumping can be considered complete.
Why do you need to change the clutch?
Clutch disc VAZ 2101
To replace the clutch you will need to stock up on: A 13mm wrench, and in addition to all this you will also need to take two different types of screwdrivers (Flat and Phillips in this case), and you also need to stock up on a mandrel for centering the clutch disc which in a car store it costs literally 100 rubles! (You can see what this mandrel looks like, which is discussed in the article, just below in the section: “For beginners!”)
When should you change the clutch?
During operation, the clutch of any car wears out over time, and the first signs of a worn clutch that a car will show are:
- Increased noise that begins to appear very clearly when changing gears in the car.
- Jerks can also occur when starting a car, and they can also occur while driving when you depress the clutch pedal, then engage a gear, and then when you release the pedal, the car jerks forward slightly.
This mainly happens due to the damper springs that are installed on the driven disk, and in the photo below they are shown by arrows. These springs are needed so that the clutch disengages smoothly and thus does not cause discomfort when driving, and when these springs become unusable, when the clutch is disengaged, as mentioned earlier, a jerk occurs, which often has a very negative effect on the comfort of driving a car!
- In addition to all this, if the clutch malfunctions, the effect that the clutch “slips” may occur. This is when you are driving a car and at the same time you press the gas pedal, let’s say to the floor, and your car does not accelerate, but the engine speed increases sharply and even reaches the red zone, this effect is popularly called the clutch “Slipping”.
- And in conclusion, we note one more effect, called the “Leads” clutch. The first signs of this effect are as follows: let’s say you engage first gear and at this time the clutch pedal is still fully depressed, but even despite this the car starts to roll. This effect is called the “Leads” clutch.
The design and principle of operation of the VAZ 2107 clutch
At its core, a clutch is a transmission link between the engine crankshaft and the input shaft of the gearbox. In this case, a simple press of the pedal separates these two units: the engine continues to operate without changing the optimal mode, and the driver can change gear to up, down or neutral.
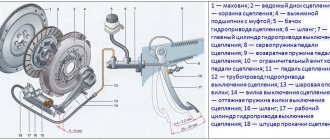
Clutch device VAZ 2107: 1 - flywheel; 2 — clutch driven disc; 3 — clutch basket; 4 — release bearing with clutch; 5 — hydraulic clutch reservoir; 6 - hose; 7 — master cylinder of the hydraulic clutch release; 8 — servo spring of the clutch pedal; 9 — clutch pedal return spring; 10 — clutch pedal travel limit screw; 11 — clutch pedal; 12 - pipeline; 13 — ball joint fork; 14 — clutch release fork; 15 — release spring for clutch release fork; 16 - hose; 17 — working cylinder of the hydraulic clutch release; 18 — clutch bleeder fitting
What would happen if the crankshaft and gearbox were connected directly? At a minimum, when stopping the car, you would have to turn off the engine and then start it again. Nowadays there are cars on the roads with a “Start-Stop” system, when instead of idling the engine simply turns off, but on the VAZ 2107 neither the battery, nor the starter, nor the engine itself are designed for such “extreme”. Changing gears while driving is also not the best option; the load on the gearbox will be too strong. And such jerks do not add “health” to the engine itself.
So, using the clutch you can:
- Transmit torque from the engine crankshaft to the transmission;
- Disconnect the engine and transmission, interrupting the transmission of rotation.
The clutch device on the VAZ 2107 is a classic clutch design, the simplest and most understandable:
- The engine crankshaft is rigidly connected to the flywheel, which rotates with it. The flywheel performs two functions: it maintains the moment of inertia so that the engine pistons do not freeze at a “dead point”, and serves as one of the elements of the clutch system;
- The driven (friction) disc is a transmission link between the flywheel and the pressure plate. It is installed on the input shaft of the gearbox and connects the clutch elements due to friction;
- The pressure (drive) disk is rigidly connected to the clutch basket. Its task is to tightly press the driven disk to the flywheel, then the torque will be transmitted to the driven disk and from it to the gearbox;
- The clutch basket consists of a casing and a system of leaf springs, which, when pressed, move the release plate back and separate it from the driven disk. When there is no pressure on the springs, they push the drive disc forward so that it presses the driven disc against the flywheel. The basket casing is rigidly connected to the flywheel and rotates with it;
- The release bearing is an essential element of the clutch system. When you press it, the leaf spring of the basket is pressed;
- The driver controls the clutch by pressing the pedal, from which the force is transmitted to the bearing through a system of rods and a hydraulic system.
As can be seen from the description, this is a “dry” (not in an oil bath) single-plate clutch, with a mechanical release bearing and a permanent connection (closed-loop system). Hydraulics are used to transmit the force that the driver applies to the pedal.
Clutch hydraulic drive device
Separately, it is necessary to say about the hydraulic drive. Thanks to it, it is possible to use the incompressibility of the liquid (maintaining a constant volume even under high pressure) and transmit force along a complex trajectory. There is no need to install complex rods and levers; hydraulics do their job perfectly.
Drive diagram VAZ 2107
The hydraulic drive system includes several elements:
- Clutch pedal;
- Master cylinder with expansion tank;
- Working cylinder with pusher;
- Pipeline and hose;
- Release fork.
Principle of operation:
- The force is transmitted from the pedal through the pusher to the master cylinder rod;
- The cylinder piston moves forward and pushes a portion of liquid into the pipeline leading to the working cylinder;
- The fluid presses on the piston of the working cylinder, combined with a pusher. The pusher comes forward and presses on the release fork;
- The fork moves the release bearing away from the clutch leaf spring.
Thanks to the hydraulic drive, the clutch can be engaged and disengaged smoothly, avoiding jerky loads on the engine and gearbox. That’s why they say that dropping the clutch is one of the driver’s “deadly sins” (and, by the way, that’s why the clutch quickly “burns out” for beginners).
How to inspect the clutch basket?
How can you tell if the basket is worn out? It’s very simple: the first sign of wear on this part is slippage, which occurs if the disk is not pressed tightly against the flywheel.
Here are step-by-step instructions for checking the basket for wear:
Put the car on the handbrake. Start the engine and engage gear 3 or higher. Lower the right pedal and press the gas. Pay attention to the car's reaction to such actions.
What do these or other options indicate?
It is considered normal if the car stalls as a result of such impacts. This means that the clutch and gearbox are fine.
Important If the engine continues to run, this should be a cause for concern. The basket is faulty because it does not allow the entire clutch to disengage completely.
It is necessary to replace not only the basket, but also the disk.
The following steps should be performed to determine a particular problem:
- Idle the engine.
- Press the right pedal all the way.
- Switch to first gear and move backwards.
If it is difficult to shift gears and strange sounds occur, it is concluded that the disk and flywheel are faulty.
The best time to repair and replace the clutch is the moment when the car is undergoing major repairs. If the power unit has already been removed, then repairing and changing the clutch will be much easier. If you follow the following plan of action, everyone will successfully cope with this job. Note that the described actions can be performed even in the garage.
So, the sequence is as follows:
- Remove the gearbox (gearbox). If there is no need to repair or replace it, you can safely disconnect the drive, battery and mass air flow sensor (mass air flow sensor). There is no need to drain the oil first.
- Unscrew the cable providing the transmission.
- Disconnect the starter.
- Loosen the fasteners on top of the box.
- Unscrew the elements of the speed sensor, as well as the electrical wiring harnesses.
- Slightly loosen the drive nut on the right, but unscrew it completely on the left.
- Unscrew the ball joint.
- Disconnect the engine protection.
- The torque rod must be unscrewed, and then the lower crankcase cover must be removed.
- Remove the linkage, first loosening the nut of the clamp, which helps control the gearbox.
- Unscrew the fasteners and bolts of the gearbox.
- Using a jack, lift the engine.
- Unscrew the box from the pillow and then remove it.
After the box is removed, the motorist can see the problem area and is able to perform some actions with it.
To replace the basket, you must first remove the retaining fasteners.
You need to pay attention to the petals: the basket should be replaced completely if it is significantly worn out
Before installing the new basket, you need to adjust the position of the gearbox input shaft so that the box can be easily put on in the future. Then a disc is installed in the flywheel.
After the position of the basket is corrected, it is necessary to tighten the bolts. This is done gradually: first 3-4 turns, and only then should it be fixed.
At the very end of the procedure, all that remains is to install the release bearing and shaft, which must be generously lubricated before installation.
All previously removed parts are installed back in the reverse order.
Bleeding the hydraulic clutch clutch VAZ 2107
The main purpose of bleeding the clutch hydraulic drive is to remove air from the fluid fluid through a special fitting located on the working hydraulic cylinder of the release bearing drive. Air can enter the clutch hydraulic system in different ways:
- through the cracks at the hose connection points;
- through loose threaded connections;
- when replacing the working fluid;
- when repairing or replacing the main circulation system or distribution center.
Tools and materials
To remove air from the clutch hydraulic drive you will need:
- a set of wrenches and spanners;
- hammer;
- slotted and Phillips screwdrivers;
- pliers;
- measuring ruler, square;
- WD-40 or other rust remover;
- transparent rubber hose corresponding to the diameter of the fitting;
- a small container for collecting operating fluid;
- working fluid for topping up or replacing.
Bleeding the clutch hydraulic drive can only begin after all identified defects have been eliminated in the master and slave cylinders, the tube and hoses for the supply of operating fluid. The work is performed on a viewing hole, overpass or lift, and an assistant will be required.
Procedure for bleeding the hydraulic clutch
Pumping is quite simple. The actions are performed in the following order:
- We unscrew the cap on the tank with the operating fluid of the GCS.
- Using a screwdriver, remove the protective cap on the drain fitting of the working cylinder and put a transparent tube on it, the other end of which is inserted into the container.
- The assistant vigorously presses the clutch pedal several times (from 2 to 5) and holds it pressed.
- Using a 8 key, turn the air bleeder fitting half a turn counterclockwise and watch for bubbles to appear.
- The assistant presses the pedal again and holds it down.
- We continue pumping until air is completely removed from the system, that is, until gas bubbles stop coming out of the liquid.
- Remove the hose and tighten the fitting until it stops.
- We check the fluid level in the tank and, if necessary, fill it to the mark.
The main symptoms of a malfunction of the control center
The following symptoms indicate problems with the cylinder:
- the fluid level in the tank decreases, spots form under the car;
- the pedal begins to fail when pressed, the clutch does not work normally;
- There are difficulties with switching or turning off speeds; adjusting the drive does not help at all.
Masters recommend first of all paying attention to the operation of the pedal. Its soft movement or failure should immediately alert you, although this is not a reason for immediate repair of the hydraulic drive
But the reason for diagnostics is that you need to bleed the clutch. If there are air bubbles in the brake fluid, it is necessary to determine their “nature”. In 99 cases out of 100, air gets inside the RCS or GCS rods due to a violation of the tightness of the cuffs.