In 1979, the Volzhsky Automobile Plant began producing the VAZ-2105, one of the modifications of the classic family. This model is a “long-liver”, since its production lasted longer than any of the “Classics” - 30 years. It is noteworthy that before the appearance of this model, at first all the predecessors of this family until 1976 were equipped with one single gearbox - from the VAZ-2101. Since 1976, the gearbox has been modernized, but it was intended only for the VAZ-2106 and Niva. The main difference lay in the changed gear ratios; later this gearbox was designated as a box with a “high” row.
For the VAZ-2105, the box was redesigned again, which affected the gear ratios. The new gearbox became “intermediate” in this indicator between the 2101 and 2106 gearboxes. Subsequently, it was the VAZ-2105 gearbox that was left and all cars began to be equipped with it, and the production of the first two versions was stopped, and there were two versions of 2105 - a 4-speed and a five-speed. Also, over time, the index of this box has changed - instead of 2105, it began to be labeled as 2107 and 21074 (5-speed).
Box faults
The design of the “Seven” gearbox is designed for many years of service.
Usually the driver carries out the first and even the second major overhaul of the engine, and only after that does the need to repair the gearbox arise. In addition, the “seven” itself has acquired a reputation as a “workhorse” throughout its long history. The machine really serves faithfully for many years, but this does not mean that each of its mechanisms will not wear out over time.
If we talk about malfunctions of the VAZ 2107 gearbox, then most often drivers complain about three defects: the inability to engage the desired gear while driving, the gear being knocked out and a strong crunch in the box.
In the early years, the VAZ 2107 was equipped with a four-speed gearbox, and since the early 1990s, a five-speed gearbox
The transmission does not start
It is very difficult to drive a vehicle if the driver cannot change gear. On the one hand, the shift lever moves to the desired position, but, on the other hand, switching as such does not occur. Or the lever cannot be set at all to the desired speed switching position.
In any case, the problem lies precisely in the box:
- Some of the moving (hinge) elements of the shafts are very worn out - it is recommended to carry out a major overhaul of the gearbox;
- wear of the blocking rings on the synchronizer - replace the rings with new ones;
- the synchronizer spring is stretched or broken - replace the spring;
- severe wear of the gear splines - only complete replacement of the gear will help.
The problem is that the lever works, but the gearbox doesn't.
Knocks out gear when driving
Another common problem with the gearbox is the transmission slipping out of gear immediately after turning it on. The lever simply throws back, and the engine begins to experience overloads, since at high speeds it does not receive the required distribution number.
The malfunction may be associated with different elements of the box:
- jamming of the hinge on the gear shift lever - it is necessary to remove the lever skirt, clean all connections and lubricate them;
- breakage of the lever - it is impractical to carry out repairs; it is easier to immediately replace the lever with a new one;
- the clutch does not work correctly - in this case, the entire blame cannot be placed on the box; it is quite possible that after adjusting the main elements of the clutch, the gear will not be knocked out;
- The forks in the box are bent - it is recommended to replace the entire set of forks.
The driver sets the lever in the desired position, but it comes back
Crunching and grinding in the box while driving
The driver may not experience problems with shifting gears, but while driving, hear a loud knocking, crunching and grinding sound in the gearbox cavity:
- the bearings on the shafts are broken - replacement is recommended;
- The gear splines are badly worn - the entire gear needs to be replaced;
- minimum oil level in the cavity of the box - you need to add lubricant and make sure that there is no leak;
- malfunction of the shafts (they began to move along another axis) - replacement of bearings on both shafts.
Unusual sounds in the gearbox are the first sign that the gearbox needs checking and repair.
Speed "knocks out"
Fuzzy switching on or knocking out the speed occurs due to:
- Wear of the retainer holes in the axle, damage to its springs;
- Wear of synchronizer blocking rings, damage to its springs or wear of teeth;
In this case, it will not be possible to eliminate the malfunction without removing the gearbox. But, it is not always necessary to completely disassemble it. For example, if the 4th gear slips out, you should immediately check the condition of the spring and the lock of the axis of this speed. It is by checking the fasteners that the search should begin. And then, by disassembling the box, we identify the true cause and eliminate it.
How to eliminate the rattling of the VAZ 2114 gearbox handle
Often, the VAZ 2114 gear knob resonates with the operation of the engine and makes an unpleasant rattling sound due to the following problems with the bushing:
- wear of plastic bushing inserts;
- discrepancy between the length of the sleeve and the dimensions of the fork.
In the first case, you will have to change the plastic inserts or the bushing assembly. In the second, you will have to bring the dimensions into line. To do this you will need a file, electrical tape and a vice. Often the manufacturer installs a bushing, which with its edges touches the traction fork (stage) and knocks on it when it vibrates. To get rid of noise, you need to do the following:
- unscrew the bushing fastening;
- remove the bushing;
- clean (wash with kerosene) the bushing from any remaining lubricant;
- make preliminary markings by drawing a line 1-3 millimeters from the edge of the sleeve;
- wrap the sleeve with electrical tape along the marking line, leaving the edge open;
- Clamp the bushing in a vice and use a file to file off the edge protruding from the electrical tape.
After such an operation, all that remains is to put on the plastic inserts and put the gearshift knob in place. The edges of the bushing will no longer touch the metal fork and the VAZ 2114 gear knob will stop rattling.
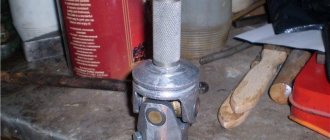
I think many car owners have encountered a problem when, when the clutch is released while standing still, noise begins to be heard from the gearbox. These are usually symptoms of a worn input shaft bearing. Therefore, today we will tell you how to replace a noisy or humming input shaft bearing of a VAZ gearbox without disassembling the gearbox itself. Of course, the box will have to be removed from the car, but almost any car owner with the slightest bit of experience in repairing classics can remove it. But not everyone can sort through a box, so we simplify the task. After removing the transmission from the car, we need to remove the bellhousing and then remove the retaining rings. We will see something like this:
Then our task is to use a powerful screwdriver to hook the bearing into the annular groove...
and using the shaft bearing as a support, move the input shaft a little forward
like this:
and then we take a hammer and hit it on the end of the input shaft.
periodically turning the shaft we continue to hit it. Now, depending on the tension in the shaft-bearing connection, after 2 - 20 minutes the bearing will come off the shaft.
The new bearing is pressed in by lightly hitting the inner ring of the bearing with a hammer. At the same time, I pull the shaft forward; it is better to use a small hammer.
That's it, we didn't have to disassemble the box to replace the bearing, and this in turn saved us a lot of time and nerves. We hope that this quick manual for replacing the input shaft bearing helped you, and our efforts were not in vain. Good luck on the roads and fewer breakdowns. Best regards, VAZ Driver team
Many owners of used VAZ classic cars, such as 2107 or 2106, mostly buy used units, such as an engine or gearbox. Think for yourself, a new engine for a VAZ 2107 costs at least 40,000 rubles, and a new 5-speed gearbox costs about 15 thousand rubles. If we consider options for purchasing a used motor or gearbox, then their cost turns out to be 3-5 times cheaper.
Oil leaks
The last common cause is a lubricant leak. This can happen through loosely screwed plugs or a damaged bottom cover gasket. But most often it is the input shaft seal that leaks.
In the first case, the problem can be eliminated simply by pulling the plugs or replacing the gasket. And for this you do not need to dismantle the gearbox from the car. But in the case of a leak in the input shaft oil seal, you will have to remove the box, but you won’t need to disassemble it to replace the damaged rubber element as a whole.
Replacing the gearbox oil seal, if it concerns the input shaft, is not difficult. It is located in the clutch housing, but from the inside, that is, it will have to be disconnected from the gearbox housing. And then the damaged oil seal is removed and a new one is installed.
Then everything is put back together. In case of damage to other seals, the gearbox is disassembled and the damaged element is replaced.
Difficulty switching
The reasons for difficult gear shifting may be severe contamination of the lever linkage or jamming of the sliders.
If the lever in the body moves without much effort, then the reason is in the sliders. After removing them from the gearbox housing, you need to carefully inspect them. Usually, in places where the sliders jam, marks remain in the form of abrasions and scratches.
POPULAR WITH READERS: Main faults of a car transmission
Then you need to inspect the seats of the slides for the presence of particles that cause jamming. Alternatively, there may be a slight bend in the slider itself. In this case, the slider is replaced.
Difference between 4-speed and 5-speed gearboxes
As noted, the VAZ-2105 was equipped with two gearboxes - 4 and 5 speeds. At the same time, the 4-speed version was taken as the basis for creating a 5-speed gearbox and slightly modified. Therefore, the five-speed gear ratios up to 4th speed are identical, but the added 5th speed has a gear ratio of 0.82. That is, this direct box still has 4th gear.
Let's take a closer look at the differences between the five-speed and the four-speed on the VAZ - there are several, and there are 2105 of them:
- on a 5-speed gearbox, a slightly different rear gearbox cover is used, where the 5th speed gear block is located;
- the intermediate shaft has a threaded hole for mounting the 5th and rear gear block;
- the presence of a 5th gear gear block with a reverse gear and synchronizer, and the output shaft is shortened slightly;
- The axis of the rear speed intermediate gear of the 5-speed version is secured with a nut;
- another multiple gear shift drive, as well as a speed selection mechanism;
- The reverse speed light sensor is also different;
Since the basis for the high-speed 5-speed gearbox was a 4-speed one, it is possible to upgrade the four-speed version yourself at home, for which you should replace and add the specified gearbox components.
As for the control of the VAZ-2105 gearbox, the switching scheme does not differ from the VAZ-2106 or any other modification with a 4-speed gearbox. In a 5-speed gearbox, to engage the last speed, it is enough to move the gearshift lever to the right as much as possible and push it, then forward in the direction opposite to the rear speed. shown below are the switching diagrams for both modifications in general:
The KPP-2105 gearbox is very capable and reliable to work for a long period of time without any maintenance. In addition, it has good maintainability and repairs are not so difficult. Gearbox Replacement 2105 is usually done in case of wear of the bearing seats in the housing or if it is damaged - breakdown, cracks. the rest In case of breakdowns (wear or damage to bearings, gears, shafts, etc.), it is possible to restore the functionality of the unit by replacing the broken elements. The replacement can also be carried out in the case of installing a 5-speed instead of a 4-speed modification, in the case when the unit was purchased as an assembly, and not only those elements that allow the old gearbox to be modernized.
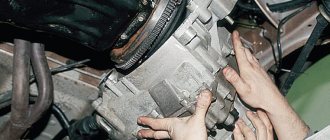
But in any case, this is a replacement, modernization or repair; nothing can be done while the gearbox is installed on the car. In any case, the unit will have to be dismantled, and you need to know how to remove the box.
Machine characteristics
On the Lada Kalina car, a Japanese gearbox is installed. Let's compare it with a standard manual transmission and determine the advantages, or vice versa, the disadvantages.
Let's take data on fuel consumption in mixed driving mode. On the mechanics, Lada Kalina consumed about 7 liters per hundred, provided that it had an 8-valve engine with a power of 87 hp. With more engine power (106 hp), consumption decreased to 6.7 liters. While Kalina with an automatic transmission consumed 7.8 liters. If we take data for urban mode, then the consumption will reach 10 liters. per 100 km.
Acceleration with an automatic transmission also slowed down, although not significantly. For example, Lada Kalina with an 87 hp engine. accelerates to a hundred in 12.4 seconds, and with 106 hp - in 11.2. In turn, the automatic transmission can accelerate to 100 km/h in only 13.7 seconds. Of course, in urban conditions this will be a little noticeable, but on the highway there will be no difference.
You shouldn’t make hasty conclusions about slower acceleration with an automatic transmission. Do not forget that with a manual transmission, you will spend time squeezing the clutch and turning on the speed, but with an automatic transmission, this time is saved, so the starting acceleration will be approximately equal.
Noise Removal
The noise of the VAZ-2105 gearbox can occur due to wear of bearings, wear of gear teeth and gears, as well as synchronizers, and axial displacement of the shafts relative to each other.
If such a problem occurs, it will be necessary to remove the transmission from the car, since it cannot be repaired otherwise. Note that eliminating noise is one of the most difficult operations to perform, since it requires complete disassembly and reassembly of the gearbox with replacement of worn elements.
In addition to the standard set of keys and screwdrivers, you will additionally need a universal puller. Next, we’ll look at how to completely disassemble a VAZ-2105 5-speed gearbox.
So, all work is done on the removed gearbox:
- Drain the oil and remove the bottom cover. We immediately assess the condition of the gear teeth. If their damage is not noticeable, most likely the noise is coming from the bearings;
- We check the position of the gearshift lever (it should be in neutral), after which we dismantle the gear shift mechanism (link) from the gearbox;
- Remove the cover of the clamps and remove the springs and balls;
- We remove the elastic coupling from the secondary shaft, and then its hub (to unscrew the hub nut, unscrew the bolt securing the 3rd and 4th gear forks, engage 1st gear in the gearbox and displace the 4th gear synchronizer clutch. Two at a time the gears are engaged, the gearbox will be blocked and the nut can be unscrewed);
- We unscrew the speedometer drive, the sensor for turning on the reverse speed light and the exhaust system pipe mounting bracket;
- We unscrew the fastening elements of the rear gearbox cover (5-speed gearboxes have 5 external nuts and 1 internal nut, 4-speed gearboxes do not have an internal nut). Then remove the cover. In this case, the bearings are second. the shaft and the 5th gear block will be disassembled - the inner races will remain on the shafts, and the outer ones, together with the rolling elements, will be in the cover, and all this will need to be dismantled for replacement;
- Remove the speedometer drive gear and oil deflector from the secondary shaft;
- We dismantle the gear block of the 5th and reverse gears by unscrewing its fastening bolt installed in the shaft, as well as the reverse intermediate gear from the axle;
- Remove the 5th gear synchronizer from 2nd. shaft, the 5th and reverse gear shift fork together with the axle, then remove the 3rd and 4th gear axle block;
- We dismantle the synchronizer hub and the reverse gear from the second. shaft;
- We unscrew the bolts securing the pressure plate of the secondary shaft bearing and remove it;
- Unscrew the clutch housing from the gearbox;
- Unscrew the intermediate shaft bolt and remove the front bearing;
- We remove the rear bearing of the intermediate shaft, after which it can be pulled out of the box body;
- We remove the axles and forks of the remaining gears, as well as the axle block of the 1st and 2nd gears;
- We take out the input shaft;
- We remove the secondary shaft along with the gears;
Well, then troubleshooting of the component elements is carried out, worn and damaged components are replaced and assembly is carried out.
Note that this disassembly diagram is general and does not consider such nuances as removing retaining rings, sealing washers, engravers and other small elements.
Symmetrical or asymmetrical
It is quite simple to understand whether the differential in front of us is symmetrical or asymmetrical. Let's do this using the example of a cylindrical differential.
If you carefully read the previous section, then you already know how power flows are distributed.
Let's imagine that the differential gears are fixed. The supplied torque acts on the satellite axis with force F
. Satellite over shoulders r1
and
r2
press on the gear teeth with forces
F1
and
F2
.
What is the relationship between them? Because for a satellite, the axis is its own axis of symmetry and rotation, then r1 = r2
, hence
F1 = F2 = F / 2. Those. satellites always split their forces in half! So where does asymmetry in the differential come from?
Forces F1 = F2 = F / 2
act on different arms
R1
and
R2
relative to the axis of rotation of the gears.
And we know that torque is the product of force and the radius of its action, i.e. in our case M1 = F1 ⋅ R1
and
M2 = F2 ⋅ R2
, where
F1 = F2 .
For example, in the specified differential
R1 = 2 ⋅ R2
, i.e.
we get M1 = 2 ⋅ M2
(torque distribution 1/3 to 2/3)
. Those.
the torque of the gears is directly proportional to the radii at which the satellite and gears engage. Try to imagine the kinematic diagram of a bevel differential and figure out at what points the forces will be applied and at what radii they will act.
Gearbox VAZ 2107 five-speed scheme, repair,
Car enthusiastsReplacing the camshaft drive chain tensioner VAZ-2107Post navigationPopular articlesSite sections
Of course, everyone knows that repairing a car’s engine or gearbox is best left to professionals. But for every owner of a VAZ 2107 it will be absolutely useful to know how to remove the box and repair it yourself.
The VAZ 2107 five-speed gearbox needs repair when the following symptoms appear:
- the appearance of a hum or an increase in familiar noises;
- difficulty shifting gears;
- spontaneous shutdown while driving;
https://youtube.com/watch?v=t4hvIWvZc-E
These symptoms are caused by wear of various parts of the gearbox 5, for example, bearings, synchronizers, spherical joints or oil seals. But in any case, if malfunctions are detected, removal and disassembly of the mechanism will be required. And in order to do all these steps correctly, you need to be familiar with the structure of the VAZ 2107 gearbox and be able to disassemble it.
Gearbox device for VAZ 2107
In general, the five-speed transmission has the same functions as its predecessors: it varies the direction and magnitude of torque from the engine. The differences are that the five-speed has 6 speeds, including 1 reverse speed.
VAZ 2107 gearbox diagram
Inside the gearbox housing there are:
- two types of shafts with different numbers of gears - primary and secondary;
- levers responsible for changing gears.
If any malfunctions are detected, it is recommended to remove the box based on the manufacturer's instructions.
Work on dismantling the five-speed gearbox VAZ 2107
Installing the car on a lift (you can use an overpass or a pit) is preceded by disconnecting the battery and removing the radio panel:
- Remove and disassemble the gearbox rod.
- Remove the cover from the gap where the lever attaches and remove the foam filling.
- Remove the exhaust pipe from the exhaust system.
- Move the starter, disconnect the speedometer wire.
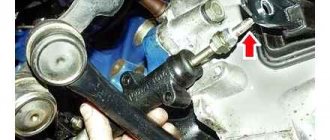
- Unscrew the bolts holding the cardan and remove it.
- The clutch cylinder is removed using the same method.
- After this, the gearbox is removed from the car. To do this, it is best to invite assistants who will support the mechanism while you unscrew the mounting bolts. At this stage, it is also advisable to drain the transmission oil.
After all these steps have been completed, we repair the VAZ 2107 gearbox.
Repair process
When starting to repair or tune the gearbox, try to wash all accessible surfaces with kerosene as thoroughly as possible.
Next, you should carefully unscrew all the fastening bolts, sequentially releasing the parts.
Each gear is disassembled separately, and it is important to carefully check not only the gaskets, but also the seals. Correcting and diagnosing breakdowns includes replacing gaskets, this is a prerequisite; oil seals are usually changed if they are very worn. The disassembled VAZ 5 mortar box must be washed again, after which all parts are checked again for faults and, if necessary, replaced with new ones
Most often you have to replace a worn gear or bearing.
The disassembled VAZ 5 mortar box must be washed again, after which all parts are checked again for faults and, if necessary, replaced with new ones. Most often you have to replace a worn gear or bearing.
To replace parts, you can buy a ready-made gearbox repair kit, designed taking into account the most frequently occurring faults in five-speed gearboxes. Also, before disassembling the transmission, prepare the necessary tools: an impact driver, a three-jaw puller, wrenches of different diameters and a torque wrench. Also for maintenance you will need fixing glue, a set of gaskets and seals, preferably a repair kit.
It should be noted that, like any gearbox, the VAZ 2107 5 mortar requires periodic maintenance to prevent malfunctions while driving.
After all the parts have been checked and replaced, you can begin assembling the gearbox, carrying out all the steps in the reverse order. If the parts have undergone too much wear and replacement of individual components no longer helps, a complete replacement of the gearbox on a VAZ 2107 may be necessary.
Thus, it is quite possible to carry out maintenance and repair of the VAZ 2107 gearbox yourself, the main thing is to follow all the requirements of the dismantling instructions and follow the drawings during assembly.
When is a locking differential needed?
And the point here is not only in those moments when the car slips in the mud. Locking the differential will not hurt when driving on snow, ice, sand and similar surfaces where SUVs reign. Despite the fact that the VAZ 2107 is a long way from an SUV, it would be very tempting to improve the car’s cross-country ability in relatively simple conditions, but on slippery roads and in adequate mud.
This is what locking differentials are designed for. These designs allow you to automatically or manually lock the differential and transmit torque equally to both drive wheels. A clutch is responsible for blocking such differentials, which allows minimizing the load on the transmission, ensuring smooth differential locking and eliminating slipping when the wheel is hanging up.
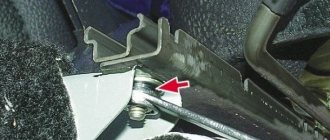
Removal and installation of the Gearbox (Gearbox) VAZ 2101, 2104, 2105, 2106, 2107
We carry out the work on a car lift.
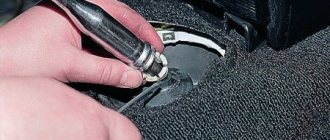
Lower the parking brake lever to the down position. Remove the gear shift rod.
Align the two screws securing the parking brake lever boot and remove the boot from the lever.
Remove the front carpet.
Remove the floor tunnel cover.
Disconnect the battery.
Remove the warm air wire hose from the air filter housing.
Remove the two upper starter mounting bolts.
Unscrew the nuts securing the exhaust pipe to the exhaust manifold and remove the locking plates. (If you have difficulty removing the nuts, complete the operation from underneath the vehicle.)
Unscrew the lower starter mounting bolt and...
...move the starter forward.
Drain the oil from the gearbox housing. Close the drain plug.
Disconnect the parts securing the main muffler to the body.
Disconnect the additional mufflers from the exhaust pipe without disconnecting them from the main one.
Remove the exhaust pipe from the car downwards.
Remove the driveline safety bracket.
Unscrew the three nuts from the bolts securing the flexible coupling to the gearbox flange.
Remove the bolts from the flange and coupling one by one by turning the driveshaft.
Using a screwdriver, pry the coupling away from the flange and lower it down.
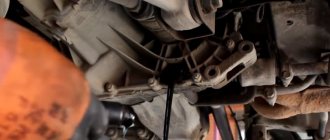
Disconnect the wires from the reverse light switch (located on the right rear of the transmission).
Unscrew the nut and disconnect the cable from the speedometer drive gearbox (located in the left rear part of the gearbox).
Remove the slave cylinder from the clutch housing without disconnecting the hose from the cylinder.
Unscrew the four bolts securing the clutch housing cover and remove the spring washers.
Place a support under the crossbar.
Unscrew the two nuts (the second one is not shown) securing the cross member to the body and remove the washers.
Remove the stop and smoothly lower the gearbox down.
Place a stop under the front of the engine to secure it in position.
Using extensions and universal joints, remove the left and right upper bolts securing the clutch housing to the engine. Remove the spring washers and eyelets.
Unscrew the left and right lower bolts securing the clutch housing to the engine. Remove the spring washers.
(An assistant must support the rear of the transmission.)
Remove the gearbox by first moving it backwards until the input shaft leaves the clutch, and then downwards.
Install the gearbox on the vehicle in the reverse order of removal. Fill in the required amount of oil.
Before installing the gearbox, apply a thin layer of LSC-15 or Litol-24 lubricant to the splined part of the input shaft and engage 1st or 3rd gear
Source
Hyundai Solaris
Removing and installing a manual transmission
The main malfunctions that require removal of the manual transmission from the car are:
- increased (compared to usual) noise;
- difficult gear shifting;
- Spontaneous shutdown or clear shifting of gears;
- oil leakage through seals and gaskets.
In addition, the gearbox is removed to replace the clutch, flywheel and engine crankshaft rear oil seal.
The work of removing and installing the gearbox is very labor-intensive, so first make sure that its malfunctions are not caused by other reasons (insufficient oil level, defects in the clutch release drive, loose gearbox fastenings, etc.).
The gearbox is quite heavy and has an awkward shape to hold, so we recommend removing it with an assistant.
You will need: socket wrenches “10”, “12”, “14”, “17”, mounting blade, pliers.
1. Disconnect the wire from the negative terminal of the battery.
4. Disconnect the wiring harness connector from the electronic engine control unit (see Removing and installing the electronic engine control unit).
5. Remove the bolts securing the electronic unit bracket to the battery shelf.
7. Remove the engine control unit complete with bracket.
8. Remove the five bolts securing the battery shelf.
9. . and remove the shelf.
10. Remove the air supply hose and air filter housing assembly (see Removing and installing the air filter housing).
11. Remove the bolt securing the wiring harness bracket.
12. ...and move it to the side along with the wiring harness.
13. Press the retainer of the reversing light switch wiring harness block and disconnect the block from the switch.
14. Use a screwdriver to pry the cotter pin securing the cable end...
15. ...and remove it from the hole in the gear shift lever shaft.
16. Remove the washer...
17. ...and the cable end from the gear shift lever axis.
18. Remove the cotter pin securing the cable end from the hole in the gear selector lever shaft.
19. . and remove the cable end from the gear selector shaft.
20. Remove the ends of the cable sheaths from the bracket sockets on the gearbox and move the gearbox control cables to the side.
21. Remove the three bolts securing the transmission control cable bracket.
22. . and remove the bracket.
23. Using a screwdriver, remove the lock.
24. ...and disconnect the wiring harness connector from the speed sensor.
25. Having released the latch, disconnect the wiring harness block from the crankshaft position sensor.
26. Remove the bolt securing the ground wire tip...
How to change the clutch disc on a VAZ 2107?
Home page » VAZ » VAZ 2107 » Changing the clutch pedal disc on a VAZ 2107: step-by-step instructions and photos
The clutch in a vehicle plays the role of ensuring smooth gear shifting by briefly disconnecting the VAZ engine from the transmission system. It is precisely because the car has a clutch that it can move off smoothly without overloading the engine and helping to increase the service life of most of its elements. This includes the gearbox itself.
VAZ 2107 car
Clutch disc cost
How much does it cost to replace a clutch disc (hereinafter referred to as DS)? This question was probably asked by every car owner who encountered a breakdown of this element. We will try to give you the most current figures, those that are found on the market.
Today, on the Ukrainian car market it is quite possible to purchase a domestically produced DS for 2107 for an average of 210 hryvnia. If you're lucky, you'll find it cheaper. But, depending on the stores, this price can vary and reach 250 hryvnia.
In Russian car stores this element costs about 500 rubles. This cost is average, so you can find DS both cheaper than this price and more expensive (mostly up to 700 rubles).
We make a replacement
Even if you have never changed this element, just follow the instructions and you will succeed. But if you are not confident in your abilities and open the hood of the car only to add washer fluid to the expansion tank, then it is better to entrust this matter to specialists.
New DS for VAZ 2107
When do you need to change the DS? This may be needed in several cases:
The process of replacing the DS involves dismantling the gearbox. However, we have a simpler option. We will look at the process of changing the clutch component without removing the transmission.
Sorry, there are no surveys available at this time.
What will you need?
Prepare everything you may need during the repair process, namely:
We will need rags and gasoline to lubricate the DS, and a mandrel to center it. It is not expensive and is sold in any car store. When replacing the DS, this point is very important, since the new element necessarily requires alignment. Having collected everything you need, you can start working.
A set of wrenches for carrying out repair work on changing the DS of a VAZ 2107 A mount that will be needed during the repair process A jack for carrying out the work A little rag for lubricating the DS A little gasoline for lubricating the DS: this amount is quite enough A special mandrel for centering the DS: sold in any car store
Replacement instructions
If you decide to replace the DS yourself, then you will need the help of another person. You need to drive onto a hole or overpass, otherwise the repair will not be possible.
1. Using a socket wrench, unscrew the casing nuts2. Take a pry bar and carefully move the gearbox away from the engine3. Take a wrench set to “13” and unscrew the nuts securing the mechanism basket4
Dismantle the old DS, do not forget to pay attention to which side it is installed6. Center the new DS: the mandrel should move freely into and out of the hole5
Place a new DS and insert a special centering mandrel into the hole
Important: do not forget to center the disk when it is already installed. To do this, use a special mandrel
If the DS is installed correctly on the mechanism, the mandrel will move freely into and out of the bearing when the basket mounting bolts are tightened.
Don’t forget to also coat the gearbox input shaft splines with a thin layer of lubricant. Don't forget to also adjust the pedal free play.
Video “Replacing the clutch on a classic”
This video describes the process of replacing the clutch on a VAZ 2102 car. The process of replacing the element, and, accordingly, the clutch disc, is identical for all classic car models, including the VAZ 2107.
Do you have any questions? Specialists and readers of the LABAVTO website will help you ask a question
What affects service life
There is no clear answer regarding the frequency of replacing the input shaft bearing. Therefore, the procedure is carried out depending on the current condition. The wear rate of elements is influenced by several factors, including:
- The quality of the bearings used;
- Driving style;
- Conditions under which the vehicle is operated (weather, road quality);
- Frequency of visits to car repair shops or self-diagnosis of the car’s condition, etc.
Checking status
Let us say right away that it will not be possible to replace the bearing without removing the gearbox. Therefore, first of all, we get acquainted with the features of dismantling the gearbox, after which we proceed to further actions.
Make sure the bearing and its components are in good condition. To do this, check the following:
- There should be no cracks or defects on the shutdown plug;
- The bosses, which are used for mounting on the release bearing, should not show signs of severe wear;
- Check the spring bracket under the soldier. The casing contains a stand for fixing the fork. The spring bracket normally does not have any signs of defects or wear;
- The presence of signs of wear on a soldier is a bad sign.
Signs of a malfunction of the input shaft bearing of the VAZ 2107 gearbox
There are several signs that indicate a bearing is faulty:
- When the engine is running at neutral speed, extraneous noise is heard, which changes with increasing speed.
- The gearbox periodically taps while the car is moving. And the knock is present in any gear.
- Gears switch on or off spontaneously.
- The clutch does not engage due to a stuck bearing.
The problem cannot be ignored: misalignment of a faulty bearing will lead to breakage of the clutch basket. And even if misalignment does not occur, a worn part will cause rapid failure of the gearbox and/or clutch.
Bearing replacement can only be done on a removed gearbox. This is where the work begins.
How to check the rear axle
Naturally, noises such as hum, vibration, crackling or knocking can also occur due to other malfunctions.
For example, the same driveshaft, if the outboard bearing breaks or the crosspiece fails, can make a crunching sound and vibrate. Failure of the elastic coupling of the universal joint is also accompanied by similar symptoms. The rear struts or other suspension elements may be knocking. In any case, before starting to repair the bridge, it is important to make sure that it is the one that is faulty
Checking the rear axle is performed as follows:
- We drive out onto a flat section of the road without holes or ledges.
- We accelerate the car to 20 km/h.
- We listen and note the accompanying noises.
- We gradually increase the speed of the car to 90 km/h and remember at what speed this or that uncharacteristic sound occurs.
- Without turning off the gear, release the accelerator pedal, reducing the engine speed. We continue to monitor changes in the nature of the noise.
- Again we accelerate to 90–100 km/h, turn off the gear and ignition, letting the car coast. If the extraneous noise does not disappear, the rear axle gearbox is in order. Without load, it cannot make noise (except for the bearings). If the sound disappears, the gearbox is probably faulty.
- We check the tightness of the wheel bolts by tightening them with a wheel wrench.
- We install the car on a horizontally flat surface. We hang its rear wheels with a jack so that we can rotate them freely.
- We alternately rotate the wheels of the car left and right, and also push them back and forth to determine the play. The wheel should turn easily without jamming. If the wheel plays or slows down when the bolts are securely tightened, the axle bearing is most likely worn out.
- When the gear is engaged, we rotate each of the wheels around its axis. Let's look at the behavior of the cardan shaft. It should also spin. If it doesn't turn, the axle shaft is most likely broken.
A little about the principle of operation
The input shaft gear, as well as four industrial gears. shafts are made integral with the shafts. And only on the secondary shaft can the gears move along the shaft. This ensures the possibility of engaging the necessary gears.
In “neutral,” torque is transmitted from primary. shaft to the intermediate one through gears having constant mesh. But on the second. the shaft does not undergo this rotation, since in this position the engagement between the gears is industrial. and sec. there are no shafts.
The driver, engaging first gear, using a shift fork mounted on the slider, moves the 1st stage gear of the second through the synchronizer. shaft and engages it with the gear on the industrial. shaft
All other steps are switched on in approximately the same way. To prevent the inclusion of two stages at the same time, the driver, before turning on the required speed, first disengages the gears of the engaged stage, that is, first moves the lever to “neutral”, and then connects the necessary gears.
In order for the meshed gears of the second. the shafts have not returned to their original position due to axial force, clamps are used - special spring-loaded balls, which, once in the recesses on the slide, do not allow it to move back.
In order to ensure rotation of the second. shaft in the opposite direction (reverse movement), the design of the gearbox includes an additional intermediate axle with a gear, which is connected to the gears of the intermediate and secondary shafts using a separate fork.
In general, the entire operation of the VAZ-2101 gearbox is based on the interaction of gears of different diameters, assembled in one housing and mounted on shafts, which allows you to change the gear ratio in the desired direction.
Article on the topic - Removing the gearbox
Rear axle and braking system | Topic author: Hadrianus
Shortening the rear axle and axle shaft.
Evgeny (Soroush) The bridge was shortened on both sides by the same length or the right side was longer, tell us if it’s not a secret and by how much on each side, thanks in advance!
Quad bike (Fouad) So I shortened the axle shaft. The right side grew 20 cm, and the left 10 cm, as a result, the base decreased by 30 cm. In pictures 1 and 2, the final stage of work. In 3, the green sketch shows how the turner made it - a hole was drilled in the left side of the axle shaft and a hole was machined in the right side for a finger - the dimensions were adjusted to fit the pressing. In Figure 4 in red, the grooves for welding the parts were welded in three stages and only with a semi-automatic machine. Alignment was mandatory.
Andrey (Rosia) This is how the stocking turned out, also shortened. I cut it, cut off the size and then realized that I had screwed up, I had to cut it behind the seam a little closer to the edge of the stocking, since after the seam there is an internal guide. But it’s true that I cooked it and will keep it that way, but I had to work hard setting it up, otherwise everything is fine. The gearbox is already upside down. I didn’t overcook the back cover - I heated it up, tapped it, installed the gearbox and the buzzing sound. The plug doesn’t interfere either.
Yury (Houshmand) Please tell me what is the best rear axle to use.
Vladimir (Dieter) Yuri, from a Ford Scorpio, or a Toyota Kaldina, and make an independent suspension on A-shaped arms
Yury (Houshmand) Vladimir, thank you
Serega (Cadmos) Vladimir, Why, when installing a bridge, is it turned upside down with the drain plug?
Vladimir (Dieter) Seryoga, this is necessary so that you have 2 gearboxes spinning in the same direction at the same gear ratios
Vladimir (Dieter) Seryoga, if of course you are making a 4x4 quad
Serega (Cadmos) Vladimir, thanks for your help
Difference between 4-speed and 5-speed gearboxes
As noted, the VAZ-2105 was equipped with two gearboxes - 4 and 5 speeds. At the same time, they took the 4-speed version as the basis for creating a 5-speed gearbox and modified it a little. Therefore, the gear ratios of the five-speed gearbox up to 4th speed are identical, but the added 5th speed has a gear ratio of 0.82. That is, this direct box still has 4th gear.
Let's take a more specific look at the differences between the five-speed and the four-speed on the VAZ-2105, and there are several of them:
Since the 4-speed version was the basis for creating the 5-speed gearbox, it is quite possible to upgrade the 4-speed gearbox yourself at home, for which you should replace and add the specified gearbox components.
As for the control of the VAZ-2105 gearbox, the switching pattern is no different from the VAZ-2106 or any other modification with a 4-speed gearbox. In a 5-speed gearbox, to engage the last speed, it is enough to move the gearshift lever as far as possible to the right and push it forward, that is, in the direction opposite to the rear speed. Below are shown the switching diagrams for both gearbox modifications:
In general, the KPP-2105 is very reliable and can operate for a long time without any maintenance. In addition, it has good maintainability and repairs are not so difficult. Replacing the 2105 gearbox is usually done in case of wear of the bearing seats in the housing or if it is damaged - breakdown, cracks. In case of other breakdowns (wear or damage to gears, bearings, shafts, etc.), the functionality of the unit can be restored by replacing the broken elements. Also, replacement can be carried out in the case of installing a 5-speed modification instead of a 4-speed one, in the case where the unit was purchased as an assembly, and not only those elements that allow you to modernize the old gearbox.
But in any case, whether it’s a replacement, modernization or repair, nothing can be done while the gearbox is installed on the car. In any case, the unit will have to be dismantled, and you need to know how to remove the box.
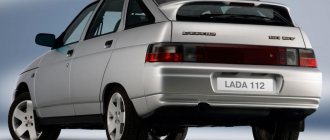
Model description
VAZ 2105 (Lada Riva, Lada Nova, Lada 1300, Lada Saloon) or “Five”, is a rear-wheel drive sedan, another representative of the Zhiguli line, popularly this series is simply called a classic. The car was developed on the basis of the same VAZ 2101 in 1979 and was positioned as its replacement.
On the basis of the five, the VAZ 2104 station wagon was created, as well as the more comfortable and prestigious VAZ 2107 car.
The production of this car lasted an unusually long time, as for the modern automobile industry, more than 30 years.
For the five, its own 1.3 liter engine was developed, the difference of which is that the VAZ 2105 engine has a timing belt. This is the only motor with a belt among the entire classic series. Essentially, the engine is a copy of the 21011 engine, where the timing chain is replaced with a belt. Details about the 2105 engine, repairs and malfunctions are described in the articles below. Its characteristics, required oil, tuning, correct increase in power, cylinder boring, etc. are given.
There is also similar information on other VAZ 2105 engines of the classic series: 1.5 liters. (2103), 1.6 l. (2106) and a rarer 1.2 l. (2101).
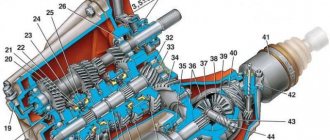
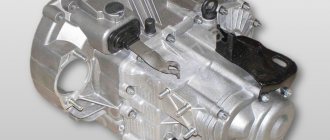
Gearbox device
In general, the concept of “remaking” the box is not entirely correct, since the design of the VAZ-2105 gearbox with 4 speeds was practically no different from the same gearbox 2101. The 2105 gearbox has a three-shaft layout, with constant gear meshing and manual control. Externally, the Kopeika and Pyaterki checkpoints can be distinguished almost only by the markings on the body of the box.
The VAZ-2105 gearbox diagram with 4 stages is presented below, and structurally it does not differ from modifications 2101 and 2106:
| 1 | Bottom cover; | 40 | Needle bearing of the front end of the secondary shaft; |
| 2 | Filler and inspection plug; | 41 | Synchronizer spring thrust washer; |
| 3 | Intermediate shaft second gear gear; | 42 | Fourth gear synchronizer ring gear; |
| 4 | Intermediate shaft third gear gear; | 43 | Sliding clutch for synchronizer of third and fourth gears; |
| 5 | Intermediate shaft; | 44 | Third and fourth gear synchronizer sliding clutch hub; |
| 6 | Front intermediate shaft bearing; | 45 | Synchronizer retaining ring; |
| 7 | Clamp washer bolt; | 46 | Synchronizer locking ring; |
| 8 | Intermediate shaft front bearing clamp washer; | 47 | Synchronizer spring; |
| 9 | Intermediate shaft constant mesh gear; | 48 | Third gear synchronizer gear and ring gear; |
| 10 | Constant mesh gear of the input shaft; | 49 | Second gear synchronizer gear and ring gear; |
| 11 | Spring washer; | 50 | Secondary shaft; |
| 12 | Retaining ring; | 51 | First gear synchronizer gear and ring gear; |
| 13 | Rear input shaft bearing; | 52 | First gear gear bushing; |
| 14 | Input shaft oil seal; | 53 | Secondary shaft intermediate bearing; |
| 15 | Transmission front cover; | 54 | Intermediate bearing lock plate; |
| 16 | Bearing mounting ring; | 55 | Secondary shaft reverse gear; |
| 17 | Clutch housing; | 56 | Elastic cushion for gear shift lever damper; |
| 18 | Gearbox input shaft; | 57 | Damper rubber bushing; |
| 19 | Reversing light switch; | 58 | Damper spacer; |
| 20 | Intermediate shaft reverse gear; | 59 | Damper locking sleeve; |
| 21 | Reverse intermediate gear; | 60 | Inner gear shift lever cover; |
| 22 | Reverse fork; | 61 | Secondary shaft rear bearing oil seal; |
| 23 | Gear shift lever release spring; | 62 | Flange of the elastic coupling of the propeller shaft; |
| 24 | Tension spring bolt; | 63 | Screw; |
| 25 | Gear shift lever guide cup; | 64 | Centering ring seal; |
| 26 | Ball joint of the lever; | 65 | Centering ring retaining ring; |
| 27 | Spherical washer; | 66 | Centering ring; |
| 28 | Spring; | 67 | Rear secondary shaft bearing; |
| 29 | Gear shift lever; | 68 | Drain plug; |
| 30 | First and second gear shift fork; | 69 | Mud deflector; |
| 31 | Third and fourth gear shift fork; | 70 | Speedometer drive gear; |
| 32 | Fork rod for first and second gears; | 71 | Speedometer drive; |
| 33 | 3rd and 4th gear fork rod; | 72 | Rear gearbox cover; |
| 34 | Locking blocks; | 73 | Reverse idler gear axis; |
| 35 | Reverse fork rod; | 74 | Rear intermediate shaft bearing; |
| 36 | Rod lock ball; | 75 | Intermediate shaft first gear; |
| 37 | Retainer spring; | 76 | Gearbox housing; |
| 38 | Retainer cover; | 77 | Sliding clutch for synchronizer of first and second gears. |
| 39 | Breather; |
Since the box from the VAZ-2105 is structurally similar to the 2101, the kinematic diagram of the gearbox is the same. But the gear ratios are different; on 2105 gearboxes they are:
- 1st – 3.67;
- 2nd – 2.10;
- 3rd – 1.36;
- 4th – 1.00;
- Rear – 3.53;
As for the differences in the design between gearboxes 2105 and 2101, they mainly come down to different numbers of teeth on different gears. So, on the intermediate shaft of the gearbox, a 1st speed gear with 14 teeth is used (15 for 2101), and their inclination angle is greater. The constant mesh gear of this shaft has 28 teeth (29 for 2101). The input shaft uses an 18-tooth gear (19 for 2101). Because of these features, the shafts with gear blocks of these two gearboxes are not interchangeable if you try to install them separately. But in the case of a complex replacement - the input shaft along with the intermediate shaft and all gear blocks, then installation is quite possible. As for the secondary shaft, modification 2105 differs from shaft 2101 in the first gear gear (its teeth have a different angle, although their number is the same, and its diameter is also slightly larger).
Consider the design of the differential
In general, the differential consists of:
1. housing (in which the axis of the satellites is rigidly fixed);
2. satellites (rotating on fixed axes);
3. gears (meshed with satellites).
In addition to bevel differentials
(the name corresponds to the shape of the satellite and gear), which are most often responsible for the distribution of torque between the wheels of one axle; there are also cylindrical differentials
, which are tightly registered in the role of interaxial ones.
As you can see, the design, despite the external differences, is very similar in essence. There are other kinematic differential schemes, but these are the most common.