The clutch (friction clutch) is the mechanism that makes the car move and facilitates gear shifting with a manual transmission. Using this device, torque is transferred from the engine to the gearbox. The clutch can be single, double or multi-disc.
The Largus is equipped with a “dry” single-plate clutch with a diaphragm pressure spring. The device consists of a driven friction disk, a casing in which the pressure disk is located, a spring and a mechanism for releasing the clutch with the drive. The 8-valve engine is equipped with a cable drive with a JH3 gearbox, while the 16-valve engine is equipped with a hydraulic drive with a JR5 gearbox.
All steps to replace the clutch cable
The lever itself that holds the weight is called a “fork.”
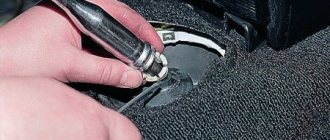
Pull the weight out of the slot by pulling the cable in the direction “away from the fork” (Fig. 1). Two actions in the engine compartment
Then they move on to the bracket: the rubber coupling is removed from the slot. The cable sheath ends with this coupling (Fig. 2).
Inside the cabin
By slightly pulling the cable toward you, remove tip 1 from the pedal holder (Fig. 1). Then tip 2 must be pushed forward. And to do this, two petals are squeezed on it. You can even damage the part itself, which will not be a big deal.
Carry out dismantling and remember: the cable cannot be seen through
The main thing is to squeeze the cable tip into the engine compartment. And then the cable assembly is replaced with a new one.
What malfunctions can happen to the clutch?
Although this list is small, if problems arise it can cause quite a few problems:
- The clutch does not engage - this malfunction occurs when the clutch pedal has too much free play. As a rule, when engaging first gear, a characteristic cracking sound occurs from the gearbox. This problem should not be ignored, as it can lead to even greater problems with the gearbox itself.
- Clutch slipping - the cause of this malfunction is that the car does not gain the required speed when the engine speed increases. As a rule, this is observed first at high speeds, but then becomes noticeable at the “bottoms”. The second symptom is an unpleasant odor that appears at high engine speeds. If such a problem is observed, it is necessary to urgently diagnose the clutch.
- Incorrect travel of the clutch pedal is a sign of this breakdown, uneven travel of the clutch pedal, when the pedal at one time returns to its original position, and at another it is in free floating. It would seem that the reason lies in the spring, but the inspection should begin with the clutch cable.
- The car jerks when you press the clutch pedal - this malfunction is very serious and you should urgently check all connections and the entire clutch for wear and notice them.
Signs of a bad clutch
It's not every day that a clutch breaks. It happens that you don’t immediately realize that the clutch on Largus is failing. This can be easily understood by the following signs:
- When you press the clutch pedal or in the neutral position of the gearshift knob and release the pedal, you hear an extraneous noise - grinding, squeaking, howling or rattling
- Some gears are difficult to engage or do not engage at all
- The clutch does not completely disengage when the pedal is pressed, the clutch moves
- The clutch slips and does not fully engage when the pedal is released and the gear is engaged
If the clutch engages at the very beginning or end of the pedal travel, then the clutch pedal free play may need to be adjusted. Our master can do this. He will also inspect the clutch and be sure to let you know if it needs to be replaced.
Most often, the release bearing disappears due to poor lubrication. It happens that the petals of the diaphragm spring weaken and sag, or critical wear forms at the point of their contact with the bearing. Over time, the damper springs or friction linings of the driven disc may become loose.
If the friction linings on the disc are worn out, cracks or delaminations are visible on them, then the disc must be replaced.
Basic malfunctions and methods for their elimination
The most obvious reason for the failure of the Lada Largus clutch is oil contamination. If this happens, the clutch cannot be replaced until the leak is fixed. There can be two sources of leakage: engine or gearbox. Oil can leak out of the engine due to a worn oil seal behind the flywheel. Changing it is quite difficult due to the labor-intensive dismantling process.
If lubricant gets in from the gearbox, the culprit is a worn oil seal located on the front of the gearbox. To replace the unit, you will need to drain the oil from the gearbox and separate the final drive housing from the gearbox housing. The process is labor-intensive, but necessary. To remove the oil seal, you will also need to remove the flywheel.
Before proceeding with the removal and disassembly of the clutch, it is necessary to check the reliability of the fixing elements that attract the assembly to the Largus frame and engine. If the fasteners are loose or the rubber bushings are worn out, when pressing the pedal the driver will feel shaking and jerking when moving away.
To describe characteristic clutch problems, special terms are used, for example, seizing. This is a situation when strong vibrations are felt during operation of the mechanism, and when you try to move, sharp jerks begin. When the clutch is driven, the disc is not pressed away from the flywheel, that is, the friction clutch does not disengage, and it is impossible to engage the gear.
If the clutch begins to squeal when shifting gears or starting off, this indicates wear on the release bearing. Wear can occur both under natural conditions after long-term use, and as a result of the actions of the driver himself. This is especially typical for cases when the car is parked with the engine running and the gear is turned off (in a traffic jam, not at traffic lights).
Slipping
The engine crank spins the flywheel faster than it transmits rotation to the pressure plate. It is not difficult to determine the malfunction, since when the speed increases, the car cannot accelerate. This is especially noticeable on steep slopes when moving up and under heavy load. To make sure of this, the car is placed on a level surface. The parking brake is applied as high as possible, after which you need to start the engine. Now you should depress the clutch, engage fifth gear, raise the speed slightly and press the brake pedal firmly while releasing the clutch. After such manipulations, if the clutch is working properly, the engine should stall. If this does not happen, it means the friction clutch is slipping. Testing is best done on a warm engine.
Jerking when turned on
If sudden jerks occur when you try to engage the clutch, the engine or gearbox mounts may be loose. This also occurs when oil gets on the friction disc and when the pressure plate is incorrectly adjusted. As a result of this, the pressure plate will not be released from the friction plate smoothly, but with sharp jerks. Typically, jerking occurs while driving in first gear with the pedal released or when reversing.
The clutch is slipping
Slipping indicates wear of the friction linings of the driven disk, failure of the pressure disk, or contamination of its surface with oil. The malfunction is manifested by incomplete pressing of the pressure plate or loose friction of the friction linings. A small amount of oil that gets between the discs cannot harm, since it burns under the influence of high temperature. This will be indicated by the dark color of the overlays. If a lot of oil gets in, it leaves behind a carbon deposit on the linings. As a result, the pressure is not enough, the disc begins to stick and slip. There are two ways to identify a malfunction:
- When driving in fifth gear, you need to lightly press the gas pedal. If the clutch slips, the revs will jump, but there will be no acceleration.
- If the discs are slipping due to oil or dirt on them, then injecting carbon tetrachloride may temporarily relieve the problem.
Sticking
Occurs due to any obstructions in the friction clutch or on the splines of the input shaft. The result of the malfunction is the impossibility of the pressure plate coming out of engagement, even if the pedal is fully depressed. In the case of a hydraulic drive, sticking may occur due to an air lock in the system. The problem can be diagnosed by a difficult first gear to engage when starting off. There is also a malfunction if, while driving, the gears are difficult to engage; when the clutch is engaged, the engagement occurs too early, when the pedal is just beginning to be released. To fix the problem, it is necessary to dismantle the friction clutch to replace damaged and worn parts.
Replacing the clutch basket (pressure plate)
- preliminary determination of the need to change the basket
- using professional tools specially designed for this purpose
- compliance with the sequence of events
This part of the mechanism is important, since it is where all the clutch parts are located. So that the unit can operate without violating the principle of operation, the pressure plate should be changed only by a qualified technician and where they have real practice in changing the clutch basket.
It is common practice in car service centers to replace the basket assembly. This type of work is considered the most acceptable and high-quality, since it becomes possible to change the casing. Accordingly, the result will be of higher quality.
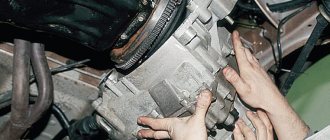
Replacing clutch parts without removing the gearbox (discs, bearing, fork)
A typical clutch replacement job and other information are shown here.
When replacing clutch parts, you don’t have to completely remove the gearbox (since this requires removing the subframe, which is very labor-intensive), but only move it away from the engine to the required distance.
Disconnect the terminal from the negative side of the battery.
Remove the left wheel drive (see here).
We unscrew the bolt securing the left subframe bracket to the body and loosen the nut securing the bracket to the suspension arm (see here).
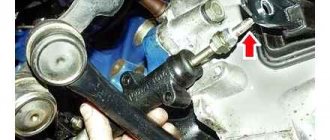
Disconnect the clutch cable from the clutch fork and the bracket on the gearbox (see here).
We disconnect the gearbox control rod from the switch on the gearbox (see here).
Remove the crankshaft position sensor.
Disconnect the wiring connector from the reverse light switch.
Disconnect the ECM wiring connector from the wiring block of the control oxygen concentration sensor.
Remove the sensor block from the holder on the gearbox and remove the wiring harness from the holder.
Unclench the holder on the gearbox housing and remove the wiring harness from it. We unscrew the four bolts securing the engine oil pan to the gearbox (see here).
We place adjustable stops under the engine and gearbox. We remove the rear and left supports of the power unit (see here and here).
We disconnect the ground wires from the gearbox, unscrew the bolts and nuts securing the gearbox to the cylinder block (see here).
Holding the right wheel drive inner joint housing.
. We move the gearbox away from the engine, removing the input shaft from the hub of the driven clutch disc.
In this case, the splined shaft of the differential side gear will come out of the tip of the right wheel drive inner joint housing.
We move the gearbox away from the engine to the required distance and rest the left side of the box on the subframe.
When removing and installing the gearbox, do not rest the input shaft of the gearbox on the petals of the diaphragm spring, so as not to damage them.
To replace the clutch release bearing , slide it along the guide sleeve to the end of the gearbox input shaft, disengaging the clutch release fork legs from engagement with the bearing clutch.
Remove the bearing (for clarity, shown on the removed gearbox).
Remove the fork from the ball joint and remove the end of the fork from the dirt cover.
Before installing the bearing, apply grease to the surface of the guide bushing, the clutch release fork tab, and also to the fork ball joint. We replace the torn rubber cover of the clutch release fork with a new one.
Install the clutch release bearing in the reverse order.
When installing the bearing, the 2 forks must fit into the plastic hooks 1 of the bearing clutch.
Further, the operations for replacing clutch discs are similar to replacing them with the gearbox removed (see here)
Source
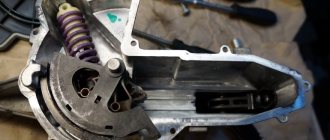
Features of the clutch of the Lada Largus car
The clutch of the Lada Largus car is single-disc, dry type.
A pressure disk with a central diaphragm spring and a driven disk are installed, with friction linings attached with rivets.
The pressure plate is mounted in a stamped steel casing and is attached to the flywheel with six bolts (Figure 1).
This manual transmission vehicle has the same clutch. Only the drive differs depending on the gearbox model.
On a vehicle with a Jh4 gearbox, the clutch is controlled by a cable, while on a vehicle with a JR5 gearbox, the clutch is controlled using a hydraulic drive.
And on a car with a Jh4 gearbox, the release bearing moves along a guide sleeve with the help of a fork, and on a car with a JR5 gearbox, a hydraulic slave cylinder is installed directly on the gearbox clutch.
The driven disk (Fig. 2) is installed on the splines of the gearbox input shaft and is clamped by a diaphragm spring.
Release bearing 1 (Fig. 3), in box Jh4 is controlled by fork 2.
The release bearing is closed and does not require the addition of lubricant during operation.
The fork is inserted into the grooves of the release bearing clutch.
A rubber cover is installed on the fork shoulder.
The fork is controlled by a cable, which at one end is inserted into the fork and the other end is attached to the clutch pedal.
The throwout bearing in the JR5 transmission is combined with a slave cylinder, which is attached by two bolts to the clutch housing.
Release bearing in box JR5 in Figure 4.
The hydraulic clutch release drive for the JR5 gearbox consists of a master cylinder, which is installed in the engine compartment, and a slave cylinder.
The hydraulic drive is connected using a tube and hose. The master cylinder is connected to a reservoir that is shared between the brake and clutch systems.
autoruk.ru
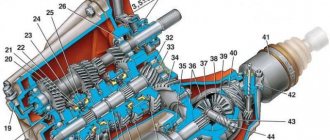
The design and principle of operation of the clutch
The pressure plate is located in a steel casing, which is bolted to the flywheel of the power plant. The friction disc is installed on the splines of the gearbox input shaft and is clamped by a diaphragm spring between the pressure disc and the flywheel. The guide bushing is a non-separable type unit, which includes the input shaft bearing and oil seal.
The bearing is moved by a ball bearing fork installed in the clutch housing. The fork is inserted into the grooves of the bearing coupling without fasteners. A drive (cable) is attached to the shoulder of this kind of shutdown lever, the second end of which is connected to the pedal in the cabin.
As the friction disc wears and operates, the clutch pedal travel is adjusted using an adjusting nut. It is located at the end of the cable.
The hydraulic clutch drive of the Lada Largus with the JR5 gearbox consists of the following components:
- the master cylinder, which is installed in the engine compartment,
- slave cylinder in the clutch housing,
- release bearing,
- pipeline with tubes and hoses,
- pedal.
The pedal is connected to the master cylinder pushrod using a tip retainer. It is combined on one axis with the brake pedal and is attached to the body with a bracket. The pedal is equipped with a spring to allow it to return to its original position.
The master cylinder is connected to a reservoir that contains the brake fluid. The reservoir also serves to connect to the brake cylinder. The slave cylinder is combined with the clutch release bearing, attached to the crankcase from the inside and exerts pressure on the bearing through a diaphragm spring. The hydraulic drive operates thanks to the presence of brake fluid. It does not need adjustment during its entire service life.
A flywheel is attached to the crankshaft of the Largus engine, which rotates during operation of the power unit. The flywheel contains a primary shaft, on the splines of which there is a clutch disc. Along these slots, the disc can move in both directions by several centimeters. The primary shaft is connected via a gear to the secondary shaft, which transmits torque to the axle shaft.
By pressing and releasing the clutch pedal, the driver adjusts the pressure of the disc from the engine flywheel. When the gear shift lever is moved to the neutral position, the secondary shaft gears do not mesh with the primary shaft gear. The same thing happens when the pedal is pressed: the driver engages the desired gear and, smoothly releasing the clutch, increases the speed. At this time, the gears gradually engage. The disc is pressed against the flywheel through the splines, thereby transmitting torque to the gearbox.
16-valve engines produce more power, so they use a clutch with a stiffer pressure spring and a friction disc damper. You can distinguish the discs by the slot of the spring petals and the damper springs, as they are marked with paint. The disk sizes used are the same.
You can install a disc from a 16-valve Largus engine onto an 8-valve one, but vice versa - you cannot.
Replacing the clutch basket (pressure plate)
- preliminary determination of the need to change the basket
- using professional tools specially designed for this purpose
- compliance with the sequence of events
This part of the mechanism is important, since it is where all the clutch parts are located. So that the unit can operate without violating the principle of operation, the pressure plate should be changed only by a qualified technician and where they have real practice in changing the clutch basket.
It is common practice in car service centers to replace the basket assembly. This type of work is considered the most acceptable and high-quality, since it becomes possible to change the casing. Accordingly, the result will be of higher quality.
How to bleed the clutch on a Renault Megane 2: photos and videos
Without exception, all 2nd generation Renault Megane models with a manual gearbox are equipped with a single-disc (dry) diaphragm-type clutch. Which, like any other device of this type, is located between the engine and the gearbox and serves to connect and disconnect the flywheel, which is installed on the engine “crankshaft” and the gearbox input shaft. You may always need to bleed the clutch after replacing the clutch itself and sometimes when diagnosing problems with the transmission system.
Before performing all work, make sure that the entire system is in good working order, that there are no leaks on the hoses and connections, that the required level of fluid in the brake reservoir is correct, as well as their wear and quality of fasteners.
Preparatory work
For optimal and stable operation of the hydraulic drive system, it is necessary to monitor the condition of its systems in general and, in particular, the absence of air in it.
To avoid pumping, you should use only clean liquid and only the brand recommended by the manufacturer. In our case, this is ROSDOT 4.
When mixing different types of hydraulic fluid, you should change it and install new O-rings. In case of regular leaks, the location of the leak should be determined and the identified damage should be repaired. Remember that poorly performed work on pumping hydraulic drive fluid can cause unnecessary replacement of parts or erroneous diagnosis.
Tool required for bleeding
In order to start bleeding the clutch we will need:
- Brake fluid of the brand intended for your car.
- Medical syringe.
- Small hose. (Good fit from the windshield washer system VAZ 2108-99).
- Container for draining old fluid. The tool is ready for use
Step-by-step work order
There is a Renault Megane 2 fitting located here, which is designed for bleeding the clutch system (working cylinder).
The fitting is visible under the hood with the naked eye.
- Next, for convenience when performing work, remove the battery and dismantle the platform under it.
- Then remove the cap from the brake fluid reservoir and add fluid to the maximum mark.
- We clean the plug on the fitting from dirt and remove it. Clean carefully so as not to damage the surface of the cap.
- We put a pre-prepared hose on it. In order to put on the hose, you will have to make a small effort
- Attach the syringe to the reverse side. The best option is a 20 cc syringe
- The next step is to distribute the spring clips on the fitting.
- First of all, lower the lock on the right all the way down. We take it out carefully so as not to break it
- And then raise the left one until it clicks.
- We extend the black tube, which is located on the right side, about 5 millimeters towards the battery, i.e. to the right. In order to remove the tube from the place of fixation, only a little force should be applied
- After completing these procedures, use a syringe to draw the liquid out of the system. This procedure will have to be done more than once.
Next, when your syringe is full, you must first push the black tube back into place (to prevent air from getting in), and only then disconnect the syringe from the hose and pour out the pumped out liquid. Then we put everything back in place and continue working.
- A similar procedure should be carried out until all air bubbles are released from the system. As a rule, such manipulations take about 2-3 repetitions.
- Do not forget to constantly monitor the level of brake fluid in the system through the brake fluid reservoir, and top it up if necessary. Fill the liquid within the MAX level
- Once air bubbles have stopped flowing into the syringe, this will mean that your system is bleed.
- We push the black pipe into place, put all the metal fasteners in place and attach the rubber plug.
Important!
Please note that it is unacceptable to reuse used, previously drained hydraulic fluid, or to use or mix different types of it together. In addition, if you accidentally spill hydraulic fluid on the car body, you should immediately clean the area of contamination and rinse it with water!
Hydraulic Clutch Actuator - Bleeding
— the clutch pedal is in the middle or depressed position;
- Difficulty shifting gears.
Possible consequences of contamination entering the hydraulic clutch system
The hydraulic clutch drive is very sensitive to contamination. The entry of contaminants into the system can lead to the following consequences:
— inability to change gears;
— damage or complete failure of the hydraulic clutch;
— leaks from the hydraulic clutch drive.
To remove air from the hydraulic clutch drive, use the following equipment:
— installation for removing air from the hydraulic drive system through a brake fluid reservoir type OMA 883 f. "OMA" (Italy);
— a syringe for removing air through a fitting located on the clutch slave cylinder.
Hydraulic Clutch Bleeding Procedures
If parts of the hydraulic clutch are removed
Perform air removal operations using a device for removing air through the brake fluid reservoir or using a new syringe through the air removal fitting located on the clutch slave cylinder (brake fluid according to the current “Codifier of basic and auxiliary materials used in vehicle maintenance and repair” LADA" K 3100.25100.00018).
If the clutch hydraulic parts are not removed
Perform air bleeding operations with a syringe only by injecting brake fluid through the air bleeding fitting on the clutch slave cylinder.
Place the vehicle on a two-post lift, apply the parking brake and turn off the ignition.
Remove the engine crankcase protection (see here)
Bleeding procedure if there are no hydraulic drive parts removed
Bleeding using a hydraulic drive system bleeder
Secure the clutch pedal in the up position using a strap attached to the steering wheel to ensure hydraulic integrity during the bleeding operation.
Connect the installation for removing air from the hydraulic drive system to the brake fluid reservoir (installation for removing air from the hydraulic drive system type OMA 883 f. "OMA", Italy).
Remove plug 1, Figure 8-1, from the air bleeder fitting on clutch slave cylinder 4.
Connect the transparent tube to the air removal fitting, lowering the other end into an empty vessel located above the air removal fitting (transparent process tube, process vessel).
Press the lock 2 and pull out the pipeline 3 one click to open the air bleed hole.
1 — plug of the fitting for removing air; 2 — clamp; 3 - pipeline connecting the main and slave cylinders of the clutch drive; 4 — clutch slave cylinder; 5 - gearbox
Open the system between the bleeder unit and the brake fluid reservoir.
Wait until the brake fluid flows out without bubbles.
Relieve pressure in the clutch hydraulic drive by turning off the air bleeder.
Press the lock and install the pipeline into the working cylinder until it clicks.
Disconnect the transparent tube from the air bleed fitting and install the plug on the fitting.
Disconnect the bleeder unit.
Add brake fluid to the master cylinder reservoir and bring the level to normal. The brake fluid level should be between the “MAX” and “MIN” marks on the master cylinder reservoir.
Press the clutch pedal twenty times quickly.
Check the functionality of the clutch. If necessary, repeat the air removal operation.
Removing air using a syringe
Secure the clutch pedal in the up position using a strap attached to the steering wheel to ensure hydraulic integrity during the bleeding operation.
Remove the plug from fitting 1, Figure 8-1, to remove air from clutch slave cylinder 4.
Attach a transparent tube to the air removal fitting so that it takes the same height position as the tank (technological tube).
Press the lock 2 and pull out the pipeline 3 one click to open the air bleed hole.
Pour brake fluid into the master cylinder reservoir until it flows out of the clutch hydraulic bleeder nipple.
Why does the ESD detect error “p0830”, video explanation
Praise to the author! I am also a terrible car enthusiast, albeit with little experience... I also had right-hand drive ones, but unfortunately, they are not convenient with our traffic. I now have probably the most boring Toyota model. For almost 2 years of owning this car, I had no problems at all, it burned out once a light bulb in the foot, and I changed the brakes and oil according to plan, despite the fact that the car is 8 years old, the mileage is about 150 thousand. It accelerates quickly, drives smoothly, and is maneuverable. spacious trunk and for its size a very comfortable and spacious interior, dad feels completely comfortable in the back seat, and he is a large man. After a night in a windswept parking lot at minus 35, it started up and didn’t even sneeze once. The stove heats perfectly, the air conditioner cools quickly, the consumption is 6-7 liters of 92 in the city. engine 1.5. 106 horses, with its size it will fit into any hole in the parking lot. In short, the car is just great. )))
I've been meaning to adjust the clutch on my Grant for a long time. I made a printout of your article. Tomorrow I’ll arm myself with the necessary tools and go to the garage to do everything with my own hands step by step, as described in the article.
Open the hood, under the air filter there is a clutch foot. It is equipped with a cable with a plastic screw. Lightly pressing the foot, remove the cable to the side. We adjust the cable screw and put it back on the foot.
When accelerating, the engine roars slightly when the leveler revs up
Clutch needs replacement! It's slipping!
When starting off there is jerking, what could be the problem?
Features of adjusting the clutch release drive of VAZ 2105, 2107 cars
Correct and precise operation of the clutch on VAZ 2105, 2107 vehicles is ensured by certain adjustments to its drive. There are two of them: adjusting the gap between the pusher and the piston of the clutch master cylinder and adjusting the free play of the clutch pedal.
The gap between the pusher and the clutch master cylinder piston is 0.1 - 0.5 mm. It is regulated by rotating the clutch pedal free travel limiter. In this case, a certain free play of 0.4 - 2.0 mm is formed at the clutch pedal, which the driver selects when starting to press the pedal.
the gap between the pusher and the piston, free play of the clutch pedal of VAZ 2105, 2107 cars
It is measured with a ruler or tape measure, which is installed from the floor to the middle of the lower part of the pedal platform. We move the platform with our hand relative to the ruler scale by pressing the pedal. If there is a gap, at first the pedal moves very easily, and then with difficulty. If there is no gap, turn the pedal travel limiter out a little. We ensure that the free movement along the ruler fits within the required two millimeters.
This gap is necessary for the clutch to disengage completely. If it is missing, then the piston will not be able to fully return to the rear position when the pedal is released and in the working cavity of the master cylinder, and excess pressure will remain in the entire drive. As a result, the clutch will not disengage completely, since the release bearing will press on the leafs of the pressure spring, and the discs will slip (not be fully pressed against the flywheel). Increasing this gap will lead to the fact that the clutch will not disengage completely and will “drive” (the discs do not fully move away from the flywheel).
Adjusting the clutch pedal free play (the gap between the release bearing and the plane of the pressure flange of the clutch “basket” pressure spring)
It is adjusted by a nut on the clutch slave cylinder pusher. With proper adjustment, the free play of the clutch release fork is 4–5 mm (checked by hand: the fork is pulled away from the stop against the adjusting nut on the pusher), and the free play of the clutch pedal is 25–35 mm. It is necessary to unscrew the lock nut on the pusher and rotate the adjusting nut to set the required free play of the fork. The pedal free play of 25 - 35 mm (until the clutch is disengaged) can be checked using a ruler. It is this value that means there is a gap between the release bearing and the plane of the pressure flange of the clutch “basket” pressure spring.
free movement of the clutch slave cylinder pusher for VAZ 2105, 2107 cars
In the absence of this gap, the release bearing presses on the pressure spring of the “basket” - the clutch “slips”. With an increased gap, it “leads.”
The clutch pedal free play of 0.4 – 2.0 mm is included in the pedal free play of 25 – 35 mm. That is, 25 - 35 mm is the total required size.
Notes and additions
— The clutch on VAZ 2105, 2107 cars is of a constantly closed type, that is, constantly on: when the pedal is released, the driven disk is pressed by the drive disk to the flywheel and rotates with it, as well as the release bearing and the input shaft of the gearbox. There is a gap of 1.5 - 2.0 mm between the release bearing and the lining of the thrust flange of the clutch basket pressure leaf spring. This gap is selected when the driver begins to press the pedal.
— The full travel of the clutch pedal on VAZ 2105, 2107 cars is 140 mm.
— After adjusting the clutch drive, check for smooth gear shifting
Particular attention to reverse gear. The smoothness of its activation is an indicator of successful adjustment
More articles on VAZ 2105, 2107 cars
Removing and installing the Lada Priora clutch
Replacing the clutch.
Instructions for clutch repair, troubleshooting Lada Priora 2170, procedure for removing and installing the disc on Lada Priora cars. Maintenance and repair of transmission Lada 2170, 2172 Priora. Wheel drive. Replacing the VAZ 2171 clutch. You will need: an “8” wrench (a socket head is more convenient), a large screwdriver...
...a mandrel for centering the driven disk (can be made from the input shaft of the gearbox by removing the gears).
1. Remove the VAZ 2170 gearbox (see “Removing and installing the gearbox”).
2. If you are installing the previous VAZ 2171 pressure plate, mark in any way the relative position of the disc housing and the flywheel in order to install the pressure plate in the same position as before removal (to maintain balancing).
3. Install the mandrel into the pressure plate hole.
You can dismantle the clutch without a mandrel, but at the same time hold the driven disk: it may fall out of the clutch housing.
4. While holding the flywheel from turning with a screwdriver, remove the six bolts securing the clutch pressure plate housing to the flywheel. Loosen the tightening of the bolts evenly: each turn of the wrench, moving from bolt to bolt along the diameter.
5. Remove the clutch housing assembly with the pressure plate.
6. Pull out the driven disk along with the mandrel.
7. Cracks on the driven disk parts are not allowed. Check the wear of the friction linings 1. If the heads of the rivets 2 are recessed to a distance of less than 0.2 mm, the surface of the friction linings is oily or the rivet joints are loose, then the driven disk of the Priora fret must be replaced. Check the reliability of the damper springs 3 in the sockets of the driven disk hub; if the springs are broken, the disk must be replaced.
8. Check the runout of the driven disk if warping is detected during a visual inspection. If the runout exceeds 0.5 mm, replace the VAZ 2172 disk.
9
Inspect the working friction surfaces of the flywheel and pressure plate of the Lada Priora, paying attention to the absence of deep marks, scuffs, nicks, obvious signs of wear and overheating. Replace defective components
10. Using an external inspection, evaluate the condition of the disc spring 1 of the pressure plate. Cracks on the spring are not allowed. The contact points of the spring petals with the clutch release bearing must be in the same plane and have no obvious signs of wear (wear should not exceed 0.8 mm). Otherwise, replace the pressure plate assembly. If the rivet connections of 2 parts of the casing and the pressure plate of the Priora fret are loosened, replace the pressure plate assembly.
11. Assess the condition of the priora compression spring support rings. The rings should not have cracks or signs of wear. Otherwise, replace the pressure plate assembly.
12. Before installing the clutch, check the ease of movement of the driven disk along the splines of the input shaft of the Priora gearbox. If necessary, eliminate the causes of jamming or replace defective parts.
13
Please note that when installing the driven disk into the pressure disk housing of the VAZ 2170, the more protruding part of the hub should be directed towards the pressure spring
14. When installing the clutch, first install the priora driven disc using a mandrel...
15. ...then place the pressure plate casing on the three centering pins and screw in the bolts securing the casing to the flywheel.
- 16. While holding the flywheel from turning with a screwdriver, evenly tighten the clutch-to-flywheel bolts: each one turn of the wrench, moving from bolt to bolt along the diameter. The tightening torque of the bolts is indicated in Appendix 1.
- 17. Remove the mandrel and install the gearbox
- 18. Install the lower end of the clutch release cable on the Priora gearbox and restore the original adjustment of the clutch release cable (see “Replacing the clutch release cable on a Lada Priora”).
Before restoring the original cable adjustment, it is necessary to restore the wear compensation mechanism for the linings of the VAZ 2171 2172 clutch disc to its original state, since if the clutch disc is completely worn out, the wear compensator slider will remain in the lowest position. After installing a new, unworn driven disk, the length of the threaded part of the lower end of the cable may not be enough to restore the initial position of the cable.
To bring the wear compensation mechanism to its original position, by installing size L (see “Replacing the VAZ 2170 clutch release cable”) between the driver and the clutch release fork lever, move the clutch pedal up until it stops - the spring of the mechanism will automatically return the slider to its original position. Then check the L size again and adjust if necessary.
vazclub.com
Video instructions: how to easily adjust the clutch cable
How to replace the clutch cable on a Renault Logan without damaging anything, and how to get rid of a squeaking fork. Previous article The clutch pedal squeaks on Renault Logan - we are looking for the reason ourselves. We provide photos, video content and articles.
Everyone knows that replacing the clutch cable on a Renault Logan takes 10 minutes. Renault Logan Car Enthusiasts Club • View topic - Changing the oil in the box The main difficulty will be in setting it up. Replacing brake pads for Renault Logan 2. If the pedal starts to “stick”, simply replace the cable. There were no known cases of breakage, although in theory this option is possible. Replacing and adjusting headlights on a Renault Sandero: video instructions In general, if you intend to change the cable, stock up on two “10” keys, a “7” key and a ruler.
We show you how to perform the replacement in the video.
All steps to replace the clutch cable
The lever itself that holds the weight is called a “fork.” Pull the weight out of the slot by pulling the cable in the direction “away from the fork” (Fig. 1).
Two actions in the engine compartment
Then they move on to the bracket: the rubber coupling is removed from the slot. The cable sheath ends with this coupling (Fig. 2).
Inside the cabin
By slightly pulling the cable toward you, remove tip 1 from the pedal holder (Fig. 1). Then tip 2 must be pushed forward. And to do this, two petals are squeezed on it. You can even damage the part itself, which will not be a big deal.
Carry out dismantling and remember: the cable cannot be seen through
The main thing is to squeeze the cable tip into the engine compartment. And then the cable assembly is replaced with a new one.
We are preparing to replace the cable, removing all unnecessary
Of course, the car must be stopped before replacement. Next, remove the filter bellows (Fig. 1). On a 16-valve valve, the corrugation is held in place by a clamp, but it will also be easy to remove.
Then, if we talk about 16 valves, it is better to remove the "intake muffler". The plastic box, when there is no corrugation, can be immediately moved to the side (Fig. 3).
The cable ends with a tip-rod on which a weight is attached. This detail was hidden from us by the corrugation.
Clutch cable end
We will unscrew the nuts:
- Take two “10” wrenches and unscrew nut 1, holding nut 2. If the thread is “sour,” clean it with a solvent;
- Unscrew nut 2, holding the pressed part of the tip with a “7” wrench.
Now the weight will be easy to pull out of the slot.
Know that replacing the clutch cable on a Renault Logan can be done without unscrewing anything. The cable is pulled towards itself, the lever with the slot is pushed back, etc.
Articles
For all cables suitable for cars of the first and second generation, the Renault catalog contains two article numbers - 8200215961 and 6001546867. We are talking about different designations of one part.
Substitutes
3074 600 294 - the most common option for replacing the original spare part
3074 600 294 in Exist
We list analogues suitable for machines from the first two generations:
- CABOR 10.2890
- TRISCAN 8140 25250
- ATE 24372810312 or 591031
- AUTOMOTOR FRANCE AVC6867SAE1 or AVC6867
- BAV DISAN96
- CAUTEX 28439
- ADRIAUTO AD41180, AD410180, 41180, 410180
- CEF RT01186
- CMB AN96
- QUARTZ QZ-154-6867
- FRANCECAR FCR210148
- COFLE 102890
- FTE FKS20023
- KAWE RT01186
- HI-DRIVE CC708
- MALO 26545
- NPA NP51105151
- SPJ 911112
- QH KA93657
- TRW GCC109
- TIMMEN 01441528
- SACHS 3074600294 (pictured above)
- MASTER-SPORT 6001546867PRPCSMS
- ABS K27640
- ASAM 30360 or 31071
- HELLA 8AK 355 700-921
- BRECKNER BK19004
- SEIM 401712
- KAGER 192756
- LEX TR2193
- RICAMBIFLEX 01441528
- METZGER 102890
- TEXTAR 58013900
Description of design
Clutch Surely, while in a driving school, everyone took a course on the design of transmission components, but it’s unlikely that everyone went into all the details and, I must say, in vain. Knowledge of the design and principles of operation will allow the owner to identify a breakdown at an early stage, take measures to eliminate it and avoid large costs for major repairs. Therefore, let’s briefly consider the components of the clutch of a Lada Kalina car:
- casing;
- release bearing;
- pressure disk;
- driven disk;
- drive cable;
- fork lever;
- cable length adjustment mechanism.
The type of friction clutch used on this model is single disc, dry with a diaphragm type spring. The aluminum casing is integral with the gearbox. Modifications involve the installation of two types of transmission components - with a diameter of 190 and 200 mm. You can determine which one is used in a particular car by the number of starter mounting bolts: two – 200 mm and, if there are three bolts, then – 190 mm.
The clutch housing is secured to the flywheel with six screws. Three pins on the flywheel fit into corresponding holes in the housing, thereby centering it. As the linings wear out, the cable length changes automatically and does not require intervention from the owner.
Clutch device of Lada Largus and diagnosis of mechanism faults
The clutch (friction clutch) is the mechanism that makes the car move and facilitates gear shifting with a manual transmission. Using this device, torque is transferred from the engine to the gearbox. The clutch can be single, double or multi-disc.
The Largus is equipped with a “dry” single-plate clutch with a diaphragm pressure spring. The device consists of a driven friction disk, a casing in which the pressure disk is located, a spring and a mechanism for releasing the clutch with the drive. The 8-valve engine is equipped with a cable drive with a JH3 gearbox, while the 16-valve engine is equipped with a hydraulic drive with a JR5 gearbox.
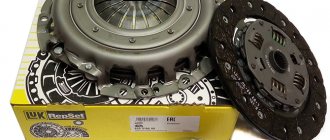
Largus clutch kit 16 valves article number
Clutch for Lada Largus VALEO
The clutch is a torque switch.
When braking sharply at high speed, the clutch will protect the gearbox
from mechanical overload and from expensive repairs.
Suitable for 16 valve engine
Hub profile: 20*21.91
Number of teeth: 26
Release bearing, sold separately
You may need a release bearing
We also bring to your attention a mechanical clutch for Lada Largus
Manual transmission JH3 540 (Largus 5 seats 8kl) - mechanical clutch (cable)
Manual transmission JH5 551 (Largus 7 seats 8kl) - hydraulic clutch
Manual transmission JH5 549 (Largus 7 seats 8kl) - hydraulic clutch
Manual transmission JH5 517 (Largus van 8cl) - hydraulic clutch
On Largus 16cl vans there is only a hydraulic clutch (all 2017 ->)
| Manufacturer: | Valeo-Service |
| Vendor code: | 302050901R |
| Catalog number: | 30205-0901R |
| Name: | Clutch LADA Largus 16 valves set Valeo (with hydraulic drive) (LADA Image) 302050901R |
| Department: | VAZ |
| Product from category: | VAZ clutch |
Payment upon receipt:
- Cash
- Transfer to card
- By bank card
- By invoice (for organizations with VAT)
Important. Before receiving the product, check its availability by phone or place an order on our website
Delivery by courier in Yekaterinburg and nearby cities
- Payment in cash upon receipt of goods
- The cost of delivery within the city and nearby cities is 100-250 rubles
- Free delivery throughout Yekaterinburg for orders over 10,000 rubles.
- Please check with the RusAvto manager for delivery times and costs.
For minimum order and delivery costs, see the Delivery section.
| Minimum order | Cost of delivery | Free delivery from | |
| Ekaterinburg | 1000 | 150 | 6000 |
| Upper Pyshma | 3000 | 200 | 10000 |
| Berezovsky | 3000 | 200 | 10000 |
| Aramil | 3000 | 200 | 10000 |
| Revda | 5000 | 400 | 17000 |
| Pervouralsk | 5000 | 400 | 17000 |
| Polevskoy | 7000 | 500 | 26000 |
| Sysert | 7000 | 500 | 26000 |
| Novouralsk | 10000 | 600 | 34000 |
| Nevyansk | 12000 | 700 | 37000 |
| * does not apply to large spare parts and special goods. price |
Delivery by Russian Post
- Prepayment 30% of the cost of the goods (Cashless payment on invoice)
- The balance of the amount is cash on delivery upon receipt of your goods at the post office.
- Delivery services are paid by the recipient according to the current tariffs of Russian Post.
Why do we ask for partial payment in advance before shipping? In our practice, there have been cases when goods sent by cash on delivery remained for a long time in the recipient’s post office and were not picked up. We were forced to pay for storage and incur additional costs for returning unclaimed goods to our warehouse.
For the Lada Largus car, in our store you can choose and buy clutch kits, as well as individual parts: clutch disc, clutch basket, release bearing from different manufacturers, both famous and little-known. Each owner of Largus will be able to choose something based on their preferences and financial capabilities.
The Lada Largus uses 3 types of clutches:
- for models with a 16-valve engine, with hydraulic drive
- for models with 8-valve engine, with hydraulic drive
- for models with 8-valve engine, with mechanical drive
The tables below show the options that can be purchased in our store:
Sign up for a technical center
We suggest you choose which method is appropriate for you - an electronic form (then you will be contacted after some time), or directly by telephone.
A preliminary agreement with the company is an undoubted convenience, because you yourself determine what time or day it will be convenient for you to arrive. You can make an appointment for the day of the call and for other days.
By the time you specify, the service station will provide a technician and a place in the work area. There will be a free lift and equipment available. In addition, you will be served out of turn.
My Largus has driven 219,160 km. And I realized that it was time to change the clutch that was installed at the factory. The clutch began to slip when accelerating or going uphill.
Since I thought that the clutch could fail at any moment, I bought a spare clutch back in 2022 before a trip to the Black Sea. As a result, I rode to the Black Sea with the clutch 4 times. And it’s good that I didn’t need it on the way. Since during repairs at the service center it turned out that I bought a completely wrong clutch. The store shipped me a clutch for a regular Logan/Largus
And since my Largus was equipped with 7 seats, it had a completely different clutch. Having loaded everything into a bag as a sample, I rushed to the store to get the right spare parts. And everything in the store was interesting. One set matched the “disc” perfectly. But it was the wrong “basket”. Another set had the same “basket”, but had a different “disc”
Also, the retractors had to be selected according to the sample. By the way, my car has a hydraulic retractor.
In general, not a machine, but a designer.
Well, we still had to change the ball joints and undergo scheduled maintenance a little earlier.
Price: 26,000 ₽ Mileage: 219,160 km
Replacing the clutch cable on Renault Logan
The Renault Logan car and its modified version Logan 2 are in great demand among Russians. The need to repair components of a vehicle with front-wheel drive and a manual transmission often arises due to the fact that you have to drive on broken roads. Replacing the Renault Logan clutch cable is a simple operation. Installing and adjusting a new part takes no more than half an hour.
Why and when do you change the clutch cable on a Logan?
Intensive use of a vehicle inevitably leads to wear and tear on the components. The signal that the cable needs to be changed is the appearance of squeaks in the clutch pedal. The sound is especially clear in hot weather, after a long trip. There can be several reasons for a squeak:
- The clutch cable has reached its service life and needs to be replaced.
- The pedal stop is very dirty and requires cleaning and lubrication.
- The release bearing has failed
- The basket is worn out.
The resource of the element depends on the intensity of driving, as well as on the quality of the spare part. Replacement is an inexpensive procedure and no special tools are needed. Compared to other common operations, such as replacing the end, installing a new cable is faster.
What tools will you need?
Replacing the Renault Logan clutch cable is done by one person. The tool you will need:
- 2 keys for 10;
- 1 key for 7;
- pliers;
- a simple screwdriver;
- small ruler.
To lubricate the fork and adjust the system, you will need a standard medical syringe. To avoid frequent replacements, adjustments must be performed every 15 thousand kilometers.
Preparing to replace the cable
Before starting the procedure, the vehicle must be stopped and the ignition turned off to prevent spontaneous movement of the car. Keys and ruler are placed in a convenient and accessible place.
The filter bellows must be removed. If the car is equipped with a 16-valve power unit, you will need to loosen the clamp. The work will be greatly hampered by the intake muffler in the form of a plastic box. After removing the corrugation, the element is moved to the side and ceases to obstruct access to the cable. Consecutive execution of operations takes no more than 5 minutes, then you can proceed directly to replacing the equipment.
Changing the cable on Logan: step-by-step plan
After completing the preparatory operations, the car owner will see a cable with a rod tip. There is a load attached to it. In the initial state, the weight is not visible. Removal and installation of the element is carried out as follows:
- Behind the weight there is a nut and a locknut that need to be unscrewed using wrenches. This weakens the fixation of the cable, it can be pulled out of the fork and bracket.
- Inside the cabin, part of the sound insulation located under the steering column is removed. You will need to move the driver's seat as far back as possible. Sound insulation should be removed carefully, as the material can easily be torn.
- The clutch pedal bends upward and the cable is released from it with some effort.
- The cable is attached to the hole in the engine compartment shield with sheath tendrils, which need to be snapped off with pliers.
- There is a fastening clamp under the left support. It also needs to be opened.
- We pull out the old spare part through the engine compartment. This completes the dismantling.
How to lubricate the fork
Remove the power steering fluid reservoir. To do this, unscrew T20 screws (2 pcs.). Then the tank is tilted to the side and secured with wire. If the fluid level in the tank is insufficient, then it is necessary to add oil to the power steering.
When there is no reservoir, you can get close to the fork boot.
It is clear that the clutch cable in Renault Logan cannot creak. If there is a creak, the fork is at fault. The clutch fork hinge is covered with a boot, which is simply pushed up (see photo).
After cleaning is completed, apply a protective lubricant. And the guide rod (yellow) needs to be lubricated.
Use only high temperature grease designed for clutch bearings.
To return the boot to its place, it should be “softened”. Any silicone-based compositions are suitable here.
Replacing the clutch on a VAZ 2110
Are there signs of clutch wear on your 2110? Hence? You need to purchase a new set and make repairs. or rather, replacing the clutch on a VAZ ten.
Without a garage with a pit, you can make do with improvised means. To change clutches on a VAZ 2110 you will need. a set of keys, a jack and wooden stumps. And for proper alignment of the clutch disc, you will also need a guide, which is also a simulator of the gearbox input shaft.
But keep in mind that this method of “replacing the clutch on stumps” is best used only as a last resort and it is better to change it anyway if you have a pit or overpass at your disposal. Because if you do not drain the oil from the box and do not remove the drive shafts, a large load occurs on them, as a result of which there is a high probability that the seals will soon leak.
Clutch replacement will be needed when the wear of the petals reaches more than 0.8 mm or an increased working stroke of the clutch pedal appears - this indicates wear of the drive disk. Possibly due to spring slump. The driven disk is mounted on the splines of the gearbox input shaft and is changed in case of runout, uneven wear, scuffing, cracks, and also if the linings from the rivets are 0.2 mm apart.
VAZ 2112 wheels can be installed on a VAZ 2110, this will only increase the force of the clutch pedal. There is no backward compatibility.
The driven clutch discs of the VAZ 2110 and VAZ 2112 have the same dimensions (200x140), but slightly different characteristics of the springs - pressure and damper. 2112 discs have a pair of springs (out of six) that are smaller and placed closer to the center; they transmit 12% more torque thanks to a boosted compression spring. The “twelfth” discs can also be distinguished by the hole in the slot of the petals.
Are the instructions useful? Yes 19 No
Replacing a clutch is a fairly labor-intensive operation. When the need arose to replace the clutch on my 10, I used these instructions. Everything is described in detail, I did everything according to the pictures. I ended up replacing the clutch myself. Thank you!
Thank you very much, I'll go change it.
Although I’ve been driving my 10 for years, I’ve never attempted to change the clutch myself, I thought that everything was complicated and it was scary to try. But when it started to slip again, I decided, armed with an article and photographic materials, to replace it myself. Of course I had to ask my friends for the keys. Thanks to the author for such detail - where to unscrew which nut, otherwise I would have spent a hundred dollars overpaying again. If it were a hundred, I would probably change the entire clutch assembly, since the work is not cheap. And here I just changed the feredo, and the basket with the release will still serve, if I can now calmly replace something myself at the right time.
When the need to replace the clutch appeared on my top ten, the question arose - do it yourself or send it to a service center? I don’t really trust the service technicians, but I just came across this photo report. I did everything myself, thanks for the help!
What could be the reasons for a clutch malfunction? For example, problems with engaging gears (to engage them you need to press the clutch pedal all the way), when overtaking the clutch disappears, the appearance of characteristic sounds, etc. If you decide to save money, you can try changing the clutch yourself:
In this case, the clutch began to engage with a characteristic sound; to get to the garage, you can insert a key between the clutch fork and the cable guide. This temporary solution helped us get to the repair site without incident. The first step was to tighten the clutch cable. but then the pedal dropped. It is impossible to determine if the clutch is broken without removing the gearbox.
How to remove a gearbox on a VAZ 2110
The gearbox is dismantled only to repair the clutch, so this method allows you to avoid draining the transmission oil from the box and not pulling the drive out of it:
Before removing the clutch, it is necessary to: remove the battery and the air filter in the housing in the place with the mass air flow sensor.
Next you will need to remove the clutch cable (clutch drive).
The clutch pedal of Lada Vesta, Largus, XRAY has failed: what to do?
When operating cars with a hydraulic clutch (Lada Vesta, Lada Largus, Lada XRAY, a number of Nissan, Renault models, etc.), when you press the clutch pedal, you can hear a loud click under the dashboard in the pedal area. After this, the clutch pedal falls to the floor. We will understand the causes of the malfunction, as well as how the design can be improved to prevent this problem from occurring again.
Cause of a failed clutch pedal
— a breakdown of the plastic retainer, which causes the clutch master cylinder rod to fly off the pedal axis. As a temporary solution, you can snap the rod into place to get there, but it will still fly off in the future.
At the service station you will be asked to replace the clutch master cylinder assembly with a new one:
- for Lada Vesta - article number 8450007300, price from 1200 rub.
- for Lada Largus - article 306107623R, price from 2200 rub.
- for Lada XRAY - article 306104118R, price from 1900 rub.
In order not to replace the part with a new one, it is proposed to modify the fastening. It will be cheaper and more reliable. It is not necessary to remove the clutch master cylinder.
- washer 10 (3mm thick);
- lock washer for 8 (or fixation washer with petals, article number 8200748573);
- lithol or other lubricant.
- Remove the rod from the pedal axle.
- Using pliers, bite off part of the plastic from the rod along with the latches.
- Lubricate the connection between the rod and axle with lithol.
- Install the washer and snap the lock washer into place.
The refinement process is also shown in the video:
After modification, it was also noted: the disappearance of creaking when squeezing the clutch pedal, and the pedal itself began to be pressed more softly and without rattling.
Replacing the friction clutch
Repairing the Larugsa clutch, like any other car, does not make sense; all worn parts must be replaced. To work, you will need a standard set of tools, amplifiers, a hammer and a new set of spare parts. First, the car must be placed on a lift or its front part raised on jacks above the inspection hole. The front wheels and engine protection are removed. After unscrewing the screws, you need to remove the left shield under the bumper. This will give you access to the shield fasteners in the wheel arch, which must also be removed.
The gearbox oil is drained into a suitable container; to do this, first unscrew the plastic and then the metal plug. Do not remove the reservoir until maximum oil has been drained. Dismantle the brake caliper and put it aside along with the pads.
Removing the steering knuckle
Removal is carried out according to the following scheme:
- disconnect the ABS sensor;
- Using a 16 mm wrench, unscrew the nut on the tie rod screw, use a screwdriver to open the two sides of the knuckle, and press out the ball joint rod;
- on the steering end stud, unscrew the nut with a 16 mm wrench and press out the stud;
- Using two 18 mm wrenches, unscrew the fastening nuts that secure the fist to the stand. Now you can remove the steering knuckle, and also dismantle the CV joint from the gearbox (in this case, the rollers will probably fall out).
It is impossible to replace the clutch on a Largus without draining the oil, since the internal drive mechanisms (CV joints) cannot be unscrewed if there is lubricant in the gearbox.
Working in the engine compartment
First you need to disconnect the negative terminal of the battery and remove the cable. To do this, the counterweight is pulled forward, removed through the slot, after which the rubber coupling is removed through it. The engine harness holder is attached to the gearbox housing. To remove it, just loosen the fastener. Now you need to disconnect all the wire terminals:
- unscrew the two mounting screws and remove the terminal from the TDC sensor;
- Disable the reverse sensor at the gearbox;
- disconnect the speed sensor terminal;
- The oxygen concentration sensor (lambda probe) is also disconnected.
The breather hose needs to be loosened and moved away from the box, unscrew the two wires to ground. Next, find the gearshift knob rod, loosen the fastening and pull out the rod.
A mark is left on the fastening clamp using paint so that the rod can be placed correctly during installation.
https://youtube.com/watch?v=WFyYSC08Aiw
Removing the gearbox
It is impossible to replace the clutch on a Lada Largus without removing the gearbox. First you need to remove the subframe by unscrewing the three bolts securing it to the bumper. Then the rear support bracket is removed, the steering mounting bolts and the power steering mounting bolt on the left on the subframe are unscrewed. The exhaust pipe is disconnected from the exhaust manifold and removed from the rubber hangers. The subframe is attached to the body with 4 bolts - they need to be unscrewed. Additionally, you will have to remove the starter.
It remains to remove the two screws on top - they secure the gearbox to the engine - and the four bolts with which the clutch housing is attached to the oil sump. Suitable supports are first installed under the engine and gearbox. At the very end, the left engine mount bracket is dismantled, after which the nuts on the lower studs are unscrewed.
Replacing the mechanism
To remove the basket, perform the following operations:
- using an 11 mm wrench, unscrew 6 bolts that hold the basket, fixing it on the flywheel - one turn at a time, sequentially;
- holding the friction disc, remove the basket.
After replacing all worn elements, the assembly is assembled, and the steps are performed in the reverse order. For installation you will need to use heat-resistant grease and a centering mandrel.
Clutch adjustment
Ideally centering and balancing the friction clutch by doing the assembly yourself will be problematic, but possible. To adjust the tension with your own hands, you need to perform a number of actions:
- find the nuts for adjusting the clutch pedal (located under the power steering reservoir);
- unscrew the outer nut to the end of the stud;
- using the second nut, the travel of the clutch pedal is adjusted to the desired cable tension;
- After this, the external nut secures the fastener so that in the future it does not loosen and the cable does not fly off.
If the Largus clutch is adjusted correctly, first gear will engage easily. When the engine is running and the clutch pedal is fully depressed, there should be no crunching, crackling, spontaneous increase or decrease in speed.
We are preparing to replace the cable, removing all unnecessary
Of course, the car must be stopped before replacement. We change the rear pads on a Renault Logan with our own hands: video and photos. Next, remove the filter bellows (Fig. 1). Replacement of brake discs for Renault Logan, Lada Largus. On a 16-valve valve, the corrugation is held in place by a clamp, but it will also be easy to remove.
Then, if we talk about 16 valves, it is better to remove the "intake muffler". The plastic box, when there is no corrugation, can be immediately moved to the side (Fig. 3).
The box is the “muffler”.
The cable ends with a tip-rod on which a weight is attached. Friends, watch a good video about checking the oil level in the Renault Logan gearbox, as well as topping up and changing the oil... And this video instruction for replacing the Renault Logan power steering sensor will help you do it yourself and not go to a service station. Replacing a headlight on a Renault Sandero Stepway video This part was hidden from us by the corrugation.
The clutch (friction clutch) is the mechanism that makes the car move and facilitates gear shifting with a manual transmission. Using this device, torque is transferred from the engine to the gearbox. The clutch can be single, double or multi-disc.
The Largus is equipped with a “dry” single-plate clutch with a diaphragm pressure spring. The device consists of a driven friction disk, a casing in which the pressure disk is located, a spring and a mechanism for releasing the clutch with the drive. The 8-valve engine is equipped with a cable drive with a JH3 gearbox, while the 16-valve engine is equipped with a hydraulic drive with a JR5 gearbox.