8.1.3. Adjusting the gap and closed state of the breaker contacts
| EXECUTION ORDER |
| 1. Unscrew the two screws and remove the distributor cap and distributor rotor. | |
| 2. Clean the inside surface of the ignition distributor cap and check its condition. | |
| 3. If the inner surface of the contacts of the ignition distributor cap is severely burned, replace the cap. | |
| 4. If there is slight carbon deposits on the contacts, use a screwdriver to clean it. | |
| 5. By pressing on the central carbon contact in the lid, check that it moves smoothly and that the contact protrudes from the lid, which should be at least 6 mm. | |
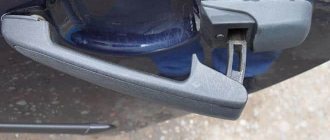
| 6. Using a screwdriver blade, open the breaker contacts and check their condition. | |
| 7. If the contacts are worn, they must be replaced. | |
| 8. If the breaker contacts are in satisfactory condition or new contacts have been installed, it is necessary to adjust the gap between the contacts using a feeler gauge blade. | |
| 9. Label and remove the high-voltage wires from the spark plugs, then unscrew the spark plugs. | |
| 10. With the handbrake released and the gear engaged, move the vehicle forward and watch the ignition distributor until the breaker contact lever is on the protrusion of one of the four cams of the ignition distributor shaft. | |
| 12. If the gap does not meet the required values, loosen the screw securing the contact plate and, by moving the plate, set the required gap. The plate can be moved with a screwdriver inserted between the mark in the breaker plate and two adjacent protrusions of the distributor support plate. | |
| 13. After setting the gap between the breaker contacts, secure the plate with a screw and re-measure the gap between the contacts. | |
| 14. Install the ignition distributor rotor, cover, spark plugs and high-voltage wires. |
If you have a meter for the duration of the closed state of the breaker contacts, the most accurate method for setting the gap between the breaker contacts is to measure and set the duration of the closed state of the breaker contacts.
The closed state angle of the breaker contacts is the angle through which the ignition distributor cam rotates while the breaker contacts remain closed. The advantage of this method is that any wear on the distributor shaft and cam circuit is taken into account, and measurement errors when using a feeler gauge are eliminated.
How correctly the ignition system is configured in your car has a strong impact on the overall performance of the car. Therefore, it is necessary to know exactly what actions will have to be taken if the VAZ 2106 distributor suddenly fails.
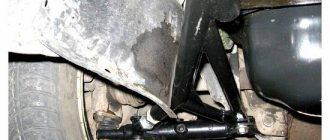
Distributor 30.3706 VAZ 2106. 1 — ignition distributor shaft; 2 — wire for supplying current to the ignition distributor; 3 — latch for fastening the distributor cover; 4 — vacuum regulator housing; 5 - diaphragm; 6 — vacuum regulator cover; 7 — vacuum regulator rod; 8 — pipe for the vacuum hose from the carburetor; 9 — lubricating wick (filt) of the cam; 10 — support plate of the ignition timing regulator; 11 — ignition distributor rotor; 12 — side electrode with a terminal for the wire to the spark plug; 13 — ignition distributor cover; 14 — central terminal for the wire from the ignition coil; 15 — central carbon electrode with a spring; 16 — central contact of the rotor; 17 - resistor for suppressing radio interference; 18 — external contact of the rotor; 19 — driving plate of the centrifugal regulator; 20 — weight of the centrifugal ignition timing regulator; 21 — lever axis; 22 — breaker cam; 23 — breaker lever; 24 — stand with breaker contacts; 25 — breaker contacts; 26 — movable breaker plate; 27 - capacitor; 28 — ignition distributor housing; 29 — roller oil deflector clutch; 30 — bearing lock plate; 31 — bearing of the movable plate of the breaker; 32 — oiler body; 33 — screws for fastening the rack with breaker contacts; 34 — terminal clamp screw; a — groove for distinguishing ignition distributors 30.3706; b - groove for moving the stand with contacts
Adjustment methods
In general, system adjustment is carried out in three stages. The first includes adjusting the angle of the closed state of the contacts. Keep in mind that it depends directly on the size of the gap in the contacts of the distributor. The second stage includes setting the angle at which the ignition advance occurs, and the third stage allows you to check and correct the results obtained. It is necessary to pay special attention to the fact that all results must be clarified directly during the driving process.
Adjustment will be needed if you use a classic or transistor ignition system in your car. In order to get started, you will first need to remove the cover covering the ignition distributor of the VAZ 2106. If your VAZ 2106 has a classic system installed, then before you begin the adjustment process, clean all the supplied contacts and check the care with which they fit to each other.
If you notice any deviations, carefully put the system in order by bending the necessary places in the contacts. Next, turn the crankshaft so that the maximum permissible distance is formed between the contacts of the VAZ 2106 distributor. Then unscrew the screw that secures the group; it is located on the bearing plate. And insert the probe, the thickness of which is 0.5 mm. Move the contacts so that it can move with little force.
Once you think you have achieved the optimal result, tighten the screw to secure the position. To find out whether you have spread the contacts correctly, place a slightly thicker probe between them. If it does not pass between the contacts, you managed to do a good job.
To rotate the crankshaft, use a special wrench. If you don't have one, start moving the car slowly with fourth gear engaged. Of course, this will require some effort, because using a starter to carry out such work becomes almost impossible. This is due to the fact that it will be quite problematic to find the optimal rotation angle.
Proceed to directly measure the angle. Remove the high voltage wire from the distributor cover and connect it to the car. Next, using the ignition coil and the 12V bulb attached to it, attach to the wire that runs directly from the distributor to the coil.
If the installation was completed correctly, when you turn on the ignition, the light will start to light, and as soon as you open the contacts, it will go out. Then start rotating the engine crankshaft so that it moves clockwise. This work must be carried out until the light goes out. Remember the position in which the slider is located and mark it somewhere for yourself.
BB wires
High-voltage wires, or, as they are also called, spark plug wires, are different from all others installed in the car. The purpose of these wires is to transmit and carry voltage passing through them to the spark plugs and protect other elements of the vehicle from electrical charge.
Malfunctions
The appearance of problems with explosive wires is accompanied by the following characteristic signs:
- problematic engine starting due to insufficient voltage on the spark plugs;
- shots at start-up and vibrations during further operation of the engine;
- unstable operation at idle speed;
- periodic engine tripping;
- the appearance of interference during the operation of the radio, which changes when the engine speed changes;
- smell of ozone in the engine compartment.
The main reasons that lead to problems with wires are wear and aging of the insulation. The location of the wires near the engine leads to temperature changes, especially in winter, as a result of which the insulation gradually cracks, moisture, oil, dust, etc. get inside. When cracks reach the conductor, the explosive wire can be pierced to ground, and a spark to the spark plug simply it won't arrive. In addition, wires often fail at the junction of the central conductor and the contact connectors on the spark plugs or ignition coil. To avoid mechanical damage, the wires must be correctly laid and secured with special clamps.
Distributor repair
Replacing the distributor with your own hands
If you need to replace a VAZ distributor, keep in mind that all parts that have become unusable during this time will also have to undergo this procedure. In order to repair the distributor, you will need the following parts:
- keys 7 - 2 pcs.;
- keys for 10 and 13;
- screwdrivers - 2 pcs.;
- a set of flat probes;
- hammer;
- mandrels, which are used to press out and press in bearings;
- tweezers.
The distributor rotor has two fixed screws that will need to be removed. Keep in mind that they are attached directly to the timing adjuster support plate. After this, you can carefully remove the rotor. All springs and weights that are removed from the centrifugal regulator responsible for ignition timing must be numbered.
This must be done so that when the installation is carried out, all small parts in the VAZ 2106 ignition distributor are installed correctly. Holding the nut installed on one of the moving contacts with one hand, unscrew the one that is located next to it and is responsible for fastening the tips of the condenser wires and the wire leading to where the VAZ 2106 ignition distributor is located.
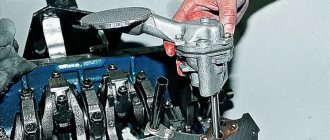
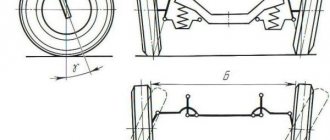
Bearing lubrication
Before checking the correct installation, it is advisable to lubricate the distributor bearings. It has an oiler on the side through which you need to lubricate it with clean engine oil. This can be done using a regular syringe. In this case, you need to ensure that oil does not get on the breaker contacts. Afterwards the cover is installed on the distributor.
1. You need to lubricate the Filz engine oil with 2-3 drops 2. Lubricate the trampler bearings through an oiler
Adjusting the ignition on a VAZ 2106.
If the car is equipped with a classic ignition system, then before starting the adjustment, it is advisable to clean the contacts of the distributor with a file. After cleaning, we check the condition of the contacts - you need to make sure that the contacts are in contact with each other along the entire plane.
If the need arises, the contacts will have to be adjusted. Now we turn the crankshaft to a position at which the distance between the contacts will be maximum . We unscrew the screw that secures the contact group on the bearing plate,
now we insert the probe - its thickness should be approximately 0.4 mm between the contacts,
After that, the position of the contact group is selected , at which the probe will move with little effort , this position must be fixed.
If this is not the case, then put it in fourth gear and carefully push the car. You won't be able to use a starter because it's almost impossible to get the right angle of rotation. The gap resulting between the contacts of the distributor gives the necessary value to the UZSK , do not forget that the angle is critical, not the gap ! It is precisely because of this that you need to check the adjustment by measuring the angle, which is approximately 55±3°
.
The simplest option is to use an electronic tachometer, which has a UZSK measurement function. To use this device, you need to assemble the distributor and start the engine. The tachometer must be switched to UZSK measurement mode.
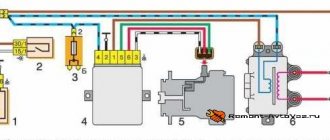
If the UZSK goes beyond the limits recommended by the manufacturer, the gap adjustment will have to be repeated. There is another way, in which you need to measure the angle. The first thing we do is pull out the central explosive wire from the distributor cover and hook it to the ground of the car, you don’t have to pull out the wire, but then there will be a risk of a breakdown in the coil. To the wire going from the distributor to the ignition coil, you will need to connect 12- Ti volt light bulb.
The light will light up if the ignition is on and the distributor contacts themselves are open, and go out when they are closed. If a thyristor or transistor system is installed on the car, then the light bulb will not light up when the contacts are open , due to the fact that there is a current limiter. Then the light bulb will have to be replaced with a voltmeter; in the open contact position it shows 12 V, and in the closed position - 0.
We turn the crankshaft clockwise , you need to turn it until the contacts close . this position of the slider ; it is advisable to mark it on the distributor. The crankshaft must be rotated until the contacts open.
We remember this position of the slider, then measure the angle between these two positions. This is done like this: we measure the length of the circular arc using the distributor body, then calculate the angle in degrees using the formula:
Candles
The main purpose of spark plugs in a gasoline engine is to ignite the working mixture in the combustion chamber. The part of the spark plug that is inside the cylinder is constantly exposed to high temperature, electrical, chemical and mechanical influences. Despite the fact that these elements are made of special materials, over time they still fail. Since both power, fuel consumption, and trouble-free engine starting depend on the performance and condition of the spark plugs, attention should be paid to checking their condition periodically.
Verification methods
There are different methods for checking spark plugs, but none guarantee their performance on the engine.
Visual inspection
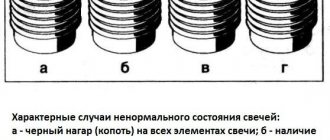
During a routine inspection, it is possible, for example, to determine that problems have arisen with the engine due to a wet spark plug, since the fuel in the combustion chamber does not ignite. In addition, the inspection allows us to identify the condition of the electrode, the formation of soot and slag, and the integrity of the ceramic body. By the color of the carbon deposits on the spark plug, you can determine the general condition of the engine and the correctness of its operation:
- brown - normal working candle;
- in soot - indicates a too rich mixture or late ignition;
- in oil - a clear sign that oil is entering the cylinder through the valve liners or through the piston rings;
- melted contacts - this happens when ignition is too early;
- ash on the spark plug - the use of gasoline or oil with additives that gets into the cylinders;
- cracked insulator - use of low-quality gasoline and incorrect adjustment of the ignition system.
At least twice a year I unscrew the spark plugs, inspect them, carefully clean them of carbon deposits with a metal brush, and also check and, if necessary, adjust the gap between the central electrode. With this type of maintenance, I have not had any problems with spark plugs over the past few years.
With the engine running
Diagnostics with the engine running is quite simple:
- They start the engine.
- The explosive wires are removed from the spark plugs one by one.
- If, when one of the cables is disconnected, the operation of the power unit remains unchanged, it means that the spark plug or the wire itself, which is currently disconnected, is faulty.
Video: diagnostics of spark plugs on a running engine
Checking for spark
You can determine the spark on a spark plug as follows:
- Disconnect one of the explosive wires.
- We unscrew the spark plug being tested and put the cable on it.
- We lean the metal part of the spark plug element against the engine.
Video: checking the spark at a spark plug using the example of an injection engine
Before unscrewing the spark plug from the cylinder head, it is necessary to clean the surface around it so that dirt does not get inside the cylinder.
Multimeter
You need to understand that using a digital multimeter you can only check a spark plug for a short circuit, for which the device is set to resistance measurement mode and the probes are applied to the central electrode and thread. If the resistance is less than 10–40 MOhm, there is a leak in the insulator, which indicates a faulty spark plug.
How to choose candles
When choosing spark plugs for a “penny” or any other “classic”, you need to pay attention to the marking in the form of a numerical value, which indicates the heat rating. This parameter indicates the candle’s ability to remove heat and independently clean itself of carbon deposits during operation. According to the Russian classification, the elements in question differ in their heat rating and are divided into the following groups:
- from 11 to 16 - “hot” candles. They are used in engines with a low compression ratio and low power;
- from 17 to 19 - the most common candles, which are also used in the “classics”;
- from 20 to 26 - “cold” spark plugs, used on powerful engines with a high compression ratio.
Installing “cold” or “hot” spark plug elements on a VAZ 2101 will lead to the fact that the power plant will not be able to function with high efficiency. Since the classification of Russian and foreign spark plugs is different and each company has its own, when selecting parts you should adhere to the table values.
Table: spark plug manufacturers and their designations for different power and ignition systems
| Type of power and ignition system | According to Russian classification | NGK, Japan | Bosch, Germany | Beru, Germany | Brisk, Czech Republic |
| Carburetor, mechanical contacts | A17DV, A17DVM | BP6E | W7D | W7D | L15Y |
| Carburetor, electronic | A17DV-10, A17DVR | BP6E, BP6ES, BPR6E | W7D, WR7DC, WR7DP | 14–7D, 14–7DU, 14R-7DU | L15Y,L15YC, LR15Y |
| Injector, electronic | A17DVRM | BPR6ES | WR7DC | 14R7DU | LR15Y |
Spark plug contact gap
The spark plug gap is an important parameter. If the distance between the side and central electrodes is set incorrectly, this will lead to the following:
- problematic engine starting;
- decreased dynamic performance due to improper ignition of the mixture;
- increased fuel consumption.
Since the first model Zhiguli is used with both contact and non-contact ignition systems, the gaps are set according to the system used:
- for a contact device, the gap must be maintained within 0.5–0.6 mm;
- for contactless - 0.7–0.8 mm.
To adjust, you will need a spark plug wrench and a set of feeler gauges. The procedure consists of the following steps:
Adjustment with strobe light
We hook the strobe light to the car's network. You need to remove and plug the vacuum corrector hose from the distributor. Now the engine needs to be started and warmed up to a temperature at which it will stable idle speed. Then you need to loosen the bolt that secures the distributor body. The strobe light must be directed at the pulley, which is located on the crankshaft.
Now we begin to turn the distributor until the mark on the pulley aligns with the marks on the timing cover . In this position, the distributor body is fixed.
Adjustment "light"
This method is considered classic, as it can be found in all automotive literature. Take a 12 V light bulb and connect two wires. When the light bulb is prepared, you can begin. The crankshaft must be rotated so that the pulley mark is positioned in a given way, in relation to the marks on the timing cover , the distributor slider must be opposite the explosive wire of the 1st cylinder.
I repeat, if there is no special key, then we turn on fourth gear and push the car . One of the wiring of the light bulb is connected to the wire that goes from the distributor to the ignition coil, the second wiring must be connected to the ground of the car . The central wire is removed from the distributor cover and connected to ground. The bolt securing the distributor must be loosened.
Now turn on the ignition. The distributor body must be turned clockwise until the light goes out . Then you need to carefully rotate it in the other direction; as soon as the light comes on, we stop rotating - it is in this position that you need to fix the distributor.
Spark adjustment
We put the crankshaft in the desired position, pull out the central wire from the distributor cover, and fasten it at a distance of about 5 mm from the ground.
Loosen the bolt that secures the distributor housing, then turn on the ignition. The distributor body must be rotated clockwise by 10-20 degrees . Then you need to slowly rotate in the opposite direction until a spark strikes , then secure the distributor body.
Checking the adjustment results
Let's move on to the last stage, we need to check the results obtained. The results are checked based on the car's behavior on the road. You need to warm up the engine, drive out onto a flat section of the road, pick up a speed of 40-50 km/h, engage fourth gear and sharply press the gas pedal . Within 1-2 seconds, characteristic knocking sounds similar to clattering will be heard, and the car will immediately begin to confidently pick up speed.
If no sounds are heard, then you need to turn the distributor counterclockwise one notch, this procedure must be repeated until a sound is heard.
The cause of the malfunction may also be a deviation of the fuel composition from the nominal one, as well as incorrect operation of the distributor systems.
“>
Symptoms of malfunction
Identifying an incorrectly set ignition will not be difficult. If your car has problems starting, the engine runs unevenly, pronounced detonation appears, all this may indicate improper ignition. Also, problems with ignition can also be determined in a folk way: The car is accelerated to a speed of approximately 45 kilometers. Turn on fourth speed and sharply press the gas pedal. After such a sharp acceleration, pronounced detonation and ringing of the so-called fingers appear, which goes away as the car accelerates, this may indicate a faulty ignition.