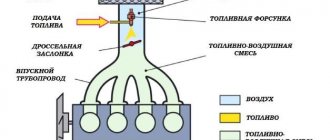
Lada Granta is a budget car, which means that the car’s owners are often young people who don’t mind adding some special features to their car. Probably one of the most popular tuning methods in a car interior is changing the dashboard lighting from the standard green to white or red.
Due to the fact that the Granta instrument panel is completely electronic, the illumination is performed not by light bulbs, as was the case before, but by LEDs, which are already soldered on the instrument panel board. To change the backlight, we will need to unsolder the standard LEDs and solder in our own ones, in the color that you like most.
Please note that all manipulations associated with disassembling the instrument panel and interfering with its operation may result in failure of the entire panel. You carry out all work at your own peril and risk!
First, remove the instrument panel from the car, we have already described how to do this in another article on our website, but let us briefly remind you:
- Disconnect the negative terminal from the battery;
- Remove the fuse box cover to access the lower screw securing the decorative casing;
- Unscrew the bottom screw of the decorative casing, two in the visor and, pulling it towards you, remove the decorative trim; for convenience, you can lower the steering wheel all the way down;
- Unscrew the four screws securing the instrument panel to the instrument panel and pull slightly towards you to access the connector;
- Disconnect the connector by lifting up the locking tab.
Next, prepare a flat screwdriver or special plastic spatulas for working with interior plastic and a regular household fork.
Using a flathead screwdriver or plastic spatula, unclip all latches around the perimeter of the instrument panel. You can insert a plastic card into the spacer to prevent them from snapping back.
After we have removed the cover, remove the arrows using a household fork, turning the arrow as you go and smoothly pulling out its top.
After removing the arrows, you can remove the board from the case by carefully disconnecting the on-board computer screen connector.
Here we ask you to pay attention to the fact that on the instrument panels of the first years of production the screen was soldered to the board and to dismantle the board you will need to unsolder the legs of the on-board computer screen. We recommend doing this operation yourself only if you have extensive experience working with microelectronics.
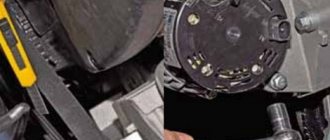
If you did everything correctly, the result of the work will be a similar instrument panel board. In the photo, the locations of the LEDs for illuminating the scales are marked in white, LEDs are in red for illuminating the arrows, and blue LEDs are for illuminating the on-board computer screen.
Source
The instrument panel on the Lada Granta is very reliable and usually there is no need to remove it often, but sometimes the need arises, for example, to update the firmware to a newer one with more functions or to carefully and secretly conduct wiring from additional equipment in the depths of the panel. Removing the shield will not be particularly difficult and the only tool you will need is a Phillips screwdriver.
We would like to draw your attention to the fact that for your own safety and the safety of the equipment being removed, we strongly advise you to disconnect the negative terminal from the battery before starting work.
First of all, remove the fuse compartment cover, just pull it anywhere, it is most convenient to do this in the niche under the steering column or near the light control module. The lid is attached to reusable metal clips; you are unlikely to break them and they will not require replacement. If you did manage to break one of the clips, they are freely sold in any auto store for about five rubles.
Removing the dashboard (panel) of the Lada Granta
If you decide to soundproof the engine shield, or cover the dashboard with carbon film, then carefully study the instructions on how to remove the Lada Granta panel with your own hands.
We remove the Lada Granta dashboard with our own hands
– flat and Phillips screwdrivers.
– socket head “13” and “24”.
1. Disconnect the negative cable from the battery.
2. Remove the cigarette lighter (squeeze the lock and remove the cigarette lighter socket, disconnect the connector with wires).
3. Remove the head unit of the audio system (radio tape recorder) and disconnect the block with wires from it.
4. Remove the central panel trim (dashboard).
5. Remove the glove compartment cover and remove the screws securing the inner panel.
6. Remove the pillar trim. Then remove the central tunnel. Then remove the steering wheel. Remove the steering column cover and steering column switches.
7. Remove the external lighting control unit (first remove the fuse box cover, then unscrew one screw and disconnect the block).
8. Remove the headlight hydrocorrector regulator (remove the handle, unscrew the fastening nut, remove the hydraulic corrector regulator).
9. Remove the instrument cluster.
10. Then remove the 4 screws securing the air duct damper control unit to the instrument panel.
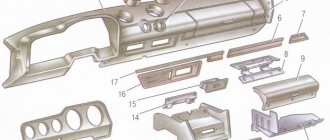
11. Remove the 18 screws securing the decorative panel to the frame (Figure 11.13).
12. Move the decorative panel away from the frame as far as the air ducts attached to its inside allow.
13. Place your hand under the panel and use a long Phillips screwdriver to remove two screws No. 1 (Fig. 11.14) (one on each side) securing the front side glass air ducts to the decorative panel. Remove the ends of the air ducts from the nozzle pipes No. 2, and then remove the inner ends of the air ducts from the pipes of the heater body.
14. Pull the panel towards you, and bending air duct No. 4 of the windshield, transfer it through box No. 2 (Fig. 12.1) for supplying air to the central deflectors on the heater body. Remove the decorative instrument panel.
15. To make it easier to reinstall the panel in the future, remove two screws No. 3 (Figure 11.14).
– Remove air duct No. 4 (Fig. 11.14) of the windshield.
– Remove the two bracket nuts from the panel brackets.
– And move them to the air duct brackets - this will allow you to install the decorative panel in place without the air duct, and secure the air duct to the panel after its installation by screwing in the screws from the interior side.
Figure 11.13.
Location of Lada Granta panel screws.
Figure 11.14.
Decorative instrument panel (view from the inside):
Installation of Lada Granta panel
Installation of the dashboard is carried out in the reverse order, but a number of points should be taken into account:
Before installing the panel, install the windshield duct over the heater housing window.
1. After installing the panel, put the air duct brackets in place (shown on the removed panel for clarity)
2. Screw in the mounting screws on the interior side.
Source: vazgarage.ru
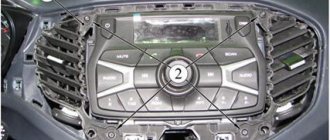
Removing the standard radio in Grant Lux
The difference between grants of the luxury configuration: the MMS (multimedia system) installed from the factory. This is a 2 din device.
To remove standard acoustic grants:
- take a knife or plastic spatula to dismantle the acoustics and disconnect the decorative trims to the right and left of the radio. It is not necessary to take pictures;
- in the gap between the cover and the panel we find the head unit lock. There are two of them on both sides. Press it out with a screwdriver;
- we take out the GU on ourselves.
Everything is described in detail in the video:
Replacing the standard MMC in Grant
The process - after removing the acoustics, we install a new system.
Difficulties: you may have to finish the fastenings of the new system for VAZ ones. Plus you need the right frame. The factory MMC frame may not fit.
When you buy a new PG for your car, you need to buy a frame for it specifically for Grants. Otherwise there will be holes in the panel.
How to remove a torpedo on a grant video
Part one is here
We disassemble the car, remove the dashboard, make noise and are now at the stage of reassembly with sound insulation and additional bauble being carried out along the way.
And so we continue to slowly cover the floor of the car with vibroplast.
After sealing the motor shield with vibroplast, we seal the entire shield with Biplast. With it there is the greatest chance that the torpedo will fall back into place. We cover the stove and air duct pipes with the same material.
We weight the torpedo with a vibroplast and pass it through from above with a biplast. We seal the edges of the torpedo with an anti-creaking agent - also known as madeleine.
We put the standard sound insulation back on the engine shield and begin to go through the floor. There are various rumors about this material that it creaks almost immediately and picks up moisture, but while I’ve been riding for almost 3 months, everything is fine, the floor doesn’t creak anywhere.
We lay out the wiring for limit switches and door activators, drag back the amplifier, video camera and other things. General view before splenium like this.
We throw back the torpedo beam, lay the wiring for seat heating, music and signaling. Don't forget to make reserves of wires for future inventions. And we continue to lay the splen.
After installing the splen, we put back the standard Shumka, admire it, smoke
Well, then we sketch out the floor and start working on the doors.
We threw on a radio tape recorder so that it wouldn’t be boring, made noise on the door foam with an acoustic vibroplast, then we put a ring under the speaker and prepared to plug the internal openings of the door with a vibroplast. The door trim itself made noise with vibration, then with biplast and at the edges with madeline (Anti-creak). We placed podiums under the speakers and assembled the doors.
Well, the mood was completely lifted when the torpedo sat in place, all the wires found their place and the assembly of the interior began.
Then they didn’t remove it anymore, like the floor in the cabin, they finished the trunk, glued the plastic panels of the pillars and the rear parcel shelf with vibra and madeleine, put the belts back, and assembled them. The MMC 2190 radio arrived and was installed. After playing with the “miracle TV,” we installed seat heating and put the seats in place. Next came the DVR and I would like to talk about it separately.
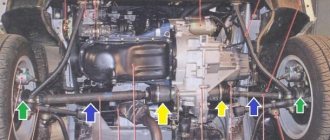
Removing the instrument panel (torpedo) on a Lada Granta car is carried out to replace it with a new one in case of severe damage or replacement of component elements, as well as when carrying out various work in which the presence of a torpedo will interfere. To perform the repair, you will need socket heads “13” and “24”, as well as two screwdrivers with a flat blade and a Phillips blade.
Tips and tricks
How to properly remove the front and rear bumpers of a Lada Granta
To achieve an optimal result, you need to follow these tips:
- If even the smallest fragment with rust and other defects is detected, it is better to remove the door completely to eliminate the defects. The same is true with internal elements, which must be located in strictly designated areas;
- colored electrical tape will help to temporarily fix small parts while working on doors that have not been removed from their hinges;
- After such work, you will need to adjust the fit of the door, especially after installing additional devices and trim inside. If there is more weight, the door will go down, making it difficult to open/close the lock. Thanks to the intervention of the master after working with the cladding, the presence of such problems is eliminated.
It is worth remembering that hermetically sealing the door trim not only allows you to insulate/isolate from unnecessary noise and vibration, but also improves the sound quality of speaker systems. Dense low frequencies directly depend on the presence of material inside, and the presence of extra gaps will add unpleasant ringing and resonance when the speakers are operating.
It is best to test the reliability of the work performed by opening and closing the doors several times and testing the installed elements while driving. If possible, you can take a passenger with you who would monitor how the sound comes in and whether there is a draft through the casing and cracks.
How to remove a torpedo on a grant video
Part one is here
We disassemble the car, remove the dashboard, make noise and are now at the stage of reassembly with sound insulation and additional bauble being carried out along the way.
And so we continue to slowly cover the floor of the car with vibroplast.
After sealing the motor shield with vibroplast, we seal the entire shield with Biplast. With it there is the greatest chance that the torpedo will fall back into place. We cover the stove and air duct pipes with the same material.
We weight the torpedo with a vibroplast and pass it through from above with a biplast. We seal the edges of the torpedo with an anti-creaking agent - also known as madeleine.
We put the standard sound insulation back on the engine shield and begin to go through the floor. There are various rumors about this material that it creaks almost immediately and picks up moisture, but while I’ve been riding for almost 3 months, everything is fine, the floor doesn’t creak anywhere.
We lay out the wiring for limit switches and door activators, drag back the amplifier, video camera and other things. General view before splenium like this.
We throw back the torpedo beam, lay the wiring for seat heating, music and signaling. Don't forget to make reserves of wires for future inventions. And we continue to lay the splen.
Kia Rio
But with this model you will have to seriously tinker. Since the deflector is attached to screws that are hidden by the visor. It must first be removed.
The tools you will need are Phillips and slotted screwdrivers, a flashlight and a construction spatula.
The process involves some combination of activities. Watch in detail how this work is done in the video.
Video: removing the instrument panel visor on a Kia Rio
Only then can you remove the central deflector. It is attached to pistons and screws. Two screws at the top, two pistons at the top and one at the bottom. After the deflector is removed, you need to disconnect the plug.
Before dismantling the left deflector, remove the left panel and the panel under which the fuse box is located. The deflector is attached to the side with two self-tapping screws. Before dismantling the right panel, open the glove compartment and remove the right panel, unscrew the screws. Now, by prying with a screwdriver, you can remove the deflector.
Video: dismantling the central and side heating deflectors
This is how the air duct deflector is removed on different cars. Of course, within one article it is impossible to give complete instructions for all car models. From all of the above, we can conclude that the amount of work that needs to be done to remove the air duct deflector is not the same. In some cars, the deflector is removed simply by pulling it out (Renault Logan), in others you have to remove the dashboard or other large elements (Lada Vesta, Kia Rio).
Wind deflectors on the Grant Liftback are not included as standard. The owner installs the accessory himself, having previously purchased it at a car dealership.
The gluing process is not complicated and intuitive. Every driver can cope with the task. Contacting the service center is not necessary at all. If you have accessories and rags, the work will take no more than ten minutes.
Removing and installing the dashboard of a Lada Granta car
We remove the instrument panel when it is necessary to change the wiring or when repairing the interior heater; we also remove the panel during body work
We prepare the vehicle for work. Disconnect the negative terminal of the battery.
Drain the coolant from the engine cooling system.
We remove the filter of the heating and ventilation system.
Using a Phillips screwdriver, unscrew the four self-tapping screws that secure the heating system filter casing to the instrument panel.
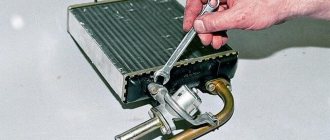
Loosen the clamps securing the heater hoses and remove the hoses from pipes 2 of the heater radiator.
Using a 10mm socket, unscrew nut 1 of the stud securing the flange of the heater radiator pipes to the front panel.
Removing the cover of the mounting block
Removing the instrument cluster
We disconnect the steering column from the instrument panel frame and lower it to the floor of the body or remove it completely
We take out the seals of the front door openings
Unfastening it from the clips, remove the left side trim of the instrument panel.
We also remove the right side trim of the instrument panel
Use a screwdriver to pry up the upholstery of the left front pillar, separating it from the pistons, and remove the upholstery.
We also remove the right front pillar trim.
Remove the headlight beam direction control knob
Using a 21mm socket, unscrew the nut securing the regulator to the instrument panel
Remove the headlight dimmer from the panel hole
Using a screwdriver, press out the two latches on the glove box and remove the top edge of the box from the instrument panel
We open the glove box completely and, applying force, pull the box off the split hinges
Near the left door opening, use a 10mm head to unscrew the nut of the ground wire tip and remove it from the stud
Using a 10mm socket, unscrew the two nuts securing the terminals of the ground wires to the right bracket of the panel console
Source: avtomechanic.ru
Choosing the right radio size
We carry out installation either independently or by contacting specialists at the service center. In the second case, the service is paid.
By default, all VAZ and Lada models are equipped with a 1-DIN radio. The opening dimensions correspond to: 180 x 50 mm. This is an old standardization that has been in force since the times of the USSR. Modern audio modules can be purchased complete with a pre-installed LCD display. The size of the opening must comply with the standard: 180 x 100 mm, that is, doubled in height. Size marking: 2-DIN.
To install the radio in the Granta liftback, cut out the top pocket, remove the plastic, and install the assembled module. For a beginner, the process will seem somewhat complicated, so strictly follow the instructions.
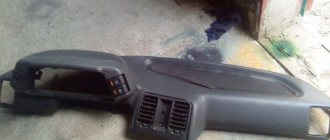
How to remove the dashboard for sizing
Recently a guy asked how to remove the dashboard for sizing. I want to share my impressions about this process. Suddenly someone wants to do this too. So here it is. I removed the panel last summer. Also for sizing. I did everything alone. I’ll say this: you can remove/install it alone, but it’s very messy. It's easier with two people, but I don't think it's much easier. Don't believe the repair book, it's much more complicated than it says. Too much will have to be removed in addition to the panel itself: the central trim, air duct tubes, gearbox housing, handbrake housing, floor tunnel, passenger airbag (if equipped), A-pillar trims, tidy. There are a lot of different screws and self-tapping screws, during assembly it is easy to get confused as to which ones were screwed in where. If I'm not mistaken, there are 26 screws alone for securing the panel itself! There are two treacherous screws on the left and right right under the windshield, which you can’t unscrew with a regular screwdriver, you can’t get under them. While the panel is being removed, you are left without glass blowing, and in current weather conditions this is fraught with consequences, including an accident due to fogged windows. If you just park the car. In terms of time: removal took 3 hours, installation took 4 kopecks. The steering wheel gets in the way. The left air duct pipe did not want to fall into place, it rested either on the body or on the windshield, it took me a whole hour just to do this. According to the results: the panel became a little more assembled, but after a WEEK it began to crunch again. In addition to this, the airflow on the windshield has become uneven - it blows weaker in the middle than at the edges. I’m generally silent about the numerous scratches on the dashboard and front door trims. You can remove them with an autogen lighter, but still the appearance is no longer marketable. Summarizing all of the above, from the bottom of my heart I HIGHLY DO NOT RECOMMEND doing this. You'll only make it worse. But this is purely my opinion, and then see for yourself. Maybe if you have experience in this matter, it will be easier for you. But I wouldn’t do this again now for any money, there are too many body movements and nuances
Similar articles
Cold welding – hot idea
So, let's begin. The work is very delicate and painstaking, one might even say a piece of jewelry, so we must be patient. The most ideal option for making such an invention as a frame for a 2 din Grant radio, in my opinion, is to mold an adapter frame from cold welding, and besides, I was not the only one who came up with this idea. The transition frame needs to be “sculpted” on the center console with the radio. To do this, you should go to a hardware store and buy there:
1. Cold welding 2. Masking tape 3. Nylon thread
You're probably wondering, why use masking tape? And this is in order to paste over the radio according to the form of welding, so as not to glue it to the panel forever. Be sure that everything will work out, and soon you will have a frame for Grant’s 2 din radio.
In order for the mold to be easily removed later, we apply cling film on top of the tape, again following the shape of the weld. Also, to give our frame greater strength, it is recommended to run thin copper wire around its perimeter.
To make it easier to remove the frame, you should put a thread under it. In my case, it turned out according to the well-known saying “The first pancake is lumpy”, I stuck a cold weld right on top of the masking tape and did not put a thread under it (although this would hardly have changed anything), the result is a broken newly made 2 din grant frame. Learn from other people's mistakes.
Don’t be surprised if it takes some effort to remove the cling film from welding; act carefully and you won’t break anything.
After we have removed the “freshly molded” frame, we should immediately take care of the fastenings, because somehow it must hold on.
To do this, we make two thin fasteners, similar to those that are placed on the caps, having previously measured the diameter between the tunnel for the radio and the upper edge of the panel. If you blinded too much, don’t worry, we have sandpaper and desire.
So, the transition frame for the Lada Grant is ready. Now we get to work on grinding off all the excess and giving our frame for the 2 din radio a smooth and attractive look. To do this, we use sandpaper No. 40, and if you have gone through with force and ground off the excess, we use the same cold welding to build up. I would like to immediately warn you that the work of adjusting the frame requires the greatest endurance.
After eliminating all the irregularities, we begin the process of preparing the frame for applying putty and primer. If you have taken on this painstaking work, then you are probably patient and a person striving for ideals, and you probably love your Lada Granta very much. After all, many simply would not take up this matter. In the meantime, let’s continue the so-called journey towards the ideal in the “2 din Grant Frame” case.