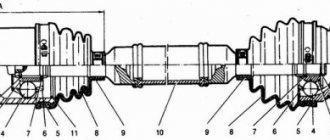
CV joint (constant velocity joint) is a mechanism that allows you to transmit torque between misaligned shafts. The device is actively used on front-wheel drive vehicles. On each shaft coming out of the gearbox there are two of them - internal and external. Repair is impossible; if the unit breaks down, it is replaced as an assembly.
Step-by-step algorithm for replacing a CV joint
The process should be started if there is complete confidence in the failure of the specified unit. Replacing the outer CV joint step by step if you do it yourself.
- We loosen the tightening of the wheel fasteners and the hub nut (first remove the cotter pin) on one of the sides of the car.
- We hang up this side with a jack and install stops under the wheels of the stern, and a safety support under the body.
- We completely remove the wheel.
- Unscrew the two bolts holding the ball joint to the steering knuckle bracket and the hub nut.
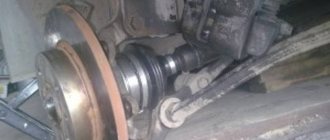
- We turn the steering wheel of the Lada Kalina as far as possible to the side, move the axle and remove the axle shaft from the splined engagement of the hinge and the hub. If there are difficulties with the free exit of the axle shaft, then use a hammer, applying impact forces to the shaft through a drift.
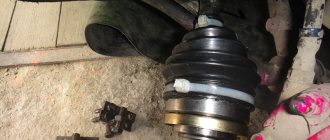
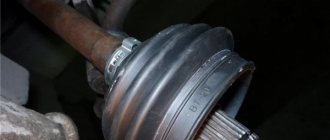
- When the axle shaft is released, we begin to dismantle the outer joint boot in combination with the clamps. These items must be replaced.
- Now we move on to removing the CV joint. To do this you will need a special puller. If it is missing, then use the hammer again. It is forbidden to apply an impact load to the separator, so we apply gentle blows to the body in an outward direction. The joint will come off if the retaining ring compresses, allowing the cage to slide off the axle shaft.
- When it is necessary to dismantle the entire axle shaft, the algorithm of actions up to point No. 7 is similar, and then, using a mount, we remove the shaft of the designated CV joint from engagement with the side gear in the transmission differential. Before such manipulation, drain the oil from the box. We take out the axle shaft as an assembly, after which we perform the necessary disassembly steps, etc.
- Removing the internal hinge involves the identical procedure given in point No. 7. To make disassembly easier, we use a vice in which we place and fix the structure.
Replacement
When faced with a situation where a fault in the outer joint cannot be corrected by repair, the entire outer joint will need to be replaced. Since there are quite a lot of features associated with removing and installing a grenade on the shaft for each specific make and model of car, we will analyze the replacement using the example of one of the most popular and widespread cars on the Russian market. Next, we will talk about replacing the outer CV joint with a Hyundai Solaris, but this does not mean that the described process will not be useful to owners of cars of other brands.
To replace you will need
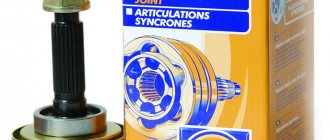
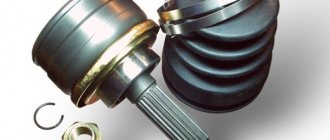
First of all, you need to purchase a new front outer CV joint. They are usually sold as a set, that is, the hinge itself, boot, clamps, retaining ring, lubricant and sometimes even a hub nut. The original outer CV joint on the Hyundai Solaris has article number 495261R001 or 495261R002. This is what the new outer CV joint kit will look like:
Also during the replacement process you will need: a jack, a spray bar, a set of keys, a screwdriver, pliers, a hammer and WD-40.
Replacement process
Find a dry room with a flat floor; ideally, carry out work in a garage equipped with an inspection pit or a lift. Remove the wheel nuts and hub nut. Jack up the car, and for greater reliability, install another support under it. Then unscrew the nuts and remove the wheel (by the way, it can be used as an additional support). Now, using a screwdriver and pliers, remove the retaining ring and unscrew the hub nut.
Unscrew the wheel speed sensor mounting bolt and remove the sensor.
Next, you need to unscrew the strut and the brake hose fastenings.
Advice! Most likely, the nuts are stuck, so before unscrewing them, treat them with WD-40.
Next, you have to unscrew the steering rod and press the ball joint into the knuckle. To do this, first unscrew the ball pin mounting nut and then remove the tie rod end. You can see the process of removing the tie rod end in more detail in the video tutorial on replacing them:
Now pull the ball joint out of the steering knuckle and remove it. Again, you can see the process of removing the ball joint in more detail in the video of replacing it on a Hyundai Solaris car:
Since we unscrewed the strut for greater convenience when accessing the outer CV joint, now we need to take care of securing the brake disc caliper (so that it does not hang on the brake hose, as it can simply break). To do this, find a wire, make a hook from it and secure the caliper to the shock absorber. Naturally, you first need to remove the drive shaft shank from the hub. It probably won't go, so use a hammer and knock it out.
In order not to drain the oil from the gearbox and not to touch the fit of the shaft in the differential gear, we will not remove the CV joint drive. It is quite possible to replace all elements while the shaft is on the car. To do this, we freed up the working space as much as possible and made it easier to access the external grenade.
Important! Place some support under the drive shaft to prevent it from falling.
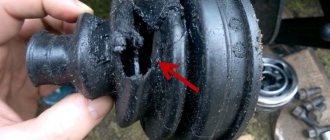
So, cut off the boot clamps and cut the boot itself for easier and faster removal. Next, remove the retaining ring.
Next, you need to remove the hinge itself. Since the old one is no longer useful to us, use a hammer to knock out the outer CV joint from its seat. Next, carefully clean the shaft from traces of dirt and old grease with kerosene and put on a new boot and a new lock ring.
Fill the new outer CV joint with grease, the more the better. A large amount of lubricant will extend the life of the joint.
Then pull the boot onto the grenade and tighten the clamps securely. The car is assembled in the reverse order. If you still have questions about replacing the outer CV joint on a Hyundai Solaris, watch the following video:
- What is the best way to decarbonize an engine?
- External grenade: disassembly and repair
- The best engine flush before changing the oil
- How to repair a CV joint with your own hands
In what cases is it necessary to replace the inner CV joint?
Replacing the internal CV joint on front-wheel drive VAZ vehicles is required if the following symptoms are present:
- Crunching and knocking noises when driving and accelerating in a straight line;
- Vibration and shock when changing gears;
- Significant play when testing by hand;
- If the “grenade” fails completely, the vehicle cannot move further. The main reason for the malfunction of the VAZ grenade is the entry of water and dirt through the hole in the torn boot. The second possible cause of failure is a sharp press on the gas with the wheels fully turned, although in this case you risk killing the external rather than the internal grenade.
In addition to the above, replacing the internal CV joint on VAZ-2110 and other models may be necessary if the quality of the previously installed joint is poor.
“CV joint - 4” lubricant is a very important element of the entire replacement process
Before tightening the boot onto the CV joint, its middle must be properly lubricated with the substance “CV joint - 4”. After this process, the boot must be put on the grenade and secured well with clamps. At the final stage, the drive needs to be driven in using a hammer and a wooden stand. You need to put the hub on the splines and tighten the nut properly to securely fasten it. The ball joint is put in place and the wheel is put on.
Important: carefully check that all bolts that you have previously unscrewed are properly tightened. Don’t forget to also screw on the crankcase protection and pour a small amount of oil into the gearbox. In order to avoid significant changes in the position of the vehicle gears, it is not necessary to practice removing the drive on both sides at the same time.
«>
Assembly procedure step by step
We carry out the entire list of assembly operations in a Lada Kalina car in strictly reverse order. During the procedure, it is necessary to take into account some nuances.
- First, we put the boot on the axle shaft. If this is difficult, then its surface can be lubricated with the grease supplied with the new hinge kit.
- Now we fill the same grease into the CV joint bearing, and the remainder into the internal cavity of the boot.
- We install the hinge on the axle shaft. We also use a hammer, applying a shock load to the body. The retaining ring should be replaced.
- When the “grenade” “sits” in its place, we push the boot, after squeezing it with our hands to remove excess air. We install clamps.
- We do the same when replacing the internal hinge.
- Now we install the axle shaft into the transmission housing until the shaft engages with the side gear. Don’t forget to fill the unit with oil afterwards.
- We insert the outer joint into the steering knuckle until it fully engages with the splined race of the hub. Screw on the central nut (do not tighten it).
- We return the ball joint to its place.
- We hang the wheel and do not tighten its fasteners too much.
- We lower the car (we do not unload the jack completely). Tighten all fasteners to the required torques. We remove the jack and stops. Replacement of the outer CV joint is complete.
The owner of LADA Kalina will spend no more than 3 hours of his time to complete the full list of replacement actions. We check the correct installation of the hinges. To do this, we start driving the car with the wheels turned out as far as possible. We observe the absence of crunching and other characteristic sounds from the axle shaft. Now you know how to change a faulty CV joint.
Replacement
Before you begin the process of replacing the boot, place the car over an inspection hole or lift it with a special lift. Also, play it safe by securely fixing the car in place by placing some supports under the wheels.
Repair of the CV joint boot without removing the latter is carried out according to the following algorithm of actions:
- Unscrew the wheel on the “problem grenade” side. Also remove the stabilizer drain mounts, caliper or similar parts that interfere with access to the hub or joint.
- Now you can start removing the hub nut, which can be done by first removing the special locking ring. Sometimes the nut “sits” tightly enough to require the use of an air gun.
- The next step is to unscrew the fastenings of the ball joint of the lever. Then carefully pull the cone out of your fist using a pry bar.
- Sometimes you will also have to dismantle the tie rod mounts and move its side, but it happens that it does not interfere and you can leave it alone.
- Moving all interfering chassis parts to the side, pull the ball drive out of the hub.
- Remove the boot clamps and pull it off the CV joint (from the gearbox side). Then carefully knock it out of its seat without damaging the “grenade” itself. By pulling out and holding the hinge tightly, you can remove the old boot, which is quite inconvenient to do alone.
- Installing a new boot is almost impossible alone, because it is necessary to simultaneously hold the CV joint drive (so that it does not fall out of the box) and put on a new cover. After installing the new boot, reassemble the structure in reverse order. Do not forget to lubricate all necessary components if there is not enough lubrication in them.
Advice! You can make the process of removing/putting on easier by using special pullers for replacement.
As you can see, replacing the CV joint boot without removing the joint itself is quite problematic, but with an extra pair of hands it is quite possible. How reasonable it is to ignore the complete removal of the “grenade” to repair the boot, decide for yourself. In any case, using the information presented above, repairs will not become a very difficult task.
Replacing the CV joint boot without removing it - video:
- What is the outer CV joint boot?
- How to choose a CV joint boot by size
- Boot clamp on CV joint
- How does a CV joint work: design features
What is needed to install a new CV joint
The CV joint, despite its strength, has parts that can wear out over time or if used incorrectly. Often, CV joint replacement occurs due to damage to the boots - during driving, cracks and holes appear that become clogged with dirt, water and dust. This way you can drive hundreds, or even thousands of kilometers, which will finally finish off the mechanism. Boot problems are expressed in a crackling sound when turning the wheels (when turning to the right, the left wheel cracks, when turning to the left, the right wheel cracks). Sometimes the CV joint has to be replaced due to incorrect actions by the driver. Acceleration of the engine with slipping, starting on the wheels turned out, braking by the transmission - often the cause of the malfunction lies in this.
Play in the ball joint has a negative effect on the CV joint. It occurs when the support itself is already severely worn out. If this problem is not identified in time, it will have a very negative impact on the CV joint. Thus, driving at high speed can tear out the support pin, which can cause the grenade to break.
It is extremely rare that CV joint failures are caused by factory defects in the mechanism parts or initially incorrect installation. Coupled with a worn boot, the problem can reach unimaginable proportions. Many reviews on automotive forums mentioned the poor quality of some parts - both basic functional elements and additional little things, like clamps.
Regardless of the source of the problem, a grenade that is not working properly will require replacement. Machine manufacturers claim that when parts wear out, the entire mechanism must be replaced, even those elements that were not damaged by failure. Considering the high quality of materials, the repair will cost quite a lot. In this regard, the car owner tries to replace the CV joint with his own hands. What will the driver need?
- pit or lift;
- hammer, screwdriver, pliers, jack;
- a set of keys or heads;
- bench vice;
- new clamps, lubricant (CV joint-4, for example), hub nut with stopper.
The latter (consumables) are often provided with a new grenade. All of the above are suitable for replacing outer and inner CV joints.
Replacing CV joints (constant velocity joints) on a Lada Granta VAZ 2190
Tools:
- Pliers
- Large flat screwdriver
- Small hammer
- Soft metal drift
- Vice with soft metal jaws
- Jack
Parts and consumables:
- CV joint grease-4
- Wood spacer
- Constant velocity joints
- Front wheel drive shaft valve
- Rags
- Gloves
Notes:
Replacing a CV joint or repairing it is a fairly common occurrence, the harbingers of which are knocking, crunching and crackling noises when turning the car’s wheels.
Work order:
1. Remove the front wheel drive from the vehicle as described here or here.
2. Clamp the drive shaft in a vice with soft metal jaws.
3. Using pliers, squeeze the bent antennae of the inner clamp of the boot of the inner CV joint.
4. Use pliers to compress the clamp lock of the inner CV joint boot.
5. Remove the clamp.
6. Similarly, remove the outer clamp of the CV joint boot.
7. Slide the dirt boot over the shaft and turn it inside out.
8. Using a drift, knock the inner CV joint off the front wheel drive shaft, applying force to the CV cage.
9. Please note: there is a plastic buffer installed at the inner end of the front wheel drive shaft.
10. Check the presence of lubricant in the new CV joint. The CV joint should contain 80 cm3. SHRUS-4 lubricants.
11. When installing the CV joint, place it on the front wheel drive shaft with gentle blows of a hammer through a wooden spacer along the outer end of the shank along its axis until the hinge is fixed on the shaft. When installing the CV joint, make sure that no dirt gets into it.
12. Install the boot on the CV joint housing.
13. Install the outer and inner CV joint boot mounting clamps in the reverse order of removal.
14. If it is necessary to replace the boots, remove the CV joint from the front wheel drive shaft and remove the air release valve assembled with the casing from the boot by sliding the valve along the shaft. Remove the boot from the front wheel drive shaft.
15. To replace the valve, unscrew its casing and, having removed the valve from the casing, remove the valve from the front wheel drive shaft.
16. Then remove the valve cover from the front wheel drive shaft.
17. Install the valve and new CV boot in the reverse order of removal.
18. After installing the CV joint, secure the boot with clamps.
19. To replace the outer CV joint, remove its outer and inner boot clamps in the same way as you did for the inner CV joint.
20. Slide the boot along the front wheel drive shaft and turn it inside out.
21. Using a drift, knock the outer CV joint off the front wheel drive shaft, applying force to the CV joint cage.
22. Install an external CV joint on a Lada Granta VAZ 2190 car in the same way as installing an internal CV joint. The difference is that the outer CV joint needs to be filled with half as much (40 cm3) CV joint-4 lubricant as the inner CV joint.
The article is missing:
- High-quality photos of repairs
- Photo of the instrument
- Photos of parts and consumables
Replacing the CV joint on the Lada Grant. Service life and causes of malfunctions of the “grenade”
In a car with front-wheel drive, it is not the driveshaft with the main gear and axle shafts that is responsible for transmitting torque from the gearbox to the wheels, but special parts - CV joints, they are also constant velocity joints, in common parlance - a “grenade”. They consist of a drive and a CV joint itself; there are 2 of them on each drive. – external (closer to the wheel) and internal (closer to the gearbox). The “Grenade” is very durable, and with constant maintenance the car can withstand 100,000 km. and more. However, it does not last forever, and one day it may fail. In this article we will talk about how to independently diagnose and replace an external CV joint using the example of the popular Russian car Lada Granta.
Causes of grenade malfunctions and its diagnosis
Usually the CV joint does not break right away. You will feel the car accelerate jerkily and hear a knocking sound from somewhere in the front suspension. Over time, symptoms worsen. Diagnostics is very simple: put the car on a jack and swing the CV joint of the suspended wheel. Do you feel any play? It's time to change the part.
There are 4 main reasons why CV joints fail prematurely:
1) The part itself is of low quality or defective;
2) The vehicle is operated off-road;
3) The boot has torn, and dust and abrasive particles have penetrated inside;
4) Aggressive driving style.
If you turn to specialists for help, you will have to fork out money. Replacement service costs an average of 1,500 rubles. for 1 CV joint.
You can save money by doing your own repairs: the cost of a spare part in auto shops starts from 1000 – 1500 rubles. for 1 “grenade”, complete with drive components cost about 3000 – 4000 rubles. There are a lot of manufacturers, but it is better to take the original from AvtoVAZ.
Tools and materials
- new CV joint (the grenade itself, without the drive) and lubricant for it;
- jack, hammer;
- wheel wrench, mounting, pipe of suitable diameter;
- a set of wrenches and sockets, a screwdriver;
- graphite lubricant.
Replacing the outer CV joint and CV boot
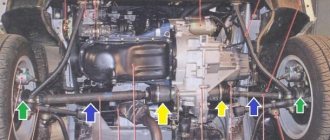
In order to change the CV joint or CV boot , you need to hang the front axle. This means that both front wheels should not touch the ground. To do this, use two jacks or lift the car on a lift.
We move under the car and drain the oil from the gearbox. You can learn in detail about how to do this in the article “ Changing the oil in the Gearbox ”.
Now unscrew the central nut of the wheel bearing. Let's first unlock it.
And unscrew it with head No. 30.
Then, using head No. 17, unscrew the two bolts securing the ball joint to the steering knuckle.
We move the shock absorber strut with the steering knuckle to the side and remove the outer CV joint from the hub.
Now you need to remove the axle shaft from the gearbox. The inner CV joint is inserted into the gearbox differential and secured with a retaining ring. We insert a pry bar or crowbar between the gearbox housing and the CV joint and, with emphasis on the gearbox housing, pull it out.
Removing the CV joint can be a challenging task. Therefore, if it doesn’t work out the first time, we turn the CV joint and repeat the steps.
To replace any of the CV joints - internal or external, or its boot, clamp the axle shaft in a vice. We will change the outer CV joint and its boot.
We knock down the boot clamps with a screwdriver or cut them off with pliers. And cut off the torn boot.
Remove old grease with a rag. The CV joint is secured with a retaining ring through a spline connection. Through the attachment, with several blows on the inner race, we knock the CV joint off the axle shaft.
Now we install new parts. First, we put a new boot on the axle shaft.
We install the retaining ring.
Then we take a new CV joint. And, if there is no lubricant in it, we put a special lubricant inside for the CV joint.
We install the CV joint on the axle shaft, aligning it with the splines. We hammer the CV joint through the wooden guide until it stops.
Thanks for subscribing!
We pull the boot over it. We clamp the boot with new clamps. Ready.
Exactly the same actions are necessary to replace the inner CV joint or its boot. We insert the repaired axle shaft into place into the gearbox.
Carefully align with the splines inside the differential, turning the inner CV joint.
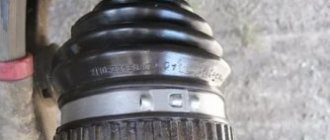
The new CV joint should be the same as the old one.
If there is excess metal boot, you need to remove it.
We insert the outer CV joint with the axle shaft into the steering knuckle. And we push it all the way: on one side into the gearbox, on the other into the hub. We tighten the bolts securing the ball joint to the steering knuckle. And we clamp. Tighten the central nut of the wheel bearing. And we squeeze it with force. Now all that remains is to fill the gearbox with oil. You can learn in detail about how to do this in the article “ Changing the oil in the Gearbox ”. Install the wheel. And we clamp it. Ready.
Checking the condition of the CV joint
- External (external) CV joints - two pieces, located on the hubs, transmit torque to the wheels. The steering angle is significantly higher than that of an internal CV joint. They also take on more load. Accordingly, they break down more often and require regular inspection and replacement if necessary. They have a smaller size.
- There are two internal CV joints that make the axle shaft move; they are located in the gearbox, one on each side. They are larger in size. They are less subject to stress and, accordingly, can work longer.
You can assess the condition of the CV joint yourself. The easiest way to inspect the external one is to turn the steering wheel all the way (to the right or left) and quietly move away. If there is a problem, a cracking or crunching sound will appear. The more damage is done to the CV joint parts, the louder the sound will be.
If problems with the external grenade are accompanied by a crash when turning, then problems with the internal grenade are accompanied by a crack when moving straight. The sound will intensify if you drive off-road - every bump, hole or ditch will clearly remind you of the problem. If you notice a crunching sound, carry out repairs immediately - problems with the internal CV joint are very dangerous. It's a little more difficult to inspect:
- We put the car on the lift.
- We turn on first gear, the wheels should rotate slowly (the car should be slightly raised).
- The presence of a distinct crunching sound is evidence of problems.
If you hear a cracking sound while driving - when turning, when overcoming off-road obstacles, or sudden acceleration - immediately fix the problem. Timely inspection and repair will help the car owner remain a driver and not a pedestrian. In addition, a problem detected in time will help to avoid critical situations on the road.
Diagnosis of anthers
As a rule, these joints are common in passenger cars that have independent suspension. They can also be found in the rear wheels and front axles of SUVs. As for the boot itself, it is a kind of protective cover made of rubber. Its shape is a corrugated pipe. This cover is indispensable in protecting against various contaminants and dust.
The CV joint itself is a rather complex structure, which is much more demanding than the same ball joint, so it requires exceptional care. If there are dust particles in it, a peculiar crunching sound appears, which means huge problems. In this case, this part will completely fail quite soon, but there are ways to extend its life a little.
To figure out whether the outer CV joint boot needs to be replaced, some work needs to be done. First of all, you should literally turn all the wheels all the way in the required direction and see what is happening behind the front wheel.
The aforementioned corrugated rubber should be located in its very center and it is desirable that it be without damage. A good sign is also the fact that there is not a single trace of grease on it. If there are such marks or the rubber is damaged, or both, then replacement is inevitable.
However, a small crack on the boot is allowed, which does not mean its final failure, but does mean that the hour of judgment is quickly approaching. Still, it’s better not to be lazy, go to the appropriate store and immediately buy a similar new part for your car. It would be a good idea to have a few of these anthers in reserve. You cannot ignore even the slightest cracks in the structure of the boot, because through them not only dirt, but also the same dust can get into the system, which is why the CV joint will certainly not last long. All this also strongly supports the formation of a special development on its parts, which leads to the already mentioned crunch.
There is also a way to check without inspection. To do this, you need to find a road with as sharp turns as possible, and if the corresponding sound is heard on it, then problems cannot be avoided. This method is effective due to the fact that the CV joint itself is a special angular velocity joint that forces the front wheels to rotate and turn.
In other words, it is capable of transmitting rotations to axle shafts located at different angles. This hinge is created from very, very strong alloys, because a huge load is transferred to it when the car moves.
Signs of failure of the outer grenade (CV joint).
There are two options here:
- signs that your grenade has already broken
- signs that the grenade will soon come out and break .
How to understand that a grenade will soon break.
Of course, the first sign of a malfunction of the external grenade is a crackling sound . If you hear a crackling noise while driving with the steering wheel turned, it is definitely a CV joint. The greater the angle of rotation of the wheel and the harder you press on the gas, the louder the clicks. Another sign that does not always appear is vibration on the steering wheel at speeds greater than 80 km/h. The vibration is only slightly similar to the vibration from an unbalanced wheel. It usually manifests itself as a slight twitching of the steering wheel.
How to understand that the outer CV joint has broken.
If the CV joint breaks, the car will stop moving. In any gear engaged, press the gas, the speed increases, but the car does not move.
How to understand that it is the outer CV joint that has broken, and not the internal one or the clutch in general (the first signs of failure are similar to the signs of a clutch failure)? First of all, start the car and put it in any gear. Next, open the hood and look in turn at each of the shafts going from the box to the wheels (one short, the other long). If any shaft is spinning, it means that the CV joint has broken on this side.
I recommend not just visually looking at the shaft, but touching it with some long, hard object, such as a stick. The main thing is that there is nothing on it that can wrap around the shaft !!! When you touch the shaft with a stick, if it is spinning, you will feel a slight vibration. This is usually done in the dark, because it is difficult to understand whether a cylindrical object is spinning, especially in the dark.
What are anthers and from what material are they reproduced?
In most cases, such elements are installed on almost all light-duty cars, or on the rear and front axles of SUVs. As a rule, such vehicles are characterized by an irreplaceable suspension.
The boot is a special cover designed to perform a reliable protective function. It is made of rubber and is made in the form of a corrugated pipe. This case is an almost irreplaceable item that serves as good protection against dust or dirt of any kind. The developers planned that the period of reliable operation of this type of structure would be identical to the service life of the entire vehicle. As time has shown, long-term operating conditions of such elements have made serious changes, so the boot became the most unreliable link. Especially to create the boot, a number of special materials have been developed, which are characterized by excellent resistance to moisture and low temperatures. Before replacing the CV joint boots, you first need to study the conditions under which replacement is necessary.
New rubber boot
When to change the CV joint, signs of malfunction
As was said, the external grenade fails after about 40 thousand mileage. This is evidenced by crunching, creaking and knocking sounds in the area of the drive shafts. To determine which side of the CV joint requires replacement, you need to turn the steering wheel all the way and drive off. In 90% of cases, a worn drive will manifest itself as a crunching sound. For control, you can turn it first in one direction, and then in the other direction, and turn it back. If the CV joint is worn out, a crunching sound will be heard immediately.
New and worn CV joint
This is the case when there are no visual signs of wear:
- Lubricant leaks near the outer joint.
- Cracks, tears on the boot.
- Lost or misaligned clamps.
- There is obvious play when turning the suspended wheel.
If there are visual signs of wear, we replace the CV joint on the Grant as soon as possible.
VAZ cars: repair, maintenance, tuning
Depending on the manufacturer and quality of the CV joint, its service life ranges from 30 to 60 thousand kilometers. Replacement of the external grenade is usually done more often, especially on the right side. It is more susceptible to stress from bad roads. How to replace the outer CV joint in Grante and which one is better to buy, we will figure it out now.
Replacing the outer CV joint boot without removing it
This option eliminates the separation of the hinge and the shaft (if dismantling is not provided for by the design or there is a risk of destruction of parts). To carry out the procedure, you will need a special device that stretches the anther.
The time spent on repairs in this case is minimal, but be careful - there is a risk of damaging the elastic element.
The most difficult thing in such work is filling the internal cavity with lubricant.
Often car owners are faced with “sticking” to the hinge shaft. If the hub is held in place by a bolt, tighten it as much as possible to separate the parts. When the part rests against the axial end, make 3 additional turns (use a wrench). When fastening with nuts, you need to remove the axle shaft and clamp the drive in a vice. This fixation allows you to knock down the part with a chisel. If this fails, the not most convenient “home” option remains - cutting the ring with a grinder.
CV joint repair
As mentioned above, the hinge cannot be repaired. Conventionally, one of the repair measures includes washing the “grenade” after driving with a damaged boot.
Washing is carried out at the same time when the damaged boot on the pomegranate is replaced. The hinge is carefully knocked off the shaft, inspected for damage and thoroughly washed to remove any dirt and grease in gasoline or kerosene.
After washing, the assembly is filled with lubricant and mounted in place, having previously installed the boot. The procedure makes sense only if there are no obvious signs of a joint malfunction.
A crunchy or knocking part definitely needs to be replaced, since wear forms on the working surfaces of the inner race, and it is no longer possible to stop the destruction. Continued operation of the vehicle may be dangerous for the driver and other road users.
Boot replacement and repair
The boot can be changed without removing the grenade if you have special equipment. His work is demonstrated on video. If you do not have such a device, to remove and replace it, you must perform the above procedure for removing the drive and dismantling the hinge. The procedure is necessary if there is even minor through damage on the boot.
Temporary repairs to the CV joint boot can be made without removing it from the vehicle. To do this, you need to thoroughly clean and degrease the damage, then seal it with a piece of rubber and cyanoacrylate-based glue (superglue).
An alternative repair method is to seal the holes with silicone caulk. It should be remembered that it takes a day to completely polymerize.
Note: express repair is a temporary measure. Replacing the inner joint boot may be delayed for a short time, but not completely cancelled. Typically, these types of repair methods are used to get to the point of repair.
How to repair
Replacing the CV joint on a UAZ Patriot
If the boot still fails, but you don’t want to buy a new one (we strongly recommend that you change your mind) or are waiting for it to arrive, it is possible to seal the CV boot.
The first option is to use rubber patches, which are typically used for car tires. In principle, the method should justify itself, because the boot and the wheel are operated under approximately the same conditions. Take care of your purchase in advance:
- patches for car tires;
- external CV joint lubrication;
- sealant;
- kerosene for cleaning.
So, first, clean the surface and apply the patch according to the instructions. It will look something like this:
For greater reliability, fill the patch with sealant. After this, theoretically, you can move on. That is, this replacement method, in principle, allows you to seal the CV joint boot without removing it. However, such carelessness can be costly if dust or water gets into the hinge itself. Therefore, it would be better to remove the boot. Clean both it and the hinge. Refill it with grease and secure it securely with clamps.
Important! This method is suitable for repairing only rubber boots, not plastic ones!
The second option looks more like a repair in the field than a planned sealing. Nevertheless, those who have used it speak of its reliability, and most importantly, the speed of implementation and extreme low cost. For this repair you will need:
- plastic bag (stronger);
- scotch;
- CV joint lubricant.
Of course, you first need to jack up the car, remove the wheel and remove dirt from the surface. Then, using a syringe or any other similar tool, fill the boot with lubricant. It’s better, of course, to remove it, wash it and stuff it, but you can also do this through the hole that has formed in it. Next, take a plastic bag and wrap it around the boot and part of the shaft. Don't forget to push the bag into the grooves. Spin the wheel (always in the direction of travel!) to make sure that your structure can move freely. Now all that remains is to rewind it all with tape. Try to purchase not ordinary stationery tape, but special automotive tape (with the addition of metals for greater durability).
If you still have questions about repairing the CV joint boot yourself, watch this video. It presents the second repair method in sufficient detail and clearly:
- How to change injectors on a Priora
- How to change the fuel filter on a Priora
- How to change the cabin filter of Lada-Vesta
- How to change spark plugs on a Priora
Choosing an outer CV joint for the Lada Granta
There are enough hinges from different manufacturers on sale, it’s bad that sellers treat them like all Zhiguli spare parts - everything is the same. In practice, for the first generation Grants there are two types of external (and internal) CV joints - for cars with manual transmission and for Grants with automatic transmission. In a word, grenade 2215012-00 (21 teeth) .
For Lada Granta with a manual transmission there is a CV joint with catalog number 2215012-86 . In order not to be confused with numbers, let’s look at the differences between CV joints for Grants with automatic transmission and manual transmission:
- The spline connection in the outer hinge has changed in size, the number of teeth is 21 . A CV joint with 22 splines is suitable for a manual transmission.
- The geometric dimensions of the body have also been changed.
- The length of the outer spline part for manual transmission is 76.5 mm , for automatic transmission - 77 mm .
- height (without spline) 55 mm for automatic and 52.2 mm for manual .
- The number of teeth for the ABS ring does not change and remains 43.
Therefore, before purchasing an outer CV joint, we first look at the number of splines on the inside of the joint body. Among the manufacturers on the market, AvtoVAZ, Belmag and Triall dominate. The price of an outer CV joint on a Lada Granta is around $20.
It is important that the kit includes a locking ring, molybdenum disulfide-based lubricant and a neoprene boot. It should not be too hard, but a boot that is too thin will not last long.
Sources
- https://AutoManya.ru/kuplya-prodazha/vnutrennyaya-granata-granta.html
- https://kalina-2.ru/remont-vaz/zamena-vnutrennego-shrusa-lada-granta
- https://autodont.ru/running-gear/menyaem-shrus-samostoyatelno
- https://AVSU-pitanie.ru/info/lada-granta-zamena-shrusa-video/
- https://www.vaz-zona.ru/zamena-shrusa/
- https://granta-service.ru/prochee/zamena-pylnika-shrusa-vaz-2110-bez-snyatiya-shrusa-video-instruktsiya.html
- https://dtp-avarii.ru/kak-pomenjat-shrus-na-grante-video/
- https://zen.yandex.ru/media/uremont/zamena-pylnika-narujnego-shrusa—kak-zamenit-samomu-instrukciia-s-foto-5e907393f49321656d3e9dbc
CV joint Lada Granta | transmission gearbox clutch Lada Granta
1. Replacement of the outer CV joint for the Lada Granta
2. Video: “Replacing the boot of the outer and inner CV joint (grenade)
Replacement of outer CV joint for Lada Granta
Still, I decided to change the CV joint today. because then there will be no time. I made a photo report, as detailed as I could.
sit down and remove the wheel
While the car is still with the wheel, loosen the hub nut using a 30mm socket and use a metal pipe for reinforcement.
Next, unscrew the caliper assembly. Some will say that there is no need to do this, because you can change the grenade anyway, but it’s convenient for me so that he doesn’t interfere with me.
then unscrew the two bolts from the ball joint
then unscrew the loose hub nut completely, and using a mounting tool (a small pull) remove the hub from the ball and at the same time from the CV joint
remove the boot from the CV joint and remove all possible lubricant so that there is less dirt
and start trying to knock out the grenade with a hammer. And she gave in quite easily, not like last time, we beat her for almost 2 hours.
remove the old retaining ring.
This is a comparison of CV joints from two manufacturers, on the right is BELMAG, and on the left is produced by AVTOVAZ. The difference is immediately visible, AVTOVAZ has a deeper CV joint calcination than BELMAG, which already gives AVTOVAZ a big plus. Let's hope that the new CV joint lasts at least 30 thousand km, and not like BELMAG only 3000 km went before it cracked. The cost of the AVTOVAZ CV joint is 1500 rubles, and the BELMAG CV joint is 1000 rubles, and the kit includes CV joint grease.
Fill the entire CV joint bearing with grease.
How often should the element be changed?
Many manufacturers recommend replacing the outer grenade boot approximately every 30 thousand km. Of course, this is an average. Much depends on the intensity and operating conditions.
If the car is used irregularly, this can lead to premature deformation of the boot. It is also negatively affected by operating the machine on poor-quality road surfaces or in conditions of high humidity. All these factors negatively affect the protection properties. As a result, it has to be changed more often than specified by the manufacturer.
We are looking for faults in the CV joint boot
Even fine dust or slight ingress of moisture into it can damage the CV joint. The characteristic sound of a breakdown will be a crunching sound when the car wheel is turned all the way. This is the first sign of a breakdown and a signal that you need to urgently check the CV joint and its components.
This happens when you don't often look at the rubber boots or known as boots. Inspecting the boot and identifying its malfunction is very easy and can be done without special equipment; just look at it by eye to see if there is any damage or holes on it.
Removing the right front wheel drive internal CV joint Lada Granta
Self-replacement of the CV joint boot on the Lada Kalina
Tools:
- 17 mm straight box spanner
- Driver for socket attachment
- Extension for the end attachment on the wrench
- 8mm wrench attachment
- 10mm wrench attachment
- High nozzle on the wrench 13 mm
- 17mm wrench attachment
- 19mm wrench attachment
- 30mm wrench attachment
- Torx wrench attachment E12
- Large flat screwdriver or spatula
- Large hammer
- Kerner
- Funnel
- Hose
- Technological capacity
- Metal brush
- Jack or ditch lift
- Stand
- Adjustable stop
- Wheel key
Parts and consumables:
- Right front wheel drive (replacement if necessary)
- Boot of the outer drive joint (replacement if necessary)
- Boot of the internal drive joint (replacement if necessary)
- Inner joint shank retaining ring
- Wood block
- Grease
- Rags
Notes:
Front wheel drives (CV joints) are often sold complete with boots and a retaining ring.
Carry out the work on an inspection ditch or overpass.
Carry out the work to replace the external and internal joints of the wheel drives, their dirt-proof covers, drive seals, as well as when dismantling the gearbox or power unit.
1. Remove the middle mudguard from the engine compartment.
2. Drain the oil from the gearbox.
3. Lift the front of the car from the right side and remove the wheel.
4. Unscrew the right front wheel hub bearing nut.
5. Remove the two screws securing the ball joint to the steering knuckle.
Note:
Turn the steering wheel to the extreme left position so that the steering rod output is at its maximum value. This will allow the outer joint housing shank to be removed from the wheel hub without disconnecting the tie rod end from the steering knuckle.
6. Using a 10 mm wrench or socket, unscrew the nut and two bolts securing the heat shield of the inner CV joint protective cover to the rear support bracket of the power unit and remove the shield.
7. Move the steering knuckle with the shock absorber strut to the side and remove the splined shank of the outer joint housing from the wheel hub.
8. Position the drive on the guy wire.
9. Install an adjustable stop under the transmission housing by placing a wooden block under the housing.
10. Using a 19 mm socket, unscrew the three bolts securing the rear support bracket of the power unit to the clutch housing.
11. Press the rear powertrain mount bracket down, insert a spade or large screwdriver between the drive inner joint housing and the clutch housing, and push the joint housing shank out of the drive gear spline.
Note:
Do not damage the protective ring of the drive oil seal located on the inner joint housing.
12. Remove the right drive, being careful not to damage the oil seal.
Note:
When removing both drives, after dismantling the first one, it is necessary to insert a clamp, for example, a wooden or soft metal roller with a diameter of 20 mm and a length of 150 mm, into the hole of the drive gear. Otherwise, the differential drive gears may become misaligned and the drives may not be able to be installed.
13. Before installing the drive, use a screwdriver to pry up the retaining ring of the inner joint housing shank, which secures the drive in the gearbox.
14. Remove the retaining ring.
15. Install a new ring into the groove of the inner joint housing shank. Reuse of retaining rings is not permitted.
16. Before installing the drive, center the retaining ring in the groove of the shank using grease.
17. Insert the splined shank of the outer joint housing into the hole in the wheel hub, install the washer and tighten (do not tighten) the hub bearing nut.
18. Insert the shank of the inner joint housing through the hole in the drive oil seal and, turning the shaft, align the splines of the shank with the splines of the drive gear.
19. Move the suspension arm down and with a sharp movement of the rack with the steering knuckle towards the gearbox, install the drive in place.
20. By pulling the inner joint housing towards you or prying it with a mounting blade, we make sure that the housing shank is fixed in the drive gear.
21. Carry out further assembly in reverse order.
The article is missing:
- Photo of the instrument
- High-quality photos of repairs
How to replace the inner joint cover
If there is no need to remove and disassemble the inner CV joint, then with the outer one removed, it is enough to pull the boot through the shaft and install a new one in the reverse order, so it is advisable to change both boots, no matter which one is torn.
When installing a new cover, it is necessary to control the distance at which the small clamp will be installed, otherwise the boot will be excessively compressed or stretched during operation due to the horizontal movement in the hinge.
How to determine a breakdown?
Removing and replacing the internal and external CV joints of the Lada Priora
The grenade is a ball bearing, the cages of which have transverse grooves. Due to this, the angle between the driven and driven axle shaft changes. Thus, the CV joint not only transmits torque, but also changes the angle between the axle shafts. In view of this, over time, it develops. In places where the parts do not fit tightly, backlash and extraneous noise are formed. In fact, this is accompanied by a characteristic crunch. It occurs due to large wear on the balls that move along the grooves. The crunch can appear both during straight-line movement and when turning. In the latter case, most likely, the external grenade of the Kalina requires replacement. This sign should not be ignored, since the bearing may fall apart at high speed.