If the mileage of your Lada Granta car is approaching 15,000 km, then it’s time to plan to replace the cabin filter. As a rule, this procedure is performed at every maintenance service. However, it happens that for some, the filter is clogged already by 5,000 km, while for others, even after 30,000 km it still shows signs of life.
Everything depends not only on the operating conditions of the car, but also on the place where it is parked. Yes, this is not a mistake! The place where the car most often stops determines how often you will have to change the cabin filter.
This place could be a parking lot near your work or near your home. If there are a lot of trees and especially poplars around, then get ready for more frequent replacements. The fact is that poplar fluff, leaves and other small debris flying abundantly from trees can partially penetrate through the plastic grille of the JABO and end up on the filter.
If this phenomenon occurs frequently, then you will accumulate more debris in the engine compartment than usual. Now let's finish the lyrical digression and begin the replacement process.
2279-4-16-07 (Copy)
In this case, the arrow on the filter label should point down, and the word “front” should point toward the front of the car.
In this case, the arrow on the filter label should point down, and the word “front” should point toward the front of the car.
In this case, the arrow on the filter label should point down, and the word “front” should point toward the front of the car.
Which filter for Lada Grant is better to choose?
The selection of such spare parts should always begin with the part number. The cabin filter for Granta has the same numbers as for the Lada Kalina and Chevrolet Niva:
- 1118-0812-201-00-00;
- 1118-08122-010-00;
- 1118-8122-010.
Old
But you should only buy an original filter if the car is operated in a dusty area. Because, except from dust, this filter element does not protect from anything else.
Under normal conditions, it would be more advisable to install a carbon element. You can choose from the following options:
- Delphi TSP0325329C;
- LYNXauto LAC-1906C;
- TSN 9.7.25;
- Filtron K1229.
The filter data contains 100% carbon and most of it is in Delphi. As you know, the more grams of carbon contained in the cabin filter, the more efficiently it works. Price tags for the cabin filter of Lada Granta vary from 250 to 700 rubles.
2279-4-16-10 (Copy)
When installing the right windshield trim, the two tabs of the trim must extend beyond the front fender flange.
When installing the right windshield trim, the two tabs of the trim must extend beyond the front fender flange.
When installing the right windshield trim, the two tabs of the trim must extend beyond the front fender flange.
[14 Lada Granta maintenance operations that will help you save]
[How to save money on scheduled maintenance of Lada Granta] [Maintenance of Lada Granta at 2.5 thousand km] [Maintenance of Lada Granta at 15,000 and 105,000 km] [Maintenance of Lada Granta at 30,000 and 60,000 km ] [Maintenance of Lada Granta at 45 thousand km] [Maintenance of Lada Granta at 75 thousand km] [Maintenance of Lada Granta at 90 thousand km] [Carrying out maintenance yourself - general recommendations] [Safety rules for doing it yourself carrying out maintenance] [Tools required for maintenance of Lada Granta] [Lamps used in the Lada Granta car]
Lada Granta: changing the cabin filter and cleaning the drainage hole of the plenum box
When is it necessary to replace the filter element on Grant
The cabin filter is a small piece of thick paper impregnated with special oil and containing carbon. While a certain amount of air passes through it, dust particles try to pass along with it into the heater air ducts.
They settle on the paper, but reduce its throughput. Ultimately, the effectiveness of the filter element drops and it stops letting air through, and in rare cases, it begins to let in dust itself.
The second point is the fogging of the windows in the cabin during rainy weather. Since air from the street stops flowing into the car interior, the moisture that remains inside the car begins to evaporate and settles on the cold windows.
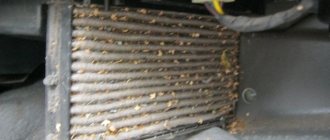
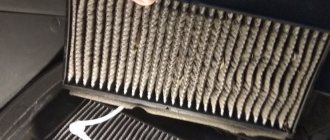
The third sign is the external condition of the filter. The filter element will require replacement if it looks like this:
If any of the above symptoms are present, the Lada Granta cabin filter must be replaced. Driving with a contaminated element is dangerous to the health of the driver and passengers.
The decisive factor determining the need for replacement is frequency. It is every 10-15 thousand kilometers.
The best lures for catching pike with a spinning rod
- Very durable Booyah Pikee spinnerbait.
- Eppinger Daredevle Spoon with high amplitude action and bright color.
- Blue Fox Super Bou pinwheel in the form of an adult fish.
- Thriller Jerkbait with holographic coloring.
- Heddon poppers.
- Tackle Industries Super D swimbait for catching trophy predators.
- Brightly colored 2 petal Mepps Double Blade Aglia.
- Zip Baits Rigge 70F is a universal wobbler. It catches both active and passive pike.
- Savage Gear's 3D Trout Rattle Shad is a 3D replica of a trout (using 3D scanning and 3D printing to create the bait). The tail of the fish contains glass and metal chips that produce a noise effect when moving. The bait is colored the same as trout.
How to change the cabin filter on a Grant in 5 minutes
There is nothing complicated in the filter replacement procedure. To perform this job, you will need the most common screwdriver with a Torex T-20 star. The procedure is the same for any Lada Granta configuration with or without air conditioning.
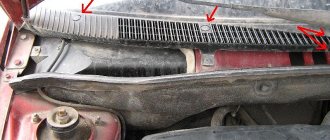
Where to find cabin filter Lada Granta
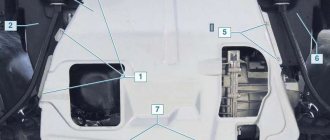
The next step is to examine the location of the cabin filter. It is located under the wiper frill, like on the Lada Kalina and Chevrolet Niva.
This arrangement allows you to change the filter element quickly and without any effort.
Dismantling the filter element of the Lada Granta
The hood must be closed and the wipers must be in the up position. To do this, turn on the ignition, lower the windshield wiper lever and when they are in the up position, turn off the ignition.
To replace you need to do the following:
- Remove the plugs and unscrew them.
- Then you should open the hood and unscrew two more T-20s.
- Remove the frill.
- Unscrew the two self-tapping screws securing the cabin filter housing.
- Next, you need to dismantle the casing, press the two latches of the filter element and remove it from the car.
Correct installation of the cabin filter on Granta
Assembly is carried out in the reverse order, but certain nuances must be taken into account. First of all, before installing a new element, you need to clean the air ducts from contaminants that somehow managed to bypass the filter and end up inside the heating system. To do this, turn on the 4th speed of the stove for a few seconds while taking air from the street.
Once the air ducts are clean, you need to install a new cabin filter. You need to install it in the same way as the old one, the latches will help you determine the correct position.
But if difficulties arise, pay attention to the arrow that is applied to the end. It shows the direction of air movement. The arrow should point straight down - towards the heater fan.
Otherwise there are no difficulties. After installing the filter element, replace the casing, assemble the frill and return the windshield wipers to their original position.
Reviews
Sergey (09/14/2018): the other day I carried out a comprehensive diagnostic of the Lada Granta, there are no comments, it works like a watch. The mechanic recommended replacing consumables, oil, filters, including the cabin filter. The choice was made in favor of the original 1118-8122010-08. The quality is good, the price is affordable, my advice to car enthusiasts.
Vasily (09/14/2018): I live in a rural area, there is increased dust and gas pollution, I have to change consumables and filters more often. For example, I change the original Lada Granta saloon 1118-8122010-08 every 10,000 km. I am satisfied with the quality, no comments, my recommendations.
Related link:
Description of the dashboards of the Lada Granta liftback. Choice differences
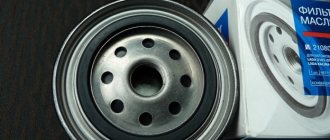
Oil filter
Everything is simple here, the filter is changed along with the oil, which means that it needs to be changed every time (15 thousand mileage).
The original element has article number 21080-1012005-08 . If there is a need to purchase an analogue, then you can consider the following options.
| Brand | vendor code |
| Goodwill | OG 410 HQ |
| JSI | JSM 101 |
| Filtron | OP 520/1 |
The vehicle must be placed on a ramp or lift. The engine must be turned off and cool. The oil change is performed according to the following algorithm:
- remove the filler cap;
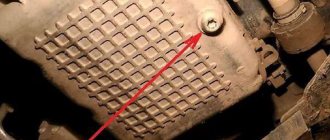
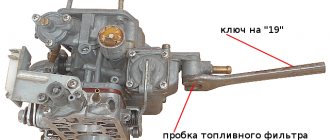
- use a wrench (17 for an engine with 16 valves and 12 for an engine with 8 valves) to loosen the drain cover;
- prepare a container and place it under the drainage area;
- Unscrew the drain cap completely;
- disconnect the wires from the sensor and move them further from the filter;
- Unscrew the filter with a special puller;
- After the oil has been completely drained, replace the drain plug;
- install a new filter (tighten);
- return the wires to the sensor;
- add new oil.
General questions about replacement: article number, replacement interval, choice
Filter item for searching and ordering online: 11180-8122010-03
How often to change
The plant regulates the replacement of air filters every 30,000 km. Practice shows a gap of 15,000 km from replacement to replacement. Or twice a year before winter and summer, respectively.
Which salon to choose
There are 2 types of cabin filters: carbon and regular. When choosing, consider the following points:
Table 1. Comparison of cabin filters for Lada Granta
| Carbonic | Ordinary | |
| How it cleanses | Detains odors | Does not allow debris and small particles to pass through, all odors pass through |
| Resource | It is believed that coal quickly clogs and after that becomes meaningless | As stated - up to 30,000 km |
| Where is it better to use | In dusty conditions, in a city with a lot of traffic jams | In an area with clean air, without traffic jams and heavy dust |
| Cost, rub. | 250 | 170 |
The choice for Granta is a matter of your preference. The cost of the part remains meager, even if it is impregnated with carbon. If you install a regular white element but change it regularly, it won’t make things worse. If you don’t change it for a long time, anyone will turn into this photo.
Air filter
According to the regulations, the engine air filter must be changed during each maintenance procedure, therefore, this is every 15 thousand mileage.
The original filter can be found by article number 2112-1109080-82 . If, suddenly, you need an analogue, then you can consider the options from the table.
| Brand | vendor code |
| Goodwill | AG 910 |
| Goodwill | AG 911 |
| BIG Filter | GB-9597C |
Replacement:
- Under the hood, unscrew the four bolts from the filter protective cover;
- for convenience, you can disconnect the plug from the mass air flow sensor;
- remove the filter protective cover;
- remove the filter (it may rise with the lid or remain in the compartment);
- install a new filter (you can put it in the top cover, or you can put it in the bottom, you should put it where it fits best, since filters from different manufacturers may differ in seals).
Design and purpose of the unit
They began equipping production cars with cabin air filtration around 1991. Initially, their main element was filter paper, which could trap particles of at least 5 microns, but was practically powerless against toxic gases. In the mid-nineties, European cars began to be massively equipped with cabin filters. More advanced filter elements now use activated carbon to absorb molecules of unwanted gaseous compounds. Today, the vast majority of cars of all brands are equipped with a cabin filtration system.
An area of heavy traffic with dense and slow traffic flow is characterized by an increased concentration of toxic compounds. In such conditions, the air intake is almost flush with the exhaust pipe of the vehicle moving ahead. The excess of substances unfavorable to health can be tenfold here. Filtration of air contaminated with toxins is one of the key functions of the cabin filter. In addition, it prevents particles of soot, dust and rubber from getting inside, protecting the lungs from harmful influences, and the dashboard and other elements from contamination.
There are currently two main types of cabin filters on the market.
- Simple anti-dust ones.
- Advanced coal.
Conventional filter elements are made from pleated paper or synthetic fiber and trap dust, soot and large pollen. They are less effective against fine-grained pollution. The synthetic material can be electrified, due to which not only mechanical retention of particles occurs, but also their attraction. The consumable is additionally treated with chlorine and also provides protection against bacteria.
Synthetic cabin filter device
Carbon filters are an improved and, accordingly, more expensive analogue of simple cabin filters. In addition to fibers, activated carbon is used here, which acts as an absorbent. This allows you to filter the air more effectively, removing most harmful substances from it. As a rule, they are distinguished by a multilayer structure, where carbon elements are interspersed with paper or synthetics. Each of these layers is responsible for filtering certain types and sizes.
In carbon filters, even heavily polluted air undergoes multi-stage purification and enters in a breathable state.
Working principle of a carbon filter
The process of replacing the cabin filter
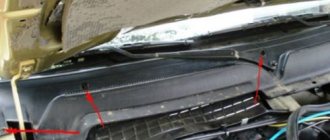
- To get started, use a Phillips screwdriver to remove the five screws from the decorative cover under the hood. They are located between the engine compartment and the windshield. Remove the decorative cover. We have already written in more detail about the location of the filter in the answer to a user’s question.
Bolts are indicated by arrows (T20)
1 bolt of protective cover
2 bolt of protective cover
Essential tool for DIY replacement
- Phillips head screwdriver;
- TORX keys for 15, 20;
- New cleaning element;
- Additional equipment, components, if you plan to carry out third-party work.
The bolts are covered with rust - take WD-40 aerosol. Spray the desired surface, wait a few minutes, and begin unscrewing the fasteners.