"LADA Kalina" are popular domestic cars in sedan and hatchback bodies, which were produced by AvtoVAZ OJSC from 2004 to 2013. Then the second generation models were launched into production - LADA Kalina 2 (hatchback and station wagon body styles). Changing the oil on Kalina is a mandatory procedure carried out during routine maintenance and largely determines the reliability and durability of the vehicle.
The rules for the maintenance of cars of the Kalina family (first and second generations) require periodic replacement of used motor oil, in common parlance “working out”, in power units and stipulate that it should be carried out no later than through:
- 3000 km (first replacement);
- every 15,000 km traveled or once a year thereafter.
Snapshot
Splash guards of the engine compartment and elements of their fastening (view from below the car): 1 - three screws with a key “8” for fastening the middle shield to the right shield; 2 — right shield; 3 - middle shield; 4 — four self-tapping screws “8” for fastening the middle shield to the lower cross member of the radiator frame; 5 — two self-tapping screws “8” for fastening the middle shield to the left shield; 6 — left shield; 7 - two 10mm key bolts securing the middle shield to the body side members.
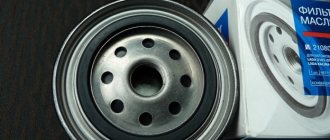
Oil filters
All filter components present on the market today can be classified into two categories.
- Rough cleaning. Such an oil filter is included in the lubrication system in series, so the entire volume of lubricating fluid passes through it.
- Fine cleaning. These components are included in the line parallel to other oil channels. The oil filter is used to pump part of the lubricant (within 10-20%). This volume is mixed with the rest of the liquid in the oil receiver.
The disadvantage of this scheme is that the filtered oil is redirected directly into the crankcase, and not to the operating parts of the engine.
The oil filter for Lada Kalina with an engine of 8 and 16 valves, designed for rough cleaning, can be plate-slotted. Components for fine cleaning are available in cardboard, felt or paper versions.
Granta headlights fog lights
Long mudguards on Granta
Installation of Lada Granta tow bar
Filters for coarse cleaning interact with a system of bypass valves, which, if the working component itself is significantly clogged or in extreme operating modes of the engine, direct oil directly into the crankcase, past the cleaning circuit. Here, the stiffness of the spring component is adjusted depending on the magnitude of the pressure variation within the range of 0.8 - 1.2 MN/m2.
Fine filter elements are capable of filtering oil, trapping particles with a minimum size of 0.001 mm. Therefore, it is important what kind of oil to pour.
2302-3-2-07-a-02 (Copy)
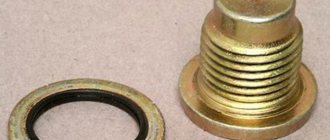
Unscrew the plug by hand and drain the oil.
Attention! Be careful - the oil is hot and harsh on the skin.
Drain the oil until it begins to drip from the drain hole. After wiping the plug and removing any remaining dirt from its thread, we wrap the plug in place. We remove oil leaks from the engine oil pan. We place the waste oil container in the area where the oil filter is located and unscrew it, rotating it counterclockwise. If this cannot be done manually, use a puller. To avoid damaging the sensor wiring harness and the crankshaft position sensor itself...
Video on changing oil in a VAZ engine
As a reminder, use only the engine oil recommended by the manufacturer. And also do not forget to change the oil in the Lada gearbox on time.
Keywords: lubrication system for Lada Granta | lubrication system for Lada Priora | lubrication system for Lada Kalina | Lada Granta filters | filters for Lada Priora | filters Lada Kalina | Lada Priora engine | Lada Kalina engine | Lada Granta engine | lubrication system for Lada Vesta | Lada Vesta filters | Lada Vesta engine | lubrication system for Lada Largus | 4x4 lubrication system | Lada Xray lubrication system | filters Lada Largus | filters 4x4 | lada xray filters | Lada Largus engine | 4x4 engine | lada xray engine | Niva lubrication system | Niva engine | Niva filters | universal article
0 0 0 0 0 0
Share on social networks:
2279-4-8-04 (Copy)
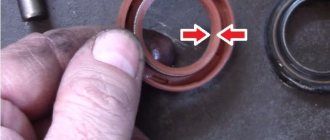
...and remove the oil filter.
If there is no puller, we pierce the filter housing with a screwdriver (closer to the bottom, so as not to damage the engine fitting) and unscrew the filter, using the screwdriver as a lever. We clean the filter seat on the cylinder block from dirt and oil drips. Fill the filter with new engine oil to approximately half the filter volume and apply a thin layer of oil to the filter O-ring. We wrap the oil filter by hand until the sealing ring comes into contact with the cylinder block. Turn the filter another 3/4 turn to seal the connection. Pour 3.2 liters of oil into the engine through the oil filler neck and screw on the filler cap.
Attention! If your car is equipped with an automatic transmission, the engine lubrication system capacity is 4.4 liters.
We start the engine for 1–2 minutes. We make sure that the indicator of insufficient (emergency) oil pressure in the engine in the instrument cluster has gone out and there are no leaks from under the drain plug or from under the filter. We stop the engine and after a few minutes (so that the oil has time to drain into the oil pan) check the oil level in the oil pan. If necessary, bring the oil level to normal, tighten the oil filter and the drain plug.
Lada Kalina: changing the engine oil and oil filter
What kind of oil should I use and how much?
Owners of the Lada Kalina car often fill in oils with the following viscosity classes 5W-30, 5W-40, 10W-40 and 15W-40. Do not forget that the selection of viscosity from those recommended by the manufacturer should be based primarily on the geographic location of the vehicle’s operation. If one viscosity is suitable for a “cold” region, then another is suitable for a “warm” region. There is also an all-season recommended for residents of mid-latitudes.
Table for selecting viscosity by temperature range
| Temperature operating range | Viscosity |
| from -35 to +20 | 0W-30 |
| from -35 to +35 | 0W-40 |
| from -25 to +20 | 5W-30 |
| from -25 to +35 | 5W-40 |
| from -20 to +30 | 10W-30 |
| from -20 to +35 | 10W-40 |
| from -15 to +45 | 15W-40 |
| from -10 to +45 | 20W-40 |
| from -5 to +45 | SAE 30 |
The choice of a specific brand is not important; you can use any popular product.
- LIQUI MOLY;
- ZIC A Plus;
- TNC;
- Esso Ultra;
- Rosneft Optimum;
- Mobil 1;
In addition to oil, do not forget about the oil filter, since today there is a large selection of domestic cars at an affordable cost.
Approximate prices for an oil filter for Kalina when purchased online
Some budget filters:
- M-008 Industrial business ~ $1.5;
- LA OF 3101(914/2) LSA ~ 1.5$;
- Z-103 Zollex ~ 1.5$;
- PR 1540-4001 Profit ~ $2;
- WL7168 WIX ~ $2;
From $2 and up:
- 2105-1012005 WEEN ~ 3$;
- OS 384 KNECHT ~ $3;
- MN W914/2 MANN ~ $4;
- 0 451 103 274 BOSCH ~$4;
When planning online purchases, also consider the cost of delivery of goods.
Advice: Many owners follow the rule of buying cheap consumables but changing them more often, approximately every 7-8 thousand km.
DIY car repair and maintenance
Step-by-step plan for replacing the CV joint (grenade) So, the grenade (both internal and external) on front-wheel drive models of domestic cars (God forgive me) starting from the VAZ 2108 and ending with at least 2115 is the same (well, maybe different manufacturers and different final service life). The same principle applies to Priora, Kalina and Grant.
Greetings, dear visitors! I want to devote this article to replacing the external grenade. If you follow the sometimes unclear terminology (which I don’t always like) - replacing the constant velocity joint, i.e. CV joint. I try to write my articles in everyday language, in which people ask for information.
The photo above shows a damaged Lada 2114, already repaired. The front right side, which we are repairing, was collected in a heap by a frontal impact along with the entire front end (look at the gaps between the parts after the repair, in my opinion, the repair was done perfectly). Looking under the front right wheel I noticed that the drive was bent.
If you don't loosen it while the wheel is on the ground, it will be very difficult to unscrew it later. After which, I jacked up the car completely and removed the wheel and unscrewed the grenade nut. There is a washer under the nut (don't lose it, as the new CV joint doesn't come with one).
Next, you need to unscrew the ball. This can be done by unscrewing two 13mm bolts, or you can unscrew the bottom nut of the pin by 17mm and knock it down by pressing it down with a pry bar, while simultaneously tapping it with a hammer (not on the pin or ball), which is what I actually did. Additionally, release the brake caliper hose.
By moving the hub to the side (having previously pushed the grenade inward with the mounting tool and pulling the hub towards us), we release the outer grenade, which we would simply replace without pulling out the entire drive along with the inner CV joint,
...if it weren't for the drive that was bent into a ram's horn. And you see the fate of the outer grenade in the photo - it crumbled.
So, let's replace the drive too. The photo below shows a CV joint from an Italian manufacturer called TRIALLI (Trialli) for 900 rubles. Quite a cheap product of very good quality.
And the photo below illustrates the components of the CV joint:
- The grenade itself.
- Two clamps.
- Protective cover (boot).
- Retaining ring.
- A tube of special lubricant (calculated for the entire service life of the hinge, if the case remains intact all this time). There is another cheap but excellent CV joint - 4 for lubricating a grenade for 50 rubles in any auto store
- Hinge nut.
Since we were changing the drive, we had to knock off the support washer from it and replace it with the new drive, which should fit clearly into the lower groove (photo below). In theory, they should be installed on the new drive anyway. After that, put on the boot and lower it into its seat.
And install the retaining ring. If it is too stretched, first squeeze it and place it in the upper groove. The easiest way to do this is with cone-shaped pliers, inserting them inside the ring and stretching the ring to fit it into the groove. And then, using a special wrench or simple pliers, tighten the lower clamp, but do not tear it off.
Next, you need to inspect the inside of the hinge for any flaws or debris. Then fill it with lubricant. Insert the neck of the tube into the separator, press it firmly and press the lubricant until it comes out through all the cracks. Usually almost the entire tube fits there.
About the types of transmission oils for Kalina
Traditionally, AvtoVAZ recommends products for use. Lubricant produced by the same company is poured into the gearbox of new VAZ cars; it acts as a break-in and flushing lubricant until the first maintenance; after replacing it, you can select a product from another company.
Brand and volume of oil for LADA KALINA gearbox
The manufacturer specifies that the new oil must be synthetic or semi-synthetic and meet viscosity grade SAE 75W-90. This is an all-season liquid that works at ambient temperatures from -40 °C to +35 °C. 75W-80 and 80W-85 oils are also suitable. 80W-90 liquids can be used in regions where winter temperatures do not drop below -10...-12 °C.
In addition to viscosity, the oil must comply with API GL-4 class. This includes transmission fluids that are designed to operate in medium-loaded gears: hypoid, bevel and spiral-bevel, operating at oil temperatures up to +150 °C and contact pressure up to 3000 MPa.
Let's consider which oils are most popular in the LADA KALINA gearbox.
- LUKOIL TM-4 (GL-4) 75W-90. This is a semi-synthetic transmission fluid used in manual transmissions, differentials and transfer cases of cars and trucks. It is made from highly purified mineral base oil, synthetic components and a multifunctional additive package. The oil has high anti-corrosion, anti-foam, anti-wear and viscosity-temperature properties. It reliably protects transmission elements under high loads, ensures smooth operation of the gearbox at low temperatures and has high oxidative and thermal stability.
- SHELL SPIRAX S4 G 75W-90. Semi-synthetic gear oil API GL-4 for manual gearboxes of cars and small trucks. Used in VAG cars as a first fill fluid. The oil does not destroy synchronizers, ensures smooth operation of the gearbox, and protects transmission elements from shock loads, corrosion and wear. It has an extended service life and improves the performance of the gearbox.
- ZIC GF TOP 75W-90. Synthetic transmission oil for manual transmissions and drive axles. Compatible with synchronized boxes. In Hyuindai and Kia cars it is used as a first fill fluid. Belongs to material class GL-4/5. Meets the requirements of 75W-85 GL-4 oils. The fluid ensures reliable lubrication of all transmission elements at high speeds and heavy loads, cleans the gearbox and axles, increases the service replacement interval, reduces wear, protects against corrosion and has excellent thermal-oxidative characteristics.
- Castrol Syntrax Universal 75W-90. Synthetic multi-purpose gear oil for gearboxes and manual transmissions. Suitable for use in synchronized manual transmissions of cars and trucks, as well as final drives and differentials of trucks and construction equipment. The fluid has excellent fluidity at low temperatures and effectively protects against wear under high loads. It has an extended service life and is compatible with conventional mineral oils and sealing materials.
- LIQUI MOLY Hochleistungs-Getriebeoil GL4+ (GL 4/GL 5) 75W-90. Synthetic transmission oil for manual transmissions and drive axles. It is compatible with synchronizers and is resistant to aging. Thanks to a special additive package, the fluid reliably protects transmission elements. The oil prevents wear and corrosion, works well under high loads and maintains its characteristics at high temperatures. Can be used in gearboxes that require GL-4 oils and manual transmissions that are combined with a hypoid transmission.
Replacement of front brake pads LADA "Kalina"
Brake pads, like car tires, wear out as you drive and require periodic replacement. The peculiarity of the car’s braking system is that the load during braking is unevenly distributed on the front and rear axles. The front wheels, and, accordingly, the brake pads, experience greater loads than the rear ones. This means that they also have to be changed much more often. The front brake pads on Kalina are replaced two to three times more often than the rear ones. To do this, you can contact specialists or do the work yourself. In the latter case, you must have a set of standard tools and new front brake pads. The procedure for replacing front pads on a Kalina equipped with and without ABS is the same.
How often should you change the front pads of LADA “Kalina”
- retaining brackets and springs;
- brake hoses;
- cuffs, seals and boots of brake cylinders;
- brake discs; adjusting rods;
- brake pad mounting parts.
With use, these elements wear out, faults accumulate in them and cause uneven or accelerated wear of the brake pads. The service life of the pads is shortened by the chemicals that are sprinkled on the streets in winter to prevent the formation of ice. Therefore, even the designer of the Kalina will not be able to name the exact mileage after which the pads will need to be replaced. The need for replacement is determined by another criterion - the thickness of the friction linings. If they are thinner than one and a half millimeters, the pads must be replaced.