1200 rub. for the photo report
We pay for photo reports on car repairs. Earnings from 10,000 rubles/month.
Write:
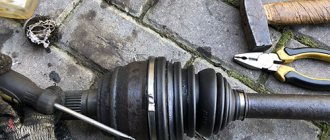
Replacing the outer CV joint boot of a VAZ 2110 without any particular difficulties can be done with your own hands in literally half an hour. You will need a new CV boot, a tube of lubricant, a couple of new clamps, a screwdriver, several wrenches to pull the CV joint out of the steering knuckle and a hammer to knock it off the drive. To see the procedure for replacing the CV joint boot on VAZ 2110, 2111, 2112 or other front-wheel drive vehicles, watch the video.
And so, in order to free the drive shaft, and then remove the outer CV joint and pull off its boot, you will have to disconnect the steering tip, unscrew the hub nut, and unscrew the 2 bolts securing the ball joint. After dismantling the grenade, be sure to wash out the old lubricant and thoroughly fill it with new one!
Grenade boot and its replacement
The grenade of the VAZ 2110 car is a constant velocity joint that forces the front drive wheels to rotate and allows them to turn. The peculiarity of this device is that it is capable of transmitting rotational movements to axle shafts located in relation to each other at a constantly changing angle. Replacing the boot of a VAZ 2110 grenade is necessary when noise and knocking are heard, especially when driving on sand. You can easily replace the boot of a VAZ 2110 grenade with your own hands, fortunately there are step-by-step instructions.
Constant velocity joint or CV joint
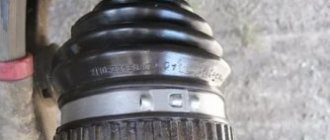
VAZ 2110 grenade boot
The design of the car provides that the hinge is subject to a significant load and is made of very strong alloys. A well-maintained and good CV joint (grenade) can last longer than the car itself. To achieve this result and save money, because the procedure for replacing a hinge is expensive, you must follow some rules. One of these rules is to systematically check the condition and timely replacement of the grenade boot. The most important enemies of a car grenade are dirt, dust, water and sand that enter the working part while driving. To protect against such destructive factors, anthers are installed, which are protective rubber cones that very tightly cover the CV joint mechanism of the vase. If you find that the grenade boot is torn, it must be replaced immediately. During periodic technical inspections, you need to carefully inspect the boots and replace them if necessary.
Note. If folds, cracks, deterioration in the elasticity of the rubber and other deformations and damage are found on the anthers, replacement should not be shelved.
Functionality check
of the inner and outer CV joints should be examined separately , since the procedures and signs are somewhat different.
External grenade
The most obvious and main sign of wear of this element is the appearance of a sound similar to a crunch. It appears because the grooves have worn out and the balls do not move along them as well as before. The crunching becomes noticeable when entering turns, sharply pressing the gas pedal or passing difficult road sections.
Grenade
If you want to verify that the outer CV joint is faulty, do the following:
- When starting from a standstill, deliberately create jerks, but not strong ones;
- Try to accelerate sharply and slow down;
- Move the shaft transversely between the CV joints. If you feel any play, then the grenade is definitely worn out.
Internal grenade
It is noteworthy that the internal hinge is more durable and less subject to wear. Most often, the inner CV joint declares its malfunction when simply driving in a straight line or when passing through difficult sections. A check for play, similar to an external grenade, will allow you to verify problems.
Replacing the CV boot
VAZ 2110 grenade and its boot
The process of replacing the boot is not as complicated as it seems at first glance. Most car owners change the boots one at a time, that is, when the inner boot wears out, the grenades change it without touching the outer one. And after a while, after damage or wear of the outer boot, they change it. This is a pointless waste of money, effort and time.
Note. It is strongly recommended that if it is necessary to service and repair CV joints, remove the entire shaft and replace both the inner and outer boots at the same time.
VAZ 21102 grenade
Build process
When assembling the outer CV joint, you must perform the following steps:
- We put a rubber part on the shaft.
- We stuff the CV joint (new or cleaned) onto the shaft until the part is secured with a retaining ring.
- We place fresh lubricant in the hinge and boot.
- We put the boot on the outer race.
- We remove excess air from the boot by pressing it with your hand.
- We secure the boot with clamps.
Then the drive is put in place, the hub is clamped with a nut. It is also necessary to put back the tie rod end, support and wheel. Next, you can lower the jack and tighten the nut securing the drive. To prevent it from unscrewing on its own, the nut should be capped.
Purpose and principle of operation, possible malfunctions
The constant velocity joint of the VAZ 2110 car model (abbreviated CV joint) is subject to loads throughout the entire period of operation, which leads to its failure. The design is distinguished by the highest level of properties; high-quality carbon steel is used for its production, capable of withstanding loads for a long period of time.
CV joint VAZ 2110
The reasons for the failure of the CV joint VAZ 2110 vehicle include the ingress of various parts of dirt and sand inside, which is associated with loss of lubrication and at some point leads to damage if the equipment is operated with a torn rubber boot. In this case, it will be necessary to urgently replace the internal grenade, which fails and needs to be monitored for technical condition, guaranteeing long-term operation of the VAZ 2110 model car. You can find the need to replace the internal CV joint of the VAZ 2110 if you hear a corresponding crunch caused by the presence of gaps in the mechanism, foreign bodies leading to malfunction.
Why and when to change the boot of a VAZ 2109-2110 grenade
A constant velocity joint, CV joint, or popularly known as a “grenade,” can last up to 100 thousand kilometers and longer. If you monitor his condition. The first signs of a worn CV joint are crunching and play when turning in one direction or another.
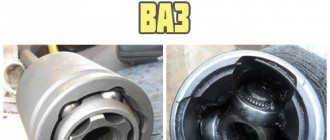
The design of the CV joint is such that there are several elements inside the body that are in constant motion and often wear out due to lack of lubrication or dirt. The body, cage and inner race rub against each other and against the balls that center them. The higher the mileage of the hinge, the more often you need to check its condition.
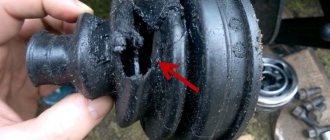
Even a small crack can be fatal to the entire CV joint
First of all, the boot fails. You need to keep an eye on it, because when the slightest leak occurs, dust gets inside the assembly, which acts as an abrasive, mixing with lubricant. In this case, the service life of the hinge is reduced by almost four times. Therefore, when you see:
The boot must be replaced as soon as possible. This will preserve the resource of the CV joint and save us money on replacement and purchase of a new one.
What will you need at work?
When replacing the internal CV joint of a VAZ 2110 car, you need to select the right equipment and tools, without which the next job is impossible. Repairing the unit does not seem likely; it will only need to be replaced .
To perform the following operations, you will need a set of equipment and tools:
- A new internal grenade, which includes a clamp and lubricant, will ensure subsequent trouble-free operation of the system over a long period of time;
- A lift, or a special inspection hole with a jack, will be required to lift and secure vehicle , guaranteeing safety during the work;
- A set of standard tools used to replace the internal CV joint. Includes wrenches, screwdrivers, pliers and much more needed for repairs.
"Grenade" defects
Before replacing CV joints on a VAZ 2110, you need to make sure that they are made with high quality and can effectively perform their job in a new place.
Alas, sometimes replacing the inner CV joint on a VAZ 2110 does not give the expected result, since product defects .
The literature indicates that CV joints are made from special high-strength alloys that practically do not wear out. But in practice everything looks a little different. Whatever one may say, there are no eternal parts, and CV joints are no exception.
Defects may be as follows:
- Low quality of alloys used in manufacturing;
- Banal fakes and defective components;
- Poor quality or complete lack of lubricant, which leads to rapid failure of even a new grenade;
- Damaged anthers, due to which all kinds of debris get into the grenade.
Regarding the replacement of CV joint boots on a VAZ 2110, we recommend watching a video that will help you cope with the problem that has arisen. This issue should be approached thoroughly.
Replacement of failed equipment
Replacing the CV joint of a VAZ 2110 vehicle, located on the inside rather than the outside, is a simple process; several operations will be required. The design transmits rotation from the gearbox to the shaft. The operation of the device affects traffic safety; for this reason, detection of a CV joint failure is carried out at a high level from the ground.
The replacement operation is performed on a special lift, an inspection hole, which is due to its location in the lower part of the vehicle; access is needed only in this position.
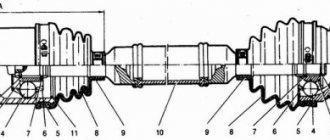
Design
Drive diagram
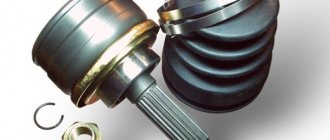
If you disassemble the CV joint, it will consist of three main elements:
- Inner ring;
- A ring with holes that hold six balls - a separator;
- The hinge body together with the drive shaft.
In a VAZ 2110 car, the CV joint may need to be replaced. But which one exactly? After all, in the “ten” there are two of them - internal and external. They are necessary in order to effectively overcome all obstacles. Here one CV joint will clearly not be enough.
Internal and external
- The first grenade is internal, and it transmits torque to the shaft from the transmission.
- The second grenade is external and engages with the car's wheel hub.
Despite the fact that their operating principle is the same, they differ in design and price.
Shall we get started?
- Before replacing the mechanism, you need to drain all the oil from the gearbox. Let's not touch the jack yet! You need to place a brick under the rear wheel of the car, after this procedure we take the 30 socket and, accordingly, loosen the nut. Don't be alarmed, you may need about a half meter long piece of pipe half a meter long as a lever. Remember, we only need to loosen the nut, not remove it yet!
- Everything worked out? Go ahead! We lift the car with a jack, and only now completely remove the hub nut along with the washer. Now you can safely remove the wheel from the hub.
- Take the 13mm head and remove the two bolts that secure the ball to the hub. After this, we move the hub and remove the outer grenade from it. Then we attach a pry bar to the internal grenade and, using hammer blows, knock it out of the gearbox. By the way, if you still don’t have a pry bar at hand, a piece of pipe can replace it.
- When the grenade is removed, we clamp its shaft in a vice.
- We remove the clamps from the unusable boot. After that, we shoot down the outer grenade. Attention! In order not to damage it, you need to hit it along the edge. When this operation is completed, remove all old grease from the mechanism, wash it in gasoline or kerosene and wipe it well again, this way you can better remove traces of grease.
- Now we put a new boot on the drive shaft, and using a hammer we hammer the outer CV joint back, after thoroughly lubricating all the parts of the product. After that, we put it on and tighten it with a collar.
- Then we insert the grenade into the gearbox, driving it there. We place it in the hub and return the ball to its place. We put on the hub nut.
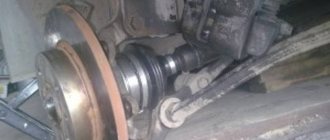
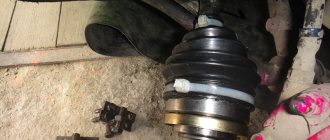
How to inspect the case
This can be done without removing the wheel: just turn it all the way in any direction and shine a flashlight on the part for better visibility. Also feel it with your hands: you will feel the tears immediately. The best inspection option is to remove the wheel (for example, when you are repairing a tube, a tire at a tire shop, or doing a seasonal tire change). Everything will be more noticeable here. Also, for one reason or another, you probably have to put the car in the inspection hole: for example, when changing the oil, adjusting the hand brake, etc. Here, also take the opportunity and inspect the CV joint covers: this can be done more carefully than in previous cases.
You can tell that the cover needs to be replaced by the appearance of thick grease on the suspension parts and on it itself.