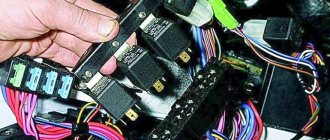
What does code P0343 mean?
P0343 is triggered when the engine control module (ECU) receives a faulty signal from the camshaft position sensor (CPS).
A common cause is a faulty camshaft sensor or damaged wiring. The DPRV is installed on one of the camshafts. P0343 is a common trouble code that has been used by all automakers since approximately 2000.
Some engines have multiple camshaft position sensors. Since the camshaft must be in sync with the crankshaft sensor when starting, a common symptom is that the engine will be hard to start or not start at all.
The four-stroke crankshaft rotates two revolutions per cycle, and the camshafts rotate one revolution per cycle. Older cars usually do not have a camshaft sensor, but only a crankshaft sensor. This is because older cars don't need to know what RPM the crankshaft is at.
Each cylinder is supplied with ignition and fuel once every two revolutions of the crankshaft. To do this, the DPRV is used to determine whether the cylinder is in the intake or combustion cycle.
In older cars without a camshaft sensor, the spark plugs fire twice per revolution, this is called "wasted spark." Thus, to avoid firing the ignition coils twice per revolution when only one is required, a camshaft sensor is used.
Symptoms of malfunction
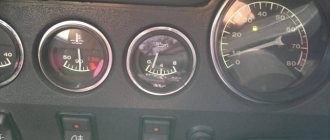
The main driver symptom of P0343 is the MIL (Malfunction Indicator Light). It is also called Check engine or simply “check light”.
They can also appear as:
- The “Check engine” warning light on the control panel will light up (the code will be stored in the ECM memory as a malfunction).
- Decrease in engine power.
- Possible misfires in the engine cylinders. The car engine may also become unstable.
- Floating speed, as well as attempts to stall at idle.
- The engine stalls or has trouble starting.
- Increased fuel consumption.
The vehicle will most likely run with trouble code P0343. But it may be difficult to start, and there may also be a drop in power and unstable engine operation. To avoid damage to other engine components, if this code is detected, it is recommended that the problem be repaired as soon as possible.
SYMPTOMS AND INSPECTION
Signs of a malfunctioning camshaft sensor, by which you can determine that the device has failed, are as follows:
- Increased fuel consumption;
- Problems in the vehicle self-diagnosis mode;
- Reduced acceleration dynamics;
- The “Check Engine” sign or errors 0343 or 0340 appear on the dashboard.
The “Check Engine” icon, as a rule, lights up when the DF is completely out of order. The following happens: you turn on the ignition, after which the starter starts working, at this time the ECU unit should receive a signal from the sensor, but since the DF is broken, it is not there, and the electronic control switches the engine to twin injection mode (based solely on the data received from the DKPV ), turning off the phased injection of the fuel mixture.
If you find any signs of malfunction, you need to check the DF. You can do this yourself; you only need a tester (multimeter), which can be purchased at any car store for 400-600 rubles. The device is inexpensive, but useful - you will need it several times when diagnosing a car.
On fourteenths with a 16-valve engine, DF models 21120-3706040 are installed, on 8-valve engines - 21110-3706040. Checking each of them has some features.
Scheme (for 8th grade)
- On the multimeter probe (V1 mode), which will be connected to contact “E” on the sensor, set the voltage to 13.5 V, on the second probe (connect to contact “B”) - 0.9 V;
- We close the probes on the corresponding contacts. We bring a metal plate to the end part of the DF (a screwdriver will do). If the device is working normally, the multimeter will show that the voltage at pin “B” has dropped to 0.4 V (should return to 0.9 when the plate is removed). Differences in readings – the sensor needs to be replaced.
Checking the DF of a 16-valve engine:
Scheme (for 16 cells)
- We switch the tester to V2 mode. On the probe of contact “E” we set the voltage to 13.5 V, on contact “B” - 0.4 V;
- Insert a screwdriver into the hole at the end of the DF housing. When the sensor is working, the voltage at contact “B” will increase to 0.9 W and drop back if the screwdriver is removed.
Replacement
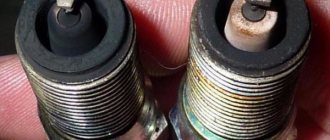
Unfortunately, it is not always possible to determine “by eye” whether the VAZ 2114 camshaft sensor is working. Sometimes it is necessary to dismantle it to inspect or replace it.
The main safety rule when carrying out work to replace the sensor is to disconnect the battery. If you break the rule, not only the sensor can burn out, but also the entire electrical wiring of the car, which is quite expensive.
The replacement procedure in 8-valve models is slightly different from 16-valve models, so if you have this option, you will have to read this paragraph separately.
The algorithm for carrying out work on an 8-valve engine is as follows:
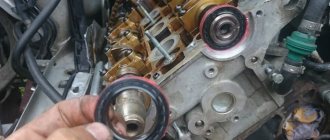
- We find the sensor on top of the engine, on the right near the air filter.
- Using a 10mm wrench, unscrew the only bolt securing the device.
- We remove the sensor.
- We close the nest from which the device was removed to prevent debris and foreign objects from getting into it. This is necessary so that you don’t have to clean it after replacing it, and so that the new sensor doesn’t malfunction due to the fact that you won’t be able to clean it.
- Wipe the device with a rag, remove any remaining dirt and oil, and clean the contacts. The rags must be dry. After cleaning, put the device back in place; perhaps the problem was due to contamination (which happens very often).
- If after cleaning the device the situation with errors and problems has not changed, you will have to fork out for a new phase sensor.
VAZ 2114: error 0343 - causes, symptoms, solutions
Error P0343 for VAZ 2114 (8 valves) indicates a malfunction of the camshaft position sensor. It indicates that this sensor emits a very high signal level that is not provided for by the automaker. This means that there is increased voltage in its circuit.
The sensor is connected to the camshaft, or more precisely, to its rotating part. When the position of the element changes, the gaps and the magnetic field change. Therefore, the tension may also become different.
DF ERRORS
If the VAZ 2114 is equipped with an on-board computer, if the device malfunctions, it will display one of the errors with code 0340 or 0343. Let’s analyze each of them in more detail.
- FAZ sensor error 0340 - indicates the absence of a DF signal. The cause of this error can be anything from oxidized contacts to mechanical damage to the device. Solved by replacing the part with a new one.
- Error 0343 - high signal level of the phase sensor. Its cause, as a rule, is damage to the wiring itself or the terminals in the contact block, or their loose/oxidized connection.
Errors in the VAZ 2115 phase sensor are completely similar to the errors that occur on the fourteenth.
It is worth noting that in addition to a malfunction of the DF itself, the cause of errors may be a slipped timing belt or a loose crankshaft gear.
On which cars is this problem most common?
The problem with code P0343 can occur on different machines, but there are always statistics on which brands this error occurs more often. Here is a list of some of them:
- Audi (Audi a4, Audi TT)
- BMW
- Cadillac (Cadillac SRX)
- Chery (Chery Amulet, Jagi, M11, Tiggo)
- Chevrolet (Chevrolet Avalanche, Aveo, Lacetti, Traverse)
- Chrysler
- Citroen (Citroen C4)
- Dodge (Dodge Ram)
- Ford
- Geely (Geely MK)
- Hyundai (Hyundai Accent)
- Kia (Kia Rio, Sportage)
- Lexus
- Mercedes
- Opel (Opel Corsa)
- Peugeot (Peugeot 308)
- Skoda (Skoda Octavia)
- Toyota (Toyota Camry)
- Volkswagen (VW Beatle, Jetta, Passat, Tiguan)
- VAZ 2110, 2111, 2112, 2114, 2115
- Volga Chrysler, 31105
- Gazelle Chrysler, 405
- Lada Vesta, Granta, Kalina, Largus, Niva, Priora
- UAZ Patriot
With fault code P0343, you can sometimes encounter other errors. The most common are: P0030, P0036, P0124, P0332, P0335, P0336, P0340, P0341, P0342, P0345, P0346, P0347, P0348, P0349, P0365, P0366, P0367, P0368, P0369, P039 0, P0391, P0392, P0393 , P0394, P0606, P2122, P2138.
How to run diagnostics?
Press the daily mileage reset button and hold it. Turn on the ignition and release the button.
The arrows on the dashboard start moving - this is the entry into the mode. Press the button briefly twice and it will display an error code.
As follows:
Nothing is clear, but there is a special table that deciphers these codes. It looks like this.
Sometimes it happens that the code we need is not in the table. This is fine. If the figure is not the same as in the table, then this means the presence of two malfunctions at the same time. For example, code 6 means the simultaneous presence of codes 2 and 4. And code 10 means errors 2 and 8.
All other error codes are deciphered in the same way. True, this system is quite primitive. Normal diagnostic tools have more detailed information about faults. The codes would look, for example, like this:
“P0303” - 03 means misfire, and the second 03 is the cylinder number. That is, the engine is tripping.
Error codes on the dashboard provide little information. It is much better to use special diagnostic equipment. Even the cheapest one can scan almost all Chevrolet Niva engine errors.
It may happen that an unknown combination of numbers and symbols appears on the dashboard, this indicates that the on-board computer is warning you that there are certain malfunctions in the car, and in order to correctly decipher the error codes on the Niva Chevrolet car and make the necessary repairs, you need to know what this or that information warns about. This article will help you with this, as in it we will look in detail at what different combinations of numbers mean and how to correct them.
But before we look at what errors there may be, let’s figure out how to detect and decipher them in general. In order to do this, you must first of all diagnose the car itself, since you can’t do without it. One of the simplest diagnostic methods is the information that appears on the dashboard, but in addition to numbers, certain phrases can also be displayed, but the car owner cannot always understand the translation of this message.
To find out in more detail about the causes of a breakdown on a Niva Chevrolet car, you can use a special scanner. It is a laptop computer with special software installed, thanks to which self-diagnosis occurs without any problems.
Now let's take a closer look at what errors can appear in the Chevrolet Niva SUV and what they mean.
Troubleshooting table for P0343
ErrorDescription Causes Remedy
| P0343 | The camshaft position sensor circuit is high. | Camshaft sensor malfunction. Damage to the 5V power wire from the control module (ECM). Corrosion/poor connection in sensor connector. Faulty ground wire to ECM. Short circuit of the power and ground wires. Low battery voltage / faulty alternator. Faulty starter. Malfunction of the engine control module (ECM). | Charge the battery, troubleshoot alternator charging problems. Repair any damage to the wiring between the camshaft sensor and the control unit. Clean the sensor from oil. Clean the sensor connector. Replace the camshaft sensor. Replace the ECM/PCM (rare). |
Diagnosis and problem solving
First of all, you need to read all stored error codes using an OBD-II scanner. If there are no other faults, proceed to troubleshooting P0343.
It is necessary to check the wires, connectors and other electrical components of the system. If any defects are found, eliminate them. After this, you need to clear the error codes from the PCM memory again and recheck the system.
If the error code appears again, check the battery charge and also inspect the starter motor. Troubleshoot, then clear the PCM memory again and check the system to see if P0343 appears again.
This procedure must be performed every time after repair work is performed. This will help determine if the problem is resolved.
Check the camshaft sensor itself if you need to replace it. In most cases, these steps will help fix your vehicle's problem.
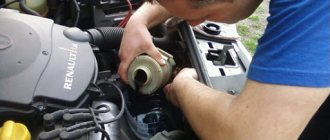
How to replace a phase sensor with your own hands
If you are absolutely sure that the phase sensor is faulty, you can replace it yourself. It is located at the end of the cylinder head next to the air filter.
Replacing the phase sensor begins by disconnecting the power from the battery. In this case, the control unit memory will be reset.
If this is not done, it will continue to operate in the same mode as with a faulty phase sensor. Normal operation will begin after a few engine starts.
The tool that will be needed is just a ten key and sealant. Next, disconnect the wires from the phase sensor and remove it using a key.
The new sensor needs to be coated with sealant, the layer should be small, and it should be left for about five minutes before installation. We install it on the seat and connect the wires.
Next, connect the battery, start the engine and see if the check engine light comes on. If it no longer lights up, then the sensor is installed correctly.
How to fix the problem?
To fix the problem, you should reset the error and repeat the diagnostics after a couple of days. It is advisable to use an OBD2 scanner. If the code does not disappear, you should check the parts and assemblies of the “four” described above. Sometimes, to eliminate the malfunction, it is enough to clear the sensor of oil and clean the contacts. This procedure can be combined with replacing the timing belt and engine lubricant. In this case, it is useful to eliminate the reason for its contact with an electrical component. If the sensor fails, it should be replaced. Broken or damaged wiring must be repaired. To restore the battery's charge, sometimes it is enough to charge it well with a charger and clean the terminals, but you may need to buy a new battery or repair the generator if the problem is in it.
The ECU, if broken, must be replaced. This is one of the most unpleasant and expensive breakdowns associated with this error. Fortunately, it is rare.
Working principle of the camshaft position sensor
There are three types of DPRV:
- Magnetic (inductive type). The principle of operation is based on the passage of a metal object (tooth) in a constant magnetic field. Magnetic sensors usually have two terminals.
- Based on the Hall effect. Records changes in the magnetic field around the sensor. Such sensors usually have three terminals.
- Optical. The principle of operation is based on recording the reception and interruption by a photocell of a beam of light emitted by a source.
The most common DPRVs are of the first two types. Optical ones are used only in some brands of cars (for example, cars based on the Mazda GE platform). Some car models may have two or more sensors installed. And perhaps of different types.
Integral sensor
Hall effect sensor
A rotor made of ferromagnetic material rotates together with the camshaft. The Hall IC is located between the rotor and the permanent magnet, which produces a magnetic field vertical to the Hall element. When a tooth passes the sensor's sensing element, the magnetic field strength changes. Due to this, a voltage is induced and a digital signal appears in the Hall IC. Thus, rotation of the camshaft pulse sensor gear changes the Hall voltage in the Hall IC at the sensor head. The changing voltage is transmitted to the control unit and analyzed.
Operating diagrams of various sensors
The sensor is integral, that is, it includes a sensing element and a secondary signal converter. The main function of the sensor is to record the cylindrical phases of intake and exhaust. That is why it has a second name - phase sensor.
DESIGN FEATURES AND OPERATING PRINCIPLE
The VAZ 2114 FAZ sensor is an integrated device, the main function of which is to receive information about the current operating cycle of the power unit and transmit it to the ECU via pulse signals.
Structurally, the DF consists of two parts - a sensitive element and a pulse signal converter, which in turn consists of an operational amplifier, a bridge circuit and an open collector type output stage.
The DF sensitive element operates according to the Hall principle; it is a microcircuit that responds to fluctuations in the magnetic field, which gains the ability to transmit an electrical signal only when there is a magnetically conductive material next to it, which is the steel head of the valve.
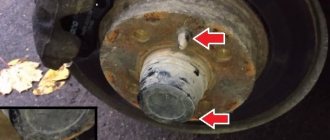
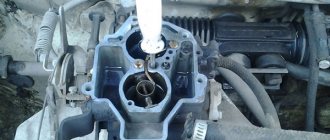
The location of the VAZ 2114 camshaft position sensor is as follows: it is located on the end of the cylinder block, not far from the air filter.
Location of DF
There is a lot of discussion on the Internet about which phase sensor is best to buy from which manufacturer. We recommend giving preference to devices from the German company Bosch. It is she who has the license to manufacture sensors operating on the Hall principle, so, in essence, you get a reliable and durable device produced by the direct owner of the technology by which it is made.
Chevrolet Niva error codes: decoding and description of meanings
The popular Russian-made model is very widespread in the CIS countries due to its optimal cost and increased cross-country ability, which is critically important in the conditions of domestic operation. Motorists buy cars for off-road travel and small towns, where the quality of roads leaves much to be desired.
The disadvantages of the car include weak wiring - when the load increases to the design limit, on-board electronic systems often fail, which causes software failures. Chevy Niva error codes appear on the dashboard display or are detected using special equipment, but the common thing is that they all indicate a malfunction of a specific component.
How is self-diagnosis performed?
We have sorted out the main errors on the Priora, now it’s worth finding out how self-diagnosis is performed. The VAZ 2170 with 16 valves has a special controller with which diagnostics are performed. If you have an on-board computer installed, then diagnostics are performed on it. There is also special equipment that allows for a more in-depth check of Priora 16 class systems.
Since most Priora 16 cars already have an on-board computer, we will consider the option without the use of special devices. Diagnostics begins with activation of the test mode. The work proceeds according to the following scheme: