December 23, 2015 Lada.Online 1 237 397 115
Modern AVTOVAZ SUVs use injection power units. If a malfunction is detected in the electrical equipment of the car, you should first check the serviceability of the fuses and relays. Next, we will show where the mounting block is located (fuse box or black box), as well as the location of the elements inside it.
Location of fuse and relay blocks Lada 4×4
The main part of the fuses is located in the interior of the Lada 4×4 under the panel to the left of the steering column. Total 4 blocks:
1 — engine control system fuse box; 2 — windshield wiper relay; 3 — fuse blocks; 4 — relay block of the engine control system.
The fourth relay block is located above the gas pedal.
Wiper relay Niva 2121
The windshield wiper relay on the VAZ 2121 and Niva 2131 is removed to replace it if it fails. The relay cannot be repaired and must be replaced with a new one. It is located in the car interior, under the decorative trim of the front left side panel. To carry out repair work, prepare a standard set of tools, and then perform the following sequence of actions:
First of all, you need to remove the decorative trim of the sidewall. To do this, use a Phillips screwdriver to unscrew the screws securing it to the body and carefully remove it from its place.
Now, using an eight-inch socket with an extension, unscrew the two nuts securing the relay to the body studs and, having disconnected the block with the supply wires from it, carefully remove it.
At this point, the repair work on removing and replacing the windshield wiper relay on the VAZ 2121 and Niva 2131 has been completed. Replace it, then install in the reverse order.
Modification of wipers and washer nozzles in Niva
You're driving like you're in a tank
First of all, I bought fan nozzles.
Instead of the old inkjet ones, which were frankly annoying with their disgusting quality. One injector simply fell into pieces, and I drove half the road with the glass half covered in dirt. True, you can’t put these fan-shaped injectors in the standard places, but it doesn’t matter, I now have the “correct” nostril on the hood, into which it would now be a sin not to install the “correct” injectors, which is what I did.
the hose was hidden in the hood amplifier
To prevent water from flowing back into the tank, and then there was no pause while it was pumped back into the system, I installed a check valve from the Toyota washer system (I just pressed it and water immediately flowed).
Nostril with nozzles on the hood.
Now the washer sprays onto the glass as it should.
All that remains is for the wipers, I installed Bosch wipers 41 cm long,
People use longer ones, but for me, after 33 cm, these were enough.
And most importantly, they don’t hurt anything.
Installing a windshield wiper breaker for NIVA
The installation process is as simple as shelling pears, I’ll describe it in two photos.
Remove the instrument panel by unscrewing the 2 screws from below.
We connect our relay into the gap of the 6-pin wiper connector, and connect the free white wire using a connector to the pink wire of the two-pin connector
We put the instrument panel in place, the installation is complete. What do we have? 1. Now, when water is applied to the glass, the wipers automatically make three strokes; 2. You can adjust the pause in the intermittent operation of the wipers.
Here's a short video of how it all works
Since people are asking how the pause is adjusted, I am posting an excerpt from the instructions for the relay:
Main and additional fuse blocks
These two blocks are connected to each other. There are 10 fuses in the upper block, and 6 in the lower one. Markings from left to right:
| F1 (16A) | Heater fan, rear window defroster, rear wiper and washer system, windshield washer pump |
| F2 (8A) | Steering column switch, windshield wipers, hazard warning lights, breaker relay (in turn signal mode), reverse light, instrument cluster (coolant temperature gauge, fuel level gauge, tachometer, warning lights: turn indicators, differential lock, parking brake, emergency condition of the working brake system, insufficient oil pressure, fuel reserve, battery charge) |
| F3 (8A) | Left headlight (high beam), high beam indicator lamp |
| F4 (8A) | Right headlight (high beam) |
| F5 (8A) | Left headlight (low beam) |
| F6 (8A) | Right headlight (low beam) |
| F7 (8A) | Side light lamps in the left front and left rear lights, license plate lights, side light indicator lamp |
| F8 (8A) | Side light lamps in the right front and right rear lamps, backlight lamps for the instrument cluster, cigarette lighter, switches, heating and ventilation control unit |
| F9 (8A) | Hazard switch, breaker relay (in hazard mode), heated tailgate glass relay contacts |
| F10 (8A) | Sound signal, interior lamps, brake lamps in the rear lights |
| F11, F12 (8A) | Reserve |
| F13 (8A) | Fog light relay contacts in rear lights |
| F14 (16A) | Cigarette lighter |
| F15 (16A), F16 (8A) | Reserve |
Additional block:
| F11 (8A) | Turn signal lamps and relay-breaker for turn signals and hazard warning lights (in hazard warning mode) |
| F12 (8A) | Daytime running light relay, daytime running light bulbs |
| F13 (8A) | Rear Fog Lamps and Relays |
| F14 (16A) | Cigarette lighter |
| F15 (16A) | Spare |
| F16 (8A) | Spare |
Additional fuse circuits in the Urban package:
| Fuse number and rating | Protected circuit |
| Main unit | |
| 1 (16A)* | Electric windows for front doors Electric side mirrors |
| 2 (16A)** | Air conditioning fan, air conditioning compressor |
| 9 (16A)* | Side mirror heaters |
| 10 (16A)* | Central interior lamp |
| Additional block | |
| 15 (16A)* | Air conditioning fan, air conditioning compressor |
How to replace the windshield wiper trapezoid?
The market price of a trapezoid is approximately one thousand rubles. A trapeze with a motor will cost approximately 2 thousand rubles.
There are 2 types of trapezoids on the Chevrolet Niva. Old modification and new. They are practically no different.
The process of dismantling the windshield wiper trapezium is quite simple. You will need keys for 10-12, an open-end wrench for 13 and a tube key for 8-10.
To remove the trapezoid, you need to remove the plastic cover under the windshield.
Then you need to unscrew the 3 bolts securing the trapezoid to the frame. After this, the trapeze can be removed.
Installation of a new trapezoid is carried out in the reverse order of its dismantling. That is, it must be secured with three bolts, and then a plastic cover must be installed under the glass.
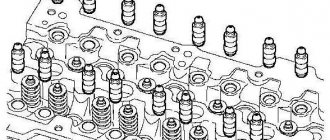
Engine control system fuses
It is located on the left side of the body, under the instrument panel, next to the diagnostic block. Consists of four fuses:
| F1 (30A) | Right electric fan relay contacts |
| F2 (30A) | Left electric fan relay contacts |
| F3 (15A) | Relay windings of the right and left electric fans, controller, injectors, ignition coil |
| F4 (15A) | Heating elements for control and diagnostic oxygen concentration sensors, phase sensor, mass air flow sensor, canister purge valve |
Description of design and operation diagram
Niva Chevrolet windshield wipers consist of the following elements:
- lever (item 1 in the figure);
- brush (item 5 in the figure), read a detailed article about the sizes of brushes, their types and selection rules here;
- drive (item 7 in the figure), which in turn consists of a gear motor and trapezoid;
- wiring.
Niva Chevrolet front wiper device
The trapezoid is one of the most important parts in this mechanism. It serves to transmit movements from the motor to the wipers and controls the synchronization of the movement of the windshield wipers.
Wires are needed to power the wiper motor.
The brushes adhere to the car glass and serve to clean it.
Engine Control Relay Box
Below the main and additional fuse blocks there is a relay block for the engine management system, which consists of five relays and one fuse:
| №1 | Ignition relay |
| №2 | Main relay |
| №3 | Right cooling fan relay |
| №4 | Left cooling fan relay |
| №5 | Fuel pump relay (fuel) |
| №6 | Fuel pump fuse F5, 15A |
On some vehicle versions, a starter relay may be located under the additional unit next to the ignition relay.
Where are the fuses located on a Chevrolet Niva?
On this vehicle, the fuse blocks are located in two places:
- on the left, under the steering column – the main fuse box;
- on the right, behind the glove compartment – fuses and relays of the injection system;
The location of the blocks in the photo looks like this:
For ease of access to the injection fuse box on the Niva, it is recommended to remove the glove compartment.
Relay block diagram above the gas pedal
| №1 | Rear fog lamp relay |
| №2 | Rear window heating relay |
| №3 | Low beam relay |
| №4 | High beam relay |
Features of the windshield cleaner and washer
The electric motor of the cleaner is double-brush, excited by permanent magnets, single-speed.
To protect against overloads, a thermobimetallic fuse is installed in it.
The purifier has two operating modes - constant and intermittent; they are activated by the right steering column switch.
Intermittent operation is provided by a RS-514 type relay, attached with two nuts to the front left side panel.
The relay should provide 9–17 motor activations per minute at temperatures from –20 to +50°C and a supply voltage of 10 V. (When the windshield wiper is turned on in intermittent mode, the brushes can make up to four continuous double strokes)
The resistance of the relay electromagnet winding is (66±2) Ohm, the breaker winding is (23±1) Ohm.
The windshield washer consists of a polyethylene reservoir with an electric pump installed in the engine compartment, washer nozzles located on the hood, and flexible connecting hoses.
The washer is turned on by pulling the right steering column switch towards you (non-fixed position).
If the pump malfunctions, it is replaced.
Clogged nozzles can be blown in the opposite direction or cleaned with a fishing line or a thin needle.
- Go to page:
Wipers and where their relay is located
Post by fraer » May 14, 2010, 11:41 am
Re: Wipers and where their relay is located
Post by ALK » May 14, 2010, 11:56 am
Who knows what's going on behind the fence of the zoo? ©
Re: Wipers and where their relay is located
Post by Nikadim » May 14, 2010, 10:02 pm
Re: Wipers and where their relay is located
Post by fraer » May 20, 2010, 10:31 am
Re: Wipers and where their relay is located
Post by _JJ » Jun 30, 2010, 12:06 pm
fraer In the motor, the contacts open and close to park the brushes in the lower position. Constant mode is supposed to work without a relay, there should just be wiring to the motor, gray. But for the intermittent mode to work, you need a relay that is above the left leg.
I moved the driver's wipers 15 cm to the left, the passenger wipers by 5. + the engine is from the 8 and the relay is also clear. I'll post a report with photos a little later. And now this question worries me: I need to install larger wipers 40-45 cm. From what? Foreign cars have a different mount, maybe look with adapters? Maybe from 8 to 9 they have the same mount? Or maybe change them along with the leashes?
Re: Windshield wiper modifications
Post by nick2121 » 02 Sep 2010, 10:13
Re: Windshield wiper modifications
Post by wwm » 02 Sep 2010, 10:20
Re: Windshield wiper modifications
Post by Ghost_killer » 02 Sep 2010, 10:22
Re: Windshield wiper modifications
Posted by kayotte » Sep 02, 2010, 10:37 am
Nowadays a bunch of wipers are sold with different fasteners, I installed 450 mm for myself, the company doesn’t matter; they are one of the cheapest graphite ones in the supermarket, IMHO it’s better to change them once a season and enjoy the quality of work than to drive a BosheChampionevaleo for 5 years
But we also need an appropriate motor, I use a 2110, disassembled the 2108 relay, changed the resistor from terminal J to 1 kOhm (it could have been less) and set the variable resistor to 10 kOhm, got a pause from 1 second to 10, but left the strokes 4 (there was no suitable resistor) well, I protected the relay with a diode, otherwise there were cases of “sticking”, I don’t think it’s advisable for more than 15 seconds, but I also think the standard pause of 3 seconds is large, the budget for rework is 0, everything was found at home
Expedition vehicle, subframe, ShN clutch, Weber synchronous carb, 31 tires, SRPM, reinforcement. in general, any small tuning.
- Ignition
- Fan motors (2 pcs)
- Turning on the fuel pump
- Main switch
Below in the video you can see where the fuel pump relay is located
To replace, you will have to unscrew and lower the mounting rail on the wiring harness.
To the right of the steering column is another assembly:
- Head lighting (two switches, low and high beam)
- Fog lights
- Tailgate glass heating element
Mounting blocks for Lada 4×4 2022
The main and additional units are located in the cabin to the left of the steering wheel, under the instrument panel. The blocks contain fuses of the “Cylinder” size, ten and six fuses, respectively. The ratings and purpose of the fuses are indicated in Table 4 “Circuits protected by fuses”:
Fuse block of standard size “Standard”. The block is located on the left side under the upholstery and contains fuses that are designed to protect engine control system devices. The ratings and purpose of the fuses are shown in Table 5:
The fuse and relay box is located on the left side of the steering column under the instrument panel. The block contains two “Standard” size fuses, which are designed to protect the circuits of the electric fuel pump, electric windows and electric mirrors. The ratings and purpose of the fuses are shown in Table 6:
The fuse and relay box is located on the right side of the steering column under the instrument panel. The block contains one “Maxi” size fuse and two “Standard” size fuses, which are designed to protect the circuits of the hydraulic unit of the anti-lock braking system. The ratings and purpose of the fuses are shown in Table 7:
How to change fuses?
Test procedure and tweezers
The replacement itself, for example, a windshield wiper fuse with a rating of 20 A (position F9 on both blocks), is carried out as follows:
- Open the block cover.
- Find the failed insert.
- Take it with tweezers and pull it out of the nest.
- A fuse of the same rating must be installed instead. The use of inserts of a higher rating can lead to burnout of the unit and electrical wiring, as well as to a vehicle fire. Using parts with a lower rating will also not protect the circuit, since such an insert will immediately burn out.
- Turn on the circuit in which the insert was replaced. If re-burnout occurs, then the problem is in the elements of this circuit.
- Place the tweezers in their original place and close the lid.
The process of replacing one of the fuses is shown in the video from the Remgar channel.
Mounting blocks for Lada 4×4 2022
Turn signal relay
(part number 8450082700, 9-pin), as well as the windshield wiper relay, are located under the trim in the driver’s feet, to the left of the fuse mounting block. Also, the turn signal relay can be located behind the instrument cluster, or under the center console closer to the left side.
Attention!
The relay and fuse diagram may differ depending on the configuration and production date of the vehicle. Current diagrams of the mounting block are presented in the operating manual for the date of manufacture of the car (download from the official website for 3-door or 5-door).
Why does a fuse or light relay or any other constantly blow out? Before replacing it with a similar one, you must first find and eliminate the cause of its burnout. This could be a short circuit, incorrectly selected rated current, etc. Use electrical circuit diagrams to troubleshoot problems. Questions on this topic can be asked on the forum.
Keywords: 4x4 mounting block | dashboard 4x4
1 0 1 0 0 0
Share on social networks:
Reasons for failure of shnivy fuses
Inserts burn out due to the following reasons:
- short circuit in the serviced circuit;
- sudden voltage surge;
- wiring damage;
- violation of cable insulation;
- installation of too powerful equipment.
Due to the failure of the fuses, the engine may not start, and the serviced unit completely breaks down.
A burnt out relay behaves similarly. The insert does not click when tested, the powered circuit is completely de-energized.