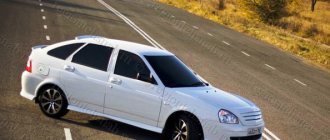
The standard sound insulation of the Priora car leaves much to be desired. Car enthusiasts strive to correct this deficiency with their own hands, since extraneous sounds irritate and distract the Lada Priora while driving.
They make noise on the doors, floor, arches, ceiling, engine compartment, hood, trunk, panels, dashboard - after this the Priora becomes a quiet car. The source of extraneous sounds can be a malfunction of the engine, its components, malfunction of suspension parts, brake system, steering, etc. Unpleasant sounds occur when driving on gravel roads due to vehicles passing by, especially heavy vehicles. To get rid of unpleasant sensations, it is necessary to modify the standard sound insulation. You can do this yourself. Depending on the body type: hatchback, sedan, or station wagon, the Shumka technology is slightly different. Read the article to the end and we will tell you how to do it correctly!
It is necessary to purchase materials and acquire tools in advance.
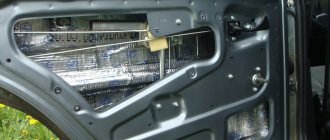
How to soundproof doors
To perform soundproofing of Lada car doors, you need to remove the handles and trim material. Eliminate the stock version. Then clean the surface from dirt and degrease. Before use, warm up with a hair dryer. It is applied to the surface in separate elements. Make sure all wires fit freely into the holes. Next, you can apply vibration insulation and sealant to them. A noise absorber must be placed on top. Glue anti-creaking on the border of the material. Reinstall the trim and handles. Start soundproofing the Priors from the front doors, then the rear ones. The anti-corrosion coating should not be damaged.
Rear left locker with noise insulation for Lada Priora (Lada), from 2007 to 2022. Article number NLS.52.16.003
- Manufacturer : Novline
- Brand : Autofamily (Novline)
- Parts : 1 pc.
- Technology : sound insulation is soldered into the locker
- Profile : Current
- Material : HDPE with Shumka
- Note : Soundproof fender liner LADA Priora, 2007-> (rear left)
Delivery
- Delivery in St. Petersburg from 300 rubles (we deliver on the day of order or the next day for most goods).
- Delivery throughout Russia - SDEK. Del.Line. Energy. PEC and others. Prompt dispatch!
- Free pickup st. Kyiv 5t. 2 more points for some products
Payment
- By card on the website (instant payment)
- Cash (only at Kievskaya 5T)
- Bank card. By translation (only on Kievskaya 5T)
*Prepayment is possible for some products
- Presentation of fender liner description
Characteristics and description of the product
Locker with noise insulation for MAZDA CX-5, (rear right). The noise-insulating locker is made of HDPE material (low-density polyethylene) with a non-woven fabric, which has high strength and retains its physical properties in the temperature range from –60 to +80° C.
Tests carried out by the noise and vibration laboratory of Federal State Unitary Enterprise NAMI have officially proven a noise reduction of up to 3 times in the frequency range from 63 Hz to 16 kHz and are recommended for installation on cars. The locker effectively helps protect the car's wheel arch from the effects of aggressive environments, sandblasting, flying small stones, and snow accumulation. The soundproofing material integrated into the plastic will not come off or come off. Precise mounting points and good geometry allow you to install the locker (fender liner) quickly without damaging the paintwork of the body.
Advantages of HDPE material:
- Impact and abrasion resistance
- Neutrality to aggressive chemical environments.
- Not afraid of temperature changes in the range from -60C to +80C.
- Low thermal conductivity (which prevents snow from sticking).
Modern design and manufacturing methods ensure that the mounting locations and product geometry are precisely matched to the vehicle. Each unit of goods is equipped with branded fasteners.
Question answer:
1. WHY DO YOU NEED FENDERS - to protect your car from the abrasive-sandblasting effect, from stones and gravel, from reagents, which allows you to preserve the anti-corrosion and paint layer of the car!
- Wheel arch liners protect the wheel arch from abrasive sandblasting and dirt!
- They improve noise and vibration insulation, which will allow you to enjoy comfort!
- Protect the car from excessive snow accumulation and ice formation, which affects driving performance and driving safety!
2. Cost determines quality - NOVLINE fender liners are designed for the entire service life of the car and reliably protect it from corrosion. It is important to note that the fender liners are designed individually for each model, which ensures the tightest fit to the wheel arch and an exact match with the standard mounting locations, i.e. allows you to avoid additional drilling of the body and not damage the anti-corrosion layer and paintwork.
3. The quality of the material is determined by the quality of the raw materials. The fender liners produced by NOVLINE are made of HDPE - low-density polyethylene, a material resistant to mechanical stress (abrasive-sandblasting effect), the material has the property of not being subject to the adhesion of excessive amounts of dirt and snow, which is important in our climatic conditions. The benzene material is oil-resistant and is not exposed to reagents, thereby the fender liners reliably protect the car body from corrosion. Environmentally friendly material, resistant to temperature fluctuations -60°C to + 80°C.
First layer of vibration isolation
It is necessary to prepare the surface. Determine the required sheet size. The larger it is, the fewer joints you will end up with. Before use, the material is heated with a construction hair dryer on the side where it is treated with bitumen. Then the layer is applied to the base, fixed and straightened using a roller. To obtain a better result, it is recommended to use another layer. Lay it out overlapping. Depending on the quality of the chosen substance, the area that needs to be covered depends. On average it is 50-100%.
Also check out
- Remove dirt from the floor and degrease it with white spirit. Thereby preparing the surface for gluing sound insulation .
- Place “Bimast Super” in the area of the front arches behind the pedals, “Bimast Bombs” - behind the glove compartment. You can use a hairdryer to heat it, but everything can be done faster using a blowtorch.
- We lay the 2nd layer of Splen 8 mm and 2 mm near the center console and sills; it is better to put Splen 2 mm on the console itself.
- Put back the carpets and upholstery and reassemble the center console.
Roof
The roof and hood of the Lada Priora are the easiest elements to start working with. The standard sound insulation of the ceiling of a Lada Priora car consists only of upholstery. The work begins with preparing the base by dismantling the factory cladding. One can be removed through the rear door or through the luggage compartment. The adjacent plastic covers are also removed. The surface is cleaned of dirt, dust, and treated with a solvent or degreaser. Allow the surface to dry. Prepare a piece of insulating material of the required length, a hair dryer, a knife, and a roller. Try to minimize the number of segments. Preheat the sheets with a hairdryer. When the surface warms up and becomes sticky, fix it on the ceiling. Roll with a roller. Next, apply a layer of material that absorbs sound waves. Splen is most often used. It retains heat well and has an adhesive backing. It is not difficult to fix it on the ceiling of the priors. Splen is applied to the entire surface. To consolidate the insulating effect, you can supplement the cladding with a layer of bitoplast.
After finishing, the upholstery is installed in the reverse order. Keep in mind that the thickness of the layers of noise-absorbing material of the Prior should not be too bulky. Otherwise, the bolt holes for the passenger handles will not line up. In general, for a prior you will need 2 sheets of splen, 2-3 sheets of bitoplast, 2.5-3 sheets of insulating material.
Video
For a method of adjusting the trunk lock on a Lada Granta, see the following video:
Unscrew the bolts Remove the lever You need to lubricate the parts well Does
the trunk close poorly or are the gaps between the trunk lid and the bumper too large/small? These are signs of an out of adjustment lock. Its adjustment on all modern LADA cars (XRAY, Vesta, Largus, Granta, Priora, Kalina Niva 4x4) is carried out in the same way. There are no fundamental differences.
Malfunctions that owners of LADA cars (and other car brands) encounter when the trunk lock is not adjusted:
: 10mm wrench, Phillips screwdriver or Torx T40.
How to adjust the trunk lock
Lada Largus has two tailgates. Not only the bracket on the body can be adjusted, but also the lock latches on the doors themselves. The process is similar: loosen the mounting screws, move the latch or bracket, tighten the screws:
Have you ever had to adjust the door locks yourself? Let us remind you that in order to extend the life of locks and seals, they should be lubricated regularly. By the way, do you know how to make the trunk lid of a sedan (Grant or Priora) or station wagon/hatchback open automatically?
Soundproofing stages
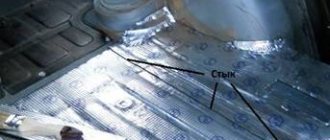
The front and rear row of seats are removed. The central tunnel is being removed. Remove plastic trim and floor covering. Clean the surface from dirt and treat the interior with solvent. The first layer is a heated vibration-isolating layer. Roll over the top. The next layer of material is overlapped. Instead of this material, mastic made from bitumen is suitable. There is no need to cover technical recesses in the floor. Application of splen or bitoplast. They are applied to the entire surface of the floor by priors. To avoid rattling, it is recommended to weigh down plastic elements with pieces of noise-absorbing composition. Cover the joint area with anti-squeak. Install factory sound insulation on the Prior floor.
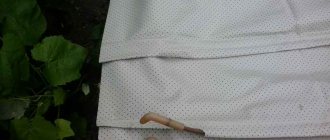
Polystyrene foam in Priora on the floor as it lies
everything except the panel.
This has been the case for me since last summer, and now it’s time for the panel.
I did everything alone, in the garage, where normally you can only open the doors on one side. The bare dashboard is very light and can be removed without problems in one, but to do this you need to free the panel from everything (deflectors, beard with radio, etc.), disconnect all the necessary connectors connecting the wiring of the panel to the body, move the bundles of wires to the side and secure so that they do not interfere when removing the dashboard, if there is an additional one. alarm, then dismantle its wiring in such a way as to exclude the connection of the panel wiring with the body one. It is also important to remove the front seats and the top of the center tunnel. Next, all the fastenings of the dashboard to the front panel are unscrewed, the panel is carefully removed from its seats and transferred to the rear seat. If you have a passenger airbag, then to remove the panel you just need to unscrew the three nuts of its bracket (they are immediately noticeable behind the glove compartment) and the panel is removed along with the airbag.
__________________ Under Priora: I swear constantly, unexpectedly and not on purpose; up to his ears dirty, but happy!
Trunk
Particularly relevant for Priora hatchbacks and station wagons. Soundproofing the trunk begins with removing the flooring of the interior space and the trunk lid. The surface of the body is cleaned, washed, treated with a degreaser and solvent. Soundproofing of the Lada Priora trunk is carried out according to the standard scheme. A vibration-insulating base is applied in two layers, which is preheated to a sticky state. Then splen and bitoplast are laid. The layers are rolled with a roller.
It is especially important to perform high-quality sound insulation of the luggage compartment arches. It is worth paying attention to plastic elements. The holes must be left open. The wires are insulated with anti-creaking, and the plastic parts are made heavier.
Materials
There is no need to invent sound insulation or use building materials, even if their price is lower; today special sound insulation materials have been developed specifically for cars:
- Vibration-absorbing materials (vibroplast, bimast) - serve to dampen body vibrations
- Sound-absorbing materials (accent) - serve to dampen sound waves, their porous structure causes sound attenuation
- Soundproofing materials (Splen) - completely reflect sound waves
- Thermal insulating materials - maintain the temperature inside the car interior (here you don’t need to look for separate materials, sound absorbers and sound reflectors, they will additionally serve as insulation)
- Anti-creaking materials (Bitoplast and Madeline) - to eliminate squeaks, crickets and rattling
Hood and engine
Sound insulation of the engine compartment of the Lada Priora
— the front instrument panel is removed;
— we also remove the factory insulation;
— use a photograph to record the position of all wires and bearings;
— wash the surface, clean it with sandpaper, treat it with a solvent;
— heat the first layer of the vibration isolator to a sticky state and fix it;
- rolled out with a roller;
- second layer - splen, bitoplast;
— insulate the wires with anti-squeak;
- Reassemble the panel in reverse order.
Sound insulation of the hood
In addition to the standard set of materials and tools, you will need factory insulation with clamps. Clean the surface, treat with solvent, and dry. The first vibration-isolating layer, preheated. Roll it out with a roller, then lay the splen. The next layer is standard insulation.
Lada Priora is not a good Shumka. This is easy to fix on your own. The procedure will not take much time and money - if you do it yourself, it will take a couple of weeks and 5 thousand materials. If you do it in a hotel, the price will be from 25,000 rubles.
Manufacturers' recommendations (different methods)
Floor soundproofing installation diagrams with materials:
| Shvi layer | Material | STP (thickness, mm) | Shumoff (thickness, mm) |
| 1 | Vibration isolation (vibration damper) | StP Aero Plus (3mm) Bimast Bomb Premium (4.2mm) | SHUMOFF L3 (3mm) Shumoff Mix F (6.2mm) |
| 2 | Sound-absorbing Thermal insulation | Accent Premium (8-10mm) Barrier (10 mm) or Splen (10 mm) | Shumoff P8V (8mm) |
| 3 (optional) | Soundproofing (soundproofing membrane) | NoiseBlock (2mm) | Germeton A30 (3mm) |
Approximate price of materials:
- Budget option (2 layers, thin vibration damper and heat insulator), up to 4,000 rubles.
- Popular option (2 layers, vibration damper and sound absorber), about 4,000 rubles.
- Maximum effect (3 layers of vibration damper, sound absorber and sound insulator), more than 4,000 rubles.