The chassis is an important parameter for comfort - not everyone will agree to a gear crusher machine. The front and rear suspension of a Priora car is, in fact, its foundation, which consists of several systems, each of which is responsible for a specific task. Some provide “swallowing” of bumps, some provide confident braking, and other systems ensure that the wheels move evenly, with the correct trajectory. The rear suspension on the Priora car is a beam. These are found on all budget cars. Lada Priora is still a budget car, if you dig deeper. Especially the interior, the handles, the paint.
The front suspension of the VAZ 2170 Priora is an independent MacPherson system, in many ways it is a modified copy of the models of the tenth “family”. Its design is simple and even, in my opinion, needs some improvement, for example in the levers. I still like the Priora chassis for its relative softness - few cars in this class are able to show a cushion that could withstand Russian off-road conditions. If you put a front suspension arm on both sides, coupled with braces, it will be a different car both in handling and in swallowing potholes.
Some spare parts are replaced almost immediately after purchase with analog ones - more expensive, but reliable. The strut rod, of course, holds all the components and mechanisms around it, but in serious off-road conditions it cannot cope with this. The rack breaks and it leaks. The chassis mechanism at the front of a vehicle is more often repaired than the rear, but on subsequent AvtoVAZ models it was made a little stronger.
Features of replacing racks
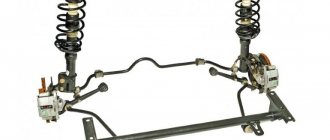
Lada Priora rear suspension parts: 1 – rubber-metal hinge;
2 – suspension arm mounting bracket; 3 – shock absorber casing; 4 – compression stroke buffer; 5 – casing cover; 6 – support washer; 7 – shock absorber cushions; 8 – spacer sleeve; 9 – shock absorber; 10 – insulating gasket; 11 – rear suspension spring; 12 – lever connector; 13 – lever of the rear suspension beam; 14 – shock absorber mounting bracket; 15 – flange; 16 – lever bushing The first generation of Priora, which debuted in the nineties, caused a lot of criticism regarding the struts and suspension. The car did not have a good chassis, it swayed, and maneuverability was not at the best level.
At the beginning of the two thousandth there was a stage of restyling, which took the car along reformist paths. Now the racks have become more reliable, and the power unit is more powerful. But nevertheless, professionals propose to improve the restyled version by replacing the struts, since then its performance will be significantly improved. Although over time, replacement of parts is necessary in any case.
Replacing struts on a Priora is based on one factor: in what conditions the car will be used. Each rack has its own design differences, pros and cons, technical features, and if one type is good in one situation, then it is unlikely to be effective in another. So this should be taken into account without fail.
Before you decide to replace parts, you should be 100% sure of this. You can check the working condition of the racks in a very simple, old-fashioned way. You'll have to rock the corner of the car a little. Now count the number of free jumps. If one, then the system is normal. If there is more than one, then urgent replacement of the racks is required, since the old ones can no longer cope with the task assigned to them.
When replacing old parts, you should also take into account that oil struts, despite their affordable price, are less effective, especially in frosty weather. Gas-oil shock absorbers are somewhat more complex and expensive, but they will please you with good performance
It is only worth noting that imported spare parts are significantly better than domestic ones. Therefore, professionals, as a rule, install Kayaba struts on Priora.
"Bogdan"
The coexistence of the previous model and the new one in the same market is a worldwide practice. As soon as the new version finally puts the previous one to shame, production of the old model is stopped or transferred to other countries. So the painfully dear sedans and station wagons of the tenth family, having left the assembly line in Togliatti, appeared in the model range of the Ukrainian corporation Bogdan.
The new VIN code did not scare off fans: in Russia alone in 2010, more than 5 thousand Extogliatti small cars were sold, and in the first half of 2011 - more than 3 thousand. Since we have a dime a dozen sedans in this class, we decided to understand why aliens from the past captivate buyers using the example of the Bogdan-2111 station wagon and its direct relative, the Lada-Priora.
In Russia, the tenth family left the main conveyor in stages. In 2007, the sedan left the scene. The hatchback and station wagon lasted two years longer, then the family finally gave way to the Priora. Although the factory stubbornly insists that this is not a restyling, but a radically redesigned car, the buyer is skeptical about such statements.
Priora front struts and rear shock absorbers: the best solutions
As practice shows, correctly selected front struts on a Priora can significantly improve the car’s behavior on the road. Taking into account the fact that Lada Priora is a budget model, there is no talk of installing expensive shock absorbers such as Bilstein, Koni, Sachs and others.
Some manufacturers simply do not have struts for Priora, others have solutions that are too expensive, and in some cases, modifications, alterations, etc. will also be required to install a new shock absorber. However, among the more affordable and high-quality racks for Priora, SS20, SAAZ or KYB (Kayaba, Kayaba) can be distinguished.
The main difference is the stiffness of the SS20 shock absorbers. These struts are hydraulic and are available in “standard”, “comfort” and “sport” versions. The manufacturer offers both rear and front struts of the Priora, which allows you to select suitable parts and perform the so-called replacement of struts “in a circle”.
The SS20 “standard” struts are the softest and are well suited for a quiet ride. The “comfort” version is more universal, the shock absorbers are a little stiffer, and are better suited for high-speed driving on the highway. Also, these racks work more efficiently on bad roads.
The SS20 “sport” version is the toughest and is designed for high speeds. At the same time, the car's handling improves noticeably, however, when driving on bad roads, the stiffness of the shock absorbers somewhat affects comfort.
Let’s also add that in addition to the struts, the manufacturer offers the Priora support bearing (SS20 support), bump stops, etc. In practice, supports for Priora and other parts allow you to purchase a kit and replace the racks without any modifications. Also, the supports are considered reinforced, the bumpers withstand impacts well, and the pillars do not break through.
If you need imported racks, in this case it is recommended to pay attention to Kayaba racks (KYB for Priora). The manufacturer from Japan is well known all over the world, and also offers spare parts for Russian-made cars
For the Priora, KYB has developed Exel-G gas-oil shock absorbers. This line includes the front and rear pillars of the Priora. In practice, these shock absorbers are in great demand among car enthusiasts. Kayaba on Priora is considered a universal solution, the rigidity is average (it holds the road well on the highway and performs well in the city).
KYB shock absorbers are also distinguished by their long service life and reliability. The only negative is the rather high price. It should also be noted that when comparing which is better, Kayaba or SS20, often the first option is better.
The SAAZ racks complete the list. Let’s note right away that these are Priora’s standard factory struts. In other words, this Priora shock absorber is on the car from the factory. This option can be taken if the car’s behavior on the original shock absorbers is completely satisfactory.
The price is quite affordable, although the service life of SAAZ shock absorbers on the VAZ 2170 is no more than 40 thousand km. It can also be noted that in some cases you can limit yourself to only replacing the racks themselves, leaving the factory supports and bumpers (if they are fully functional).
Chassis SS20
These spare parts for domestic and foreign cars are produced under the “System Technologies” brand. These racks have become so popular due to their high quality. For Priora, the manufacturer offers 4 product options that differ in hardness. Which stands are better? They need to be selected according to your driving style. The softest ones are the “Standard” series racks. Rear shock absorbers from the same series are also offered.
A reinforced version is offered to increase the load capacity. Next are the “Comfort” racks. According to reviews from many car owners, this is the best option. They are stiffer than the Standard, but the suspension works equally well on bad and good roads.
The “Highway” kit is suitable for those who like stiff suspension and high speed. With these racks you can drive on bad roads, but it will be uncomfortable. “Sport” is the toughest option from this manufacturer for Priora cars. A front suspension of this type is not very suitable for the city, but for sports competitions it is just right.
When to change
Factory SAAZ rear struts usually withstand 70-80 thousand kilometers, after which, according to the factory’s recommendations, they need to be replaced. But there is no point in changing shock absorbers if they do their job perfectly, unless you want to change the characteristics of the suspension.
It is not difficult to determine the serviceability of the racks yourself. As already mentioned, the first sign of their malfunction is a visible oil leak. In addition, faulty shock absorbers give themselves away with a characteristic dull knock in the area of the rear arches. This is also evidence of their depressurization and oil leakage.
You can verify that the racks are faulty in a simple way. Try rocking the left or right rear of the car. If it swung once and froze rigidly, it means that everything is in order with the shock absorber from which you rocked the body. If the car continues to rock, the shock absorber is faulty, and the body lowers and rises due to the spring.
Replacing rear struts on a Priora
Shock absorbers located in the rear of the body serve to reduce the force of mechanical shocks, and sometimes to completely absorb them. Like any part, the rear struts have a very specific service life, after which they will not be able to fully cope with their main task. And here it is necessary to change them.
Replacing struts on a Priora is far from the worst problem that car enthusiasts may encounter.
The timing and need for replacing rear shock absorbers is determined in each specific case individually. This primarily depends on the operating conditions of the machine. In a Lada Priora car, repairs to struts are carried out as necessary. Moreover, the moment when the rear shock absorbers stop working efficiently is perfectly felt by both the driver and his fellow travelers.
You will notice poor performance of the shock absorbers while driving. Your car will become less maneuverable and stable, especially when traveling at high speeds. By the way, the stability of the car, its maneuverability and accuracy when changing trajectories will be ensured by the installed front strut brace on the Priora. But that’s not about that now, let’s get back to the work of shock absorbers.
As for gas-oil shock absorbers, their price tag is much higher. But at the same time, it is completely justified and corresponds to their high technology. Even at low temperatures, you will not feel any changes in the behavior of the car. This, in turn, is the best assessment of the work of the racks. There is an opinion among motorists that foreign parts are of higher quality and more reliable.
Replacing Priora struts is divided into several stages. By and large, there is nothing complicated about replacing rear shock absorbers on a front-wheel drive car. But still, the tips below will be useful to owners of both Priora and other VAZ models.
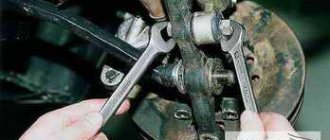
First of all, you need to unscrew the nut with which the struts are attached to the body. It is ideal to do this with a special wrench size 22*13, designed for dismantling and subsequent installation of shock absorbers in Priora. Then you need to securely fix the car, tighten the wheel bolts and use the jack.
Do not forget that the stop must be installed in the direction opposite to the lift. For your own safety, place an additional support under the car for safety. Of course, the preparatory work will take some time, but this way you guarantee yourself a replacement of the racks that does not threaten life and health.
The next step in replacing the rear shock absorbers is to remove the wheels. To do this, you need to unscrew the bolt from the bottom of the rack and remove it. It is likely that you will have to work with a hammer. After completing these steps, you can remove the faulty strut along with the spring
It is important here to correctly identify all faulty elements and replace them with new ones.
The most common parts that wear out are bushings and boots. But the bump stop can be in use for a long time. That is why carefully examine its condition. Elementary replacement of the corrugation casing
It is important to choose the correct size of the impact washer. Secure it on top of the element and place the bumper in the corrugation
The boot is put on the stem. In the latter, you first need to install a rubber element, similar in shape to a donut and having an iron sleeve.
There is a rubber cushion on the shock absorber spring, which it is advisable to dismantle and test for suitability. The spring must be correctly positioned and installed on the shock absorber. And now, the new racks are ready for installation on your Priora.
When installing a shock absorber, it is necessary to ensure that the rod fits into the hole provided for it. After that we start the lower part. Everything is traditionally secured with nuts and bolts. The lower connection of the rack needs to be tightened more tightly to the beam itself; most likely, the use of keys will be needed here.
Important! All actions with the upper mount are carried out strictly after the car body has been lowered slightly. This will allow the spring to compress under the pressure of the weight of the car.
Next, assemble something similar to a pyramid from a donut-shaped rubber element and a washer. At the same time, the nut is screwed onto the rod. At the same time, secure it well with a key, ensuring immobility, after which you can tighten the fastening nut.
After the upper part of the strut support on the Priora has been assembled and installed, you can safely begin installing the wheel, and upon completion, lower the car from the jack.
Life hack: front suspension of a Priora car - how to disassemble it, diagram
The chassis is an important parameter for comfort - not everyone will agree to a gear crusher machine. The front and rear suspension of a Priora car is, in fact, its foundation, which consists of several systems, each of which is responsible for a specific task. Some provide “swallowing” of bumps, some provide confident braking, and other systems ensure that the wheels move evenly, with the correct trajectory. The rear suspension on the Priora car is a beam. These are found on all budget cars. Lada Priora is still a budget car, if you dig deeper. Especially the interior, the handles, the paint.
The front suspension of the VAZ 2170 Priora is an independent MacPherson system, in many ways it is a modified copy of the models of the tenth “family”. Its design is simple and even, in my opinion, needs some improvement, for example in the levers. I still like the Priora chassis for its relative softness - few cars in this class are able to show a cushion that could withstand Russian off-road conditions. If you put a front suspension arm on both sides, coupled with braces, it will be a different car both in handling and in swallowing potholes.
Some spare parts are replaced almost immediately after purchase with analog ones - more expensive, but reliable. The strut rod, of course, holds all the components and mechanisms around it, but in serious off-road conditions it cannot cope with this. The rack breaks and it leaks. The chassis mechanism at the front of a vehicle is more often repaired than the rear, but on subsequent AvtoVAZ models it was made a little stronger.
Replacing struts on a Priora: when is it necessary to repair a car?
Before determining which racks on the Priora are better and more reliable, you should make sure that the elements need to be replaced. There are several main reasons why repair work is required. The best decision would be to visit a car repair shop and examine the spare parts by specialists. You can independently determine the need for installation based on the following phenomena:
1. The car holds the road worse.
2. When turning, vehicles are subject to strong roll.
3. There is a knocking or clicking sound in the area of the racks.
4. Shocks when hitting small holes lead to “jumping” of the car and are transmitted to the cabin.
5. When the body rocked, strong vibration appeared.
Bleeding a car is easy and allows you to accurately identify problems. To perform it, the owner needs to swing the body at the corner front point. The next time you lower the car down, you should release it.
If, after lifting to its original position, the body stops swaying, then the condition of the racks is normal. Otherwise, you need to think about what racks to install on the Priora, and start work as soon as possible.
Racks, what are they and why are they needed?
Struts are a mechanism whose task is to filter the shocks coming to the car when driving on a bad road. If the racks are of poor quality and not well-designed, then movement becomes a nightmare. This is why driving an expensive foreign car and a budget domestic car, which is sensitive to every bump, are so strikingly different.
The struts have a complex design, but the basis is a hollow piston system. The piston system is equipped with multiple parts that secure the racks to the car body, and inside it is filled with either gas-oil liquid or oil. The principle of operation of the struts is that the piston, when it starts to move, seems to break the impacts falling on it, reducing their force.
Front and rear struts, depending on the manufacturer, can last a different amount of time, for example, standard Saaz rear struts installed on Lada Kalina and Lada Priora can last 75,000 - 85,000 km, after which they require replacement. If you put new ones on a Lada or Priora, of better quality, then they will last 120,000 - 125,000 km, which is already an achievement.
On the Priora, as on other cars, problems with struts are expressed in oil leakage, insufficient adhesion of the tires to the road surface, and deterioration in maneuverability. Another sign of problems with the rear strut is a sudden, sharp increase in braking distance. According to professionals, if it is necessary to replace one rear strut, then it is wiser to change both at once, since otherwise there may be a mismatch of parts, which will lead to a significant deterioration in the operation of the entire system and a decrease in the dynamics, maneuverability and controllability of the car.
Engines and transmissions
In 2001, a new facelift model of the VAZ 2110 was introduced. The car had slightly more rounded edges and a modernized front bumper. Until 2004, the offer included 1.5-liter gasoline engines with a power of 77 or 92 hp. With. Since 2004, larger 1.6-liter 80- and 89-horsepower engines have been installed under the hood. Power was transmitted to the front wheels through a 5-speed manual transmission 2110.
A year after its debut, the sports version 21106 GTI appeared. The transmission here is based on a 2-liter 150-horsepower engine from Opel, which allowed acceleration to just over 200 km/h. Car enthusiasts are also familiar with the Lada 110 Premier, the difference of which was that the body was increased by 19 cm. It can often be found in the form of a taxi. Under the hood is a 1.8-liter gasoline engine producing 98 hp. With. In 2009, production of the Lada 110 was completed, and the Priora became the model's successor. The VAZ 2110 was offered in sedan (2110), station wagon (2111), five-door hatchback (2112) and coupe (21123) body styles.
The main “disease” of all VAZ 2110 engines is the cooling system. Oxides and deposits often collect here and become clogged in the engine casing and radiator. Due to a malfunction of the sensor, the electric fan periodically fails. The tens clutch also usually fails quickly during aggressive driving.
Every owner of a Ten is faced with the need to replace a piston - the one on the Priora is perfect here. It will significantly improve the technical characteristics, but such an exchange is best carried out after 120,000 km.
Salon VAZ-2110
If we compare the VAZ 2110 and Priora, Russian manufacturers have been upgrading the latter’s 1596 cc engine for many years. The four-cylinder sixteen-valve engine produces 72 kW/98 hp. With. at 5600 rpm and a maximum torque of 145 Nm at 4000 rpm, which, according to available data, allows the Priora to reach a top speed of 183 km/h, and provides acceleration to 100 km/h in 11.5 s.
Rear springs. — Lada Priora Sedan, 1.6 l., 2008 on DRIVE2
Good day, everyone. Over 10 years, the rear springs sagged and got tired, the arches were already covered by the tire treads, and with two passengers in the back, the tires even touched the fender liners on potholes! I didn’t want to install strut spacers (houses), because... last summer I replaced the rear struts and they were already working in a compressed range. I bought springs, the seller gave them from 2110 (blue marker) and said that they would fit, but in the garage, when I removed the right spring and placed it next to the new one - the difference was 1 turn lower than the original old one! I went to change it, the seller admitted the mistake and offered Priorovskie class B (soft) black marker) or for the Universal class A (hard) yellow marker)! All springs are painted gray, but several coils have different marker colors! The reinforced ones, on the contrary, turned out to be 1 turn higher than the original ones and 100 rubles (1050 rubles) more expensive. But when I installed it in place, it turned out the way I wanted - the arch is slightly higher than the wheel. As a result, the suspension changed for the better, I don’t even know how to explain it yet. About the installation I think it’s too much to write, I didn’t remove the wheels, the keys are 17, two for 19 and an adjustable one, hold the rod. Another piece of hose, as a guide for the rod when lowering the jack, pullers are not needed, together with the removal of the seats it took about 40 minutes. Thank you for reading! A little I didn’t forget: the tip of the lower turn should look towards the wheel! After driving for three days, with a load and empty, I was pleased with the result: the car became more stable in turns, smoother on potholes, and sat down less than usual when loaded! In general, there are many advantages; it would have been necessary to change it earlier and not have to suffer with subsidence!
Price: 1,050 ₽ Mileage: 69,600 km
www.drive2.ru
Types and characteristics of racks
At the moment, several types of racks are installed on Priora.
| Type | Description |
| Oily | Their action is based on the force of hydraulic oil. As a rule, such devices are two-pipe, although sometimes single-pipe ones are also found, but they are less efficient and difficult to operate. Oil racks are easy to install and are wear-resistant and durable. The only disadvantage of this device is that it does not cool well, which ultimately leads to deformation. But with proper care of the car, deformation may not occur soon. But oil parts are cheaper than gas-oil parts. |
| Gas-oil | They are in many ways similar to oil ones, but here we have a completely different type of liquid, which means a different operating principle. Here, a part called a gas boost regulates the oxygen pressure, replacing it with nitrogen, which sets the entire system in motion. Such racks are often presented in a single-pipe version, unlike oil single-pipe ones; gas-oil ones are good in everything. The most significant advantage of the system is good heat transfer. The downside is less wear resistance than oil struts, as well as high sensitivity to external factors of various properties. |
Engine and gearbox problems
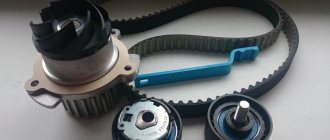
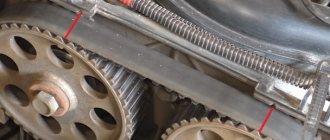
If we talk about power plants, in general they are quite reliable (at least when compared with the “decimal” ones). The timing system is belt driven. The belt runs for quite a long time - up to 120 thousand kilometers. However, the roller and pump may fail earlier, which leads to a break in the timing drive or overheating of the motor in the first and second cases, respectively.
By the way, the “Prior” engine has different pistons, crankshaft and lightweight connecting rods. The resource of the internal combustion engine is about 300-350 thousand kilometers.
Among the common problems on Priora is difficult starting. The reason for this is a low-quality standard battery. Its service life is no more than one year. The owners strongly recommend replacing it with a better one so as not to experience problems with starting, especially in winter.
Now about the transmission. All power units are paired with a five-speed manual transmission. It has been significantly improved and is now equipped with a cable drive. Shifting gears is clear, without hesitation. The clutch lasts up to 100 thousand, depending on driving style. The box itself has no major flaws. The recommended transmission oil change interval is 60 thousand kilometers.
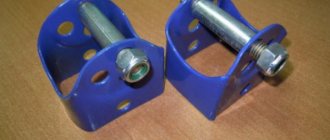
Installing spacers on the Priora
Lada Priora - everything you need to know about increasing ground clearance. Part 9
Installing spacers yourself is not difficult for anyone who has at least minimal experience in car repairs. In this article we will talk about the sequence of actions that are performed when installing spacers, as well as the most common mistakes made during the work process.
How to install spacers
In one of the previous articles, we talked about the main activities that need to be carried out before installing spacers. If you have replaced sagging springs, changed struts and silent blocks if necessary, and also bought spacers of the required size, then you will need ordinary driver's tools - a jack, a support, wheel chocks, a set of keys, and a steering pin puller. The exception is a spring puller, but this can be purchased at your local auto parts store.
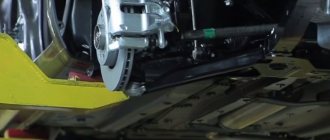
Installing spacers on the front suspension
To replace spacers on the front suspension, chock the rear wheels, raise either side with a jack, and install stands. Do not perform any work under a car that is on a jack, it is deadly. With one of the front sides of the car hanging, remove the wheel and unscrew the hub nut. To do this, you will have to engage first gear with the engine off. If that doesn't work, have someone press and hold the brake pedal. Often you have to use a powerful wrench to unscrew this nut. Then loosen and unscrew the steering pin nut and ball joint bolts. Using a puller, remove the steering pin from the strut.
If you do not have such a puller, visit your local auto parts store. Using a crowbar, press the lower suspension arm so that the ball joint comes off the steering knuckle. Pull the brake disc towards you so that the hub comes off the constant velocity joint shaft (grenade) and support the strut with something
Unscrew the three nuts that secure the support bearing to the body and carefully lower the rack down. Replace the bearing bolts with longer ones, then put a spacer on it and install the strut in place, then reassemble the suspension in reverse order. Don't forget to adjust the camber and toe
Don't forget to adjust the camber and toe.
Installing spacers on the rear suspension
Support the front wheels with chocks, engage first gear, support either rear side with a jack and support it. Remove the wheel. To install the lower spacer, unscrew the lower bolt of the shock absorber, pull it out of the mount, insert the spacer into the mount and secure it with the same bolt and nut. Insert the shock absorber into the spacer and secure with a new bolt and nut in the desired hole. To install the upper spacer, compress the springs using a puller, then hold the shock absorber rod and unscrew the fastening nut. Remove the standard gasket and install a spacer instead. Do not place a spacer on the gasket; it will pop out over time. If necessary, attach an extension to the rod and install the shock absorber, securing it with a nut. Loosen the puller so that the spring takes its place. Put the wheel on and tighten the wheel bolts.
Or you can combine both by buying a small car and then making it suitable for crossing bad roads. You can create such a universal car by simply increasing the ground clearance of your existing car. In the conditions of Russian roads, such fraud will always be relevant. So, for example, by increasing the ground clearance on a car like a Priora, you will save a lot of money on its repairs. After all, you won’t have to repair the suspension in vain after encountering a couple of holes.
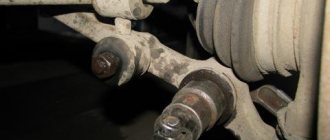
Suspension arms or beam - check fastenings and silent blocks
One of the common causes of knocking in the rear suspension is the beam. If your car has such a suspension design, it is worth determining the exact location of the knock. To do this, you need to put the car in a pit, ask someone to rock the car, and in the pit, grab hold of various places on the beam with your hand. Most often we are talking about the knocking of the silent blocks of the rear beam. The suspension arms may also knock, and here the diagnosis will be somewhat more complicated:
- you need to install the car in the pit, putting it on speed, and not on the handbrake, then climb into the pit, taking with you a pry bar, a large screwdriver, and a set of keys;
- using a mount, check the functionality of the bushings and silent blocks; if they move easily in their seats and noticeably play, they need to be replaced;
- check the integrity of the suspension arms, their bending can lead to knocking and uneven running of the car, and cracks indicate the need for quick replacement;
- the fastenings of the levers can be loose, for this you need to use keys and tighten all visible connections, this will help eliminate this item from the causes;
- When the suspension elements are deformed, the levers themselves can knock on body parts and other elements of the rear suspension space while driving, so you can rock the car and find out.
Which ones to choose and their price
Having decided to replace the rear struts, you will have to choose among today's abundance of original spare parts and their analogues on sale. You can, of course, not bother and buy stock oil shock absorbers from the SAAZ plant, exactly the same as those installed on the Priora on the assembly line.
Part numbers:
Their prices vary from 1200 to 1400 rubles (for one rack).
If you want to change the characteristics of the suspension, namely make it softer or stiffer, you can purchase alternative struts. The most popular shock absorbers among Prior owners are SS20.
They are distinguished by high reliability, and in addition, a variety of designs that allow you to change the stiffness of the suspension. There are four modifications of SS20 for Priora on sale: “Comfort”, “Standard”, “Highway” and “Sport”, differing in rigidity in ascending order. The cost of a pair of such racks is about 3,700 rubles.
"Technology System" – SS20
Important: it is recommended to replace shock absorbers in pairs, i.e. if you change it, then change it on both sides of one axis! To replace the rear struts yourself, you don’t have to go to a service station.
This process can be done at home and will not take more than an hour.
To replace the rear struts yourself, you do not need to go to a service station. This process can be done at home and will not take more than an hour.
Tools and tools you will need:
- jack;
- a “shoe” or an ordinary brick to block one of the wheels;
- wrenches at “6”, at “19”, at “22”;
- rust remover like WD-40;
- small mount.
Work order:
- Place the machine on level ground.
- Secure one of the front wheels with a “shoe” or brick.
- Open the luggage compartment lid, move the trim on one of the rear “glasses” at the place where the pillar is upper mounted.
- Using a wrench set to “22”, unscrew the nut securing the strut, holding the shock absorber rod with a wrench set to “6”.
- Using a jack, lift the car body from the side of the wheel where you plan to replace the strut.
- Having climbed under the car, unscrew the nut securing the lower part of the rack to the rear beam bracket with a “19” wrench.
- If the nut does not budge (soured), treat the threads around it with WD-40, let it penetrate the joint for about 20 minutes, then try again.
- When the nut is unscrewed, remove the bolt and remove the lower part of the shock absorber from the bracket. To simplify this process, you can use a small pry bar.
- Remove the shock absorber.
- Go to the trunk and remove the support washer and strut pad from where the upper part of the shock absorber is mounted.
- Remove the lower spring, cushion, bushing, boot and compression buffer from the shock absorber. If the boot, buffer, or shock absorber pads show signs of damage, they also need to be replaced.
- Carefully inspect the shock absorber spring. There should be no cracks, chips or other signs of destruction on it. If they are present, the spring must be replaced.
- Reassemble the new rack in reverse order.
- Install the new rack by first inserting its rod into the upper mount, and then securing the lower part into the bracket with a bolt.
- It is recommended to finally tighten all connections after the car body has been lowered, i.e. after you remove the jack.
- Upon completion of the work, rock the car body several times on the side where the rack was installed.
- After 100-150 km, tighten the shock absorber mounting nuts.
Checking the condition of the chassis and transmission
We check the condition of the chassis and transmission every 15 thousand kilometers. The parts of the chassis (wheels, suspension arms, anti-roll bar, rear suspension beam, shock absorbers and suspension springs) and transmission (front wheel drive shafts) must be free of deformations, cracks and other mechanical damage that affect the shape and strength of the parts. Hanging the front wheels one by one (while the car must be securely fixed on the support stand), we check the condition of the wheel hub bearings.
Use only factory-made support stands. The wheel should rotate evenly by hand, without jamming or knocking.
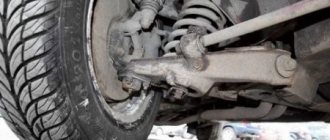
Holding the wheel in a vertical plane, we alternately sharply pull the upper part of the wheel toward ourselves, and the lower part away from us, and vice versa. We make sure there is no play (knock). If there is a knock on the front wheel, ask an assistant to press the brake pedal. If the knocking noise disappears, then the wheel bearing is faulty, and if the knocking noise remains, then the ball joint is most likely worn out. The hub bearings of the front and rear wheels are not adjustable and must be replaced if there is play. To check the serviceability of the ball joint, insert a mounting blade between the suspension arm and the ball joint housing. Be careful not to damage the ball joint boot.
While pressing the lever with a mounting blade, we monitor the movement of the lever head relative to the ball joint housing. If there is play in the connection, replace the ball joint.
We check the condition of the protective covers of the ball joints. We replace ball joints with torn or cracked covers. To check the silent block of the front suspension arm...
...insert a mounting blade between the body bracket and the lever head... ...and try to move the lever along its axis and along the axis of the bolt. If the lever moves freely, without effort, it means that the silent block of the lever is badly worn or damaged and needs to be replaced. Ruptures, cracking and swelling of the rubber bushing of the silent block are unacceptable. Checking the condition of the silent blocks...
... and the back ends of stretch marks. Tearing, cracking and swelling of rubber silent blocks are unacceptable.
Inspecting the anti-roll bar cushions...
...and rubber bushings for stabilizer struts. If ruptures, cracks or severe deformation are detected on the rubber pads and bushings, they must be replaced. Lifting the rear wheels one by one, we check the condition of the rear wheel hub bearings. The wheel should rotate evenly by hand, without jamming or knocking. To check the condition of the silent block of the rear suspension beam arm...
...we insert the mounting blade between the body bracket and the lever head and try to move the lever in different directions. If the lever moves freely, without effort, it means that the silent block of the lever is badly worn or damaged and needs to be replaced.
We check the condition of the springs, telescopic struts and shock absorbers of the front and rear suspensions. The suspension springs must not be damaged. Tearing, cracking and severe deformation of rubber bushings, cushions and compression buffers of shock absorbers are unacceptable. Liquid leakage from shock absorbers is not allowed. A slight “fogging” of the shock absorber in its upper part, while maintaining the characteristics, is not a malfunction. If the rubber element of the upper support of the front suspension telescopic strut settles or is destroyed, the support must be replaced.
We check the condition of the hinges and the protective cover of the gear shift rod and jet rod. Alternately rotating and turning the front wheels (with the front of the car hanging out)…
...we inspect the protective covers of the outer...
...and internal hinges of the front wheel drives, check the reliability of their fastening with clamps. Covers that are cracked, torn or have lost elasticity must be replaced. We check that there is no oil leakage from the gearbox through the seals of the internal drive joints. If there is a leak, replace the seals.
The VAZ-2110 is considered the predecessor of the Lada Priora; their front suspensions are almost identical, the only differences are in the spring parts and shock-absorbing components. The problems that drivers noted with the VAZ-2110 with front suspension migrated to the Priora - the wheel bearings leave much to be desired, the ball joints wear out quickly and must be regularly replaced.
What to do and is it possible to drive?
Of course you can drive, in general you can “drive” without shock absorbers - but how? Of course, if you have one strut leaking, then you may not notice it, but if there are two at once, or as my friend had three (two in front and one in the back), then the car will “swing” like on a roller coaster. Even low speed and reaction to small irregularities caused the car to sway, I’m already silent about some sharp maneuvers (turns, for example), the car was simply drifting!
What to do - change it urgently, the sooner - the better, otherwise, due to your incorrect savings on racks - then you will pay more.
Is it possible to ride:
- If one rack is leaking, then it’s possible, but you need to change it quickly (you’ll understand why later).
- If there are several leaks, say two or three, then it is not advisable to drive, but if necessary, we do it very carefully, at low speeds. Do not make sudden maneuvers, braking, overtaking or entering turns - this can lead to accidents with inoperative shock absorbers.
Guys, I understand that original shock absorbers are expensive, but they need to be changed! YES, and you can find quite sane originals, for example KAYABA, very sane quality and more or less prices.