February 28, 2017 Lada.Online 28 411 0
The starter is removed in connection with its replacement, inspection or repair. On LADA cars, the starter is installed on the clutch housing at the front in the direction of travel. Before starting work, you should disconnect the negative terminal of the battery, drive the car onto an inspection ditch (overpass) and remove the engine protection.
On all modern LADA cars (Lada XRAY, Vesta, Largus, Granta, Kalina, Priora and Niva 4x4), removing the starter is performed in the same way. Installation is carried out in reverse order. Distinctive features of the process are presented below.
Removing the Lada Priora starter
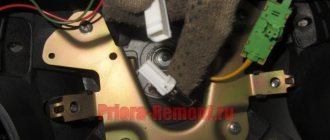
Disconnect the wire terminal from the negative terminal of the battery.
Remove the air filter (see “Removing the air filter”).
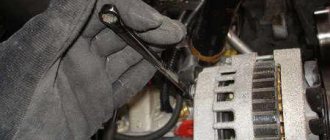
Using the “13” head, unscrew the nut securing the tip of the wire connected to the “positive” terminal of the battery.
Remove the wire tip from the contact bolt.
Disconnect the traction relay control wire.
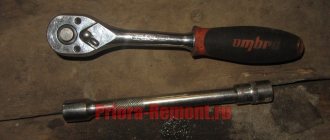
Using a 15mm socket, unscrew the two nuts securing the starter (the lower nut is not visible in the photo)…
...and remove the starter. Install the starter in reverse order.
Video on the topic “Lada Priora. Removing the starter"
How to remove, disassemble and reassemble the starter on a Priora!
how to remove the starter of a Lada Priora Lada Priora will not start - the starter does not turn Source
How to remove the starter on LADA cars with your own hands
The starter is removed in connection with its replacement, inspection or repair. On LADA cars, the starter is installed on the clutch housing at the front in the direction of travel. Before starting work, you should disconnect the negative terminal of the battery, drive the car onto an inspection ditch (overpass) and remove the engine protection.
On all modern LADA cars (Lada XRAY, Vesta, Largus, Granta, Kalina, Priora and Niva 4x4), removing the starter is performed in the same way. Installation is carried out in reverse order. Distinctive features of the process are presented below.
Starter problems and their elimination
If the starter clicks but does not turn, then first of all attention should be paid to the battery. Most likely, its charge is not enough to start the car. You should also inspect the condition of the terminals. More rarely, the culprit for clicking is the traction relay.
If the starter does not turn the crankshaft of the power plant, then conditionally possible causes can be divided into mechanical and electrical. The first most often includes problems with the clutch or drive gear. If there are any malfunctions, the listed elements must be replaced.
In the electrical part, the weak point is the brushes. They are the most susceptible to wear and tear. When the remaining length of the brushes begins to be 4 mm or less, they must be replaced.
Checking the starter circuit
If the starter does not work when the ignition key is turned to position “II,” there may be a malfunction of both the starter itself and its activation circuit. To check, turn off the ignition and disconnect the wire block from the terminal of the starter traction relay windings.
During the operation, care must be taken, as sparking may occur in the area where the terminals are closed. Do not connect the screwdriver to ground while closing the terminals!
Using a screwdriver, we bridge the terminal of the traction relay and the tip of the wire connected to the “positive” terminal of the battery. If the crankshaft rotates, then the starter is working, and the cause of the malfunction is a violation in its activation circuit. Otherwise, the starter or its traction relay is faulty. If it is not possible to eliminate the malfunction in the activation circuit of a working starter, then, if necessary, in this way (by turning on the ignition and closing the terminals), you can start the engine and drive to the repair site. A malfunction in the starter switching circuit can be caused by damage to: the starter relay, the power circuit or relay control circuit, the ignition switch contact group. To troubleshoot the starter circuit...
We insert a jumper (piece of wire) into the sockets of the power contacts of the relay “30” and “87”. We turn the key in the ignition switch to position “II” - “starter”. If the starter turns on, the power circuit is working, if not, then we check it with a tester...
...is “+12 V” supplied to socket “30” of the starter relay when the ignition key is in position “II”. In this case, the second (“negative”) tester probe can be connected to the head of the instrument panel mounting screw. If voltage is supplied to socket “30”, use a tester to check the integrity of the circuit from socket “87” of the starter relay to the tip of the starter traction relay control wire. If voltage is not supplied to socket “30,” we check the circuit from terminal “50” of the ignition switch to socket “30” of the relay. If the circuit is in good condition, it is necessary to replace the ignition switch contact group. If the starter power circuit is working properly, check the starter relay control circuit. To do this, insert the tester probe into socket “86” of the starter relay, connect the second probe to ground. With the ignition on, check...
...is “+12 V” supplied from the main relay of the engine management system to socket “86” of the starter relay. Then we insert the tester probes into the relay sockets “85” and “86” and check...
...is there ground in socket "85" of the relay... ...connected to terminal "50" of the controller. Otherwise, we check the integrity of the starter relay control circuits: from the main relay of the control system and output “50” of the controller - respectively to sockets “86” and “85” of the starter relay.
Article number and approximate price for the original Lada Priora starter
There are two types of starters installed on Lada Priora cars. They differ in power and mounting method. The units are not interchangeable, so it is important for the owner to know which starter is installed on his car.
The original unit with a power of 1.4 kW has article number 21100370801002. The cost of a new product is from 3600 to 4000 rubles. At car dismantling yards, spare parts can be found with a price starting from 800 rubles. However, most used starters are in very poor condition.
The Priora uses a 1.8 kW starter. The branded unit comes with catalog number 5702370815. Its price ranges from 2300 to 4100 rubles for a new product. A used spare part will cost from 900 rubles.
Catalog number and cost of a good starter for Lada Priora
Car owners have a predominantly negative attitude towards original starters on Priora. This is due both to a large number of defects and to the presence of breakdowns that are not typical for starters from other manufacturers. For example, it is not uncommon for stator magnets to come off. Therefore, drivers recommend paying attention to analogues. Among them there are many decent options at an affordable price. The tables below provide a list of brands that have proven themselves in use in a car.
Table - Good analogues of the original 1.4 kW Lada Priora starter
| Manufacturer | vendor code | Approximate cost, ruble |
| Lauber | 221182 | 5300-6100 |
| Krauf | STR1182 | 2100-2700 |
| Bosch | 986023780 | 6400-7300 |
| HC Parts | CS1182 | 2200-2700 |
| Eldix | ELDST2110 | 3200-3700 |
Table - The best analogues of a branded starter with a power of 1.8 kW
| Manufacturer | Catalog number | Approximate cost, ruble |
| Bosch | 1108203 | 8800-11000 |
| Eldix | ELDST2110R | 2800-3500 |
| As-pl | S9009 | 2100-2900 |
| Motorherz | STB1182WA | 4200-4800 |
| WPS | 33306N | 2900-3600 |
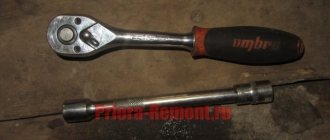
Required Tools
In order to remove or install the starter on a Priora, you will need the tools from the table below.
Table - Tools required to replace the front strut
| Name | Note |
| Spanner | "at 13", "at 15" |
| open-end wrench | "at 13", "at 15" |
| Pliers | Can be replaced with pliers |
| Screwdriver | With a thin flat blade |
| Silicone Grease | If you plan to remove the air filter |
| Head | "at 13" |
| Vorotok | With extension and ratchet |
| Penetrating lubricant | For example, WD-40 |
| Rags and wire brush | To clean dirt |
Replacing the starter on a Lada Priora can be carried out without access from the bottom. If you don’t want to remove the air filter and the wires going to the sensors, then you can dismantle and install the unit from underneath. In this case, you will need an inspection hole, overpass or lift to access the place where the starter is located.
Life hack: Lada Priora car starter - malfunctions, price
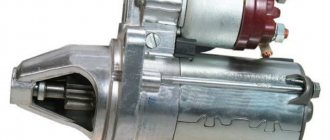
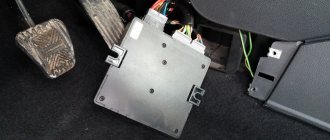
The car starter starts the engine. The Priora will not start without his participation. Without it, starting a movement is simply impossible. Sometimes the Lada Priora does not start because the fuse has blown, or the starter relay has malfunctioned; it is marked K3. Sometimes it clicks but doesn't turn. The reasons are in the details. The starter on a Priora consists of the following parts: bendex, retractor relay, armature and others - for a complete list of how many parts the starter of a Priora car contains, see the article below. It is advisable for car owners to know where this mechanism is located on a Lada Priora car - it is located immediately under the air filter. The price of the part is a starter for a Priora engine (16 valves): from 2750 to 4500 rubles. When a breakdown occurs, the device on the Priora stops turning.
There is nothing to be done - you will have to get it out and figure out the problem. Despite the rather “brute” force that the starter unit “applies” to start the engine, its structure is quite complex and consists of several fairly small parts. So, you will have to understand the relay mechanism in detail, because problems may also arise in it. Photo of the detail below.
Description of the Priorov starter
How to remove a headlight on a Priora
Before we talk about how to repair a starter, let's get acquainted with the basic description of the mechanism. Let's start with the purpose and location.
Purpose and location
An electric starter is a unit used to convert electrical energy into mechanical energy, which is necessary to start the engine. In fact, this mechanism is an electric DC motor equipped with a mechanical drive. The principle of operation of the device is to close the retractor and retainer coils, as well as move the core, which helps push out the bendix. As a result, the Bendix engages with the flywheel of the power unit, and under the influence of the anchor, this flywheel begins to spin. Accordingly, this leads to the engine starting. In Lada Priora cars, the starter unit is located on the gearbox, under the housing of the engine air filter element.
Designation of structural elements of the starter assembly
Which starter is better to install on Priora?
Today you can find many models of starters on sale from various manufacturers, but they are all divided into geared and gearless. Both one and the second type have both their advantages and disadvantages. The main advantage of the gearless version is reliability and the ability to repair in case of breakdown, which is due to its fairly simple design. As for the disadvantages, such mechanisms are characterized by high voltage consumption and heavy weight.
Geared devices began to be used relatively recently; the addition of a gearbox to the design made it possible to improve the technical characteristics of the unit as a whole. The main advantage is considered to be higher reliability of engine starting, in particular at low temperatures. This advantage is achieved as a result of increased torque. The electric motor itself is smaller in size, but the rotation speed of the device is higher, and accordingly, less current is required to start the motor. In the production of geared devices, fewer expensive materials are used; accordingly, their cost is an order of magnitude lower than that of gearless ones.
As for directly choosing a starter, in practice geared devices are more reliable and fail much less frequently than gearless ones. But in this case, you need to remember that under no circumstances should you allow the starter mechanism to operate while the power unit is running. This is because the rotation frequency of the armature will be several times higher; accordingly, its conductors can come out of the grooves and touch the stationary components of the device, thus destroying its structure (video author - CompsMaster).
Standard starter and analogues - article number and price
Unfortunately, if the mechanism does not work, the problem can only be solved by replacing it. Neither installing new parts under the body, nor any cleaning will save the situation. The standard starter for a Priora with 16 valves goes under catalog number 2111.3708010-01, its cost is about 4,000 rubles. As analogues we can consider:
- "Baker." Article 5702370800010, costs 3,700 rubles;
- "Starvolt." Article lst0190, price - 3,200 rubles;
- Valeo. Article 438285, costs from 3,700 rubles;
- For automatic transmission, article number 219002370801000, costs from 3,900 rubles;
- "BATE". Article 51323708000, costs from 2,750 rubles;
- Gearbox – 51213708000bate, costs from 2950 rubles;
- "Kzate." Article 5702370800, costs from 3,300 rubles;
- Pramo (Eltra). Article TS12E901, price – 3,800 rubles;
- Fenox gearbox. Article 2110-3708010, price – 4,500 rubles.
Lada Priora starter: device and principle of operation
As mentioned earlier, this part can be installed on the Priora of two types: geared and gearless. Sometimes it may be necessary to remove the starter, note that it is located under the engine, on the right - closer to the space under the air filter.
To ensure that the starter unit does not wear out so quickly, it has a special mechanism that disengages the gear from the crankshaft flywheel - the Priora starter retractor relay. If it were not there, the service life of the unit would be greatly reduced, or repairs would be required.
Geared
This mechanism is small in size. It turns out this way because the gearbox allows you to increase or decrease the torque. The planetary gearbox itself in the car in question is located between the armature and the bendix; it serves as a “buffer” and an intermediate part between them. Thus, it does not take up so much space in the case, under which there are:
Its main difference is that the bendix is fixed on its own shaft, and it interacts with the Priora engine through a gearbox.
Gearless
A gearless starter is much larger than its counterpart, but it does the same job of receiving electrical energy from the battery and sending it to the crankshaft to start the engine. It consists of the following components:
- relay;
- an electric motor containing the traction relay cores and winding;
- brushes and holders, “brush assembly”;
- solenoid relay;
- stator;
- fork;
- contact bolts;
- anchor;
- starter mask;
- retaining ring;
- freewheel;
- front bushing and rear bushing;
- starter bendix Priora;
- gear.
The gearbox operates according to the following algorithm:
- Power is supplied from the battery through the wiring harness.
- The anchor is retracted.
- The Bendix is attached to the gear, “thrown out”, the pin contacts are closed, and voltage is applied to them.
- The armature rotates, the torque is transmitted to the bendix, through it to the gear, and it is already in contact with the engine flywheel.
- As soon as the ignition key is released, the retractor relay disconnects the bendix and the gear.
Disassembling the starter
We disassemble the starter 2110-3708010-02 to replace the traction relay, brush holder with brushes and drive elements.
The traction relay can be replaced on the car. For clarity, we show the replacement of the traction relay with the starter removed. Using a 13mm socket, unscrew the nut of the lower contact bolt of the traction relay and remove the wire tip from it.
Use a Phillips screwdriver to unscrew the two screws securing the traction relay...
...and remove it. We remove the spring and the traction relay armature from the front cover.
Using the “8” wrench, unscrew the two coupling bolts.
Separate the housing and the front cover.
We remove the armature with the brush holder and the back cover from the body.
Using a Phillips screwdriver, unscrew the two screws...
...and remove the back cover. A wavy spring washer is installed in the bearing seat of the rear cover.
Remove the insulated brushes from the brush holder.
Remove the cover of the planetary gearbox.
We take out the three satellites of the planetary drive gear.
Remove the rubber plug. By pressing your finger on the end of the drive shaft...
...remove the drive assembly from the front cover.
Use two screwdrivers to open the support eye and remove the drive lever. We support the end surface of the ring gear on a wooden block. By placing the jaws of the open-end wrench “at 13” on the limit ring of the drive gear travel...
...and hitting the key with a hammer, we press the restrictive ring.
Use a screwdriver to pry up the locking ring and remove it. Remove the limiting ring of the drive gear.
Remove the overrunning clutch with the drive gear assembly.
Using a screwdriver, move the retaining ring out of the shaft groove and remove it.
Remove the ring gear of the planetary gearbox from the drive shaft.
We insert two metal plates between the bearing and the armature commutator and rest them on the jaws of a vice, striking with a hammer, through a soft metal drift into the end of the shaft, and compress the bearing. By external inspection we check the condition of the commutator and armature windings. Charring of windings is not allowed. If the collector is slightly burned, we clean its plates with fine abrasive sandpaper. If the commutator is severely burned and worn, the armature should be replaced. We remove scuffing and envelopment of the sliding bearing material on the armature shaft journal using the finest sandpaper, followed by polishing. Using an ohmmeter, we check the short circuit of the armature winding to its core. The ends of the windings must be well soldered to the lamellas. Blackening of windings and separation of varnish insulation from them is not allowed. When the brushes wear out, replace the brush holder assembly. We assemble the starter in the reverse order. We install the brush holder before installing the armature in the stator. Before installing the brush holder on the armature commutator, remove the springs of all four brushes so that the brushes slide into the guides.
To do this, bend the four spring holder clamps...
...remove the spring. After installing the brush holder on the armature commutator, install the springs and bend the clamps of the spring holders. We install the back cover and attach the brush holder to it. We apply CV joint-4 lubricant to the gears of the planetary gearbox.
We install the limiting ring of the drive gear on the locking ring using sliding pliers.
When installing the housing on the anchor, use the handle of a hammer to hold the anchor from being attracted by the permanent magnets of the stator and lower the stator onto the back cover.
Basic faults
Externally, a breakdown of the Priora starter can be recognized by the following signs:
- “turns” and at the same time starts the engine;
- does not “twist”;
- continues to “twist” after the key is released;
- creaks, clicks are heard;
- It spins, but for too long.
The reason may lie in a faulty battery, in the starter itself and fuses. The most common are those that are most likely to disable
the car – it’s worth taking a closer look.
Doesn't turn on
If the engine does not start, the problem may be:
- discharged or broken battery;
- no closure of contacts 50 and 30;
- terminals or tips are oxidized;
- interturn closure;
- short circuit to ground;
- open circuit “starter - traction relay”;
- the ignition module is faulty;
- break in the traction relay winding;
- brush wear;
- the anchor jams;
- the additional relay or the control circuit connected to it is damaged.
Clicks won't start
If the starter clicks but does not turn, there may be several reasons:
- the gear working with the bendix does not engage with the engine flywheel;
- the bearing of the armature shaft bushings is worn out;
- the starter mount or housing is broken;
- gear or flywheel teeth are damaged.
Doesn't turn off
When the Priora starter unit does not turn on, the problem may lie in the following:
- the freewheel slips;
- the battery is discharged or broken;
- sudden and severe voltage drop in the circuit;
- oxidation of contacts.
Starter rotates slowly
Reasons for slow performance may include:
- the battery is discharged or broken;
- terminals or tips are oxidized;
- the connection of wires from the power unit to the body is very weak;
- the contact bolts on the traction relay are loose or oxidized;
- brush wear;
- a short circuit or break has occurred in the armature winding.
Repair and replacement of Bendix starter in a car
The Bendix installed on the starter is an overrunning clutch. Serves for silent starting of the car and extending the life of the starter, protects the starter from impacts of the teeth of the rotating flywheel, and also allows it to rotate in the same direction without speed restrictions.
Interesting fact! The operating principle of Bendix is used not only in the automotive industry, but also in the helicopter industry, on the gearbox for the propeller. Bicycle rear wheel hubs work on the same principle.
When a replacement is needed, is it possible to repair the starter bendix?
Most often, a breakdown occurs not in the bendix itself, but in the starter. Replacing the bendix may be necessary if the starter fires when you turn the key, but there is no engagement and the flywheel does not rotate or rotates slowly.
Problems with bendix arise due to mechanical wear of parts due to high loads, so it is better to replace the bendix completely. You can also replace a component that has failed, but this will not guarantee that the rest will serve you for a long time.
Did you know? The name “Bendix” comes from the name of its creator, designer Vincent Bendix. This device was called "Bendix drive". It has been used in the automotive industry since 1916. Since the creation of this node, the principle of operation remains the same.
How to remove the starter
If problems arise with the starter or its components, then replacement or repair will need to be performed on the starter removed from the engine. To remove the starter, do:
- Raise the car on a lift or drive it into a “pit”, since the work will be carried out precisely from the bottom of the car.
- Remove the terminals from the battery to avoid a short circuit when disconnecting the wiring from the starter.
- Unscrew and remove the engine protection from the bottom of the car.
- If you have access to the starter and there is enough space to remove it, then remove all the terminals from it. If not, then remove the elements that are interfering with your process.
- Unscrew the starter mounting bolts.
- Remove the starter from its seat.
Note! All the processes given above are more correct and easier to carry out from below the car
How to check the starter bendix without disassembling it
A malfunction of the starter bendix can be determined “by ear” without removal. When starting the car, the starter is activated and makes a characteristic sound, which means it is working properly. But the car does not start, there is not enough engagement, which means the bendix is faulty.
Disassembling the starter, removing and replacing the bendix
Already with a previously removed starter, you can replace the bendix. To remove the bendix from the starter, you must follow the following sequence of actions in performing the work:
- Unscrew the nut securing the brush assembly from the traction relay bolt.
- Remove the brush assembly output contact from the relay output bolt.
- Unscrew the coupling screws that secure the traction relay to the “mask”.
- Remove the traction relay from the “mask” seat.
- Unscrew the stator coupling bolts and remove the motor from the “mask”.
- Remove the traction relay core.
- Remove the gearbox from the starter mask.
- Remove the fork from the bendix mount.
- Knock the retaining ring off the gearbox shaft and remove it.
- Remove the bendix itself directly.
Having removed the bendix from the starter, we replace the bendix with a new one, or with a repaired old one. By following these rules for disassembling the starter and replacing the Bendix, you can do this work yourself at home or in the garage.
Important! Do not forget that the work of specialists, although paid, is also qualified. The technicians at service stations will do this work not only faster, but also with better quality. Having figured out what a bendix is, where it is located and how you can determine its malfunction, you will solve the problems that have arisen with this component of the car
Having figured out what a bendix is, where it is located and how you can determine its malfunction, you will solve the problems that have arisen with this component of the car.
Subscribe to our feeds on Facebook, Vkontakte and Instagram: all the most interesting automotive events in one place.
Was this article helpful?Yes No
Starter diagnostics to determine the cause of the malfunction
In order to determine which part of the Priora starter mechanism is failing, you need to check absolutely everything - the problem could even be with a fuse that is located far from the part. Perform diagnostics in the following order:
- Turn off the ignition and secure the car with the handbrake. Remove the negative from the battery.
- Remove the air filter and intake hose.
- Disconnect the current-carrying cable from the part that is connected to the battery positive. In order to remove it, remove the upper stud of the solenoid relay with a 13 mm wrench.
- Place neutral on the gearshift lever.
- You will need a working car battery. If you are completely sure that the battery in your Priora is fully operational, use it. Connect the cable with alligator clips to the negative terminal of the battery, the other end to the bolt on the housing of the starter unit. Before doing this, make sure that the connection area is clean. If there is dust and dirt on it, clean it with a brush.
- Connect the second cable with the crocodile to the positive of the battery, its second end to the positive on the back of the starter. When you connect everything there should be a click. It will mean that you did everything right. If there is no click, you need to check the ground just in case.
- Disconnect the negative wire from the housing and connect it to the bottom screw of the solenoid relay. Connect the positive wire to the back of the relay. If a click is heard, it means the brush assembly has failed. If it doesn't work, you'll have to buy a new starter - the relay is broken.
- The negative wire must be reconnected to the body, the positive wire to the lower screw of the relay. When connected, the starter assembly should begin to rotate and you will hear a characteristic noise. The revolutions can rise to 11 thousand per minute. If the RPM is too low and the armature turns slowly, the problem is with the brush assembly or armature.
- If the armature does not spin at all, the problem is in the winding.
- Finally, you need to connect the plus to the top stud of the pull-out relay and close the contacts. If you hear extraneous sounds, you should check the bendix and gearbox.
Relay test
First, it’s worth studying the location of the Priora starter relay, which is located in the starter unit in a small housing. Checking its serviceability is carried out in two stages.
- First, you need to ask a friend to turn the ignition key and listen to the engine compartment. If there is a click, then everything is fine with the part. If there is no click, or the armature does not spin with a click, you will have to move on to the next step.
- Connect the terminals coming from the battery with the terminal that is connected to the starter assembly with a screwdriver. If the unit works, then the relay is faulty.
Fuse
The Priora fuse box is located above the driver's left knee. Remove the plastic cover by first unscrewing the three fastening screws. The Priora starter fuse is K3, that is, third from the left in the first “line”.
You can check the additional block, which is located under the floor tunnel lining. In this case, the 15 Ampere fuse F1 is checked - the one on the far left; sometimes it is enough to change it, since repair of this mechanism is not always required.
Toyota Corolla starter repair
VAZ 2114 starter: where is it located, how to remove, replacement
If your starting problems have not been solved, then it is necessary to repair the main starting mechanism. It is better to carry out repair work in specialized workshops, but if you are an experienced car enthusiast, you simply must do everything yourself.
The first signs of a malfunction: the engine turns slowly or does not turn at all, the starting mechanism seems to work, but the crankshaft does not move.
Causes of malfunction:
- there is not enough battery charge (which is unlikely);
- the mass on the engine does not work or is completely missing;
- the retractor relay does not work completely, the brushes are worn out, the bendix needs to be replaced, interturn short circuit, bushings are worn out.
The Toyota Corolla needs to be driven to the nearest inspection hole or lift and disconnect the terminals from the battery. Next, remove the two bolts from the mount and completely remove the current supply wire. Carefully remove the trigger and inspect it carefully.
After a thorough inspection and detailed check of the disconnected starter without additional loads, connecting it to the battery, we identify the main causes of malfunctions. Let's say in this situation we have a bendix failure.
To identify this malfunction, remove the gearbox
We disassemble everything carefully, in no case confuse the parts and arrange everything in the correct order. Otherwise, everything can be completely confused or, even worse, lost. Remove the two mounting bolts, disassemble the housing and take out the overrunning clutch
We remove the two mounting bolts, disassemble the housing and take out the overrunning clutch.
Before removing the overrunning clutch from the Toyota Corolla, be sure not to lose the support ball, as it will be very difficult to find later. Carefully check the operation of all mechanisms, in particular the bendix. We hold the bendix in one hand, and with the other we need to turn the gear clockwise. It should rotate in any order.
If it turns in the other direction, the gear should stay in place. If your Toyota has even a slight movement, then the diagnosis is as follows: the roller seats on the Bendix itself are badly worn or the springs are out of order.
Repairing the clutch must be done very carefully; first, we disassemble it from the side where the gear that engages the flywheel is located. Next, carefully move the washer down, which closes the locking ring, and remove it. Where the overrunning clutch shaft is located, use a puller to remove the bearing.
Next, we take out the bendix itself. Be sure to remember its position so as not to confuse anything later. We remind you that repairing a starter is not an easy task and it is very easy to ruin everything.
We carefully examine all the contents of the starter and draw the correct conclusion about what can still be repaired and what needs to be replaced. As a rule, in such a situation, springs most often fail. We buy new springs and reassemble the overrunning clutch; we don’t have to install the bearing itself for now.
The next step is to do the same thing as described above. One hand turns the gear clockwise - the gear rotates, then we turn it counterclockwise - everything stays in place. From this it follows that the repair of the starter on the Toyota Corolla was carried out correctly, then we assemble the remaining structure.
If the gear rotates counterclockwise, then, most likely, the slots for the rollers have failed. To make repairs, in this situation you need to select a drill whose size will be slightly larger than the diameter of the roller itself. Next, we cut the amount we need and place it in the mounting slots instead of the damaged rollers.
And finally, we check the gear spring of the Toyota Corolla; if it is very weakened, then it must be replaced. Now we complete the repair of the unit and completely assemble it. After you have assembled the starter and placed it where it should be, we connect all the necessary wires, the main thing is not to confuse anything. Let's start the Toyota Corolla and enjoy the wonderful moment that you can do at least something yourself.
So, in conclusion, you have just seen from your own example that replacing the starter is not an impossible task; everything can be done perfectly well yourself in the garage. Just use your wits more often and never be afraid of your car. If you have the opportunity to make repairs yourself, then take full advantage of this. Well, if you are not confident in your abilities, or after your repair it has become even worse, then you have a direct route to a car service center.
Replacement
In order to replace the starter of a Priora car, prepare the 13th and 15th keys. Before removing the mechanism, be sure to remove the negative from the battery - this little procedure is very important this time. Next follow the instructions:
- Remove the air filter, then its housing.
- On the starter assembly, unscrew the nut that secures the terminal.
- Remove the terminal from the contact bolt.
- Disconnect the wire and terminal.
- Remove the starter assembly mounting nuts (there are 2 or 3 of them, depending on the type).
- Remove the starter assembly. Install the new one in reverse order.
Source