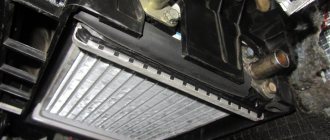
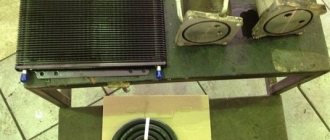
The radiator provides cooling of the liquid, which circulates in a large circle. Heat transfer occurs when antifreeze or antifreeze passes through its tubes, which come into contact with air.
Additionally, two fans blow over the engine, each of which turns on at a certain temperature.
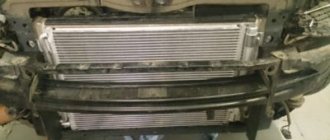
On the Niva Chevrolet, the radiator is installed in the front part of the engine compartment; the designers have provided good access for its replacement.
Before dismantling, you need to make sure that the radiator is broken.
When to replace a Chevrolet Niva radiator
Replacing the cooling system or its individual components is usually required due to wear or mechanical damage. Among the most common complaints when contacting a service station, the following points stand out.
- Using low-quality antifreeze or pouring water into the system. The main property of coolants is the protection of metal parts from corrosion and rust formation. When water is used in a radiator, strong carbon deposits or oxides form inside the lines, which can clog thin tubes. In case of mild damage, repair is limited to sealing one part of the system.
- Mechanical damage. The main radiator is located at the front of the car and is covered with a thin grille. Due to poor protection when traveling off-road or on country roads, the element can be damaged by a stray stone or foreign objects entering the radiator grille. At the same time, a small force is enough to cause serious damage - the thinnest plates are easily crushed, which leads to loss of heat transfer and overheating of the system.
- Natural wear and tear. During active use, the radiator is subject to constant temperature changes, which affects the condition of the metals. Additionally, the presence of increased pressure inside the lines after starting the machine is harmful. Such vibrations lead to cracking of tubes, fasteners or cooling plates.
The above cases apply not only to the main radiator; problems also arise with the elements of the stove and air conditioner.
Advantages and disadvantages
The design of the Chevrolet Niva stove is considered successful, since in principle it is similar to the design of the heating system of many foreign cars that are not equipped with air conditioning. In this regard, a number of advantages of such a scheme can be identified.
- Quick heating of the interior. Now there is no need to wait for the thermostat to open. The air becomes warm as soon as the coolant begins to heat up.
- Possibility of engine cooling through the heater radiator. A very common failure in the cooling system is a stuck thermostat. And if a thermostat stuck in the open position does not interfere with getting to the service station, then it is impossible to move the car with the cooling radiator closed. By turning on the heater, you can remove some of the heat and cool the engine somewhat.
- The recirculation mode helps to quickly heat the interior or temporarily stop the penetration of outside air.
The heating system is not without its shortcomings, which clearly manifest themselves.
- The complex system of damper levers often leads to jamming. Some dampers become difficult to adjust over time.
- Leaky duct joints result in loss of airflow. Considering the high noise level of the heater motor, the speed of the air flow entering the cabin through the deflectors is extremely low.
- Almost the entire system is located inside the car, so repair work has to be carried out in limited space.
Do-it-yourself replacement of a Niva Chevrolet radiator with and without air conditioning
If you need to replace units, you can contact a service station or a qualified technician for help. Other users prefer to perform all procedures themselves. This is possible due to the fact that replacing a Chevrolet Niva radiator pipe or the cooler itself does not require specialized tools or deep knowledge of mechanics.
Chevrolet Niva heater radiator replacement: necessary tool
To completely replace the device, you will need to prepare the necessary tools in advance.
- A set of open-end and ring wrenches, possibly heads with a knob.
- A canister of coolant of the type that was previously used in the machine system. The standard system uses 5 liters of antifreeze with a class of at least G12.
- One liter canister of power steering fluid.
- 5-6 metal clamps of the appropriate diameter, you can use plastic ones.
- A set of containers where the old antifreeze will be drained, and a funnel to make it easier to fill in the new coolant.
- Silicone sealant is resistant to high temperatures.
- Set of screwdrivers of different sizes.
- Several clean rags and gloves.
After preparing everything you need, you can begin repairing the car.
Replacing a Niva Chevrolet radiator without air conditioning: sequence of actions
The sequence of actions for cars with and without air conditioning is slightly different. Further instructions are relevant for the more common modification, which uses a conventional stove.
- Drive the car onto an overpass or inspection hole. After this, wait the certain time necessary for the engine to cool completely. This is required because the antifreeze gets very hot during operation and performing a hot repair procedure can lead to serious burns or damage to vehicle components.
- Place wheel chocks under the wheels, raise the handbrake lever and engage the gear. During manipulations, the car will constantly twitch - unnecessary movements will not bring anything good.
- Open the hood and disconnect the terminals from the battery - the need is caused by tampering with the electrical part of the car.
- If necessary, remove the crankcase protection and outer plastic (if any) - this will facilitate access to the required fasteners and components.
- Treat all bolted connections with a liquid wrench or similar means to facilitate their unscrewing. In this case, you should not use a hammer or chisel - an entrenching tool can only cause harm - only keys will be used here.
- The next stage is disassembling the decorative radiator grille. The body part is removed using a Phillips screwdriver and a No. 10 socket.
- Next, two mudguards under the engine are removed. Dismantling can also be done with keys or a screwdriver.
- After opening access to all systems, the antifreeze is drained. To do this, you will need to fully open the valve of the stove and auxiliary devices where the coolant flows. After identifying the tap, you should wear protective gloves and goggles - the formula in the radiator is toxic and can cause severe poisoning if it gets into the stomach or eyes. Next, you will need to unscrew the top cap of the expansion tank to facilitate fluid drainage. The next step is to crawl under the car and find the drain valve on the left side of the radiator and open it. You will first need to place a canister or container under the used product (the capacity must be at least 5 liters). After this, the used antifreeze is disposed of appropriately.
- Wait until the refrigerant has completely drained and tighten the valve until it stops.
- Then, to replace the Niva Chevrolet cooling radiator, you should again rise above the car and remove the air filter box. The fasteners are made in the form of 4 bolts with No. 10 heads.
- Next, unscrew the pipes entering and exiting the radiator. The lines are secured with metal clamps and loosened with a Phillips screwdriver.
- Next, remove the top cover of the power steering expansion tank.
- Disconnect the pipes coming from the power steering to the cooling system, first placing an empty container under the connections for testing.
- Similarly, disconnect the lower hoses using one sequence of actions.
- The next step is to disconnect the radiator itself. The part is secured with 5 bolts, one of which is screwed in through a special bracket; it can also be disassembled.
- Drain the remaining antifreeze from the radiator (there will be about one liter).
- Next, you need to disconnect the contact groups of the horn and radiator fans. If this is not done, the wiring will interfere with dismantling.
- Remove the horn using screwdrivers and wrenches.
- After this, you need to disconnect the line on the thermostat, leaving the latter on the tube along with the engine.
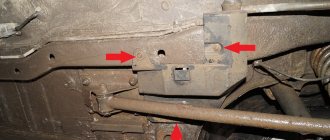
- Repairs are ongoing by removing the fly catcher and small stones. The part is placed directly in front of the radiator and secured with 4 bolts and nuts.
- Next, remove the part holders and move the upper part of the radiator forward in the direction of travel of the car.
- Next, unscrew and tighten the pressure line hoses, this is also done carefully; there may be some antifreeze residue inside.
- To continue dismantling, you need to separate the radiator body from the fan module. To do this, unscrew 6 screws. The first 4 are located in the upper part, the lower two require a special approach and are located at the bottom of the unit.
- After all the manipulations, the modules are separated and the coolers are lifted up.
- Next, the lower pipe is removed and the air trap is bent. The last element is covered by a bumper, so it will also need to be unscrewed.
- After completing all the steps, the old radiator is completely removed from the engine compartment along with the support rubber bands and pads (they may come in handy).
- Reassembly is performed in the reverse order, adding antifreeze. After complete installation of the system, the motor warms up and the coolant is added if necessary.
- Replacement of the Niva Chevrolet cooling radiator without air conditioning has been completed.
Preparation.
First you need to make sure that the problem is a faulty radiator. In some cases, coolant leaks may be due to burst pipes. If there is no visible damage and only traces of antifreeze indicate a leak, you can try washing it. But this does not apply to cases where there is obvious damage; in this case, urgent replacement is required.
Before starting work, you need to make sure you have WD-40 fluid to unscrew rusted bolts, and you also need to have a container with a volume of at least 5 liters to drain the used coolant. During operation, you will also need to drain the used fluid from the power steering.
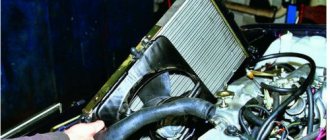
Replacing the Chevrolet Niva heater radiator
The specified sequence of actions is relevant for car models without an air conditioning system.
- Completely dismantle the glove box along with its lighting and brackets. To do this, you will also need to disconnect the side trim elements of the interior.
- Drain the antifreeze from the car's cooling system.
- Loosen the connections of the pipes and tighten them. In this case, antifreeze will flow from the channels - you need to substitute a piece of plastic bottle or a tray in advance.
- Next, unscrew the heat exchanger screws and pull the part towards you until it stops.
- Interfering structural elements can be removed or, for plastic elements, bitten off with tongs.
- After which the part will freely leave the seat.
Installation of a new device is carried out in the reverse order, fully observing the instructions and sequence of actions.
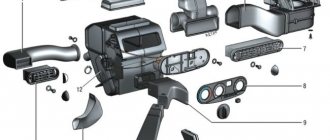
Device
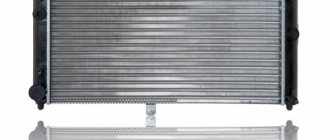
The part has a classic design, typical of modern passenger cars: two tanks connected by tubes with cooling plates. The manufacturer took the path of reducing the cost, which was reflected in the materials used. The tanks are made of plastic, the tubes are made of aluminum. the parts are connected through a rubber gasket that prevents coolant leakage.
Chevrolet Niva with and without air conditioning is equipped with one radiator model. The only difference is that in the first case, the condenser of the air conditioning system is fixed in front of the honeycombs, and in the second - a guide casing.
Replacement radiator Niva Chevrolet price
The cost of such car repairs in different regions can vary significantly. For example, in Moscow, replacing a radiator will cost at least 5,000-8,000 rubles. At the same time, in the Rostov region, the procedure can be performed for 3-4 thousand rubles. At the same time, the cost of repairs may also vary among different specialists located in the same city.
Also, the cost of replacing a Niva Chevrolet radiator greatly depends on the vehicle’s equipment and additional factors such as the abundance of rust or dirt under the hood. For example, the difference between the simplest and most sophisticated versions can reach 1,500 rubles.
Only the master performing the operation can give the exact price tag.
Comparison of manufacturers
In stores you can find spare parts produced by several companies. Products differ in two parameters: price and workmanship. Let's look at a few of the most popular brands.
Hola is a trademark of the Dutch company H{amp}amp;H Group. 15 European factories produce radiators, belts, shock absorbers and other auto parts. Inexpensive products of this brand are of good quality. According to customer reviews, spare parts of this brand at a comparable price are superior in quality to Chinese products. Price - 2000 rubles.
DAAZ - Dmitrov Automotive Assembly Plant, part of the United Automotive Technologies concern, was founded back in 1967. In addition to radiators, the company produces filters, brake pads and other spare parts for Russian and foreign cars. The products of this brand are used in cars that come off the AvtoVAZ assembly line. Price - 2500 rubles.
Luzar is a Russian company that was founded in 2003 on the basis of the Lugansk Radiator Plant. Products of this brand comply with GOST-R and the manufacturer gives them a 2-year warranty. Price - from 2100 rubles.
Bautler is a British company that produces, among other things, spare parts for the Chevrolet Niva. Price - from 2200 rubles.
Reviews from car owners vary. Some consider DAAZ radiators to be the most reliable, others consider Bautler, Hola or Luzar.
Taking into account the fact that replacing a part takes a lot of time and effort, it is worth taking the sports version of Luzar. It is designed to withstand heavy loads and is therefore more reliable.
Also interesting: How many liters of oil should be poured into a Chevrolet Niva engine
Hola products are distinguished by the fact that each tube has its own rubber seal, rather than being fixed with a single seal. In Luzar-Sport, the honeycomb is soldered to a base that is attached to the tanks.
Removing the front bumper with grille for models with Bertone
The removal principle is quite simple, you need to unscrew the fasteners and remove the front end. But it's a little more detailed because there are cases. “everything seems to have been unscrewed, but it doesn’t work!” To avoid such situations for novice drivers, a detailed description of the sequence for removing the Shniv bumper is provided.
- First of all, you need to install the front part of the lift or jack, and then remove the wheels for easy operation.
- Disconnect the car from the battery to keep cables away.
- The radiator grille is secured at the top with three bolts that need to be unscrewed.
- Next we'll move down below the license plate area where there are two self-tapping screws that also need to be removed.
- The lower part of the front bumper
also has two mounting bolts that are easier to unscrew during inspection. - Removing the protective cover is as follows: twist six screws on each side of the front bumper cover, you will also find two nuts there and remove them. The protective cover has been removed.
- Behind the housing we will find the wiring suitable for the PTF, it must be disconnected so as not to break the wiring when removing it.
- Proceed to remove the left and right headlight covers. The cover is installed on an adhesive base, so it must be removed carefully.
- There are two bolts behind the headlight cover, which are additionally designed to secure the front bumper. Unscrew and remove these bolts. A little lower. side attachment of the bumper to the body structure that needs to be removed.
- There is one screw on the side of the car on both sides that is removed and the bumper is taken to the side.
- Unscrew the 4 nuts to secure the bumper beam. After this, the beam is directly extracted. The front of the car is completely removed, now if all components of the part need to be disassembled.
Chevrolet Niva Little horse › Logbook › Replaced the radiator without losing freon.
When I received this car, the radiator was already leaking, and not weakly. Then I found out that the cause of the leak was a jammed valve in the tank cap. The radiator could not withstand the pressure and began to snot at the junction of the honeycombs and the covers. I changed the cap and there was no more leaking. And I bought a radiator but did not change it. You can add a liter every six months, just to avoid the hassle of replacing it. But not long ago, either the radiator died completely, or the cap failed, and it began to leak heavily again.
And all this lost a liter of antifreeze per night. Nothing needs to be changed. There was no desire to remove the air conditioner condenser, especially since now we have no one to refill it for me. Surely everyone who reads this text has already encountered the location of the cooling radiator on a Chevrolet Niva with air conditioning. But what are the eyes afraid to do and the hands afraid to do? I had previously removed the bumper to repair it after this incident. Using the old instructions, I figured out how I would get the radiator out, and realized that I needed to move the capacitor at least a little in order to remove the radiator from above. The fact is that the liquid line to it, a thin tube at the bottom, has a loop, and the gas line, a thick tube, is connected to a flexible hose to the compressor. It is the attachment of the upper condenser tube to the body that limits the deflection of the condenser. It is also advisable to remove the bumper frame.
In general, bending the air conditioner radiator literally a centimeter gave me the necessary window.
Once the window appeared, I immediately removed the upper pipes from the radiator.
But it is basically impossible to remove the cooling radiator without removing the fans from it, and as it is written in the old Murzilka. Using various ratchets and wrenches, S10 unscrewed the fans.
But removing the fans from the radiator did not give me the opportunity to remove the radiator. The fact is that the lower left mounting ear of the fan frame is in the way, clinging to the lower pipe that has not been removed. In general, by removing the radiator frame reinforcement, I got more space to move the fan frame. Moving the fans in the window in every possible way, I found a position in which it was possible to press the pipe with a rod and remove it from behind the mounting ear. And then everything is simple, I partially took out the radiator and gained access to the lower clamp.
The principle of fluid circulation in the VAZ-2123 system
The circulation of antifreeze or antifreeze in the Chevy Niva cooling system occurs in two circles - small and large. In the first case, the liquid moves bypassing the radiator, since it does not need additional cooling and the outside air temperature is sufficient for it to effectively absorb heat from the engine. The tolerance for the heating level of the liquid in this case is about 78 degrees Celsius.
The standard pressure level is 1-1.2 atmospheres, and when the liquid is heated, its excess is “bleeded off” through a special valve. It is located on the expansion tank, which can be further adjusted.
If heating occurs above 80 degrees, liquid circulation begins in a large circle, involving the radiator in cooling. The direction of liquid movement in one of the circles is regulated by a thermostat, which reacts to an increase in the temperature of the liquid in the system, opening and closing if necessary. In this case, circulation is provided by a water pump, which is driven by the crankshaft through a special V-ribbed belt.
Cooling of the cylinder head and block occurs due to a special “jacket” with coolant, which picks up heat and then enters the radiator, where its temperature decreases. To ensure complete tightness of the system and prevent fluid leakage, a gasket and seal are provided. The first ensures tightness on the side of the cylinder block, and the second prevents leakage at the point where the shaft enters the pump housing.
When the liquid circulates in a large circle, it is cooled by the radiator honeycombs, which are blown by the air flow. In most cases, this is quite enough to provide the necessary heat transfer. However, in the hot season or in traffic jams at low speeds, the temperature of the antifreeze increases significantly, until the liquid completely boils.
In this case, the heating is regulated by forcibly turning on the fans, which are attached to the radiator housing from the outside. The factory design provides for the presence of two such elements at once, which are activated independently of each other. The first is when the liquid is heated to 98 degrees, the second - to 102.
The efficiency of the fans is guaranteed only if the temperature sensor inside the radiator is working properly, the readings of which serve as the reason for starting the active air cooling system. In this case, the normal operating temperature of the liquid is considered to be from 80 to 95 degrees.