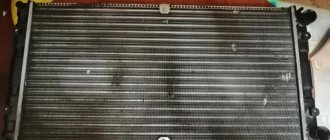
The radiator provides cooling of the liquid, which circulates in a large circle. Heat transfer occurs when antifreeze or antifreeze passes through its tubes, which come into contact with air.
Additionally, two fans blow over the engine, each of which turns on at a certain temperature.
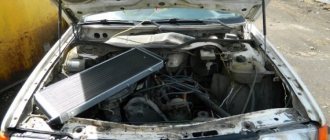
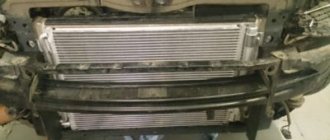
On the Niva Chevrolet, the radiator is installed in the front part of the engine compartment; the designers have provided good access for its replacement.
Before dismantling, you need to make sure that the radiator is broken.
When does a radiator need to be replaced?
If the system is sealed, the coolant level does not change; it will always be at the same level. During engine operation, due to heating and expansion, the mark will rise slightly, but upon cooling it will return to its original position.
A case from practice: a fluid level above normal may be due to an air lock. This often happens when the filling of antifreeze or antifreeze is disrupted during repair work.
Often, due to damage to the radiator, the coolant level drops.
A malfunction can be detected by the following signs:
- the appearance of a leak on the front surface of the bumper;
- smudges under the car near the right or left headlight;
- a drop in the level of antifreeze or antifreeze and “fogging” on the surface of the radiator.
If at least one of the signs is detected, the radiator must be replaced. If repair work is not carried out in time, the leak may worsen and the car will be unusable.
The repair is quite simple; you can do it yourself even without professional skills.
Causes of Niva 4x4 radiator malfunction
- Flattening of thin plates - heat dissipators. Occurs from insects or small pebbles getting into the oncoming air flow. An attempt to straighten thin metal usually leads to it breaking off. Therefore, if there is a high percentage of damage, the part needs to be replaced.
- Clogging of thin channels - obstruction of coolant circulation. You can try to rinse the mash under high pressure, or fill it with a special solvent and then pour plenty of water on it.
- Thermal deformations. If a large amount of cold water comes into contact with a heated surface, the aluminum may crack.
- Metal fatigue. It has a certain service life, after which replacement follows.
- Clogging of honeycombs with leaves, small insects, and caked dust. There are many ways to clean the outside of it. The main rule is no mechanical force or water under pressure. "Kärcher" won't do!
Algorithm for replacing a radiator
Most often, the radiator is replaced when a leak appears that cannot be eliminated with conventional sealant. The manufacturer recommends installing only original parts that exactly fit in size and fit.
Along with the radiator, you can also change the cooling fans by disconnecting them from the network and unscrewing the fasteners from the cases.
Replacing the radiator of a Niva Chevrolet - work algorithm:
- Remove the negative terminal from the battery.
- Remove the crankcase protection and mudguard by unscrewing the fasteners.
3.Unscrew the coolant drain plug, having first unscrewed the cap of the expansion tank and switched the damper to “hot air”.
4.Remove the decorative radiator trim.
5.Disconnect the terminals from the cooling fans.
6. Unscrew the top and side bolts securing the upper casing and remove it.
7. Remove the lower casing in the same way.
8. Remove the lower hose from the thermostat by unscrewing its clamp. Carefully pry off the pipe with a screwdriver and do not tear it.
9. Unscrew the upper radiator mounting brackets and remove them.
10. Pull the radiator towards you and remove the return hose.
11. Disconnect the bolts securing the electric fan housing and pull the radiator towards you to gain access to the lower pipe. Loosen its clamp and remove the hose.
12. Carefully remove the radiator.
Assembly is carried out in the reverse order of removal. If you are going to change the fans, remove their nuts from the housing. When tightening, do not overdo it; with too much force, the plastic may burst.
If you don't remember when you changed the coolant, it's better to fill it with new one. It is not advisable to filter old antifreeze or antifreeze, which already contains debris and dirt.
Radiator of the Niva stove
The heater radiator of VAZ 2121, 2131 is not a critical vehicle component. But in cold weather, driving a car with a faulty heater is unlikely to be a pleasure. In addition to the sheer coldness in the cabin, the windows may fog up, which leads to poor visibility, and this is a matter of safety for the driver, passengers and other road users.
Structurally, the radiator is a heat exchanger, or more simply put, a battery, whose task is to heat the air passing through its grille. Externally, it looks the same as a similar unit on other cars.
The same type of heater radiator is used for “Niva” and “classic” VAZs
The Chevrolet Niva radiator is not suitable for the VAZ-2121, 2131 family. This should be taken into account when selecting spare parts in the store.
Radiator location
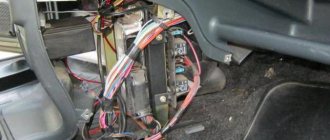
The heater radiator on the Niva is located under the dashboard behind the center console between the driver and right passenger seats. This is the standard location for the heater in most cars. Compared to many other car models, access to the radiator in the Niva is quite simple. This will take about 10–15 minutes for a semi-skilled specialist.
The radiator of the Niva stove is located in a plastic casing under the center console
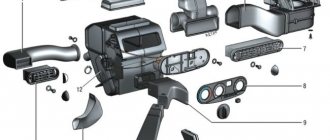
Radiator design and functions
The stove radiator is a unit in which heat is transferred from the heated liquid to the surrounding air. It consists of two horizontal rows of tubes intersecting with vertical metal plates (ribs). On the sides, the structure is limited by panels that provide the functions of tanks. The incoming and outgoing pipes of the cooling circuit are connected to one of the tanks.
There are two unconnected cavities inside the tank. Antifreeze enters through the inlet pipe into the cavity connected to the upper row of tubes. On the other side of the radiator there is a return tank, through which antifreeze flows into the second row of tubes and moves in the opposite direction to the second cavity of the tank and the outgoing pipe. After leaving the radiator, the antifreeze enters the main cooling system of the car. Antifreeze circulating in the tubes ensures heating of the entire grille, thanks to which heat transfer from the radiator reaches maximum effect.
The radiator is installed in the instrument panel console in a plastic casing and sealed around the perimeter with foam tape. Air heating depends on the degree of opening of the valve that regulates the flow of liquid through the radiator. The valve is installed at the radiator inlet and is controlled by the upper lever on the center console.
Cold air comes from the external environment, passing through a hot radiator, heats up and enters the car interior
The main and only function of the heater radiator is to heat the air flow entering the cabin through the air ducts.
Radiators are made of aluminum or copper. The aluminum product does not hold temperature well. A copper radiator works more efficiently, but is more expensive. The advantages of a copper radiator include its maintainability: the ability to seal cracks in the tubes.
Lada 4×4 3D Karabas › Logbook › Moving the radiator to Niva 2121
Well, I finished this upgrade on my war horse! Moving the radiator to the place of the spare tire (under the hood). Many of you will say that this is complete nonsense, why, etc. Let's consider the advantages (if you disagree, speak up! 1) When moving the radiator, space is freed up for the winch. 2) In the event of an impact (against a tree, stump, stone, etc.), the radiator will not be damaged and you can at least sit in a running, warm car (waiting for help if your car cannot move on its own). 3) It doesn’t get clogged with dirt (and if you managed to get it clogged with dirt), then it’s easy to wash and blow out. 4) The radiator in this position becomes higher than the heater radiator (due to this, it is hot in the cabin when the heater is on). 5)… ITD…
How to replace the heater radiator on a Chevrolet Niva with air conditioning
When a car is equipped with an air conditioning system, replacing the heater radiator at home is much more difficult, but still possible.
What tools will you need?
For dismantling you will need:
- Screwdriver Set;
- keys (heads) at “8”, “10”, “19”, “24”;
- cross bits and Torex T20;
- knife;
- Head Torch;
- sealant.
To dismantle the radiator, you will need to prepare a certain list of tools
How to remove the evaporator and fan
Before removing the radiator, you will need to provide access to it. To do this, you need to remove the air conditioner evaporator. We carry out the procedure step by step:
- We remove the glove compartment, for which we unscrew all the fasteners.
- We dismantle the airbag (if the car is equipped with one). We remove the negative terminal from the battery, then look for the red airbag connector and remove it. Using a suitable tool, unscrew the pillow mounting bolts. Using a flat-head screwdriver, pry up the plug on the panel, press the latches at the bottom and pull the pillow up.
Using a wrench or socket of a suitable size, unscrew the two airbag mounting bolts - Remove the air duct from the passenger side. Use a flat screwdriver to pry up the ventilation grille plugs, unscrew the screws and remove the grille. Remove the tape and remove the air duct.
To remove the air duct on the passenger side, you will need to remove the ventilation grille and remove the tape. - We dismantle the pipe in the passenger's feet. Unscrew the hose fastener and pull it towards you.
At the passenger's feet you need to remove the pipe, for which we unscrew the hose fastener - To remove the air conditioner evaporator you will need to remove the fuse box and control unit. There is no need to completely dismantle them; you can simply leave the devices hanging. We unscrew the cover of the control unit using a “10” socket, and use a Phillips screwdriver to unscrew the fastening bolts.
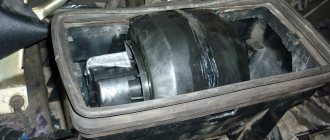
Before dismantling the air conditioner evaporator, you will need to remove the control unit and fuse box - To dismantle the fan, remove the air filter and unscrew the 4 screws that secure the electric motor.
To remove the heater fan, you need to remove the cabin filter and unscrew 4 screws - At the bottom of the stove, unscrew the screw with a bat to “7”.
We insert the bit on “7” into a key of a suitable size and wrap it with electrical tape - We bend the metal brackets.
To ensure that nothing interferes with the removal of the evaporator, you need to bend the metal brackets - Carefully remove the cable responsible for adjusting the damper so as not to lose the latch. We remove the structure itself to the right.
- To disassemble the fan into two parts, remove the latches (6 pieces) by prying them off with a screwdriver. After this, the housing can be separated and pulled down.
To separate the fan parts, it is necessary to remove the latches, after which the elements are removed - The next step is to remove the air conditioner evaporator. To do this, unscrew the air conditioning pipes under the hood. Since freon will begin to leave the system, it is better to avoid getting it into the respiratory system.
- Unscrew the nuts from the nearby studs.
In the engine compartment you will need to unscrew the nuts from the studs and remove the evaporator tubes - Carefully unscrew the bolts securing the evaporator housing so as not to tear off the nuts, and one self-tapping screw located near the radiator pipes.
In the cabin, carefully unscrew the evaporator mounting bolts, as well as the self-tapping screw - We move the evaporator nozzle to the right until it is free, but you will have to apply some force. The left front bracket will interfere with the removal of the assembly; it must be tightened and removed from under the panel fastening. In addition, the clamps of the radiator pipes will prevent removal. It is better to loosen them and pull them down. After this, remove the evaporator itself.
To remove the evaporator, it is necessary to apply some force to remove the bracket on the left side from under the panel mounting
How to remove a radiator
Dismantling the evaporator is one of the preparatory activities before removing the stove radiator. First, perform the following step-by-step actions:
- To prevent antifreeze from leaking onto the floor, we place a plastic film under the heat exchanger itself to allow the liquid to drain into a suitable container. To drain the antifreeze from the radiator and prevent it from getting on the floor, we drill a hole in the lower part of the element. If this is not done, then the probability of filling the floor with antifreeze through the pipe is quite high.
You need to drain the remaining antifreeze from the old radiator, for which a hole is drilled in it from below - We loosen the fastening of the clamps and unscrew the screws of the heating radiator. We take out the heat exchanger and tighten the pipes.
To remove the heater radiator from its seat, loosen the clamps, unscrew the heat exchanger mount and remove the part itself
This completes the dismantling process. Assembly is carried out in reverse order. It is recommended to use new pipes during installation, since rubber elements lose their elasticity over time. If desired, the hoses can be sealed with sealant. Upon completion of all procedures, coolant is poured into the system to the required level in the expansion tank.
This is interesting: About the engine cooling system
VAZ 2121 (Niva 4x4): replacing the heater radiator with your own hands
The operation of the stove on the classic Niva traditionally causes complaints from most owners of this car. A frankly weak but noisy fan and poor design of the air ducts do not warm the interior properly. In addition, the operation of the heater is affected by the operation of the VAZ 2121, 2131 in difficult road conditions. The stove radiator, air ducts become clogged, and the pipes are destroyed. Therefore, understanding the operating principles of the heater and the ability to repair it with your own hands become an important task for the Niva driver.
Possible heater malfunctions and ways to eliminate them
Cherry Niva Chevrolet
If the stove in a VAZ 21214 has stopped working, then, in principle, repairing it yourself is not a particularly difficult task.
The reasons for the malfunction why the Niva stove refuses to work are given below:
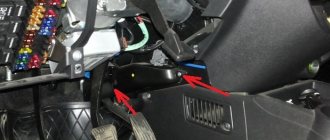
- Failure of the additional resistor. This element of the system is located behind the glove box and is designed to control the ventilating device for pumping warm air into the cabin. The problem is solved by replacement.
- Wear of pipes. Over time, the pipes begin to wear out, and temperature changes especially contribute to this. To detect worn hoses, each line must be carefully inspected. Wear may be indicated by cracks and other damage to the pipes through which antifreeze can escape.
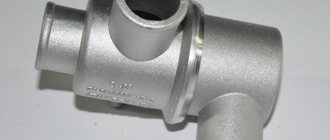
- The heater valve is faulty. A breakdown of this component may be indicated by traces of a coolant leak in the vehicle interior. If the heater tap is being replaced, it is better to use a ceramic device; its service life is usually several times higher than that of traditional metal devices.
- Problems in the operation of the control unit. It is best to have this part repaired by a qualified electrician.
- The heater radiator has failed. On Niva 21213 you can easily replace it with your own hands, we will talk about this below (the author of the video is the OWNER G channel).
Dedicated to Niva car owners!
VAZ 2108 stoves (high performance, quiet operation, affordable price, fairly long service life). Various experiments with installing a fan strengthened the idea of installing it in the engine compartment. This required a major modification to the stock air intake. By cutting and soldering the air intake, the required design was obtained. Practical tests have shown its high efficiency. As it turned out, in its research Niva stove 2108 with an electrical harness
Installation.
First you need to prepare a new radiator. To do this, we remove the rubber feet from the old one and put them on the new part, since new radiators are not equipped with them. Next, we reassemble in reverse order. During installation, it is best to position the clamps so that access to them is as convenient as possible in case of the next replacement.
When assembling the power steering system, there is no need to pump fluid; if a small amount of air gets inside, it will escape after a while into the expansion tank. Therefore, after replacement, it is necessary to monitor the fluid level for some time and, if necessary, add it to the maximum mark.
After assembling the system, it is necessary to fill in new coolant. It must be filled through the expansion tank. After filling, it is important to start the engine so that the pump works and wait until the engine warms up to operating temperature and the thermostat opens. At this moment, the large circle will be open and you will need to add antifreeze to the system to the required level.
Replacing the heater tap
The standard heater tap on Niva 21213 does not do its job. Since it has a small cross-section, coolant flows quite slowly through the radiator. In addition, it often becomes a place for coolant to leak into the cabin. Therefore, car owners prefer to exchange it for similar models from other AvtoVAZ, Volkswagen, Toyota or Opel cars. For example, the ceramic faucet installed in 2108 has a large diameter passage opening, which increases the performance of the stove. It is better to install it in the pipe that supplies coolant to the stove, otherwise even if it is closed in the warm season, heated air will still flow into the cabin.
Comparison of manufacturers
In stores you can find spare parts produced by several companies. Products differ in two parameters: price and workmanship. Let's look at a few of the most popular brands.
Hola is a trademark of the Dutch company H&H Group. 15 European factories produce radiators, belts, shock absorbers and other auto parts. Inexpensive products of this brand are of good quality. According to customer reviews, spare parts of this brand at a comparable price are superior in quality to Chinese products. Price - 2000 rubles.
DAAZ - Dmitrov Automotive Assembly Plant, part of the United Automotive Technologies concern, was founded back in 1967. In addition to radiators, the company produces filters, brake pads and other spare parts for Russian and foreign cars. The products of this brand are used in cars that come off the AvtoVAZ assembly line. Price - 2500 rubles.
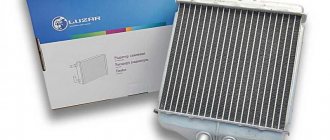
Luzar is a Russian company that was founded in 2003 on the basis of the Lugansk Radiator Plant. Products of this brand comply with GOST-R and the manufacturer gives them a 2-year warranty. Price - from 2100 rubles.
Bautler is a British company that produces, among other things, spare parts for the Chevrolet Niva. Price - from 2200 rubles.
Reviews from car owners vary. Some consider DAAZ radiators to be the most reliable, others consider Bautler, Hola or Luzar.
Taking into account the fact that replacing a part takes a lot of time and effort, it is worth taking the sports version of Luzar. It is designed to withstand heavy loads and is therefore more reliable.
Hola products are distinguished by the fact that each tube has its own rubber seal, rather than being fixed with a single seal. In Luzar-Sport, the honeycomb is soldered to a base that is attached to the tanks.
How to choose a radiator for a Chevy Niva
The Chevrolet Niva has two main configurations - with and without air conditioning. Regardless of the presence or absence of a condenser, the engine cooling radiator is the same on all Niva Chevrolets. All that remains is to choose a good brand and install a new part on the car.
The article number of the original spare part is 2123130101200.
Famous brands:
- Hola - a radiator from this company will cost the car owner 2,500 rubles. This is a famous Dutch manufacturer of various auto parts, ranging from belts to complex suspension parts and bearings. User reviews speak for themselves - the price/quality ratio is well maintained here.
- DAAZ - price 3000 rubles. It is a famous domestic manufacturer of a wide variety of spare parts for Lada and foreign cars. Many of the parts are supplied to the VAZ conveyor, so there is no doubt about the quality.
- Luzar - inexpensive radiators priced at 2880 rubles. The quality is average, but for its price the Luzar radiator on the Chevrolet Niva works quite well.
The brand rarely affects the service life of a part. Rather, it determines the likelihood of a manufacturing defect. If the radiator is made incorrectly, it will immediately leak.
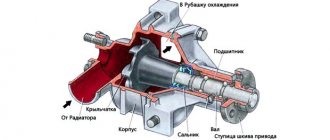
Relay for starting the fan
The spare block may contain not only the fuses themselves, but also electromagnetic relays. They control the operation of the engine cooling system, the circuits of which are powered by the ignition switch of the on-board computer. The current comes from the battery through the fuses themselves.
The relay operates as follows: at the very beginning, voltage is applied to the output, as a result an electromagnetic field is formed by passing current through the inductive coil. Subsequently, the current passing through the relay starts the engine. If the voltage is removed, the contacts will open due to the spring that is present in the mechanism, and the fan itself will stop.
There are several ways to check the operation of the relay. The simplest method is to replace the relay with the same working one and check the condition of the system. Turn off the engine, then disconnect the temperature sensor connector, after which you will hear a characteristic click of the relay. Then you need to remove and test the output contacts using multimeters, constantly applying voltage to the output. From the temperature sensor, information is supplied to the unit switching device.
The temperature sensor itself is a resistor, the values of which vary in a variable temperature range: from 1.3-1.8 Ohms at 30°C to 155-196 Ohms at 90°C. To give an accurate assessment of its performance, use a thermometer and an ohmmeter, calculating the resistance at different temperatures. To check, the part is removed and then immersed in an aqueous environment. The sensor can be found near the main exhaust system. It is dismantled using a spanner.
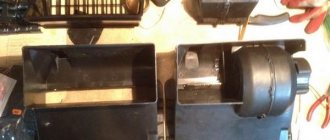
Fan replacement
The main reason for the low temperature in the car is the poor performance of the heater fan, which forces warm air through it into the cabin. In addition, being directly inside the car, it operates quite loudly at high speeds and whistles unpleasantly, especially in winter. Therefore, it is replaced with a fan from a VAZ-2108 (“eight”) car, which together with the casing is often called a “snail”. Their sizes differ slightly, so installing a new one is quite simple, with minor design modifications. Place the fan in the engine compartment, inside the air intake. This significantly reduces the noise from it. The heater radiator shutter needs to be removed.
You can leave the standard two-speed airflow mode switch
or replace it with a three-position (and, if desired, four-position) installed on 2108, adding an additional resistor from the “eight” to the fan circuit.
They place it inside the air duct, since it needs airflow.
The cross-section of the wires suitable for it needs to be increased, since the new motor consumes more power.
The outer openings for air passage in the hood must be sealed to reduce the flow of cold air through them to the stove by half.
Preparatory work
If there are visible signs of damage, even without a coolant leak, the cooling radiator requires replacement.
Before you start work, make sure that you have all the tools at hand, WD-40 fluid for the best removal of soured parts, a container with a volume of at least 5 liters for draining used coolant, as well as an additional container for draining the power steering fluid.