Print this article Font size 16
Considering the current opportunities in terms of purchasing spare parts, materials, tools, as well as the relative simplicity of the design of the VAZ 2109 car, doing body repairs yourself is far from the most difficult task. Many perform body work on their own, not inferior in quality to specialized workshops.
The task is to return quality
1) Warning icons on the dashboard: "Check Engine" indicator
The check engine light on the dashboard is the most common problem for car and truck owners. This light on the dash comes on when the ECU (Electronic Engine Control Unit) detects an error code in the system. For example, this happens when a sensor generates an error.
Since there are more than 200 possible error codes that can cause the engine light to come on, in order to determine the cause of the engine warning, you need to do an electronic diagnostic, which will show the error number. Using the code, you can determine what has gone wrong in the car. If you ignore this warning, there is a risk that it will lead to more serious engine damage.
3) High fuel consumption
When the engine is running efficiently, it burns fuel at a rate that helps in fuel efficiency (fuel economy). However, some parts of the fuel system, such as fuel filters, air filters, mass air flow sensor and oxygen sensors (lamb probe), become dirty and wear out over time.
If they are not replaced, this will cause the engine to use more fuel than usual. Again, a proactive attitude towards regular car maintenance will save you from the headaches caused by increased fuel consumption due to improper engine operation.
Heart examination
Any edition of the manual says that the most important part is the engine. The driver knows that each vehicle has its own resource. In this case we are talking about 150 thousand kilometers. In most cases, the machine lasts longer, but proper care is important for this.
First of all, you must follow the maintenance rules. The manual provides detailed advice on when and how to change each part. You can handle almost all consumables with your own hands.
The second point is driving style. The engine is strictly prohibited from operating for a long time at low or high speeds. The driver should change gears in a timely manner.
Recommendations include restrictions on towing, cold starts, and the use of poor fuel.
The main way to extend the life of the machine's heart is to maintain it regularly. It consists of a planned replacement of technical fluids and consumables. Depending on the mileage, but on average approximately once a year, it is necessary to inspect the car and consult the manual for preventative repairs and identification of problems.
Engine overhaul
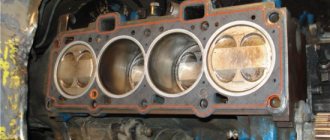
Extraneous noise, knocking, increased fuel consumption, and decreased power indicate the need for a major engine overhaul. On a VAZ 21099, engine overhaul means restoring its technical parameters, as indicated in the operating instructions. The VAZ 21099 engine is overhauled after removing the device from the car and disassembling it.
Removing the engine
- The battery is removed from the car.
- Oil and coolant are drained.
- The protection installed on the engine crankcase is removed.
- The exhaust pipe is disconnected from the muffler.
- The air filter is removed.
- The vacuum hose, which serves for the brake booster, is disconnected from the engine intake pipe.
- The ground wire from the clutch housing is disconnected.
- The hoses are disconnected from the thermostat.
- The high-voltage wire is released from the distributor cover.
- The low-voltage wires located in the block are disconnected.
- The hose supplying fuel from the fuel pump is removed.
- The cable tip mounted on the drive lever to disengage the clutch is removed.
- The block with the wire is disconnected from the starter relay for traction.
- The generator output is disconnected.
- Wire from carburetor valve.
- The hose is released from the carburetor for return drainage.
- The choke linkage and the control lever are separated.
- The cable for driving the air damper is removed.
- The latch installed on the damper drive sector, which holds the accelerator drive cable, is removed.
- The cable is removed from the throttle valve drive sector.
- The bracket on which the accelerator drive cables are attached is removed.
- The oil pressure and coolant temperature sensors are turned off.
- The heater hoses are disconnected.
- The gear shift rod and the joint tip are separated.
- The speedometer turns off.
- The car's reverse light switches are turned off on the gearbox.
- To make it easier to remove the engine, the extensions on both sides are retracted to the sides.
Stages of engine overhaul repair
On the eve of a major overhaul, it is necessary to draw up a detailed action plan:
It turns out which VAZ 2109 engine repairs you can do yourself, and which ones you must trust to a car repair mechanic. Necessary:
- choose a place for major repairs - in the best case, it is carried out in the pit of your own garage;
- choose a decent lifting mechanism with slings for securing loads - it helps to remove the power plant unit;
- the engine parts that have been removed must be placed in special trays that are suitable in size for the engine;
- You should not purchase spare parts for the engine in advance - having removed them, you can come to the conclusion that they have become unusable and only then go to the auto store for spare parts;
- if the engine is in very poor condition, a second-generation power plant is immediately purchased complete with a cylinder block for a complete replacement;
- it is necessary to calculate your financial potential and clearly calculate how much time it will take for major repairs, since this is a very long-term undertaking.
Operation of the VAZ 21099 car
Exhaust gases are toxic! If you must start the engine in a garage or other building, provide good ventilation or be sure to open the gate.
When starting to repair or maintain electrical equipment, first be sure to disconnect the wire from the “-” terminal of the battery.
When coasting, do not turn off the ignition - the anti-theft device in the ignition switch may be activated, blocking the steering column shaft. Your car may become uncontrollable!
Leaded gasoline, antifreeze and antifreeze are toxic, so take precautions when filling your car with technical fluids. If a catalytic converter is installed in the exhaust system, please note that when the engine is running, it heats up to temperatures above 600 ° C
Therefore, to avoid a fire when parking, make sure that there is no dry grass or flammable materials under the bottom of the car.
If a catalytic converter is installed in the exhaust system, please note that when the engine is running, it heats up to temperatures above 600 °C. Therefore, to avoid a fire when parking, make sure that there is no dry grass or flammable materials under the bottom of the car.
It is prohibited to operate a vehicle with the emergency oil pressure lamp on: it should light up briefly (no more than 2 s) only when starting the engine.
Do not work under a jacked-up vehicle. Be sure to place supports under the body.
It is prohibited to smoke or use open flames when refueling or servicing the vehicle.
It is forbidden to check the operation of the generator by disconnecting the wires from the battery, as well as the functionality of the ignition system “for spark”.
When lifting the car with a jack, be sure to apply the parking brake and place suitable supports under the wheels on the opposite side.
Maintenance and repair of the car during the warranty period must be carried out only at service stations with a mandatory note about the work in the service book coupons, otherwise you will lose the warranty on the car.
Before driving, warm up the engine at idle speed, since running a cold engine at high speeds will reduce its service life.
When turning on the starter, the gearshift lever must be in the neutral position.
Drive away only in first gear.
Do not exceed the load capacity standards specified in the technical specifications of the vehicle: overload leads to increased wear of tires and suspension parts, as well as loss of directional stability.
Check the air pressure in your tires regularly: low pressure leads to increased tire wear. A difference in tire pressure of 0.2–0.3 atm leads to a deterioration in vehicle handling.
Vehicles equipped with catalytic converters cannot be fueled with leaded gasoline. This will lead to rapid failure of the neutralizer.
Regularly check the condition of the protective covers of the steering rack, constant velocity joints (CV joints), ball joints, and steering rod joints. Damaged covers must be replaced, as water and dirt will quickly damage the mechanisms.
For refueling, use fuels, lubricants and operating fluids recommended by the manufacturer.
Regularly check the condition of the battery terminals and the fastening of the wires on them. Loose or oxidized terminals can damage the vehicle's electronic devices.
Video about “Car operation” for VAZ 21099
VAZ 21099 what you need to know when buying a car
VAZ 2108,2109,21099 - do-it-yourself maintenance (film)
https://youtube.com/watch?v=RsA35H7cL3U
VAZ-21099.Car repair and operation
Lada/VAZ-2108/ -09/ -099 operation, maintenance and repair manual
VA3-2108, -2109 and their modifications are five-seater passenger cars with a front, transverse engine. The body is a load-bearing structure, all-metal, welded. Engines are four-cylinder, in-line, four-stroke, gasoline, with a displacement of 1.5 liters and a power according to GOST 14845-89 (net) 51.5 kW (70 hp), carburetor or with a distributed fuel injection system. To reduce exhaust toxicity, some cars with fuel injection are equipped with a neutralizer in the exhaust gas system (previously, some carburetor cars in the export version were also equipped with a neutralizer). Previously, cars of the “eighth-ninth” family were equipped with carburetor engines with a displacement of 1.1 and 1.3 liters, with a power of 39.7 kW (53.9 hp) and 47.0 kW (63.7 hp), respectively.
VAZ-2111 engine management system The VAZ-2111 engine uses a distributed fuel injection system (a separate injector for each cylinder). The injectors are turned on in pairs (for cylinders 1-4 and 2-3) when the pistons approach top dead center (TDC). Some engines are equipped with a feedback injection system (oxygen sensor) and a neutralizer in the exhaust system. This system does not require adjustment or maintenance (if exhaust gas toxicity standards are exceeded, failed components are replaced). The oxygen sensor and converter are not installed on the other part of the engines. In this case, the toxicity of exhaust gases is regulated by a CO potentiometer using a gas analyzer. INJECTION SYSTEM CONTROLLER It is a special-purpose mini-computer. It contains three types of memory—random access memory (RAM), programmable read-only memory (PROM), and electrically programmable memory (EPROM). RAM is used by the computer to store current information about engine operation and process it. Codes of any faults that occur are also recorded in RAM. This memory is volatile, i.e. When the power is turned off, its contents are erased. The PROM contains the actual computer program (algorithm) and calibration data (settings). Thus, the PROM determines the most important parameters of engine operation: the nature of the change in torque and power, fuel consumption, etc. The PROM is non-volatile, i.e. its contents do not change when the power is turned off. The EPROM is installed in a connector on the controller board and can be replaced (if the controller fails, a working EPROM can be replaced with a new controller). VEPZU records immobilizer codes when “learning” the keys (see “Car anti-theft system”, p. 11). This memory is also non-volatile. INJECTION SYSTEM SENSORS Provide the controller with information about engine operating parameters (except for the vehicle speed sensor), on the basis of which it calculates the torque, duration and order of opening of the injectors, the torque and order of spark formation. If individual sensors fail, the controller switches to bypass operating algorithms; in this case, some engine parameters may deteriorate (power, throttle response, efficiency), but driving with such malfunctions is possible. The only exception is the crankshaft position sensor; if it is faulty, the engine cannot run. CRANKSHAFT POSITION SENSOR Installed on the oil pump cover. It provides the controller with information about the angular position of the crankshaft and the moment the pistons pass the 1st and 4th cylinders TDC. The sensor is of the inductive type and reacts to the passage of the teeth of the drive disk on the generator drive pulley near its core. The teeth are located on the disk at 6° intervals. To synchronize with TDC, two teeth out of 60 are cut off, forming a cavity. When a depression passes by the sensor, a so-called synchronization reference pulse is generated in it. The installation gap between the core and the teeth should be within 1±0.2 mm. COOLANT TEMPERATURE SENSOR Screwed into the exhaust pipe on the cylinder head. It is a thermistor that changes its resistance depending on the temperature: Temperature, °C - Resistance, Ohm 100 - 177 80 - 332 60 - 667 40 - 1459 20 - 3520 0 - 9420 -20 - 28680 -40 - 100700 The controller supplies The sensor uses a stabilized voltage of +5 V through a resistor and, based on the voltage drop, calculates the engine temperature, adjusting the mixture composition. THROTTLE POSITION SENSOR (TPSE) It is installed on the throttle valve axis and is a potentiometer. A stabilized voltage of +5 V is supplied to one end of its winding, and the other is connected to ground. The signal for the controller is removed from the third output of the potentiometer (slider). To check the sensor, turn on the ignition and measure the voltage between ground and the slider terminal (do not disconnect the connector - the wires can be pierced with thin needles connected to the voltmeter terminals) - it should be no more than 0.7 V. Turning the plastic sector by hand, fully open the throttle flap and measure the voltage again - it should be more than 4 V. Turn off the ignition, disconnect the connector, connect an ohmmeter between the slider terminal and any of the two remaining ones. Slowly turn the sector by hand, following the arrow readings. There should be no jumps throughout the entire working range. Otherwise, replace the sensor. If the TPS fails, its functions are taken over by the mass air flow sensor. In this case, the idle speed does not fall below 1500 min-1. MASS AIRFLOW SENSOR Located between the air filter and the intake hose. It consists of two sensors (working and control) and a heating resistor. The passing air cools one of the sensors, and the electronic module converts the temperature difference between the sensors into an output signal for the controller. In different versions of injection systems, two types of sensors are used - with a frequency or amplitude output signal. In the first case, the frequency changes depending on the air flow; in the second case, the voltage changes. If the mass air flow sensor fails, its functions are taken over by the TPS. KNOCK SENSOR One contact knock sensor is screwed into the upper part of the cylinder block, a two contact sensor is mounted on a stud. The operation of the sensor is based on the piezoelectric effect: when a piezoelectric plate is compressed, a potential difference occurs at its ends. When detonation occurs, voltage pulses are generated in the sensor, according to which the controller regulates the ignition timing. OXYGEN SENSOR (LAMBDA PROBE) Installed in the exhaust pipe of the exhaust gas system. The oxygen contained in the exhaust gases creates a potential difference at the sensor output. On the currently produced “January” and Bosch controllers, self-diagnosis is not provided, and the connector is used to connect a diagnostic device of the DST-2 type. If the system is working properly, then when the ignition is turned on, the “SNESK ENGINE” lamp lights up, but goes out immediately after the engine starts. If the lamp lights up while the engine is running, there are malfunctions in the engine management system, the conditional codes of which the controller records in memory (RAM). Even if the light then goes out, these codes remain in memory and can be read using a scan tool or self-test mode (if equipped). To erase codes from the controller’s memory, you must disconnect the battery for at least 10 seconds. However, the failure of some components of the injection system (fuel pump and its circuits, ignition module, spark plugs) is not detected by the controller and, accordingly, the “SNESK ENGINE” lamp does not light up.
A book in a series of full-color illustrated guides to do-it-yourself car repairs. The manual describes the design features of components and systems of VAZ-2108, -2109, -21099 vehicles with engines 2108, 21081, 21083, 2111. The main malfunctions, their causes and solutions are described in detail. Color photographs, annotated, show in detail all maintenance and repair operations. Recommendations for tuning car components are outlined. The Appendices contain tools, lubricants and operating fluids, lamps, lip seals, bearings, tightening torques for threaded connections, as well as electrical diagrams. The book is intended for drivers who want to maintain and repair a car themselves, as well as for service station workers.
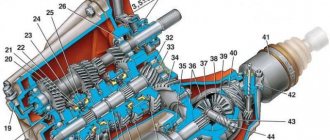
Location of elements of the VAZ-2108, VAZ-2109, VAZ-21099 engine control system: Diagram of the VAZ-2111 engine control system
Vehicle characteristics
VAZ 21099 operation and repair
This model of the Samara family differs from its analogues in its overall length, which has increased by as much as 200 mm due to the rear overhang. In addition, this model is distinguished by the following components:
- Radiator trim;
- A hood that looks more sophisticated;
- Front fenders without plastic mask;
- A new interior instrument panel, popularly called high, has a tachometer in the instrument cluster.
All these innovations were subsequently transferred to other models of the Samara automaker quite successfully. If we consider the advantages and advantages of the VAZ 21099 model in relation to other models of the family, they are as follows:
- High speed characteristics of the car;
- Excellent handling;
- Excellent stability on various types of road surfaces;
- Spacious 3-volume trunk and much more.
Now about the technical characteristics of this car. VAZ 21099 is a front-wheel drive sedan with a 1.5 liter petrol engine. The car is equipped with a 5-speed gearbox. The car is very economical and consumes little fuel on the highway, which is partly explained by the distributed injection system, simply called an injector. This engine also meets all international exhaust emission standards. As for the instrument panel equipment, everything is in excellent shape. There are various backlit switches that provide power windows and door locks automatically as well. The on-board monitoring system, which is able to notify the driver about the normal operation of individual parts and components of the car, deserves special attention.
VAZ 21099 repair and operation manual
So:
- The steering column of the VAZ 21099 car is installed for a reason, but with an adjustable tilt angle. As for the seats, they are also made to provide a more comfortable seating position for the driver and passengers. This can be done thanks to the height adjustment of the attachment points, including the seat belts.
- The headlights are installed with fog lights (see Installing fog lights on a VAZ), which optimize the lighting performance of the car even in inclement weather.
Today, the VAZ 21099 is still able to compete even with foreign car models, being considered a prestigious domestic budget class model. On the market, the VAZ 21099 is rated as the most convenient and practical car, which has earned many praises and positive assessments from world experts in this field.
Repair manual for VAZ 2109 Lada Samara
- Repair manuals
- Repair manual for VAZ 2109 (Lada Samara) 1987+.
General information about the car.
VAZ 2109 Sputnik/Lada Samara is a front-wheel drive five-door hatchback manufactured by the Volzhsky Automobile Plant, the repair of which is possible with your own hands. Look at the detailed repair manual in one or more subsections of the site. Unlike its fellow G8, the VAZ 2109 Sputnik/Lada Samara is seen as a more “respectable” car for a family man - due to the presence of five doors and, as a result, a less expressive appearance. Repairing a VAZ 2109 with your own hands is a task that almost any car owner can do, because there are a lot of repair manuals.
However, this five-seater hatchback (especially in the first years of production) did not escape the fate of being called a “chisel” for its characteristic wedge-shaped body contours. The front-wheel drive VAZ-2109 began to be sold in 1987. A more successful modification of the “nine” VAZ 21093 was released in 1990, naturally, with an increase in price compared to 2109. A new solution for the front part with a short wing and a separate segment of the front end and radiator was made in connection with unification with the VAZ 21099 sedan, on which “long” wings were installed. The interior is identical to other Sputnik models. Since the early 90s, cars in the “Lux” configuration have been equipped with a different, more modern instrument panel with a tachometer and a trip computer. The range of engines used has been supplemented with a motor with a distributed fuel injection system, which provides increased dynamic properties and improved fuel efficiency. Some vehicles are equipped with an anti-theft system. Additional conveniences are provided by electric door locking and electric window control from the driver's seat. The on-board monitoring system reminds you of unfastened seat belts, incomplete closing of doors, leaving the ignition key and the functionality of individual components. The basic VAZ-2109 was equipped with a transversely mounted carburetor 1.3-liter four-cylinder engine producing 65 hp, with which a fully loaded car (payload 425 kg) accelerates to 100 km/h in 18 seconds and reaches a speed of 156 km/h. It was discontinued in 1997 due to the cessation of production of insufficiently powerful VAZ-2108 engines. The more stylish VAZ-21093 model (which is now the only “nine” in the factory program) is equipped with a 72-horsepower 1.5-liter VAZ-21083 engine, which, while maintaining speed and economic parameters, has the best acceleration result from zero to hundreds by a second . VAZ-21093i - with a 1.5-liter injection engine. A modification with an engine displacement of 1.1 liters (VAZ-21091) was also produced. Very few VAZ-2109 units were equipped with a four-speed gearbox; mainly on the market there are cars equipped with a five-speed manual gearbox, which later began to be installed on all models of the Samara family. Sharp and sensitive, with good feedback, the steering mechanism is quite reliable, however, every 50 thousand km the rack-and-pinion engagement should be adjusted at a service station, but the quality of work must be checked yourself. There are also options with right-hand drive, their indexes are 21096 (1.3 l) and 21098 (1.5 l). The McPnerson front suspension is somewhat harsh (the rebound travel is too small), but during high-speed driving it provides a stable straight-line run-out. Particularly noteworthy are the variants with a convertible body produced by Tantal. However, the reality of the existence of their prototype, and even more so its serial production, raises serious doubts. The interior of a car can be strictly practical and with a claim to comfort. The first option has a laconic “low” dashboard, which is nevertheless quite convenient. The front seats are equipped with headrests. For the front seats, the upper seat belt anchor points are height adjustable. In the second option, a more informative “high” dashboard provides clear control over the state of the vehicle’s on-board systems. Installing an improved interior (fabric seat upholstery, door upholstery with inserts) allows the car to acquire elements of prestige. When the rear seat is folded, the car transforms into a cargo-passenger version, similar to a station wagon. An additional advantage is the 5-door body, which turns this model into a “family” universal car. In 1995, the front part was restyled again: the radiator grille stopped melting. The last cosmetic upgrade was carried out in mid-1997. The rest of the equipment remained virtually unchanged. The plastic in the cabin rattles in the same way as on the first releases of Sputnik. Since re-export hatchbacks of the VAZ-2109 family are successfully sold in Russia, models of various versions (L, GL, etc.) and configuration levels may be found on the market. However, the export name Samara can also be written on a typical domestic car, since the panel with the inscription does not take long to attach yourself. Be careful: for a used Sputnik, it no longer matters which country it was intended for export to. The five-door hatchback is currently also produced in the “police version” VAZ-2109-90 with a compact two-section 654 cc Wankel rotary piston engine - VAZ-415, which allows you to get foreign cars of offenders at a speed of 200 km/h. With this power unit, a hatchback with a curb weight of 1015 kg accelerates to 100 km/h in 8 seconds and consumes 10 liters of AI-93 gasoline per 100 km. They tried to resurrect the VAZ-21093 in Finland at an enterprise. The main deliveries were intended for Europe, where the rating of the Lada brand had dropped significantly, which was no longer helped by specially prepared export modifications of the Samara 1500i with fuel injection. But a significant part of the cars was re-exported to Russia (until import duties were raised), then production was curtailed. Due to the relatively high cost of the VAZ-21093 on the domestic market, safety equipment and systems standard for Europe (inflatable airbag, standard alarm system, catalytic converter) are installed only upon request. Cars produced for the domestic market are still let down by quality, which determined (before the crisis) that many owners of this car switched to inexpensive foreign cars. And yet, the “nine” is a constant object of “assault” from tuning firms. The list of options in this case is rich: power accessories, alloy wheels, four-headlight headlight system, various aerodynamic and aesthetic parts for the bodywork. The advantages include fairly high dynamic qualities for domestic cars, excellent handling, stability at high speeds and slippery roads, and a low price (in dollars, at least after the crisis).
In the model range of AVTOVAZ JSC 2001-2002. modifications of the VAZ-21093 with carburetor and injection engines are presented. The following versions are available: for cars with carburetor engines - “standard” (VAZ-21093-00), “norm” (VAZ-21093-01) and “luxury” (VAZ-21093-02), for cars with engines with distributed fuel injection - “standard” (VAZ-21093-20), “norm” (VAZ-21093-21) and “luxury” (VAZ-21093-22).
On our website you will receive comprehensive information on repairing a VAZ 2109 with your own hands. Below is a list of all car components. By clicking on the link, you can go to the appropriate section:
1. Description of the car 2. Operation of the car 3. Maintenance of the car 4. Car care 5. Malfunctions on the road 6. Chassis 7. Steering 8. Brake system 9. Electrical equipment 10. Body 11. Engine and its systems 12. Transmission 13. Applications
↓ Comments ↓
1. Description of the car
1.0 Description of the vehicle 1.1 Appearance 1.2 Engine compartment 1.3 General data 1.4 Technical characteristics 1.5 Passport data
2. Vehicle operation
2.0 Vehicle operation 2.1 Safety rules and operating recommendations 2.2 Side doors 2.3 Trunk lid 2.4 Opening and closing the hood 2.5 Luggage compartment 2.6 Adjusting the front seats 2.7 Controls 2.8 Interior ventilation and heating 2.9 Eliminating fogging or frosting of windows
3. Vehicle maintenance
3.0 Vehicle maintenance 3.1 Checking the tightness of the engine and gearbox seals 3.2 Checking the tightness of the cooling system 3.3 Checking the tightness of the fuel system 3.4 Replacing the coolant 3.5 Replacing the oil filter and engine oil 3.6 Replacing the air filter filter element 3.7 Checking and adjusting the generator drive belt 3.8 Replacing the belt generator drive 3.9 Cleaning and flushing parts of the crankcase ventilation system 3.33. Replacing lamps
4. Car care
4.0 Car care 4.1 Car washing 4.2 Caring for and restoring body paint 4.3 Body lubrication 4.4 Cleaning drainage holes 4.5. Car storage 4.6 Preparing for winter use 4.7 Tips for starting the engine in severe frost 4.8 What is useful to buy for winter 4.9 Tips for winter use of the car
5. Problems along the way
5.0 Malfunctions along the way 5.1. Engine 5.2. Checking electrical equipment 5.3 Extraneous knocking noises appeared 5.4 Vibration and shock on the steering wheel 5.5. Brake problems 5.6 Wheel puncture
6. Chassis
6.0 Chassis 6.1. Front suspension 6.2. Rear suspension
7. Steering
7.0 Steering 7.1 Steering wheel 7.2 Steering column 7.3 Steering mechanism 7.4 Replacing steering rods
8. Brake system
8.0 Brake system 8.1 Front wheel brake 8.2 Rear wheel brake 8.3 Wheel cylinder 8.4 Brake drive
9. Electrical equipment
9.0 Electrical equipment 9.1 Relay and fuse box 9.2. Generator 9.3. Starter 9.4. Lighting and light signaling 9.5. Heater 9.6. Windshield wipers 9.7 Sound signal 9.8. Ignition system 9.9 Instrument panel (high)
10. Body
10.0 Body 10.1 Replacing the front buffer 10.2 Replacing the rear buffer 10.3 Replacing the radiator trim 10.4 Replacing the front fender 10.5 Removing and installing the hood 10.6 Adjusting the hood 10.7 Adjusting the hood lock 10.8 Front door 10.9 Rear door
11. Engine and its systems
11.0 Engine and its systems 11.1 Removing and installing the engine 11.2 Adjusting the clearances in the valve drive 11.3. Power supply system 11.4. Lubrication system 11.5. Cooling system 11.6. Exhaust system 11.7 Complete disassembly of the engine 11.8 Cylinder block. Inspection, troubleshooting and repair 11.9 Piston with connecting rod. Disassembly, troubleshooting and assembly 11.10. Cylinder head 11.15. Carburetor adjustment
12. Transmission
12.0 Transmission 12.1 Gearbox and differential. Main components and parts 12.2 Removing the gearbox 12.3 Installing the gearbox 12.4 Adjusting the clutch drive 12.5 Disassembling the gearbox 12.6 Inspecting and troubleshooting gearbox parts 12.7. Secondary shaft of the gearbox 12.8 Primary shaft of the gearbox 12.9. Differential 12.16. Clutch drive 12.17. Front wheel drive
13. Applications
13.0 Appendices 13.1 Appendix 1. Basic data for adjustments and monitoring 13.2 Appendix 2. Fuels and lubricants and operating fluids 13.3 Appendix 3. Tightening torques for threaded connections 13.4 Appendix 4. Service book 13.5 Appendix 5. Vehicle electrical diagram
Glass cleaners
Operating a vehicle with faulty wipers is prohibited. If the drive is working properly, but the quality of cleaning leaves much to be desired, replace the brushes immediately. This is an inexpensive consumable item, installation of which takes just a few minutes and does not require the use of specialized tools. Remember that in addition to comfort in bad weather, serviceable wipers significantly increase traffic safety, and timely replacement of the blades will help you avoid scratches on the windshield, which sometimes even expensive polishing cannot remove.
Also pay attention to the ability of the windshield wiper mechanism to operate at high speeds. As a rule, a decrease in their speed, regardless of the selected mode, indicates a malfunction in the drive
Preparatory work for replacing the VAZ 2109 spar
Since spar replacement and repair are carried out using the same technology, the set of tools will also be the same.
Please note that it is better to purchase spars complete with other parts. This way you will be sure that they will fit each other perfectly and will not spend so much time installing them.
If you nevertheless decide to repair the side member on a VAZ 2109 yourself, first you will need to acquire the following tools for the job:
- welding unit (the most convenient and simplest option would be semi-automatic welding);
- grinder and discs, hard metal brush for the grinder;
- a set of new side members and connectors for the VAZ 2109;
- grinding tool;
- electric drill;
- metalworking tools;
- packaging of automotive mastic;
- 2 medium-sized paint brushes;
- can of primer;
- bottle of solvent.
Auto highlight
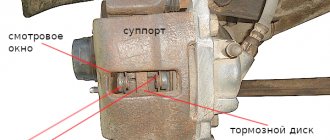
First of all, you need to study the brake system. This includes regular replacement of pads and brake cylinders. The repair and operation manual for a VAZ 21099 carburetor or injector describes in detail how to disconnect the fasteners, dismantle the old part and install a new one.
The literature allows you to competently bleed the brake system. This is a simple action if you follow all the steps step by step:
- It is necessary to open the reservoir on the master cylinder.
- You should find and clean the bleeder fitting. It is located on one of the brakes, specifically for troubleshooting and prevention.
- Brake fluid is poured using a special hose. The cable is immersed in a bottle with it and the brake is pumped.
- The buddy must press the pedal all the way down several times and then hold it down.
- The fitting is unscrewed with a key, the liquid merges with the air.
For a more detailed description of the procedure, download the manual. This process is repeated several times until no more air bubbles come out.
The main passport dimensions between the control points of the VAZ 2109 body
| Diagonal of the front doorway from the extreme point of the lower threshold to the middle of the roof | 1345 mm (plus/minus 5 mm) |
| Diagonal of the front door opening from the lowest point of the windshield to the middle of the lower threshold | 1000 mm (plus/minus 5 mm) |
| Distance between the front door hinge area and the pillar in a straight line | 963 mm (plus/minus 5 mm) |
| Diagonal of the rear door opening from the point where the lower sill meets the door center pillar to the roof | 1112 mm (plus/minus 5 mm) |
| Diagonal of the rear door opening from the top of the B-pillar to the lower sill | 860 mm (plus/minus 5 mm) |
| Long diagonal rear side window frame | 706 mm (plus/minus 3 mm) |
| Short diagonal rear side window frame | 383 mm (plus/minus 3 mm) |
| Hood diagonal | 1610 mm (plus/minus 5 mm) |
| Distance from the middle of the hood to the middle of the windshield | 712 mm (plus/minus 5 mm) |
Interesting video about the repair and straightening of the body of the “nine”
7) Generator failure
The alternator is the part of your car that keeps all the electrical systems running when you start the car. It is also responsible for supplying charge to the battery to keep it in peak condition. If the alternator breaks down, it can cause premature battery wear and other problems when starting the car.
Check your machine manual or service book for recommended maintenance intervals for your generator and replace it before it breaks to avoid problems.
Also note that many generators can be iterated over. This way you can save a lot of money.
Headlights
Everyone remembers that driving with faulty lighting devices is prohibited. However, if a partial malfunction occurs, many simply continue driving, hoping that the remaining light will be enough for them. This is a dangerous practice that, in addition to a hefty fine, can cause a serious accident, especially in bad weather.
At this point we are not even talking about the complete loss of functionality of one of the headlights, but, for example, about the gradual loss of transparency of lenses or diffusers, untimely adjustment of the light flux, as well as banal pollution.
Always check the functionality of the lighting devices, especially if you are traveling in the dark or in bad weather, carry out all routine maintenance in accordance with the recommendations, and also if there are only the slightest changes in their operating parameters. Even if it’s snowing or raining, wipe your headlights - this will significantly improve the road illumination for at least a few kilometers of your route.
Weak spots
What weak points does the body of the domestic nine have? Let's try to find out.
If rotten or deformed elements of the car body are detected, they must be removed and appropriate measures taken to restore the integrity of these areas.
The most vulnerable areas of the VAZ 2109 body include:
- Front floor, reinforced sills, doors, fenders and rear underbody;
- The hood has relative endurance, but over time it begins to lose its former properties. The area above the battery is especially affected. This is where Nine owners most often notice the formation of rust;
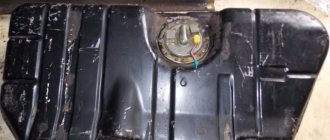
- A noticeable problem that many drivers face is the fuel tank floor;
- Optics reflectors and a muffler also cannot boast of a long life without the appearance of signs of rust.
Corrosion is obvious
Corrosion is the main enemy of almost all domestic cars. Although anti-corrosion coatings are done quite well, time, weather conditions and the characteristics of our roads kill everything, rust actively begins to eat the metal and this problem must be dealt with.
Dealing with problems in general terms
To get rid of the problem of rust formation on the body, you need to do some work. On your own or with the help of specialists, decide for yourself.
- Disassemble the engine compartment, drain the coolant and remove the radiator.
- Remove all doors.
- If there is an amplifier (TV) in front, then it will also have to be disassembled.
- Using a grinder, all damaged areas are cut off;
- If the wings or panels are rusty, they will have to be cut off.
- If holes or holes have formed due to corrosion, they can be welded or patches can be used.
- It is recommended to additionally cover areas that are not highly resistant to corrosion with metal inserts.
- Experts advise strengthening mudguards with additional inserts and then securing them with spot welding.
- New body parts that are installed in place of rusted ones must be adjusted in accordance with the standards.
- After processing, the wings and sills are secured with screws, bolts and welding.
- Restoring the geometry of the body is a mandatory activity, on which most of the time is spent. To do this, you will need a bench machine on which the machine is fixed and adjusted in accordance with the norms of the control points.
- The next stage is welding a new floor, if required as a result of assessing the condition of the body. When restoring the floor, patches, connectors and amplifiers are used. At the final stage, the floor is covered with anti-corrosion compounds.
- It is easier to purchase new arches than to try to restore old ones. They can be coated with resin and waste oil mixed together. This mixture is excellent at resisting rust. Just do not use this composition to treat the bottom under any circumstances.
During body repairs, it is often necessary to jack up the car. If the jacking areas are rusty, use a support beam to lift the car.
Holes, rust
Often, the body is repaired independently if small areas are damaged, dents or holes are formed due to the effects of rust. In addition to correcting the geometry, painting and polishing are performed.
More serious deformations and damage caused by collisions and road accidents necessarily require contacting specialized workshops. Here, focusing on control points and using professional equipment, you can restore the body as correctly as possible without disturbing its geometry, maintaining rigidity and other factory parameters. Sometimes they can even be improved.
Fluid levels
Let's start, first of all, with the oil level in the engine - this is the most important parameter that characterizes its operation. With increasing mileage, engine oil consumption due to waste increases significantly, and the recommended replacement interval of 10,000 km may be too long. It is necessary to regularly check the level on the dipstick in the engine compartment, without waiting for the warning lamp on the instrument panel to light up, which will protect your engine from completely replacing the cylinder-piston group and grooving the crankshaft.
In addition, you should pay attention to a sharp increase in the oil level - most likely, there has been a leak of coolant into the lubrication systems or into the combustion chamber. Operation in such a situation should be stopped immediately
An additional confirmation of this disappointing conclusion can be a decrease in the level of coolant in the expansion tank.
In turn, the lack of this fluid leads to an increase in the operating temperature of the engine, frequent activation of the forced radiator fan, and can subsequently lead to boiling in the traffic jam. It is worth noting that in particularly advanced cases, systematic overheating causes warping of the cylinder head cover, which requires expensive repairs.
Brake fluid is also of particular importance, since the effectiveness of the most important safety system directly depends on it. This is a hygroscopic substance that needs not only control of its level, but also systematic replacement in order to avoid boiling and brake failure on a long descent.
It is also worth remembering about the transmission oil in the gearbox - it is not replaced as often as in the engine, so many car owners simply forget about this important procedure. For a manual transmission, this can lead to increased effort on the lever and the inability to engage one of the gears.
If these symptoms continue to be ignored, then excessive wear of the bearings occurs, which makes further operation impossible.
An automatic transmission is even more demanding on the level and condition of the working fluid, since changes in its properties during long-term operation lead to costly breakdowns and the risk of having to replace the entire assembly.
Bleeding air from the VAZ cooling system
VAZ 2109 repair and operation manual
Recognizing this very air lock in the cooling system can be very difficult. But, nevertheless, the main signs exist. This is a characteristic sound that resembles gurgling. In addition, this may be indicated by the coolant temperature indicator, which, if it approaches the red zone, clearly indicates the presence of malfunctions in the system. This air lock must be removed urgently, as it causes corrosion. Let's get started, first armed with the necessary tools and a new coolant antifreeze:
- we stop the VAZ 2109 engine;
- wait until the engine cools down.
Note. It also happens that an overheated engine does not stop immediately. In this case, it is recommended to stop it forcefully. The fact is that the engine continues to operate on pseudo-channel ignition. The way to forcefully stop the engine is to smoothly press the gas pedal all the way to the floor and then turn it off.
- remove the cap from the expansion tank;
- sharply press the upper and lower hoses, trying to “expel” air from the system;
- if this does not help, then we try to get rid of air in the system by starting the engine and leaving it in idle mode;
- After removing air from the system, fill in coolant to the required level.
VAZ 2109 operation and repair manual
Note. After filling in the antifreeze, you need to secure the lid tightly, thus eliminating the possibility of air penetration through the weak plug, expanded from overheating.
You should be extremely careful when working with coolant, because it is highly toxic and can cause harm to the human body.
Advice. After the system is completely filled with coolant, the radiator hoses should be tightened. This method helps to better fill the system with liquid, leaving no free spaces for air to enter.
In addition to checking the condition of the cooling system of the VAZ 2109, it is a frequent and mandatory maintenance procedure. The front suspension of the car is something that needs to be checked without fail, since the VAZ 2109 is a front-wheel drive car. So:
- Front and rear hydraulic struts are one of the important components that should be taken into account when inspecting and repairing the front suspension. This vehicle unit includes a certain group of parts capable of performing the function of a guiding suspension device and other parts, as a rule, performing the functions of a damping element.
- The first group, which performs guiding functions, includes parts for attaching the rack to the body, including the body. And for the second group - a hydraulic shock absorber, completely built into the rack.
The instructions for the VAZ 2109 say in black and white that repairs to the front suspension can be avoided if you carry out frequent preventive inspections. This includes a visual inspection for cracks and traces of road accidents, the presence of various types of deformations and much more. It is recommended to check the condition of the car's rubber cushions, silent blocks, ball joints and, of course, the settlement of the telescopic struts.
VAZ 2109 suspension repair
Recommendations for caring for equipment
Modern models from the brands Bernina, Veritas, Jaguar, Singer, etc. are equipped with great functionality. And during operation, do not neglect the instructions and maintenance of the unit. It is better to prevent any damage than to deal with it. In order for the equipment to serve for a long time, it is necessary to follow the manufacturers' recommendations.
- Do not store the unit in a room with high humidity, this will lead to rusting of individual parts.
- After each use, it is necessary to clean the unit from dust, fabric lint, thread fragments, etc.
- All moving parts should be lubricated at least once every three months.
- For oiling, only recommended grades of technical oil should be used. Expired formulations should not be used.
These simple recommendations will increase the life of your device and make working with it enjoyable.
How to set up carburetor 21099
The outside of the device does not need to be washed if it is used regularly. Cleansing becomes necessary only when the internal mechanisms become very dirty and their mobility becomes difficult. Before you start adjusting the carburetor or taking your car in for repairs, you should also clean the mechanism. It is strictly forbidden to use brushes or dry rags for internal cleaning. Even the smallest and invisible lint can get inside the device and disrupt its operation. After the VAZ 21099 carburetor is brought into proper shape, you can begin to configure it.
Setting the throttle valve is the first step in carburetor adjustment. It consists of checking how well the damper cable is tensioned. It should neither sag nor be too tight.
If you need to tighten or loosen the cable, you should adjust the drive, which consists of several stages:
- A size 13 wrench holds the tip nut, and a second similar tool slightly unscrews the lock nut.
- The required distance from the tip of the nut to the carburetor is set. In this case, the gas pedal must be lowered.
- The locknut that was previously unscrewed with a wrench is tightened.
After the throttle valve is brought to the required state, you can proceed to setting up the air damper drive.
To do this you need:
- Remove the cover from the air filter.
- Check the draft level in the shell. This is done as follows: if the drive is adjusted correctly, then the air damper opens completely when the drive handle is screwed in. If the opening is not complete, it must be adjusted. The handle rotates 180 degrees so that the damper opens completely.
The next step is setting up the launcher. This mechanism can be adjusted correctly only with the carburetor removed. If this is problematic, then you should purchase a tachometer.
After the carburetor is removed, you need to do the following:
- Remove the air filter base.
- Pull out the air damper drive handle and open the damper itself by about a third.
- Start the engine, loosen the bolt to 3 - 3.5 thousand rpm and lower the throttle.
- Continue unscrewing the adjusting screw to 2.7 thousand rpm.
- When the required values are achieved, you can tighten the bolt back and return the filter base to its place.
It is also sometimes necessary to adjust the idle speed. To do this, warm up the engine and turn on power-consuming devices (headlights, stove, etc.). After this, using a screwdriver, set the maximum possible speed of the carburetor quality screw. On the contrary, the quantity screw decreases the normal speed. Next, you need to go to the quality screw again and lower the speed to the average value.
Tools
Before moving on to the direct instructions for repairing the VAZ 2109 body, I would like to dwell on choosing the right tools. Every professional, master of his craft will confirm that a good tool is half the successful completion of any repair operation.
So, the list of necessary tools for body repair of the “nine” is quite wide, since the work is by no means simple and will require a considerable number of specific instruments:
- Special hammers are required, at least 3 types of them with different sizes for straightening work;
- A grinder with mounted circles (you need different discs that perfectly remove paintwork and rust);
- It is advisable that the garage have a carbon dioxide cylinder (about 10 cubic meters);
VAZ 2109 body repair and tools
- Without welding during body work, it’s like having no hands (it’s better to choose a device with a maximum current of 150 A);
- Good chisels with hardened tips and several similar metal drills;
- Lift (it is better to have 2 jacks);
- A good metal brush (you will need it to clean rusty areas of the body);
- A standard set of motorist tools (keys, screwdrivers, etc.).
What is an injector - a modern replacement for a carburetor
An injector is a device that replaces the operation of a carburetor and consists of a fuel rail (rail) onto which injectors are attached. Under high pressure from the gasoline pump, fuel enters the rack, and from there the gasoline is distributed to the injectors. The injector nozzles, using rubber sealing rings, are inserted together with the rack into the engine block and inject fuel, which then ignites.
An injector is a fairly thin device, the operation of which is constantly regulated by the electronic “brain” of the car. The presence of an on-board computer allows specialized car repair shops to carry out quick and accurate vehicle diagnostics. Diagnostics is carried out by connecting special equipment through a connector to the vehicle’s on-board computer.
Injection models of the VAZ 21099 since 2000 have also acquired electronic “brains”. This car model has front-wheel drive and shows high road stability. The engine of the injection 99 is four-cylinder, eight-valve, with a displacement of 1.5 liters. In a modern VAZ, the maximum speed indicated on the speedometer is 180 km/h. In practice, it is not recommended to accelerate this car over 160 km/h.
Do-it-yourself body repair on a VAZ 2109: main weak points and how to combat them (video), LuxVAZ
Carrying out body repairs yourself in a garage is not easy, since this procedure includes several stages, each of which requires specialized tools and knowledge of new body repair technologies. However, this task is not impossible. This section contains many recommendations for performing various types of body work with photos of the main stages. For beginners or inexperienced car enthusiasts, video lessons on auto body repair may be useful.
Having learned about the techniques and modern technologies of car body repair in a garage, you can not only choose the right body part, but also install it on the car, eliminate the source of corrosion, straighten the door, fender or hood with your own hands, remove a small dent on the car, correctly install thresholds and even do body welding work yourself.
Do-it-yourself minor auto body repairs include removing small dents without painting, repairing paint chips, removing scratches on a car, and repairing corroded areas of the body.
Local car body repair is aimed at removing scratches, chips, corrosion, and repairing small dents without painting. There are many videos on the Internet that demonstrate these processes quite clearly. The technologies for minor body repairs of Mercedes, Nissan, Gazelle or Niva are not much different.
However, if you have at least basic straightening and welding skills, complex body work can be done with your own hands. The approach to work is the same and does not depend on the make of the car, regardless of whether you need a Gazelle body repair yourself or a UAZ Bukhanka body repair. The main thing to remember is that the technology for restoring body geometry with your own hands must be followed at all stages of repair.
- Preparing for painting. The body is cleaned of traces of old paint, surface unevenness is filled with putty, then the surface is sanded and primer is applied.
- Car painting. This is the final stage of any body repair. Do it yourself only in well-lit rooms so that all defects are visible. To work you will need a spray gun. If not a complete repainting of the body is carried out, but local painting of the wing or hood, the remaining parts of the body will have to be tightly covered with film.
During work, it is necessary to use eye and hand protection: glasses, rubber gloves, so as not to be exposed to the risk of chemicals coming into contact with the body.
After the car has dried, all problem areas must be treated with coarse sandpaper or a brush with metal bristles can be used for this. It is not recommended to use an angle grinder because the sanding discs remove a rough layer of metal. Only discs with plastic soles are suitable for this procedure. You can also place the abrasive wheel shown in the photo on the drill.
You can also use a rust converter to repair a rusty car body. It must be applied to all defective areas, and after a few hours, washed off with a stream of water or a wet cloth.
Next, a primer is applied to the surface of the car, free of corrosion, and after drying, the uneven surfaces are filled with putty. After sanding the dried putty, the surface can be painted.
Then, using a powerful soldering iron, you need to tin the surface on the outside of the hole and the edge of the patch with tin. Orthophosphoric acid or a rust converter based on it can be used as a flux.
At the end, the patch must be soldered to the hole with a continuous seam, after which the patch must be hammered (sinked). Clean the protruding edges of the patch with coarse sandpaper. Then the defective area is puttied, primed and prepared for painting.
It is also possible to weld the patch to the body with a continuous seam, but this will require a welding machine and skills to work with it.
The difficulties of do-it-yourself body repair of a Niva lie in the peculiarities of its operation. The bottom of the car is most susceptible to corrosion, and if left unchecked for a long time, through holes can form. Another weak point of the VAZ 2121 is the side members - under difficult operating conditions they tend to crack. In addition to cracks, the spars are also highly susceptible to corrosion. Reinforcement of the floor and side members should be done with sheet metal at least 3-4 mm thick. We advise you to watch a video of Niva 2121 body repair with your own hands in order to orient yourself in the sequence of stages of work.
Most often, the body of VAZ 2110, VAZ 2112, VAZ 2115 is repaired on wheel arches. These places are very prone to rot, so they are simply replaced. Since you need to weld into these hard-to-reach places, you will have to completely disassemble the car interior, including removing the trim, so that no flammable substances remain. Also, quite often, do-it-yourself body repair of a VAZ 2110 involves replacing the bottom and sills. This work is very painstaking, so you should first watch a video of VAZ 2010 body repair.
Materials: https://www.mv-avto.ru/samostoyatelnyy-kuzovnoy-remont.html