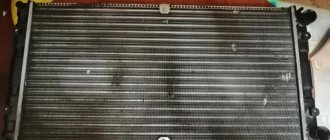
Today we are undergoing repairs on a well-known Chevrolet Niva 4x4, produced in 2005, on which the heater radiator needs to be replaced. The mileage of the car is 139 thousand km. A problem arose: antifreeze from the heater radiator began to pour out under the front passenger’s feet. The owner drove for some time simply adding coolant, but soon the pressure became stronger and stronger, and a replacement was necessary. We will show you a detailed photo and video tutorial on how to do it yourself.
Features of replacing the heater radiator in a Chevrolet Niva with and without air conditioning
The heating system of any vehicle has its own components that ensure the full functioning of the entire device.
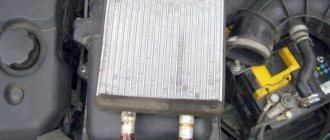
The stove radiator plays an important role in the operation of the system. Situations arise when the device fails and stops working. To fix any serious problem, you will have to dismantle the unit. The radiator is located according to a special design. The article will tell you in what cases the radiator requires replacement and how to replace it yourself.
Where is the heater radiator located on the Chevrolet Niva?
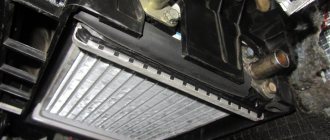
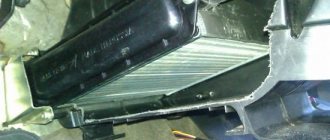
The heating system of a car consists of a number of elements, without which its normal functioning is impossible. One of these is the stove radiator. Sometimes problems occur with the heat exchanger, to eliminate which it is necessary to dismantle the unit. The radiator is located in the cabin behind the heater control unit.
Body interior heating system: 1 — ventilation duct; 2 — air duct for heating the windshield; 3 - intermediate body; 4 - intermediate air duct; 5 — air intake filter housing; 6 — heating system fan; 7 — central cabin ventilation nozzle; 8 — facing of the control lever panel;
Fan replacement
So, if there is an urgent need to replace the stove motor, we recommend that you hurry with the repairs without waiting for frost. Believe me, driving in a vehicle in which the heating system does not function is quite uncomfortable. In addition, in severe frosts such trips are still extremely unsafe, since the lack of heat does not allow the ice concentrated on the windows to thaw. Icy windows limit the driver's visibility of the roadway and, accordingly, provoke emergency situations.
So, pick up a new fan and check the quality of rotation of the blades. If you have not purchased it yet, we recommend that you give preference to a model with bearings, of course, if the auto store offers you an expanded range of heaters suitable for your Chevrolet Niva.
How to replace a heater radiator on a Chevrolet Niva with air conditioning (what are the differences)
Replacing the radiator of a Niva Chevrolet stove with air conditioning is carried out by changing the evaporator. To simplify the furnace reassembly process, it is advisable to mark all connectors using a special marker. After removing the fan, begin dismantling the regulator.
And also interesting: Do-it-yourself modifications to the Niva 2121 “
To change the regulator, you will need to disassemble the front panel. It is important to remember that after dismantling you need to check the radiator tap and all supply pipes for leaks.
Signs of a leak
Unlike the VAZ 21214, the heater radiator on the Chevrolet Niva is not equipped with a tap and coolant circulates through it year-round. This does not mean that the heating works constantly; with the help of a plastic damper, the flow is switched past the stove, causing cold air to blow into the feet of the driver and passenger. But the stove itself is always hot, which can be felt by the slight heating of the side plastic panels of the center console.
It is impossible to know that a car’s heating system is leaking by external signs. There are no stains under the car, all connections between pipes and fittings are dry, and the liquid goes somewhere. Because of this, the electric fan that cools the engine may turn on even on cold days.
Replacing the radiator of a Chevrolet Niva stove with air conditioning is quite a difficult job, but at the same time it can be done independently. Just first you need to determine whether the cause is really in the heater radiator. Symptoms of malfunction are as follows:
- Poor operation of the stove;
- Regular lack of fluid in the heating system;
- The appearance of an antifreeze smell in the cabin (not always);
- A puddle of greasy liquid under the driver's mat (at the same time, read the article on how to dry it).
Just in case, before you climb to the stove, check the hoses and pipes supplying liquid to it. If they are wet, then that's the reason.
Tool. This work does not require any special tools; almost everything you need can be found in a regular set of keys. You will also need 2 screwdrivers (slotted and Phillips) and pliers. And also a box for screws. In addition, you can stock up on markers.
The causes of the malfunction can be listed in a small list:
- A breakdown of the control unit has occurred.
- Mechanical or operational damage to the radiator surface.
- Failed additional resistor.
- Radiator pipes damaged by external factors or worn out by prolonged use.
- Faulty heater valve.
How to determine what kind of breakdown occurred? Let's look at several different signs by which you can determine the cause of the malfunction and understand where to start repairing the stove.
What is a stove tap, its functional features and location
The stove tap is a metal part that resembles a regular water tap. Antifreeze (coolant or coolant) constantly flows through it.
In the Chevrolet Niva, the coolant can flow through 2 cooling circles: winter and summer. The heating tap gives the driver the opportunity to switch to one of them. For example, with the onset of summer, when the tap is fully open, it is almost unbearable to be inside the car due to the heat, so it is closed for this period of time, and with the onset of cold weather, the tap is opened again. Due to active use, the part eventually becomes unusable and leaks coolant.
In the diagram you can see where the heater tap is located and the circulation of antifreeze in two circles
It is best to replace the metal faucet of the stove with a ceramic one, which will increase its service life several times.
About removing other elements
When replacing the heater on all VAZ cars, questions often arise - how to get to the heater and how to remove the radiator in the easiest way. In this regard, the Chevy Niva is considered an exception; getting to the stove here is relatively easy. No special tools are required for this; all you need is a set of screwdrivers and the following tools:
Also interesting: How to tension a Chevrolet Niva alternator belt
You should also prepare a supply of antifreeze for refilling in an amount of 2-3 liters. An inspection ditch is not needed for work; a flat, open area will suffice. The process begins with partial emptying of the Chevy Niva cooling system. Antifreeze is drained only from the cylinder block; there is no need to touch the cooling radiator.
To empty the basin, you need to place the basin under the cylinder block on the left side (in the direction of travel) and pass the hose into it. Using a 13mm wrench, loosen the bolt - the plug on the block - and then unscrew it by hand, holding the hose at the ready. When the plug comes out of the hole, you need to quickly insert the hose and hold it until the antifreeze flows out.
After removing the element, it is worth examining the condition of the rubber pipes supplying coolant to it. If they become sour or cracked, they need to be replaced, otherwise you will have to undergo lengthy disassembly again later. To disconnect the pipes from the engine, you need to remove the plastic casing from the motor and unscrew 2 clamps, then pull the hoses out. That's all, we install the new unit, assemble it and fill it with antifreeze.
Car enthusiasts practice a simpler method, but it involves cutting out the plastic elements of the front panel. Here each motorist decides for himself which method to choose.
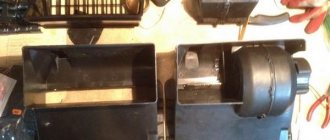
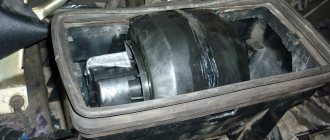
Taking advantage of the moment when part of the Chevy Niva’s interior has been disassembled, you can simultaneously replace other parts if they are faulty. If it is necessary to replace the fan, then the disassembly procedure is carried out in the same way, only at the end the motor and turbine located above the removed glove box are dismantled. The sequence of actions is as follows:
- Disconnect the motor power supply terminal.
- Disconnect the air duct from the supercharger.
- We unscrew 3 screws and dismantle the fan with turbine.
- To separate the turbine, simply remove the spring-loaded washer.
How to remove and install the stove tap
To replace a part, you must initially prepare the appropriate consumables, as well as tools:
- open-end and socket wrenches;
- pliers;
- flat screwdriver;
- a five-liter tank into which you will need to drain the liquid from the radiator;
- new faucet.
After preparing the necessary tools, you can begin replacing the tap, and the sequence of actions should be as follows:
- We install any container with a volume of about five liters under the radiator and unscrew the cap on it. Wait approximately 10 minutes until all the coolant has drained.
- Next, open the hood of the car and loosen the pipe clamp on the tap pipe.
- We take pliers, carefully bend them and pull out the short cotter pin.
- Remove the hose from the pipe.
- We unscrew the 2 screws, using a socket wrench set to “7”. In this way the sealing plate is removed.
- Remove the sealing plate.
- Using the key “8” we unscrew the fastenings of the glove compartment located in the cabin, after which the heater tap will be accessible.
- The rod is secured to the glove compartment lever with clamping brackets. To loosen the nut located on the bracket, take a “7” open-end wrench. Remove the traction cable from the stove tap lever.
- The “10” socket is designed to unscrew the 2 bolts that secure the valve to the wall of the engine compartment.
- The final stage is to remove the heating tap from the niche and replace it with a new one.
A pipe is installed on the part, as well as rod fastenings; in this case, new gaskets must be used, which are pre-coated with sealant.
Sealing plates are coated with sealant to reduce the risk of coolant leakage
The tap is put in place as follows:
- We tighten the two nuts on the pipe with the rod using a “10” wrench.
- We put the part in place and tighten the fastening bolts located on the tap.
- We install the rod and tighten the clamping bolt using the key to “7”.
- We tighten the self-tapping screws that hold the sealing gasket with an “8” wrench.
- We insert the pipes into the fittings and tighten the clamps.
When filling the system with liquid, fill it slowly to avoid air pockets. Antifreeze is poured in until it begins to flow out of the pipe. Moreover, the heating tap must be open.
Antifreeze must be poured into the heating system carefully, avoiding the formation of air pockets.
Video: how to install a heater tap on a Chevrolet Niva
Replacing a broken tap with a new one on a Chevrolet Niva is easy. To do this, you need to acquire the usual set of tools that are found in every car, and buy a new faucet. After which even an inexperienced driver will be able to install it on the car.
About removing other elements
The device is replaced in stages:
- Remove the glove box and disconnect the air duct.
- To simplify the process of removing the rubber tube to drain the remaining liquid, loosen the bolts.
- The structure is attached using two screws.
- Using a side cutter, remove a piece of plastic that interferes with the dismantling of the structure.
- Then a new radiator is prepared. To prevent air from passing through the cracks, glue is applied around the perimeter.
Also interesting: Tuning a Niva 4x4 with your own hands: updating the interior of the Lada VAZ-2121
This procedure is based on the experience of a large number of drivers who have already replaced a part without the complex dismantling of the instrument panel. The work can be divided into several stages:
- We remove the glove box and disconnect the air duct leading to the front passenger's feet.
- Loosen the clamps so that you can remove the rubber tube to drain the remaining liquid. To do this you need to prepare a small container.
- To carry out this procedure more carefully, you can cover the interior with cloth or film so as not to accidentally spill antifreeze.
- The radiator is additionally secured with 2 screws. After removing them, you need to pull it towards you a little until its movement is limited to the air duct.
- Remove the relay cover fastener to remove it. This must be done so that the corner of the plastic frame on the heat exchanger does not interfere.
- Using a side cutter, you can bite off a piece of plastic that interferes with dismantling
- Then you need to prepare the new radiator for installation. To do this, use glue to apply thin strips of foam rubber around the perimeter of the part. This must be done so that the air does not pass through the cracks and warms up as efficiently as possible.
- Then the part is installed in its standard place
For what reasons is the Chevrolet Niva crane replaced?
In a car, the heating valve is a maintenance-free unit, so it is necessary to change it for both technical and financial reasons. If the faucet breaks down, it is only thrown away, and the causes of the malfunction may be as follows:
- Violation of tightness. When the elements rub, they wear out and therefore no longer fit together as they should. As a result, various smudges appear, which are very noticeable.
- Internal oxidation of elements. In summer, the stove tap is closed for a long time, so during this period its elements oxidize and stick to each other. Consequently, it is almost impossible to open the tap without breaking it.
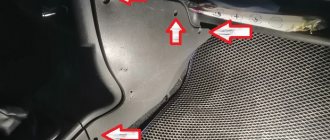
On a Chevrolet Niva, the heating valve for the heater is located in the wall of the engine compartment, so when you open the hood of the car, you will see a pipe that goes to the valve adapters from the radiator. To get to it, you need to dismantle the dashboard in the cabin on the passenger side.
The stove valve is mounted in a special niche in the engine compartment
The principle of installing the stove tap
Before replacing the heating tap on the stove, you need to perform preliminary work:
- remove the glove box;
- partially drain the coolant.
Antifreeze is drained in this way:
We carry out all work only on a cooled motor, so as not to accidentally get burned. On the left side under the motor we place a basin or any other plastic container.
If possible, open the tap as far as possible.
We prepare a meter-long hose, use a key set to “13” to unscrew the plug on the cylinder block. We substitute the hose and insert one end into the basin.
Lightly hold the hose with your hand and gradually open the cap located on the expansion tank
We do this work carefully, as the stream of antifreeze will gradually increase.
Loosen the clamp on the carburetor heating pipe and remove this part from the fitting. After all the coolant has flowed out, screw the plug into the block and tighten it well.
The glove box can be removed by unscrewing all the screws that hold it in place. Some of them are located deep in the part, others - under the tank lid.
Replacement of the Chevrolet Niva heater radiator with air conditioning. Difficult, but possible
Sooner or later, you may need to replace the radiator of the Chevrolet Niva stove with air conditioning. This is due to the tendency for this element to maintain a normal microclimate in the cabin to break down. After all, gone are the days when copper radiators were installed in AvtoVAZ’s creations; they were essentially eternal. Aluminum parts are now being installed, which does not have the best effect on the operating life of the stove.
At the same time, many drivers are afraid to do repair work themselves and turn to services. They don’t like this work there, because the volume is large, not very comparable with the payment, and they often do it not very well. In this regard, it is advisable to make the replacement yourself.
Read news about the new Niva
- Air conditioning Niva Chevrolet - design and repair
- Pump for Chevrolet Niva - Auto workshop online
- Niva Chevrolet installation of air conditioning - Auto magazine MyDucato
- Niva Chevrolet installation of air conditioning - Auto magazine MyDucato
- Why the Chevrolet Niva air conditioner does not turn on: reasons and installation (diagram), belt replacement
- Niva Chevrolet installation of air conditioning - Auto magazine MyDucato
- Niva Chevrolet air conditioning installation - Online auto workshop
- Replacing a Chevrolet Niva heater radiator with air conditioning without removing the panel
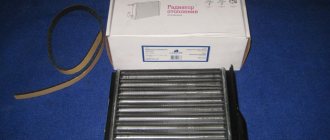
Problems of choosing a new radiator
For the Chevrolet Niva car, you can find aluminum and copper radiators on the market, differing both in performance characteristics and in price.
Aluminum radiators
The main advantages of aluminum radiators:
- low price (from 700 rub.);
- short heating time;
- light weight.
The disadvantages of such radiators include:
- low heat saving rates (heats up quickly and cools down quickly);
- low maintainability (impossible to solder holes and holes);
- the presence of steel inserts that are subject to corrosion and significantly reduce the service life of the radiator.
In Russia, aluminum radiators are produced by LUZAR and.
LUZAR radiators are low cost