Hi all! I am dealing with a typical and common problem: the Niva Chevrolet fuel pump does not work. Yesterday I got into the car, started it - it started, but immediately froze. The first thought that came to my mind was that the fuel pump was broken. When the engine starts, a pump hum is heard, after which the relay is activated and stops the fuel supply. I left the car, the next day I started trying to start it: the pump did not hum and would not start. What to do?
You correctly noted that when you turn the ignition key, the relay is activated and the fuel pump starts working, supplying fuel to the cylinders through the lines. If you do not hear a hum from the pump, there is most likely a problem. To find out if this is actually the case, you need to follow a few simple steps. Let's talk about everything in order.
Chevrolet Niva fuel pump does not work: what to check?
Once upon a time I was also wondering what to do and where to look first if the fuel pump does not work. To begin with, I recommend removing the negative terminal of the battery in order to “reboot” the brain of the on-board computer. If after this the pump starts working, great, the problem is solved. But this doesn't happen every time.
So, the order of further actions is as follows:
- We open the hood, find the fuel rail, there is a side hood, under which there is a coil. Find the valve there, click on it. Did you run out of fuel? If yes, then great!
- A thin stream of fuel? Try turning the ignition key several times, then press the valve again
- If nothing works, most likely there is no pressure in the system, which means the fuel pump has failed
Don't forget to check the fuse. It may burn out, so the pump simply cannot work. We move the front passenger seat and find the fuse under the cabinet. We check, if it’s working, we move on. If it burns, replace it with a new copy.
Video instructions for replacement:
A fairly common option: “It’s getting cold outside. I got into the car, started it, and the car immediately stalled!” My first thought was “the fuel pump is broken.” The starter spins briskly, but doesn't grab a beat.
0) When the car is working properly, when you turn the ignition key, you hear a click from the fuel pump relay (under the glove compartment, at the passenger’s feet), after which the fuel pump hums for 4-6 seconds (increases pressure), after which the relay clicks again. Also, the relay and pump operation can be heard while the starter is running. (But due to the operation of the starter itself, it is very quiet).
In my case, the relay was audible, but the pump was silent.
But you should keep in mind that clicks and the pump will only be heard the first 2 turns of the key. After this, Boshev’s “brains” block the work of pressure, it is believed that there is pressure in the system.
You can reset the negative terminal from the battery for a few minutes (reset the “brains”). After this, the pump will turn on again.
Make sure there is gasoline in the gas tank. (although the relay will click without it, the pump will be audible even without it).
What to check, where to crawl. 1) We get under the hood. Fuel rail (where the molds are) At the end of the ramp (from the windshield side) there is a cap. Under the cap there is a spool (valve) that, when pressed, gasoline should flow from the ramp in a good stream. After several attempts to start the key, there should be a trickle. You can check with two people (one turns the ignition key, the second checks the pressure in the rail). If there is pressure, everything is fine with the fuel pump. That's not the reason.
Checking the fuel pump relay Niva Chevrolet
Sometimes the fuse dangles in its socket, although it is intact and in good working order, but in this case it will not work. Check if it is tight, if necessary, press the “legs” of the fuse, just be careful, it will be more reliable and effective. So, let's move on to the relay race. If you hear the relay click when you start the engine, it is more likely to be working correctly. Otherwise, the mechanism must be checked and changed.
suitable relay for 12 V and 30 A - article number 752.3777-121. But before changing the coil, check the wiring. Perhaps where the break occurred or where the contact oxidized? There is a small hatch under the rear seat on the right side, open it, remove the connector, check the voltage with multimeters - it should be 12 V. If the readings differ significantly, look for the place where the circuit break occurred. This way we find the problem area evenly and evenly and thereby eliminate the problem. Good luck.
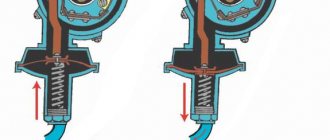
Checking the fuel pump of a carburetor car (mechanical)
Mechanical fuel pump - diagram
To check the operation of the fuel pump, you should:
- Remove the fuel hose from the carburetor inlet fitting.
- Immerse the hose in a specially prepared transparent bottle. By actively using the pumping lever manually, we notice how strong and dense the fuel is supplied. Air impurities should not be visually noticeable.
Delayed jet output is not a sign of a breakdown, especially if the car has been parked for a long time. As a rule, diaphragms eight and nine are the main cause of malfunction.
Be that as it may, you need to inspect both the strainer and the inlet/outlet valve.
Even if the gaskets are replaced, fuel may leak. In this case, the problem lies in the tightness of the fuel pump housing due to deformation during repairs.
Let's summarize:
The causes of fuel pump problems, both electrical and mechanical, are varied, and the need to find/fix a breakdown may take you by surprise along the way. By following the above recommendations, you will be able to independently carry out the entire necessary set of measures to diagnose this device. And you should start with the power supply (if it is an electric fuel pump) and the operation of the diaphragm when checking a mechanical fuel pump. Very often, the unstable operation of a fuel pump is not due to its breakdown, but to related parts - a filter, check valve or injectors.
The fuel pump is an important element of the fuel system, performing two functions:
- Supplies gasoline to the injectors.
- Creates high fuel pressure in the gas line.
The Chevrolet Niva has an electric pump controlled by the vehicle's electronic system.
Tips for motorists
The operation of any internal combustion engine is impossible without supplying fuel to the combustion chamber. This process is equally important for both carburetor and injection engines. The fuel mixture is supplied by a fuel pump, which is electrically driven for multipoint injection systems. Therefore, failure of its operation on this car is almost always associated with the electrical circuit of the car.
What to do in this case
This is a very unpleasant time, especially when it happens on a busy city highway or during rush hour. If there is nowhere to wait for help, you should move the car off the road and try to “revive” the gas pump yourself. To do this, it is recommended to have a car tester or at least a test lamp. The first sign of such a malfunction is that the engine does not start, and when the ignition is turned on, the sound of the fuel pump electric motor is not heard.
Auto electricians recommend disconnecting the battery terminal for a few minutes and trying to restart the engine. If the problem persists, continue troubleshooting. Now you need to get to the pump to check the presence of supply voltage at its terminals. One terminal of the warning lamp or tester should be connected to vehicle ground, and the other to the gray wire of the electrical connector on the fuel pump. There are two possible control options: the presence of voltage or its absence. The first case indirectly confirms the breakdown of the electric motor, the second suggests continuing the search.
Where is the fault located?
Failure of an electric motor is a fairly rare occurrence, so we will focus on the case when there is no supply voltage at the pump terminals. When checking for power supply, note that the control unit initially emits a pulse to start the pump that lasts only 5 seconds. If the engine does not start, there will be no more impulse. Therefore, before checking the supply voltage, it is necessary to relieve the fuel pressure in the rail.
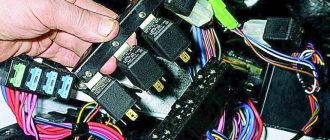
Power is supplied through the relay contacts. This is not very easy to check, since you need to remove the plastic cover under the glove box on the front panel. There is a relay block and a deep fuel pump fuse. To check the relay, it must be replaced with another one. Most often, burnt-out contacts of this relay are to blame. In some cases, problems are created by an additional relay that is part of the alarm system. When the vehicle is armed, it blocks the fuel pump power circuit, preventing the engine from starting.
The fuel pump is an important element of the fuel system, performing two functions:
- Supplies gasoline to the injectors.
- Creates high fuel pressure in the fuel line.
The Chevrolet Niva is equipped with an electric pump, which is controlled by the vehicle's electronic system.
How does an electric fuel pump work?
To constantly maintain the correct pressure in the fuel rail, the electric fuel pump must always operate when the ignition is turned on. The uninterrupted supply of fuel to the combustion chambers of the engine depends on it.
As soon as you get into the car and turn the key in the ignition, this unit immediately starts working - even before the starter starts cranking. When you turn off the engine, the fuel pump also turns off - this ensures safety in emergency situations and in case of an accident. Excess fuel is released back into the tank through a special bypass valve.
Having a given pressure in the fuel rail, it is easy to dose the fuel supply to each specific cylinder: at the right moment, the “brains” of the car send a command to one or another injector, its solenoid valve opens for a few milliseconds, and the fuel flows by gravity into the combustion chamber through tiny holes. All the car's ECU needs is to calculate the time during which the injector valve should remain open. When the pressure in the rail drops, the fuel supply is disrupted, which leads to numerous problems, which we will discuss below.
Design and principle of operation
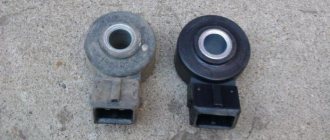
The Chevy Niva fuel system uses a submersible fuel pump, which is based on a brushed motor with two permanent magnets on the stator.
The pump is driven by a relay, the control contact of which is connected to the engine control unit. The circuit is protected by a fuse that prevents the wiring from turning on in the event of a short circuit.
The relay is located in the passenger compartment under the glove box. The fuse box is nearby.
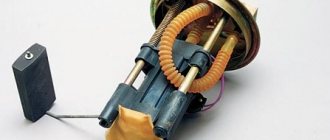
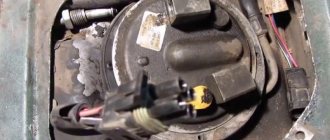
Often the fuel pump is not called the electric motor itself, but a module that includes:
- Plastic housing with load-bearing function.
- Coarse filter that traps large contaminants.
- The pressure regulator is a bypass valve that returns excess fuel to the tank.
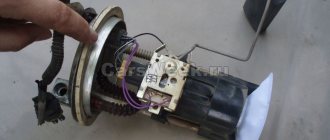
- A sensor and float that read information about the fuel level in the tank and transmit the data to the on-board computer.
The electric pump is installed below the gasoline level. This ensures lubrication and cooling of its parts. If you run out of fuel completely and the electric pump runs dry, it will quickly fail.
The rotation of the pump impeller ensures pressure in the fuel line within 3.6-4 bar. If this value is exceeded, the bypass valve of the pressure regulator is activated.
Gasoline enters the impeller through a mesh filter that protects the unit from large foreign particles. Fine-grained dirt does not damage the fuel pump.
Types of fuel pumps
Let’s immediately say that this is not the only type of fuel pump. Until the mid-70s (and in the Soviet Union and Russia until the 2000s), carburetor cars with a mechanical fuel pump were widespread, which was located directly on the engine and was driven mechanically - from the camshaft cam via a pusher. By pressing the lever at a certain interval (depending on engine speed), the pusher pumped fuel into the carburetor. There was no great pressure, as you may have guessed, in such a system, nor was there any need for it. With the advent of the fuel injection system, mechanical gasoline pumps have sunk into oblivion, giving way to high-performance electric units. If the former could pump fuel under a pressure of 0.3-0.5 atmospheres, then the latter, on average, produce all three.
Main malfunctions and their possible causes
Problems in the operation of the fuel pump manifest themselves in the operation of the engine, which begins to behave incorrectly:
- Doesn't start or crashes.
- It idles, but does not develop high speeds.
- It doesn't develop enough power.
- Unstable minimum.
Similar symptoms appear when there is a malfunction in the ignition, injection and other key systems. However, it’s worth starting by checking the pump’s operation.
Problems arise for the following reasons:
- Broken wires or oxidation of contacts in the power supply circuit of the relay and fuel pump.
- The pressure regulator is faulty.
- Relay or fuse failure.
- The fuel filter is clogged.
Important: if the coarse filter is dirty, not enough gasoline is supplied to the electric motor and it overheats. If the problem is not corrected in time, the fuel pump will fail.
Checking the serviceability of the fuel pump on the injector
When, when you turn the ignition key, you hear a slight buzzing, a slight hum, this is how the fuel pump works, pumping gasoline creates pressure in the system. If, when you try to start, there are no such signs of the fuel pump working, then you can assume a malfunction of the electrics, the pump itself or its individual parts. Therefore, let’s look at how you can check the operation of a gas pump using a step-by-step logical chain. Starting from whether power is supplied to the fuel pump and ending with whether the fuel pump pumps at all, and if so, what pressure is created in the fuel rail.
Step 1: Checking the fuse
Checking the fuel pump fuse involves inspecting the integrity of the conductive plate and, if broken, replacing it. But if there is no new fuse, then wind one strand of copper wire around the fuse contacts. If it burns out again, it means the problem may be in the wiring.
Stage 2: Checking the relay
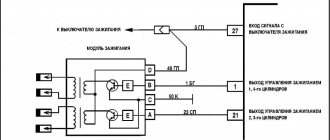
To check the fuel pump relay, remove it from the socket and connect a 12 volt light bulb according to the diagram. If the light bulb works, the relay itself is also working properly. An alternative is to use a multimeter in ohmmeter mode to measure the resistance of the relay coil winding. One probe is connected to terminal 85, and the other to 86. The device will show a break if the relay has failed.
Make sure that the terminals are not oxidized - this will negatively affect the power supply to the fuel pump engine!
Stage 3. Checking the power supply to the BN
Checking the fuel pump voltage is done using a multimeter. The probes of the measuring device in voltmeter mode (from 0-20 volts) must be connected to the power terminals of the fuel pump. Turn on the ignition and take readings on the device. 12-12.5 volts is normal operating voltage. If there is voltage, but the pump does not work, check the electric motor.
Stage 4. Checking the fuel pump motor
To prevent damage to the electric motor, we supply 12 volts directly from the battery to the fuel pump terminals. It works - we check its performance, check valve, measure the pressure with a pressure gauge. If it doesn’t work, check the coil for a break.
When voltage is applied to the terminals of the gasoline pump, does it not work? Let's check the stator winding: take a tester (multimeter) and switch it to ohmmeter mode, it should show resistance, otherwise there is a problem with the winding and it needs to be replaced. If there is a resistance reading, the problem may be that there is a short winding on the fuel pump body. The tester probe goes to the positive terminal, the second one goes to the body. If it shorts, there will be no break.
Step 5. Checking the coarse filter
By removing the coarse filter (see vehicle technical documentation) from the fuel pump, you can even visually determine how dirty it is. If there is a large amount of deposits, it is recommended to replace the filters; if the problem occurs on the road, use a brush and gasoline to clean it.
Step 6: Check the check valve
The check valve must constantly prevent the movement of liquid in the opposite direction. During operation, its performance decreases, which reduces its technical characteristics.
1 way. Checking the check valve involves measuring the pressure with a pressure gauge. It needs to be connected to that part of the system that is directly involved in supplying fuel to the internal combustion engine. Pressure readings should not exceed 3 kg/sq.m. see (true for passenger cars). And when the engine is stopped, the pressure should not drop sharply.
Checking and cleaning the check valve
Method 2. To check the operation of the fuel pump check valve without a pressure gauge, you need to clamp the return line and watch how the engine operates. If the check valve is faulty, the internal combustion engine will operate at higher speeds (provided there are no other problems).
3 way. Combines diagnostics and cleaning of the check valve at the same time. Remove and inspect it—clogging that requires cleaning can be seen with the naked eye. You can blow out the valve with a dense stream of air, but it is better to pass water through it under pressure. This way you combine checking the valve with cleaning it. If after this the valve does not work, it needs to be replaced.
Step 7. Pressure check
In order for diagnostics to correctly determine pressure readings, you need to reset the initial fuel pressure by turning off the fuel pump fuse.
Checking with a pressure gauge how the fuel pump pumps
How to check a fuel pump with a pressure gauge
You can check the fuel pump with a pressure gauge for serviceability as follows: connect the device to the fuel rail. The output is through the edge of the hood onto the windshield, where we install the device securely.
We record measurements in:
Static position. Turn the ignition key and look at the pressure gauge readings, they should not exceed 3.7 atm.
Dynamics. We turn on third gear (speed about 50 km/h), observing the pressure gauge data. When driving, if the problem is pressure, the readings will be either below 3 atm or above 3.7 atm.
Low pressure in the fuel system may be due to a fuel leak. The passage of fuel will show a decrease in pressure below 1.6 atm. Fault location: injector or fuel regulator.
It should be noted that, despite all the similarities (principle of operation, purpose), the methods for diagnosing a mechanical fuel pump differ, and in what way we will consider in more detail below.
Trouble-shooting
The engine will not start if the fuel pump does not supply gasoline to the fuel line.
In this case, the check begins with the fuse. If it works properly, you need to make sure there is voltage at the fuel pump terminals. For diagnostics you will need a multimeter. Raise the rear seat and remove the pump cover. If, when the ignition is turned on, 12 volts are supplied to the terminal and the pump motor fails, the unit must be replaced.
Often the pump stops working due to terminal oxidation. Therefore, inspect the connector and, if necessary, clean it of corrosion.
If there is no power, it is necessary to check the operation of the relay and the integrity of the wires.
Interruptions in operation or insufficient engine power are a consequence of loss of pump performance and a drop in pressure in the line. This happens for three reasons:
- Voltage drop across oxidized contacts.
- The coarse filter mesh is dirty.
- The pressure regulator is faulty.
First check the status of your contacts. Then disassemble the fuel pump and remove the filter. At the first sign of contamination, the mesh should be replaced with a new one.
To check the operation of the pressure regulator, a pressure gauge is required. Connects to the fuel line outlet. The operating pressure with the ignition on must be at least 3.6 bar.
The fuel pump does not pump when the ignition is turned on
First of all, you need to check the fuel pump terminals and the power to them. In the photo, the terminals were worn out, which caused the contact to close and the fuel pump to melt.
What to do if such a situation arises. The verification algorithm is described below. Briefly check the presence of voltage at the fuel pump terminals. Based on this, further conclusions are drawn.
Checking the fuel pump circuit
Checking the power circuit.
If you know that the pump is working (to do this you need to gain access to it, remove it and connect it to an alternative power source), then the reason should be looked for in the car's wiring. To do this, the control light should be connected to the gray wire that goes to the pump.
This is exactly what is a plus. If the light does not light up, then power is not supplied to the unit.
Checking relays and fuses
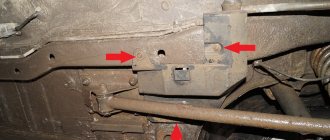
Here you should initially check the fuses and relays. The fuse box is located behind the left of the driver under the dashboard, and therefore is not easy to access. You will have to unscrew two bolts and remove the decorative protective cover.
If these components are faulty, they should be replaced. The relay is checked in the same way as the pump, by connecting a test light to the input and output . The fuse can be checked visually.
The fuel pump relay is marked with a green arrow.
If the car still does not start, you should check the connector block. It is located behind the driver's side fuse box in the passenger compartment. Here you can also use a test light or tester, with which you can check the voltage at the inputs/outputs.