1200 rub. for the photo report
We pay for photo reports on car repairs. Earnings from 10,000 rubles/month.
Write:
Painting a bumper yourself without good experience is quite problematic. It is important to have not only a suitable room, but also tools, as well as the ability to choose paint to match. To paint a plastic bumper, you will need to buy a primer (primer) specifically for plastic, and if it is an old bumper, then also putty for plastic. In addition, of course, a sanding machine, sanding wheels and a spray gun, although you can get by with spray cans if quality is not the main goal. When you have everything you need, and you are ready to try painting the bumper yourself, then knowing the sequence of actions and the nuances of the procedure will be very necessary. And it doesn’t matter whether it’s local painting or complete painting of a plastic bumper.
Necessary materials and tools for painting
- degreaser (after each stage of grinding), and it is best to purchase a special one for working with plastic surfaces, as well as several napkins.
- primer for plastic or, as they say, primer (200 grams).
- sandpaper to rub both immediately before priming and after priming the bumper, before painting (you will need P180, P220, P500, P800).
- a correctly configured spray gun, selected paint (300 grams) and varnish for the final touch. Without a spray gun, you can carry out all the necessary procedures with a spray can, but all bumper painting with a spray can is used only in local areas.
Partial painting: how to do it correctly
- everything is the same as for completely painting an old bumper
- aerosol solvent
We proceed according to the same scheme as when completely painting, but we work only with the damaged part of the bumper. We remove the coating, sand the adjacent area, putty, level the surface, matte, prime, wash, paint, varnish.
Step by step pictures
Please note: the scratch may be small, but the area of each subsequent step should increase. Let's say you removed the coating from a circle with a diameter of 5 cm; putty overlapping the part that was not removed - it turned out to be a circle with a diameter of 9 cm; rubbed the putty over the paint - 15 cm; prepared the surface for priming and again increased the area of repair - the diameter of the circle is already 19 cm. The numbers are indicated only to clarify the recommendations, you do not need to rely on them: just expand the area of work with each step, then you can achieve uniform painting.
Example of aerosol painting on video
The only new action that appears when partially painting the bumper: after varnishing, coat the part of the paintwork adjacent to the area to be repaired with an aerosol solvent. This will make the transition from the repaired area to the non-repaired part of the bumper smoother.
Step-by-step instructions on how to paint the bumper yourself
First of all, you need to decide on the type of work to be performed. That is, establish the scale of work based on the condition of the bumper. Is this a new bumper or an old one that needs to be restored to its original appearance? Do you need to repair the bumper or start painting right away? Indeed, depending on the condition and the task at hand, the procedure for painting the bumper will have its own adjustments and will differ slightly. But in any case, you need to thoroughly wash the bumper and treat it with a degreaser.
Painting a new bumper
- We rub it with P800 sandpaper to get rid of both the remaining transportation oil and minor flaws, after which we degrease the part.
- Priming with two-component acrylic primer. The bumper primer is made in two layers (the frequency of application of the next one depends on drying, it is necessary for the layer to become matte). If you are not a master in this matter, it is recommended to buy ready-made soil, rather than dilute it adhering to the required proportions.
- Rub or, as they say, wash the primer with sandpaper P500-P800 so that the base layer of paint sticks well to the plastic (quite often they don’t wash it, but simply lightly rub it dry with sandpaper, and then blow it off).
- Blow with compressed air and degrease the surface before applying the base coat of paint.
- Apply the buza and apply a couple more layers of paint at intervals of 15 minutes.
- After making sure that there are no defects or jambs, apply varnish to add gloss to the painted bumper.
Repairing and painting an old bumper
It is slightly different from the first case, since in addition one will need to treat individual places with putty for plastic; an additional step will be the elimination of defects, possibly soldering the plastic.
- You need to wash the part well, and then use P180 sandpaper to clean the surface, erasing the paint layer down to the ground.
- Blow with compressed air and treat with anti-silicone.
- The next step is to smooth out all the unevenness using putty (it is better to use a special one for working with plastic parts). After drying, first sand with P180 sandpaper, then inspect for minor defects and treat with finishing putty, sanding it with P220 sandpaper as well, in order to obtain a perfectly smooth surface.
How to paint an old or contract bumper with your own hands
For painting you will need:
- everything is the same as for painting a new bumper
- a grinder or grinder with an attachment for sanding discs
- grinding discs
- sanding blocks of different sizes (70*400 mm rigid, 70*400 mm flexible, 70*200 mm, 70*125 mm, and a small sanding barrel)
- sandpaper of varying hardness for sanding blocks (starting from P120)
- putty
- set of spatulas of different widths
- marker
- brush
- solvent
We dismantle the bumper. We remove all third-party elements (fog lights, radiator grille, fasteners, etc.). We clean the bumper from dirt. We choose a grinding wheel with a hardness of P120, and using a grinder or grinder we begin to evenly remove the old coating. In hard-to-reach places, use a sanding block with appropriate sandpaper.
Quite a rare thing, but if you can find it in a store, buy an aerosol for removing old paint - for example, Body 700. This will make the process of removing old paint easier and save time.
Photo of removing old paint
How it was before using aerosols
Aerosol for removing old paint
The paint swells and peels off the bumper on its own.
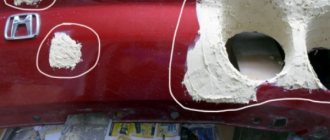
When the coating is removed, degrease and find problem areas - depressions that violate the plane of the bumper. It is difficult to find them visually, but if you run the entire plane of your palm across the bumper, you will feel the unevenness. Circle the places you find with a marker so you don't have to look for them again. Let's start puttingty. For each problem area, choose a spatula wider than the unevenness found. Apply the putty not strictly from the beginning of the depression, but a little earlier, and with one confident movement, pull the spatula through the entire dent and onto a flat area. It is better to make a slight bulge out of the dent so that you do not have to wait for the putty to dry and apply a new layer. To prevent the bulge from becoming too large, use a rigid metal spatula and hold it at an angle of 45° in relation to the bumper.
You will have to work quickly with the putty: after adding the hardener, you will only have time to stir the putty, apply and add a couple of adjustments. In order not to waste time, you can mix the putty with the hardener directly on the spatula with which you will apply it. It is convenient to stir it with a second, narrow metal spatula - with its help you will move all the putty to the edge of the spatula for ease of application. Read the can to see what ratio of putty to hardener is required (usually 50:1) and try to stick to it. Don't put too much hardener: the putty will dry faster, but you won't have enough time to apply it properly. Keep a bottle of solvent, a brush and a rag nearby. Immediately after applying the putty, wash the spatula with a brush and wipe it clean. It is very difficult to clean a spatula from dried putty, and if you work with dried pieces, you will not be able to apply new layers evenly.
After the putty has dried, you can begin to level the planes. For this purpose, use the largest possible sanding block and P120 sandpaper. If you choose a block that is too small, or do not use blocks at all, holding the sandpaper in your hands, you may get a new dent, and you will have to repeat the filling procedure again. When restoring planes, try to position the sanding block diagonally so that the edges extend beyond the plane. When the planes are restored, check the entire bumper again: if there are holes left somewhere, do the same with them. Then sand the surfaces with blocks of P180 sandpaper and sand with a soft sander and P240 sandpaper. Blow off dust from the bumper and degrease. You can move on to the next step - priming.
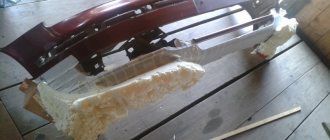
Progress of work in the photo
The first step towards perfection
They removed the old coating, putty the problem areas, and sanded them. Ahead of the coating is primer, paint and varnish
This is what the bumper looks like after the paint and varnish have dried
We reinstall the removed elements: radiator grille, nameplate, license plate
After you have putty all the problem areas, you can use a special finishing aerosol putty to work with small cracks, irregularities and marks from hard sandpaper P120. It is sold in cans, applied in the same way as a primer and helps to achieve maximum smoothness of the product.
Starting with priming, the procedure is the same as with a new bumper. Apply primer, wash, degrease, cover with several layers of paint and varnish, wait for it to dry and enjoy the look of a freshly painted bumper.
How to shine: video
Painting nuances that should be taken into account
- Start work only on a well-washed and clean bumper.
- When degreasing the bumper, two types of wipes are used (wet and dry).
- If self-painting work is carried out with a bumper of Asian origin, it must be degreased more thoroughly and rubbed well.
- Do not use a hair dryer or other heating equipment to dry paint.
- When working with acrylic varnish, you need to follow the instructions that come with it, therefore, before you paint the bumper yourself, you need to carefully read all the instructions for the putty, primer, and paint as well.
- If smudges or shagreen marks form when painting, it is worth sanding with wet, waterproof sandpaper and treating the desired area with polish.
As you can see, painting a bumper yourself, adhering to the correct technology, is not so easy, since not everyone has a compressor, a spray gun and a good garage. But if this is for yourself, where the quality requirements can be even lower, then in an ordinary garage, having bought a can of paint and primer, it is quite possible for anyone to do a local bumper painting.
When and why do you need to paint your bumper?
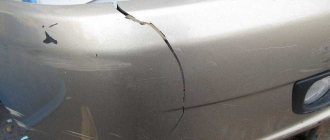
More often than not, a car bumper needs painting and repair after an accident. But there are often cases when, during operation, manufacturing defects appear, small chips and cracks appear. Painting may be necessary after purchasing a new bumper.
Therefore, many car enthusiasts are wondering: how to paint a bumper from a spray can yourself? The main thing is to follow the technology to obtain the desired result.
Preparing tools and materials
Their number and volume directly depend on the scale of the work performed. How many cans of paint do you need to paint a bumper? If partial repairs are being carried out, one volume of 500 milliliters is sufficient.
- Primer.
- Putty (for deep damage or dents that could not be restored by heating).
- Degreaser (white spirit or “anti-silicone”).
- Sandpaper of varying degrees of grit.
- Polishing machine with felt attachment.
If a partial repair is being carried out, it is important to ensure that the product is as shiny as possible. How many cans are needed to paint a bumper with varnish? One or two is enough. The varnish should be colorless. Also, do not forget about protective measures - prepare goggles, gloves and a respirator.
Preparatory stage
- It is necessary to dismantle the bumper, wash it thoroughly using household chemicals, and wipe it dry.
- The old layer of paint is completely removed with sandpaper, which is specially designed for repair work. Grit size from P220 to P400. The work is carried out manually, with a grinder or an electric drill with a special attachment.
- The rear bumper is painted on a degreased surface. Degreasing is carried out using various chemicals. This can be a solvent, white spirit or anti-silicone. There are special napkins already impregnated with the appropriate compounds.
- The surface is primed with special compounds for plastic. This is done for better adhesion of the surface to the putty. It is applied to remove minor defects, scratches and abrasions that have arisen during use.
- Final sanding brings the surface to a perfectly smooth state; there should be no scratches or irregularities on it. The effective painting of the rear bumper and the final appearance of the product depend on its quality.
- The smooth surface is degreased and primed again to improve the adhesion of the plastic to the paint.
Preparation
First you need to decide how to paint it. If this is painting a new bumper with a spray can, it is better to carry out the work with removal. For partial restoration, you can leave the bumper on the car and apply the compound locally. But remember that due to the complex geometric shape, it is very difficult to achieve a uniform layer. Drips may form if the bumper is painted on site.
What's next?
At the next stage we need to correct the previous defects. These may include scratches and light dents. If the bumper has a crack, it is repaired with epoxy glue from the back side. In order to level the surface from the outside, use automotive putty.
Remember that the final result of the repair depends 90% on quality preparation.
Instructions for spray painting a car
The dyeing process is divided into a certain number of stages. At the first stage, preparatory work is carried out, which includes cleaning the body, degreasing work, and the use of anti-silicone.
At the next stage, you need to decide on the shade. Having previously checked the body marking instructions, a specialized store will help you choose the required option.
To prevent an error, colorize the body. Specialized equipment and software will evaluate the level of color fading and other factors.
It is worth noting that you will have to spend a lot of money on the procedure. In addition, paint options such as “metallic” or “chameleon” cost much more, because these shades are the most popular.
If there is already rust on the body, then you need to get rid of it, in this case you will need sandpaper, which will turn the surface matte.
After degreasing, we begin the putty process. If the defects are more serious, then you should use putty with windshield washer.
Do not overdo it with a layer, because it may peel off. Layers are applied gradually until the surface is completely leveled.
To make the putty dry faster, there is a secret - you should add a large amount of hardener to the putty. But in this case, you should not overdo it, because you can turn the putty into a crumbling element.
The putty is considered ready when a homogeneous mixture is created. Apply it as quickly as possible, because it begins to harden instantly, already in the seventh minute. If the procedure is not carried out in a timely manner, lumps may form.
The most optimal technique for applying putty is to apply it across scratches and chips, and then level it lengthwise. Thus, it is easy to fill the voids that appear.
The temperature at which the mixture dries as quickly as possible is 25C. Next, sandpaper is used to level the surface. If the damage is deep, use coarse-grained paper; fine-grained paper for smaller scratches.
The next stage is primer. In the modern world, primer in cans is popular; it is easier to apply and saves time. But you can prepare the primer yourself by mixing everything according to the instructions. As a rule, the required proportion is indicated on the packaging.
The resulting mixture is stirred with a wooden stick and filtered through a filter. Many car enthusiasts use a regular stocking as a filter.
The resulting primer is poured into a spray gun, which will help apply it evenly. Remember that the solution can be used for 2 hours, then it begins to dry out.
The dried primer is treated with sandpaper, but a plane is more suitable to save time. Those areas where the old paint will be combined with the new must be prepared: matte them with Brite tape with abrasive paste or sand parts of the body with P1000 sandpaper.
The surface should be cleaned of chips and dust so that the paint lies evenly on the surface.
To avoid other defects, walk over the surface with an antistatic cloth and treat with a degreaser.
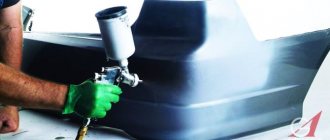
Next comes painting. The spray can is held perpendicular to the surface to be painted and strictly at a short distance. Moving upward, painting is done horizontally.
The distance at which the can is held is 30 cm, painting is carried out at room temperature. Thus, uniformity and absence of drips are achieved. When the first layer has been applied, it is worth letting it dry and applying the next one.
It is not necessary to apply all the paint; once you have achieved the desired color you can stop working. When the paint has dried, it must be varnished and polished.
In the process, you will experience how simple and fast it is to spray paint a car. Finally, a clear varnish can be applied to the coating. The application of this substance is carried out according to the same principle as paint.
It is recommended to apply at least three coats of paint within twenty seconds.
If there was a violation of the coating procedure, then certain defects may form:
- If the surface is not properly prepared, the coating may begin to peel off over time. In this case, you will have to do all the work again.
- the paint may be applied unevenly, due to the composition of the paint or thick application, the work will have to be done again.
- In some places the paint may fade; you should strip the coating down to the metal and carry out the procedure again.
By following the instructions above, you will be able to complete all the work quickly and efficiently. The paintwork will delight you for a long time.
Once painting is complete, you can polish the area that was repaired. This procedure is carried out using a paste, and it is necessary to eliminate visible differences between the new paint job and the old one.
After polishing, the surface of the car shines like new.
Popular polishing techniques are abrasive and protective. The most popular polishing pastes contain wax or Teflon.
After carrying out work, leave the car indoors or in the shade. Minor defects can be easily removed with an aerosol can.
The procedures are carried out using our own efforts, which allows us to save money. But significant damage is eliminated by the intervention of specialists in a specialized chamber.
Primer
The sanded putty will definitely leave pollen behind. Its presence on the surface is not at all desirable.
Note! The bumper has its own primer. When purchasing, check with the seller that you need the material specifically for plastic surfaces.
Then we apply the composition in several layers. Usually the bumper is processed in two passes. Between the first and second layers you need to take a 15-minute break. Give the composition a chance to dry. After the second layer, the bumper is sent to dry. It lasts 24 hours at a temperature of 20 degrees. The process can be accelerated by using an infrared heater.
Technology for painting the entire bumper with a spray can
So, our bumper is completely prepared for final painting. But its technology will differ depending on whether it is a complete repair or a local one. Let's consider the first case.
In this situation, the entire area of the element is treated with paint. First you need to make a developing layer. It will be the thinnest. In order not to form drips, we spray the composition at a distance of no closer than forty centimeters at a speed of 0.5-1 meter per second. Then we wait until this layer dries on the primer. It is enough to wait 15-20 minutes. Then you can apply a second, thicker layer. But make sure there are no drips. Do not bring the spray tip too close to the element. Keep it strictly perpendicular to the surface. Pay attention to hidden cavities. After 20 minutes, apply another finishing layer. If the shade turns out to be pale and unsaturated (and the paint was registered), we cover the bumper again. It is necessary to achieve the same shade as the factory surface.
If all that remains of the bumper is the name: damage repair
If your plastic bumper is full of cracks and holes, then do not rush to throw it away and buy a new one. Even if the bumper falls to pieces, it can be fixed if desired.
- everything that is required to paint an old bumper
- industrial hair dryer with narrow nozzle
- soldering iron with a wide tip (1 cm or more)
- flat electrodes (take several types in stock)
- putty for repairing plastic
- heat-resistant tape
- drill
A flat electrode is a strip of polypropylene suitable for repairing cracks in plastic bumpers. Electrodes are divided into several types depending on the thickness and type of plastic. Find the material markings on the inside of the bumper, and in the store select the types of electrodes suitable for this plastic.
Just like when painting an old bumper, we remove the coating with a grinding machine with a P120 wheel. In places where there are cracks, remove the coating completely, down to the plastic. We remove dust and degrease the area of the crack, connect both parts and glue them to the outside of the bumper with heat-resistant tape. We turn the bumper over and work on the inside. At the crack site, we use a soldering iron to make a groove into which we will place the electrode. Do not press the soldering iron too hard, do not hold it in one place for a long time, so as not to tear the bumper. Make the groove 2–3 centimeters longer than the length of the crack. When the groove is ready, select an electrode of suitable thickness, apply it to the beginning of the groove and start heating it with an industrial hair dryer. When the electrode “floats”, pressing it, place its beginning in the groove, and thus, heating it at the base and pressing it, place the entire electrode. Wait until the plastic hardens and cut off the excess.
Features of local painting
The main task is to make the transition to the factory paint layer as smooth and imperceptible as possible. The problem is further complicated by the fact that the shade of the factory paint may fade (paint slowly but surely fades in the sun).
- We increase the spray distance as the torch approaches the layer of factory paintwork.
- With each new layer we move the imaginary border further and further from the repair site.
- We do not use masking tape under any circumstances. It leaves a strong and noticeable transition. You can use tape and film only to protect adjacent body elements if the bumper is painted without removal.
- Varnish, unlike paint, is applied to the entire surface area. This way we will hide the difference in shades if the bumper is old and a little faded. We will also get rid of the dullness in the transition line.
Next, similar to the previous case, we wait for the paint to dry completely and after a couple of days we polish the surface.
We paint a new plastic bumper from a spray can
Previously, if it was necessary to replace a body part, the only option was to purchase a contract part at a car dismantling station or second-hand. This method has its disadvantages:
- it is very difficult to select a contract part that exactly matches the color of the car, and in addition to the cost of the part, you will have to pay for painting;
- a contract part may not be a contract part, but a used one; when repainting, a different color, putty, hidden damage may be discovered under the top layer of paint, and the cost of repainting will increase taking into account the repair.
A contract spare part is a part removed from a car that has no mileage in Russia. Let's say a Japanese car was used in Japan for several years, then the owner decided to exchange it for a new one, and the old one was sent to Russia to be sold for spare parts. Purchasing contract spare parts from a reliable company is a transparent transaction. You are provided with reliable information about the part; you can often see a photo of the car from which the part was removed, mileage, and an auction sheet with an estimate. The auction list always honestly states the condition of the car, and if any part has been repainted, the seller will know about it. But there are also cases when, intentionally, or simply without making a distinction, under the guise of a contract, the seller offers a used part - it has already been used in Russia, its history is unknown, and its condition can only be assessed visually. If it comes to auto body work, and you are not an expert in this field, there is a risk of buying just such a part, especially when it comes to a spare part, the reverse side of which cannot be seen without disassembling (for example, a door assembly with trim).
Today, the situation with the purchase of body parts has improved: companies have appeared that produce new body parts, and stores where these products are presented in an assortment. New parts, compared to contract ones, are inexpensive. Even if there is no such store in the city, you can order the product via the Internet, and be sure: you will receive a new part that has not been painted or repaired before.
Painting a new bumper is a real pleasure and doesn’t take much time or effort. The consumption of materials will be minimal, and difficulties in work can only arise due to your own mistakes.
What you will need:
- primer in a can (for plastic)
- spray paint
- varnish in a can
- degreaser
- antistatic
- clean cotton rag
- sandpaper P800
- bucket with water
- gloves
- sponge
- respirator (mask)
- protective glasses
- work clothes
The primer comes in different colors: white, different shades of gray, black. Despite the fact that the paint will completely cover the primer, choose the color of the primer based on the color of the paint: for light shades - light primer and vice versa. When selecting materials, carefully read what the manufacturer writes on the can about applicability, rules of use, and drying time. When selecting paint, be guided by the color code indicated on the plate under the hood; if the car was repainted in a different color, contact a colorist to mix the paint according to the sample. For a sample, the easiest way is to remove the gas tank flap.
Choose a suitable room. A suitable one is one in which there is no dust, ideally a paint booth. Many people do not attach any importance to this until they see that dust has settled on the product and all their work is in vain. When you work in a garage, at least try to cover the inside with film; if this is not possible, pour water on the floors. Place the bumper on a stand (for example, on a table) at a convenient height. Cover the stand with a soft cloth and film on top - this is necessary so as not to damage the fragile plastic with the corners. Choose a stand so that it rests against the middle part of the bumper at several points, but in no case rests against the edges: if during work you inaccurately press on the bumper, with such a support it may become deformed or crack.
The bumper is new, so it does not require special preparation for painting work. Rinse it with water, wipe it with a clean cloth, and cover it with an antistatic agent. Degrease, wait for the degreaser to dry completely, and begin priming. In order for the material (no matter whether primer, paint or varnish) to lay down evenly, always spray it at the same distance from the part. Start spraying outside the bumper, gradually moving onto it, and finish smoothly: do not make sharp boundaries in applying the material. Wait for the soil to dry completely. Degrease and add another layer of soil.
How to paint: step by step photos
As silly as it may sound, don't try to check with your fingers to see if the material is dry. Many beginners, wanting to finish the job quickly, try to check whether the next layer can already be applied. If a print on the ground is easy to remove, then getting rid of a mark on paint or varnish takes much longer than just waiting. Study the drying times indicated on the paint can, rely on these data, increased by 1.5–2 times, since your coating will probably turn out thicker than the manufacturer intended.
Take a bucket of water, cut a piece of sandpaper suitable for the job, dip it in water, place it on a sponge, and start washing the bumper. The primer coating turns out to be rough; if you leave everything as it is, after painting all the roughness will be visible. When the bumper becomes perfectly smooth, repeat the procedure: rinse with water, wipe, coat with antistatic agent, degrease, wait for it to dry. Now you can apply the paint in the same way as the primer was applied. After drying, apply a couple more layers of paint. After the last layer of paint has dried, we move on to the final stage - applying varnish. After applying the varnish, feel free to go home: there is nothing to do in the garage for the next 24 hours.
Video about carrying out work on cars
The next day you can return to the bumper and admire the result. But keep in mind that “admiring the result” is a figurative expression. Since the painting was not carried out under ideal conditions and without special equipment, despite your care and compliance with all precautions, you will probably see defects in the paintwork: adhered dust, bubbles, shagreen, dullness. Let this not be a reason for frustration: such defects can be removed by sanding and polishing, but it is better to do it not immediately, but 3-4 weeks after painting, since some defects appear only after the varnish has settled.
Premises requirements
Do not under any circumstances perform this operation outdoors - only indoors.
- Carry out a complete wet cleaning. The slightest pollen falling on the surface will be clearly visible on a bright day, even from a great distance.
- Distribute work areas in advance. If you are painting the VAZ-2114 bumper with a spray can and removing it, prepare hooks to engage the element in a horizontal position. You should not place the part vertically - drips will form.
- Ensure ventilation, as painting work must be carried out with the gate closed.
- Provide quality lighting. The more light, the easier it is for us to notice and eliminate any defect.
Reasons for painting
The bumper must be painted in the following cases:
- The car is many years old, although the plastic bumpers do not bloom and do not rust like the metal of the body, but over time the paint begins to fall off from them piece by piece.
- The bumper suffers the most in collisions. In such cases, either buy a new one and paint it, or restore the old ones, if possible.
- Even after purchasing a new car, some drivers have noticed that the paint on the bumpers begins to peel off. This is most likely due to non-compliance with the technology when carrying out paint and varnish work or the quality of the paint itself.
How to paint bumpers: methods
You can paint bumpers yourself, in makeshift conditions, in several ways:
- brushes (can be used for invisible areas, because stains are visible);
- with a spray can (one of the popular and easy ways to apply paint);
- spray gun (a compressor, a hose and a gun for spraying paint are required).
Some large auto manufacturing plants have a method where parts are dipped into a paint bath. This method is used by manufacturers of expensive cars (Ferrari, Lamborghini, etc.). And even AvtoVAZ, they say, those cars that were exported to India were painted in this way (dipped in a bath). For the domestic market, VAZ cars are painted using the application method.
DIY painting materials and tools
Work such as painting or tinting the rear window with your own hands does not in any way affect the operation of the engine and other parts, so a completely inexperienced beginner can do it. It is clear that a beginner should not attempt to repair engines and other complex technical products alone. In order for the result to be of high quality, you must follow the technology and use the following materials and tools:
- Personal protective equipment (PPE). These are gloves, a respirator or gas mask, overalls (robe).
- Degreasing liquids.
- Primer.
- Putty. It is desirable that the putty contains fiberglass.
- Sandpaper. It is necessary to sand with sandpaper before and after priming work. Sandpaper markings: P120, P180, P220, P500 and P800.
- Electric grinding machine.
- Depending on how you paint, you will need a spray can or a spray gun.
Sequence of work when painting a bumper yourself
Painting is not a job that can be done haphazardly, although many people think so. In order to prevent the paint from flying off later, you will need to follow a certain sequence:
- Preparatory work.
- Grinding work.
- Puttying (puttying).
- Applying primer.
- Sanding after priming.
- And finally, applying the paint.
Step No. 1 Preparatory work
- After dismantling, if we paint the old bumper, we proceed to a thorough wash with the addition of a cleaning agent (Fairy, Drop, etc.). If there is tar on the surface of the old bumper that cannot be washed off, it must be carefully removed with either a knife or a chisel.
- After washing and mechanical cleaning of dirt, we use a solvent, preferably WHITE SPIRIT or 646 solvent. Old paint must be removed with a spatula. If it doesn’t come off well, then by purchasing a special remover, for example, VIKA 0.5 l, the process of stripping off old paint, even with an anti-gravel coating, will easily come off. You need to apply this solution with a brush several times, then wait about 10 minutes and it will also come off easily with a spatula.
- Such special substances for removing old paint, for example, VIKA or BODI, require careful handling. Namely, work with rubber gloves, because it burns the skin and smells terrible.
- After all the old paint has been removed, you need to remove the remover with dry rags and, only then, wash everything with solvent.
Grinding work
- Some people simply use a mechanical method to remove old paint and old primer. But using a drill or screwdriver with an emery attachment spoils the plastic itself. Therefore, it is better to use chemicals to remove old paint.
- Those who still want to use the mechanical method will need a grinder. First of all, we sand with coarse sandpaper 120. If there are scratches, we smooth them out with a block and remove all burrs.
- If medium and microcracks are detected, you can weld them with a regular soldering iron. And large cracks are welded on both sides with oblong electrodes.
Preparing a plastic bumper for painting
Old paint from the surface of the bumper is removed using a remover. This is done as follows:
- The entire surface is treated with dry sandpaper No. 240. This must be done carefully so that there are no marks left on the plastic. The purpose of the work is to destroy the integrity of the old paintwork.
The surface of the bumper is carefully processed with fine-grain sandpaper - A remover is sprayed onto the surface treated with sandpaper to remove old paint.
A “wash” to remove old paint is carefully applied to the bumper - Allow some time for the layer of old paint to lift.
- After this, it is carefully removed using a plastic spatula. This choice of tool is due to the fact that metal can leave marks on the plastic.
Next, take P 600 sandpaper, wet it and use it to process the entire cleaned surface to give the bumper a matte finish. At the same time, the main thing is not to overdo it and not leave risks that cannot be covered with soil. Then the entire bumper is coated with anti-silicone, and if it is not there, then with some other degreaser.
The next step is to apply the primer. This must be done in two steps:
- The first layer has an adhesive purpose. In other words, it provides soil adhesion to the bumper surface. After applying the first layer, you need to let it dry completely. How long this will last depends on the ambient temperature and the quality of the raw materials.
- The second layer will be the main one, so the paint must be applied in sufficient quantities. However, you can’t overdo it here either, since a very greasy layer will take a long time to dry.
Completely dried soil is sanded with R 1000 sandpaper and supplied with a large amount of water. You should not perform this work with excessive zeal; the main purpose of the operation is to make the surface matte and remove shagreen that has formed after applying the primer.
Painting a new bumper
A new bumper also needs to be prepared for painting, especially since new products are coated with various protective oils that need to be removed. They may also be partially damaged during delivery of the goods.
- Step #1. We take sandpaper number P800 and start sanding. New products have burrs that need to be cleaned out.
- Step #2. We degrease the new polished bumper from the factory shipping oil.
- Step #3. We begin priming with a 2-component acrylic primer. After applying the first layer, wait until it dries. We begin applying the second layer after the first layer becomes matte. Beginners are advised to purchase ready-made diluted soil, since dilution requires strict proportions.
- Step #4. We take sandpaper (sandpaper) from P500 to P800 and rub the primed layer. Thanks to this grouting, the primer is permanently glued to the plastic.
- Step #5. Blow off crumbs with a compressor.
- Step #6. Degrease with solvent.
- Step #7. Apply buza and apply paint in layers. Wait 15 minutes between coats.
- Step #8. Glossy coating.
Useful tips
In order to be satisfied with the work done by yourself, here are some tips:
- It is necessary to paint in a moderately warm room, where there are no drafts. If there is a draft, there will undoubtedly be sand and dust on the parts to be painted, which will significantly complicate the work.
- Regardless of whether the new bumper needs to be painted or the old one, it must be washed and degreased. If you do not degrease, the grease film will not allow it to stick firmly to the plastic and very quickly the new paint will crack and burst.
- For degreasing you need wet and dry wipes.
- Do not use a hair dryer to speed up the drying of applied layers of primer, paint and varnish. Drying naturally is better.
- Read the instructions and recommendations for working with varnish and paint. So, as a rule, it contains useful information, especially for beginners.
- If a leak suddenly appears, it must be removed. Clean the area with moisture-resistant sandpaper and polish.