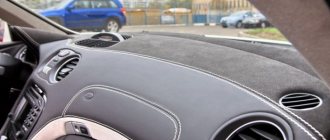
The interior of a car is often subject to adverse influences as a result of operation. Despite high-quality care, timely treatment with protective agents and polish, over time scratches, abrasions, and small dents appear on the plastic. The time for drastic decisions is coming. Painting the car interior will help restore the attractive appearance of the plastic panel and the positive emotions of the car owner.
Types of automotive plastic and features of its restoration
Before you start painting the plastic, you need to determine its type. In the manufacture of car interior parts, two types of plastic are used (thermoplastics and thermosets). We are of little interest to the chemical components, so let’s move straight to the specifics of preparing the material and coating it with paint.
Painting plastic in the interior is a fairly simple procedure, provided that the type of material is set correctly. So, you can determine the type of plastic in the following ways:
- Set fire to a piece of plastic, thoroughly cleaned of dirt and paint coatings. If during combustion soot and black, thick smoke appear, then the surface does not need a primer and it is enough to just treat it with sandpaper. If the flame is clean, without smoke, then the plastic must be primed before painting.
- Place the element in water. If the interior plastic floats on the surface, then it needs to be primed, and if it sinks, then, as in the first case, just clean it with sandpaper.
How many layers of paint to use
Car parts can be painted in 2 or 3 layers.
It all depends on the paint you use.
- One coat – covering car interior parts in one layer – is quite a serious task. To implement it, the master must master not only the technology, but also have a light hand, so as not to make stains, for example. In this case, the quality of the coating leaves much to be desired.
- Two layers is a very popular technique. Even if you have some kind of trouble while painting, you can polish this place without any problems. Simply put, the first layer can be “oblique and crooked”, and the second will cover everything.
- Three layers (using varnish) - usually the third layer is varnish (to add shine) or a matte finish (to create a matte layer). If, nevertheless, your two layers turned out to be not the most successful, you can do this work a third time.
Types of paints for auto plastics
In order for painting the car interior with your own hands to be successful, it is important to choose the right paint. The following types of paint are suitable for plastic parts:
- Vinyl paint is the best option for painting car interior elements. Vinyl paint adheres well to the plastic surface and, after drying, becomes one with it. This paint can also be used for leather interiors. Manufacturers recommend treating the surface with primer before painting.
- Matte or glossy paint. Matte - perfect for painting the dashboard. Gloss paint is not used for painting large parts, as it can create glare that distracts the driver from the road. The gloss is suitable for painting small parts, for example, buttons on the steering wheel or moldings.
- Car spray paint can also be used on plastic parts. Spraying an adhesion enhancer, in this case, is a prerequisite for an even and durable paint coating.
- Structural paint for car plastic allows you to completely restore the original structure of car plastic, making it rough, hiding scratches and small defects. Special paint designed for painting plastic creates a durable coating that is resistant to mechanical stress. The range of texture paints is quite large and allows you to choose a material that is suitable in color and structure.
What to look for when choosing paint?
When purchasing paint, you need to pay attention to the following points:
- Purpose of paint. Give preference to special paints for plastic.
- Possibility of painting textured, uneven surfaces.
- Manufacturer. It is optimal to give preference to paints and varnishes from proven, well-known manufacturers that guarantee reliability and quality.
- Price. You should not buy paint that is too cheap, as it may turn out to be of poor quality.
- Release form. Aerosol for painting plastic is much more convenient to use.
What color should I paint the interior plastic?
The choice of interior color or its individual elements is a matter of preference. Here are some recommendations, taking into account some body colors, that you can take into account when buying paint.
- For individual interior elements, colors such as silver, bronze, black, gray, chrome and gold are well suited. They can be considered universal for any car interior and exterior color.
- For red cars, red is a good color for the interior plastic inserts.
- On blue cars: individual parts of the interior can be painted in the same color as the body, blue with a mixture of purple, violet or orange.
- On black cars: universal colors, red, blue (cyan), purple, orange and pink (for girls).
- You should not choose a color that is too light (especially white) for painting interior parts, as it will be too easily soiled.
Adhesion promoter
Another necessary procedure for preparing to paint a car interior is to coat the surface with a special compound that enhances adhesion. An adhesion enhancer or primer for plastic is a special formula that acts as an intermediary between the paintwork and the surface being treated. This material performs several important functions:
- Thanks to the primer, the paint is firmly fixed to the plastic.
- Using a surface primer composition, there is no need to install the type of plastic.
- The principle of operation of the amplifier is to form pores on the plastic surface, providing an even coating and better adhesion to the paint. Thus, primer is a kind of glue for paint and plastic.
- The primer provides reliable protection for the plastic from aggressive paint components that can dissolve the surface.
Before using the composition, you must carefully study the instructions for use and precautions.
The soil should be sprayed at a distance of at least 20 centimeters from the surface in an even, thin layer.
The validity period of special liquids may vary. Most often, the manufacturer recommends painting plastic parts no later than 24 hours after spraying the amplifier. After a day, the properties of the composition decrease and the plastic requires re-processing.
Painting plastic with chrome
Recently, it has become fashionable among car owners to repaint plastic interior elements to look like chrome. Basically, this painting is not much different from the usual one. This especially applies to the surface preparation process. There are two methods of chrome plating. The first of them involves performing the following sequential steps:
- applying black paint;
- polishing the painted product after drying to a mirror finish;
- wiping the polished surface with special alcohol;
- heating the painted part with a construction hairdryer;
- chromium spraying;
- polishing after drying.
Important! Chrome plating is done using a spray gun with a small amount of paint applied under high pressure.
The second method involves initially using a regular varnish coating. After 15 minutes of drying you need to:
- perform polishing;
- apply several thin layers of chrome with a spray gun;
- Dry the part thoroughly in a special chamber at a temperature of about 600 C.
Today, there are also various ways to paint car plastic like wood and metal, aluminum and gold, crocodile and snakeskin.
See also:
Removing scratches from car plastic
Stages of self-restoration of auto plastic
Carrying out restoration of automotive plastic with your own hands is not at all difficult. To do this, you need to purchase all the necessary materials and understand the sequence of actions.
Materials required for restoration
In order for the work on restoring auto plastic to be of high quality, it is necessary to prepare in advance the materials and tools that will be needed during the work:
- Solvent or degreaser.
- Primer for plastic surfaces (if necessary).
- Moisture-resistant sandpaper.
- Paint on plastic.
- Colorless acrylic varnish.
- Brushes of different sizes.
For the restoration of plastic parts, it is optimal to use paint in a can, since operating a spray gun in the interior is inconvenient due to limited space, and purchasing equipment is not a cheap pleasure.
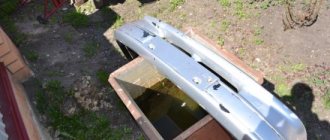
Dismantling elements before painting
Removing parts to be processed is one of the important stages in preparing to paint the car interior. The fastening of the elements is different for each car model, so dismantling may cause some difficulties.
While disassembling the dashboard of a domestic car (for example, a Lada Priora) with your own hands is not difficult, dismantling the plastic elements of the interior of foreign cars often requires special tools. A set of universally applicable tools will greatly facilitate the task.
It is necessary to remove the plastic carefully and carefully to prevent breakage of clips, latches and loss of small parts. To facilitate the assembly process, it is recommended to take intermediate photographs of the dismantling process.
universal kit for dismantling plastic car parts
Preparing plastic for painting
Before painting the plastic inside the car, it must be carefully prepared.
Preparing parts for painting is carried out in several stages:
- Removing dust, dirt, degreasing. To clean the surface, you can use acetone, white spirit, or solvent.
- Removing traces of old paint using sandpaper dipped in water.
- Next, you need to cover the plastic elements in the car that cannot be painted so that you don’t have to clean them later. To do this, use masking tape, newspapers and oilcloth.
- The next stage of preparation is repeated degreasing and application of an adhesion enhancer.
How to paint the plastic of a car interior?
The consistency of painting technology will ensure a durable and reliable paint coating. Painting car interior elements consists of several steps:
- The paint is sprayed or brushed onto the surface in two or three layers, depending on the desired depth of color and the condition of the plastic. Each layer must be dried for half an hour. Using an industrial hair dryer for drying will significantly reduce painting time.
- After applying and drying the final layer of paint, the surface is coated with clear varnish in one or two layers.
- The finished surface is polished with a special paste and a soft cloth.
Features of painting a car panel with your own hands using a brush
It is more convenient to paint some plastic elements of the car interior with a brush. The brushed paint guarantees excellent adhesion and coverage of small parts and rough surfaces. However, when painting you should consider:
- Car interior plastic paint applied by brush requires a longer drying time. The drying process of each layer increases by an average of 20 minutes.
- To keep the paint layer as thin as possible, you need to work quickly with a brush and, at the same time, press the tool tightly against the surface.
- To avoid smudges, it is necessary to remove excess paint from the brush on the edge of the container.
- To obtain the most even coating, the painting angle should be the same.
Preparing plastic for painting
Painting the plastic interior of a car yourself requires a number of manipulations. This is interesting: how to paint a torpedo. To perform the work you need tools and materials:
- pliers, tweezers for removing plastic coating;
- protective paper, tape if parts cannot be removed;
- degreaser;
- sandpaper, scotch-brite;
- putty, primer, paint;
- spray gun, if necessary;
- antistatic, urethane varnish;
- gloves, respirator.
Comprehensive preliminary activities:
- Cleaning. Removing the lubricant used in separating the finished plastic part from the mold. Wash with car shampoo in hot water with a brush (sponge).
- Degreasing. It is better to use branded anti-silicone products, since classic solvents (white alcohol, solvent) can damage the plastic part.
- Grinding. It is carried out in any convenient way (dry, wet) using red Scotch-Brite for soft material, gray for hard plastic, or P300-P400 sandpaper. Finally, degrease the surface.
- Padding. First of all, we inspect the surface for cracks and scratches. If they are not there, then you don’t have to prime them. Otherwise, the damaged coatings are puttied (putties for plastic are used), sanded again, and then primed. It is better to use an aerosol can and apply a thin layer. In rare cases where the base is severely damaged, a second primer coat may be applied.
Remember! After applying the composition, professionals advise starting painting within 10-20 minutes, as during this period good adhesion is maintained.
For painting, all plastic elements are removed from the car.
Carefully sanded and primed. Please note: Painting the steering wheel
Do-it-yourself car interior wood painting
If you are bored with the monochromatic interior of your car, then you can diversify it by painting the interior “wood” with your own hands.
To work you will need:
- Degreaser.
- Glossy brown paint in a can.
- Primer for plastic.
- Disposable tableware.
- Lighter or matches.
- Clear varnish.
- Set of tools.
So, the first step is to dismantle the elements to be painted, wash them thoroughly and degrease them. Next, a primer is applied to the surface, and after it dries, brown paint is applied in several layers.
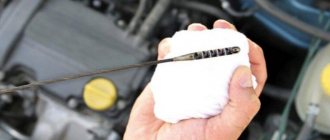
The base is ready, now you need to apply black stains on it. This is done with smoke from burning disposable tableware. Light a fork or spoon and cover the painted surface with black smoke. You need to move evenly over the entire surface to get a dark pattern reminiscent of wood texture. We coat the resulting pattern with varnish and, after drying, polish it to a shine.
How to properly apply paint to interior elements
Undoubtedly, everyone agrees that the success of painting a car (or any of its parts) depends not only on the choice of paint, but also on the specialist and his application technique.
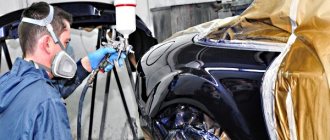
- The paint is applied not just with a brush, but with a special sprayer (it is also often called a spray gun).
- It's not enough to just hold it in your hands, you need to hold it at the right angle and choose the right solo.
- If you do something wrong, let's say you stop and apply too thin a layer - you will form so-called “apples” (that is, bulges) and “clouds” (stains on the surface).
The sprayer is usually held at right angles to the surface to be painted. Otherwise, in the case of an inclination, in the upper and lower parts of the spray the distance to the surface will be different, then beige means in one place the layer will be thicker, in another thinner.
Aerosol paints for plastic
It should be immediately noted that this option is excellent for those who independently carry out painting work.
The following types of aerosols are currently distinguished:
- Soft touch - after all the necessary actions have been carried out, the surface acquires a pleasant roughness; Also, with the help of this paint it is possible to eliminate existing shortcomings;
- Modal enamel provides a glossy shine to the treated surface.
The main advantages of the spray can be considered:
- No costs associated with the purchase of painting materials (for example, brushes and rollers);
- Ease of application;
- Uniform surface coverage and creation of a smooth layer;
- Creation of any texture;
- Preservation and protection from tarnishing for a long period of time;
- Economical paint consumption;
- Ease of painting surfaces of a different color.
Regardless of what type of paint is chosen, to give the surface an ideal look, after drying it must be coated with polishing wax paint, which will help hide minor defects.
In the event that an independent dyeing process is carried out for the first time, it is extremely important to first obtain comprehensive consultation from a specialist.
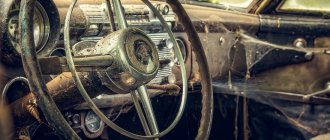
Car preparation
When starting to prepare the car for painting, you need to arm yourself with a screwdriver, because at the initial stage you need to dismantle removable parts : carefully remove handles, linings, panels, grilles and other elements. Places in the cabin that do not need painting should be protected from paint getting on them using oilcloth, newspapers and masking tape.
The next step is cleaning: we clean out the debris that has clogged up in small crevices, wipe off the dust, and wash off the dirt. It is also recommended to inspect the metal parts of the interior for rust and remove it using chemicals or manually. After washing, the interior must dry completely; this process can be accelerated by using a hair dryer, which, moreover, prevents dust from settling on the surface.
After cleaning the car dealership, the parts that will be painted must be degreased, because applying enamel to an unprepared surface is fraught with smudges. Degreasing is carried out using a solvent and a smooth, lint-free cloth. You can also use acetone or white spirit for this purpose.
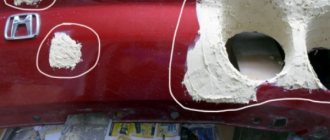
At the next stage, you can begin to eliminate traces of wear on the plastic: repair scratches, cracks, chips and dents with putty, and it is recommended to putty some defects in several layers, but only after the previous one has completely dried. Maintaining the correct temperature conditions plays an important role both in the painting process and in surface preparation. The type of materials applied and their drying time depend on this.
Important! It is recommended to putty surfaces at a temperature of +20°C, since at lower temperatures the putty does not harden.
The surface is leveled using a grinding machine or abrasive sandpaper. To eliminate noticeable flaws, a coarse abrasive (P320-400) is used, while fine-grained sandpaper (P1500-2000) is suitable for matting. There is also special sanding paper for plastic - coated with silicon carbide.
To achieve greater smoothness and eliminate dust, you can use water, constantly feeding it under a waterproof abrasive. Textured surfaces should not be sanded. Restoration of parts with complex patterns is carried out using a special plasticizer gel, which allows you to exactly replicate the texture of the plastic.
Matte paint for plastic
To give the surface an aesthetic appearance, it is extremely important to use matte paint, before using which the surface must be treated with a primer.
This type of paint contains substances that are prone to wear resistance, which makes them suitable for painting cars.
Necessary equipment, consumables
For painting work to transform a car dealership you will need:
- Tools for dismantling interior elements - screwdrivers, keys, steel forks, plastic spatulas, etc.
- Personal protective equipment: overalls, goggles, gloves, respirator.
- Cleaning equipment: rags, brushes, vacuum cleaner, chemicals for rust removal.
- Newspapers, rags, film, oilcloth, masking tape - to protect car parts that will not be painted.
- Grinding machine and sandpaper of varying degrees of grit: for cleaning corrosion, grinding and matting the surface.
- Solvent. Necessary for removing excess paint and degreasing surfaces.
- Putty for eliminating unevenness on plastic.
- A universal primer or specifically for plastic.
- Gel-plasticizer, necessary for processing textured surfaces.
- Spray gun, paint brushes.
- Paint for plastic. If you plan to paint the entire interior, you will need at least two cylinders.
- Urethane varnish designed to protect interior elements from rapid wear.
So, it is quite possible to carry out restoration of the car interior without the help of professionals. The main thing is to take the work seriously, calculate the costs and follow the instructions. Thus, you will save money, time, and also gain invaluable experience and decent results!
Source: