We all know that, in addition to the engine, there are a number of auxiliary systems under the hood of the car, including air conditioning, alternator and power steering. Their similarity is that they are all driven by a system of pulleys and belts that transmit torque to them from the motor. In some cases, all auxiliary elements are driven by one single belt, which is usually called a drive belt. But on some cars, the power steering system has its own belt. Like all other rubber parts, these belts wear out over time and must be replaced before they break and cause other potential failures of the associated mechanical components.
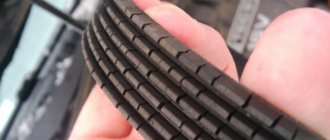
As for general symptoms, when it's time to replace your power steering belt, some of the most common signs include a squealing noise from under the hood when starting the engine, or visible cracks, cuts, or dents in the belt.
How to replace a power steering belt
1200 rub. for the photo report
We pay for photo reports on car repairs. Earnings from 10,000 rubles/month.
Write:
The Volkswagen Passat B3 suspension belt pulley has to be replaced very rarely, but the power steering suspension belt and pumps need to be changed a little more often. An accidental break of this belt will not cause immediate harm, but it is also impossible to drive without it, because this mounted belt drives the water pump that circulates coolant in the system. Therefore, every 30 thousand it is necessary to check the belt of attached units (generator, power steering, pump). If you need to replace the power steering belt on a Passat B3, then this video instruction will be useful.
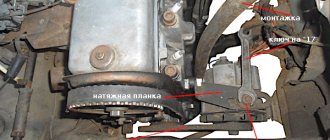
Such work must be carried out from under the car, so an inspection hole or overpass is indispensable. You will need to unscrew several bolts and loosen the tension on the power steering belt and pump in order to remove it.
Is it possible to change the power steering belt yourself and how to do it?
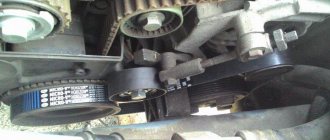
Replacement can be done at a car repair shop or yourself. The only difficulty is that the power steering belt is located behind the alternator belt, so replacing it involves removing both belts, which subsequently entails the need to properly tension them. This cannot be done without knowledge and a certain skill.
In order to remove the belt we are interested in, it is necessary to first loosen the bolts securing the power steering pump. And only then, by rotating the adjusting bolt, the tension of the belt itself is released, after which it is directly removed from the male parts.
The new belt is installed in the reverse order of removal. It should be remembered that it is mounted on the pulleys of the power steering pump, the air conditioning compressor, and also on the crankshaft pulley. The final step is tension adjustment, to which the greatest attention should be paid.
2303-3-Teh_obsluzhivanie.indd
Diagram of the location of the drive of auxiliary units of a car with air conditioning.
1 — auxiliary drive pulley; 2 — generator pulley; 3 - guide roller; 4 - tension roller; 5 — coolant pump pulley; 6 — auxiliary drive belt; 7 - air conditioning compressor pulley
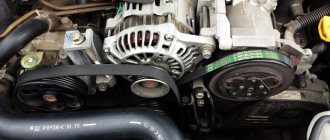
The accessory drive pulley transmits rotation through a belt to the generator, coolant pump and air conditioning compressor pulleys. The guide and tension rollers serve to change the belt routing and ensure proper tension. A pulley of increased width is attached to the coolant pump shaft, driving the power steering pump through a separate belt.
Depending on the vehicle configuration, there are two options for drive schemes for auxiliary units: with air conditioning and without air conditioning.
The work is shown on a car with air conditioning.
We carry out the work on an inspection ditch or overpass.
How to loosen the tension on the power steering belt
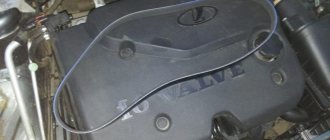
New belts are often quite tight, making it sometimes difficult to put on. To make this task easier, move the pump towards the engine until it stops. If this measure does not help, then the belt is put on by turning the pump or crankshaft by hand until the process of putting on the belt is complete.
If your car has not reached the required mileage for replacement yet, but you have doubts about the reliability of the belt, it is worth making a diagnosis. You can also pre-tighten the belt - this in some cases will help lead to the disappearance of extraneous noise.
On a Volkswagen Passat B3, drivers often have to change the suspension belt pulley, but the power steering belt and pump are replaced quite often. Car enthusiasts should be prepared to carry out repairs, which can be done independently or contact a car service center. To avoid problems when servicing the machine, it is recommended that you read the instructions provided.
What will happen if you don't change it?
If the power steering belt was not replaced on time, then various defects will be visible on their surface - cracks or abrasions. A worn belt will produce an unpleasant whistling sound during operation. This means it's time to replace it. If the drive belts break, the driver will hear a loud bang, and the equipment will simply stop performing its functions. For example, if the alternator belt breaks, then the battery will stop charging. Also, if there is a break, the hydraulic booster may stop working. As a result, the steering wheel will become very tight. Of course, you can drive with such a malfunction, but you shouldn’t put off replacing it. This is very harmful to the amplifier system. However, the main problem is the pump not working. In this case, the circulation of coolant stops and the engine may overheat. And this is already fraught with expensive repairs.
Replacement features
Drivers may not notice an accidental break immediately, as the consequences appear over time.
However, replacing the Passat B3 power steering belt must be carried out in a timely manner.
It drives the water pump, which is responsible for circulating coolant in the car system.
The serviceability of parts of mounted units should be checked every 30 thousand kilometers or once every 2 years. Inspection and repairs must be carried out from under the machine, so work is only possible on an overpass or inspection pit. First you need to prepare new spare parts and a set of automotive tools.
2297-4-14-10
In this case, the protrusion on the tensioner body should fit into the recess in the socket.
Next, reinstall the power steering pump drive belt.
[We save on maintenance of Daewoo Gentra] [Maintenance of Daewoo Gentra at 3 thousand km] [Maintenance of Daewoo Gentra at 15,000/75,000/105,000 km] [Maintenance of Daewoo Gentra at 30,000/60,000 km ] [Maintenance of Daewoo Gentra at 45,000/135,000 km] [Maintenance of Daewoo Gentra at 90 thousand km] [Maintenance of Daewoo Gentra at 120,000/150,000 km] [Tools required for maintenance of Daewoo Gentra ] [Carrying out maintenance yourself - general recommendations] [Safety rules for doing car maintenance yourself]
Checking and replacing Daewoo Gentra accessory drive belts
Replacement process
Replacement is carried out in the following sequence:
- the negative terminal is disconnected;
- the air purifier is dismantled;
- the air conditioner and generator belts are removed, placing direction marks for correct installation;
- the tension is retracted and the tension is released;
- the rod is inserted into the combined holes of the tension and support rollers;
- the latches open and the upper part of the timing drive casing is removed;
- all marks are set and aligned;
- the crankshaft pulley is removed;
- the tensioner is turned counterclockwise and the fastening nut is loosened;
- the timing belt is removed;
- The tension roller is changed.
Belt installation and assembly are carried out in reverse order. It is important to perform this process correctly so that the parts are placed in the right place and perform their functions correctly.
Replacing the power steering belt yourself
How soon might the power steering belt need to be replaced? This depends on how it was installed correctly. Inexperienced car owners tighten the belt using a screwdriver or other similar device. The result is damage to this element, due to which its service life will be reduced by approximately 2 times.
A loose or overtightened belt will wear out much faster. Therefore, tensioning the power steering belt must be done by a specialist. Only he can provide the “golden mean” of tension force.
When buying this spare part, you need to look at the expiration date. A belt that has been lying in a warehouse for too long, perhaps improperly stored, will quickly lose its properties due to a change in the chemical composition of the material under the influence of time.
Drive Element Replacement Procedure
You can learn how to change the power steering belt from the step-by-step instructions.
- We lift the vehicle on a lift, or place it over a hole to get to the rack.
- You need to disconnect the battery from the vehicle's electrical system (disconnect the terminals).
- Remove the engine protection, if equipped. Depending on the brand of the car, we use a screwdriver or wrench.
- If necessary, first remove the alternator belt. In some brands of cars, without this procedure you will not be able to get to the power steering drive belt.
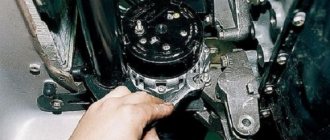
- Find the steering rack pump. In most brands of cars, it is located on the driver's side.
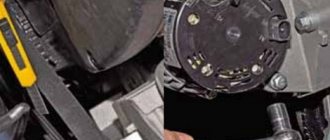
- Find the tensioner pulley. Its top and bottom bolts will most likely be tightly seated due to rust, so you can douse them with WD-40. After a while, loosen the bolts.
- We loosen both bolts of the pulley so that it begins to move freely.
- When the pulley and tension roller are relaxed, the belt should come off easily.
Installing a new belt
Below is an algorithm for how to tighten the power steering belt.
- The power steering belt is tensioned with the teeth inward, it is pulled through all the rollers where the old one was.
- The power steering pump is tensioned and the bolts are tightened. Use a pry bar to move the pump away, applying tension to the belt. Hold the pump with a pry bar and tighten its bolts.
- We install everything that was removed in reverse order: the generator belt and engine protection. We connect the battery.
- We start the car. Let's listen. If there is a whistle or squeal from the engine compartment, it means that the power steering or generator belt is not tensioned enough. If there are no extraneous sounds, we proceed to a 10-15 km race, upon completion of which we need to tighten the belt bolts again tightly, since from the long operation of the internal combustion engine after the first race, they could become loose.
How to change and tighten the power steering belt?
We all know that, in addition to the engine, there are a number of auxiliary systems under the hood of the car, including air conditioning, alternator and power steering. Their similarity is that they are all driven by a system of pulleys and belts that transmit torque to them from the motor. In some cases, all auxiliary elements are driven by one single belt, which is usually called a drive belt. But on some cars, the power steering system has its own belt. Like all other rubber parts, these belts wear out over time and must be replaced before they break and cause other potential failures of the associated mechanical components.
As for general symptoms, when it's time to replace your power steering belt, some of the most common signs include a squealing noise from under the hood when starting the engine, or visible cracks, cuts, or dents in the belt.
Device
The following devices are found on machines:
- early model G12, producing current up to 20 A;
- G250, equipped with a built-in rectifier, develops power up to 350 W;
- improved 161 3771, equipped with an integrated voltage regulator;
- brushless products model G700A30.
All generator models are mounted on the crankcase of the power unit on the right side with a special bracket. The drive uses a belt stretched between pulleys. The lower support of the generator allows the unit to be moved a short distance, providing drive tension.
- Outer casing made of light alloy or steel (on early models). At the ends there are covers in which the rolling bearings are located. The back cover on a number of models is used to install the rectifier unit, brushes and voltage regulator.
- Inside the housing there is a package of steel sheets with a wound wire that forms a 3-phase winding. A device called a stator is used to generate current.
- Inside the stator, a rotor rotates on bearings, on which steel bushings and an excitation winding are placed. The wire leads are attached to the collector. On the outside of the stator there is a shaft with a recess for a key, which is used to mount the drive pulley. The part is secured with a nut. An impeller is installed in front of the pulley to supply cooling air inside the device.
- A spring-loaded brush assembly is used to supply excitation voltage.
- The rectifier bridge consists of 6 diodes.
Part 1: Replacing the power steering belt
- wrench or ratchet wrench;
- (you may need) a flashlight;
- hydraulic lift or inspection hole;
- a long flathead screwdriver and also a flathead screwdriver;
- penetrating agents (WD-40);
- new power steering belt to replace;
- a new power steering belt pulley to replace it (in some cases);
- protective equipment: safety glasses and gloves.
Step 1 : You need to lift the car on a lift or place it over a hole in order to have access to the engine compartment from below.
Part 2: Installing a new power steering belt
Step 1 : Install the new belt, teeth inward, onto all the rollers from which the belt was removed when replacing.
Step 2 : Tension the power steering pump and tighten the bolts. In step 9 we used a pry bar to push the steering pump forward to relieve the tension. At this point we need to reverse the process by pulling the pump in the opposite direction to apply tension to the pulley.
Tension the power steering belt in this way and, without loosening it, tighten the lower bolt, and then the upper bolt. Once both bolts are tightened, release the tension on the pry bar and move on to the next step.
Step 3 : Tighten the idler pulley and tighten the bolts. Using the same method as above, apply pressure to the idler pulley until the belt is tensioned at all three access points.
Step 4 : Install everything that was removed and removed to access the power steering belt. Replace the alternator belt, install the engine guard and connect the battery cables.
Step 5 : Start the car. Listen carefully to all sounds coming from under the hood of the car. Pay special attention to whistling or squealing noises. If you hear such sounds, turn off the engine and recheck the tension of the belts (power steering and generator, if the latter was removed).
If you do not hear any symptoms, proceed to test drive the car for approximately 10-15 kilometers. When you arrive home, open the hood and re-tighten all the power steering belt bolts, as if the engine was running for a long time after the first start, they could have become loose.
Malfunction
A malfunction may be unexpected, or it may indicate its existence in advance, for this reason the best recommendation is to simply listen to your car. And it goes without saying that UAZ is a collection of sounds, different and strange. This is not entirely true. You not only need to drive the car, but you also need to listen to it. Riders don’t drive UAZs or MB G-classes.
Manifestation of malfunction
Cold weather is often a catalyst for troubleshooting, and in my case this was exactly the case. A slight whistling sound appeared, like a nightingale under the hood. Based on the sound, it was decided that the source of the sound was a belt or rollers, which means it needed to be disassembled.
Source
FIAT Albea > › Logbook ›
Replacing the timing belt and roller + auxiliary power steering and alternator belts
1. Preface:
I changed the belt without any tools, I needed keys, a set of sockets, a white marker (I used a stroke), a place where I could safely do the work, good music and, of course, hands.
In Yekaterinburg for 2022, the service center offered me to change the belt for 3500. Before that, I had never changed the belt on any car, I thought if it was around 2500 I’d give it to the service center. In general, the amount of work was the key factor in favor of replacing the belt with your own efforts. Before replacing, I bought spare parts: Timing belt Dayco 94950 - 625r; Timing tensioner pulley - SNR GT35840 1515r; Power steering belt Dayco 3РК915 - 238 rubles; Dayco generator belt - 5РК1165р; Parasitic roller Dayco APV1068 - 612r; Tensioner pulley Dayco APV1079 - 1542r. When replacing, I changed all the belts and the timing belt pulley, but did not touch the other rollers. I also washed the engine before replacing it to make it more pleasant to work with. (there will be a report in the future) 2 So, the process of replacing the belt:
1) Before starting, I removed the negative terminal from the battery. It’s worth not removing the terminal, to be honest, I don’t know, during the work it will be necessary to remove a couple of sensors and in order not to grab too much on the on-board vehicle, I decided to remove the terminal. 2) Remove the right wheel 3) I recommend removing the wheel arch liner rather than bending it when unscrewing the belt pulley cover. Later, when replacing the belt, the fender liner constantly caught and dirt fell from it into the eyes. Here you either wear safety glasses or remove the fender liner completely. 4) Remove the lower protective cover of the attachment belt pulley. 5) Disconnect the engine wiring harness from the timing control valve (p. 88, p. 11 of Murzilka, until I read it I didn’t understand how to remove it). I don't know if I need to take it off? I did it like everyone else. 6) Pull out the air duct from the air filter housing. 7) Remove the upper timing case, having first pulled out the harness from the casing. Loosen the locknut, and then the bolt that regulates the tension of the power steering belt. 9) Disconnect the connectors from the crankshaft and oil pressure sensors. 10) Use a 8mm hex to loosen the lower bolt securing the power steering pump. I also loosened the top bolt (literally by one turn) of the power steering pump, because... I couldn't remove the belt. 11) Take a piece of nail (no more than 4mm in diameter) and use it as a pin to loosen the tension of the automatic roller of the accessory belts. 12) Using a 13mm wrench, placed over the roller bolt, turn it clockwise, while simultaneously inserting the pin into the hole on the automatic tensioner body, until we feel that the pin has entered the second hole on the auto tensioner body. As a result, the roller will rise slightly upward, thereby loosening the belt tension, then remove the belt of the units (generator, compressor). 13) Unscrew the accessory belt pulley (key 13). When removing and installing, be careful not to break the key. 14) Unscrew the lower timing belt casing. 15) Place marks, not forgetting to indicate the direction of movement of the belt. Be sure to put three marks: on the body, on the belt, on the pulley.
Useful tips
As you can see, if everything is done correctly, replacing the alternator belt will take no more than 30-40 minutes. Let us remind you once again that installation difficulties may arise on some cars, so you should not neglect sketching the diagram when removing the old belt.
Also, given the large number of different manufacturers on the market, you should not opt for the cheapest products. This is true for both timing belts and alternator belts. In practice, it is optimal to purchase products from well-known companies (for example, Gates belts). It is important to find the original and not a fake.
We also recommend reading the article about which timing belts are best to choose. From this article you will learn which companies and manufacturers of timing belts are trustworthy, as well as what to look for when choosing a timing belt.
After replacing the belt and checking its tension, you should put a load on the generator (turn on the high beams, heater, heating) and let it idle. The appearance of a whistle will indicate that the belt needs to be tightened. However, it also happens that the whistling of the alternator belt occurs for other reasons. In this case, it is necessary to study separate material on this topic.