The alternator belt is an important element of the life of your car. The correct operation of the generator, the quality of battery charging, as well as the voltage level in the on-board network largely depend on its integrity and correct tension.
When loosened, the belt begins to whistle, which may increase wear on the generator bearings. In addition, improper tension can lead to rapid destruction and further damage to the belt itself.
Such as:
- Cracks, cracks.
- Uneven wear.
- Break.
Therefore, you must know how to adjust the alternator belt on Kalina, what to do and in what sequence.
Specifics of the drive circuit on different modifications of Lada Kalina
The factory design provides for different lengths of standard gears, which depend on the configuration of the machine:
- without air conditioning – 882 mm;
- with air conditioning – 1018 mm.
The first VAZ 1118 models without air conditioning and a tension roller are equipped with a poly-V drive with a length of 823 mm
. Thus, with one belt from the crankshaft pulley, not only the alternator, but also the air conditioning compressor can be activated. The roller circuit allows you to adjust the tension.
How to change it yourself?
The complexity of replacing the alternator belt on Kalina does not depend on the number of valves or additional units on the engine.
Replacement on 8 valve engines without tensioner
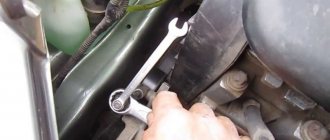
Replacing the belt on such an engine is the simplest; the only tools you need are a 13 mm wrench and a short flat-blade screwdriver. Since the tension in such a drive scheme is quite strong, when changing it is necessary to use only a Gates 6PK823SF or Dayco 825 six-V belt with the additional marking POLY-V. The remaining straps are too rigid, quickly collapse and damage the bearing on the generator shaft.
Stages of work
To complete the task you need to do the following:
- Unscrew the lower mounting bolt of the generator 2-3 turns.
- Unscrew the nut of the upper fastening, use a screwdriver to push out the bolt and remove it completely.
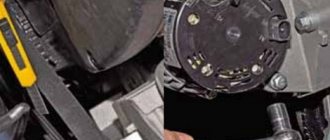
- Lower the generator down. The eye of the mechanism must pass through the gap between the radiator and the TV body.
- Remove the old belt and replace it with a new one. If the strap does not fit easily onto the pulleys, you can carefully tighten it using a screwdriver.
- Raise the generator up, ensuring the belt is tensioned.
- Insert the upper mounting point bolt and tighten the nut.
- Tighten the lower mounting point bolt.
- Check the operation of the belt.
The repair process on such an engine is clearly shown in the video filmed by the author Ilgiz Magafurov.
Replacement on 8 valve engines with tensioner
Here, the procedure for installing a new alternator belt is very different from that presented above.
Required Tools
To replace the alternator belt yourself, you will need at least the following tools:
- regular or box wrench for 13, 17 and 19 mm nuts;
- a head with a ratchet for 8 mm nuts; if it is not available, an open-end or regular wrench of the same size will do;
- a screwdriver with a thin flat blade;
- thin needle;
- rags;
- white spirit or gasoline, approximately 0.5 liters;
- container and brush for washing;
- CV joint bearing lubricant.
Stages of work
To adjust the degree of belt tension on Kalina engines, a mechanical tensioner is used, in contrast to the timing drive, which uses a hydraulic tensioner. When changing an element, it is recommended to carry out preventive maintenance of the roller by adding fresh lubricant.
To complete the work you need to do the following:
- Loosen the roller bolt. The thread on it is reversed.
- Use a screwdriver to pry up the plastic plug on the roller and carefully remove it.
- Unscrew the fixing nut on the tensioner rod a few turns.
- Loosen the belt tension by rotating the rod nut clockwise. The nut must be unscrewed until the rod begins to move freely in the seat.
- Unscrew the side bolt securing the rod end, located next to the tension roller.
- Remove the tensioner and set it aside.
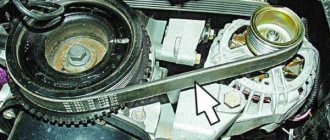
- Proceed to dismantle the strap. The procedure must begin with the generator pulley, while overcoming the slight resistance of the belt.
- Remove the element from the crankshaft pulley and remove it completely.
- Unscrew the roller bolt and remove it.
- Using a needle, carefully pry up and remove the protective caps on the bearing. Wash the bearing with white spirit or gasoline.
- Refill with fresh grease and install protective rubber caps.
- Assemble all the parts and mount the roller in place. When assembling, you must remember that the bushing is in the bearing on the side of the bracket.
- Change the belt by installing it in the reverse order - from the crankshaft pulley to the generator pulley.
- Install the tensioner and begin tightening the belt by turning the nut counterclockwise. The nut must be tightened until the resistance increases. A well-tensioned strap should be slightly pressed when pressed by hand.
- Tighten the nut securing the tensioner rod.
- Check the operation of the mechanism; if a whistle occurs, tighten the strap.
We recommend: How to change the clutch master cylinder on a Ford Focus 2
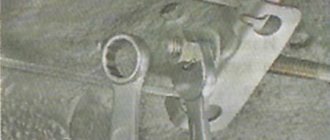
Loosening the 17 mm left nut Removing the cover on the roller Disassembled tension roller Bearing with covers removed Cleaned roller Reassembling the unit Belt tension Tightening the control nut
Replacement on 16 valve engines
The difficulty of replacing the alternator drive belt on such Kalinas lies in the need to remove the front engine mount.
Required Tools
- head for hexagonal sprockets size 11 mm or TORX E14;
- two jacks;
- 17 mm socket or wrench;
- 8 mm ratchet head.
Replacement process
During the work process you need to perform the following actions:
- Raise the car on a jack and remove the right wheel, as well as the protective wheel arch liner and the support boot.
- Install a safety support under the bottom of the machine.
- Remove the protective shield under the engine.
- Raise the engine under the crankcase with a jack. A wooden stand must be placed between the lifting part of the jack and the engine oil sump.
- Remove two TORX E14 bolts securing the power unit support to the bracket. If the screws are tight, you need to vary the position of the motor with a jack, achieving easy rotation.
- Unscrew the three TORX E14 bolts securing the support to the side members of the car body.
- To loosen the belt tension, to do this you need to unscrew the fixing nut.
- Rotate the nut 8 mm clockwise until the belt is completely loosened. Then you need to remove the strap and thread a new element through the place where the support was removed.
- If necessary, you can replace the grease in the tension roller. The scheme is completely identical to that described above.
- Tension the belt by turning the nut 8 mm counterclockwise. The tension should be controlled by hand - the element should bend when pressed.
- Secure the tension with a 19 mm nut.
- Install all removed parts in reverse order.
- Start the engine and check the operation of the drive. To do this, you need to load the belt as much as possible - turn on all electricity consumers and the air conditioner.
- If a whistle occurs during operation, you must tighten the strap. To do this, with the engine running, you need to loosen the lock and carefully tighten the tensioner rod until the whistle disappears.
- Tighten the lock nut.
- If a whistling noise occurs during operation, the belt must be tightened further.
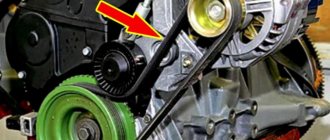
The engine mount is outlined in red. Loosening the tensioner. Arch locker and support boot. The engine mount is highlighted in red oval. Location of the five TORX E14 bolts. Place for support on the engine.
Recommendations for choosing a belt drive
Gates
drive as standard.
.
As a replacement on the first models, you can use Dayco 825
.
Here you need to take into account that elastic specimens are marked with the “ Poly-V
” symbol; if it is absent, the product has a rigid structure.
Alternative drives for VAZ 1118 with air conditioning
:
- Roulunds Rubber 6PK1015;
- Dayco 6PK1005;
- Bosch 6PK1015;
- Gates 6PK1019.
Alternative drives for VAZ 1118 without air conditioning
:
- Bautler 6PK883;
- Dayko 6PK888;
- Finwhale BP6 883;
- Luzar LB 0118 1118-3701720 6РК 884;
- Roulunds Rubber 6PK884;
- BRT 882 mm (Balakovo plant).
Drive system repair
Regulations for periodic inspection and replacement of the alternator belt on Kalina
Many new owners of vehicles, either from prolonged joy or out of ignorance, remember the presence of a flexible connection under the hood only after the lamp on the dashboard lights up. The technical documentation of the vehicle indicates operational standards, after which the torque transmission elements must be removed and new ones installed:
- tensioner roller after 60,000 km;
- belt after 30,000 km.
Experts strongly recommend monthly scheduled maintenance of the rubber drive, consisting of simple external inspection steps. The part needs to be replaced if the following defects are detected
:
Purpose of the belt
The generator is used to generate electricity, which powers the entire on-board network of the vehicle along with the current collectors while driving. This unit is also used to recharge the battery. Without these important features, the car can only function for a short time until the battery is completely discharged. This aspect prompts LADA Kalina owners to check the condition of the belt drive more frequently, so that its breakage, which suddenly occurs far from a populated area, does not cause a flurry of hysteria and frantic searches for the phone in order to call for help.
On-board computer for Grant
Experienced drivers here show their thriftiness when they take on board a new alternator belt, fortunately this consumable component has negligible weight and dimensions.
Our material is intended to help those owners who, due to lack of proper experience, silently shrug when asked about the purpose of the belt. In most modern engines, the generator unit is driven through such a transmission. The generator belt itself is in a tense state between the crankshaft pulleys and the LADA Kalina generator itself. With the start of rotation, electrical power is generated, which is sent through a rectifier device to all switched-on current collectors of the vehicle, including the battery.
Repair technology for the auxiliary drive system
Sequencing
is similar for both models with and without air conditioning and consists of the following items:
- Remove the engine protection.
- Remove the right wheel and fender liner.
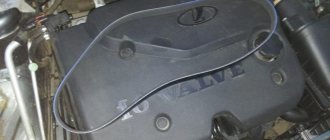
- Remove the expansion tank.
- Jack up the right side of the engine and unscrew the mount.
- By tightening the tensioner mechanism pin, loosen the belt tension.
- Remove the drive from the roller and then from all pulleys.
- Install the new part and reassemble in reverse order.
- Adjust the tension.
It is advisable to carry out work in an inspection pit in compliance with all safety measures. When changing the flexible connection, it is recommended to simultaneously install a new tensioner roller, but this depends on the desire of the owner and the condition of the unit.
Replacement cost
The cost of changing a belt on a Lada Kalina car depends on the type of engine, range of units and is:
engines with a tensioner without air conditioning - from 150 to 350 rubles;
Replacing the roller will require an additional 250 rubles. The total amount required by the car owner to purchase spare parts, in the maximum version, will not exceed 850 rubles.
Tension adjustment
After replacing the alternator belt on Kalina, making a rough adjustment and then starting the engine, it is necessary to more accurately adjust the drive tension
. To do this, we perform the following operations:
- loosen the tensioner rod locknut;
- turn the adjusting pin with a wrench to “8” until the result is achieved;
- tighten the locknut.
When gradually tightening the belt, you can use a simple canter scale, which you need to attach to the key at “8” and tighten the pin counterclockwise to a reading of 2 kg. A normal setting is considered when, with a force of 10 kgf, in the area between the generator and crankshaft pulleys, the deflection value will be within 8-10 mm.
More “advanced” owners have devices such as TsNT-Belt, the operation of which is based on the recognition of the known acoustic characteristics of drive devices.
Required Tools
To replace the alternator belt yourself, you will need at least the following tools:
- regular or box wrench for 13, 17 and 19 mm nuts;
- a head with a ratchet for 8 mm nuts; if it is not available, an open-end or regular wrench of the same size will do;
- a screwdriver with a thin flat blade;
- thin needle;
- rags;
- white spirit or gasoline, approximately 0.5 liters;
- container and brush for washing;
- CV joint bearing lubricant.
Useful video tutorials on the topic
A video with a step-by-step operation will help you analyze in detail all the nuances of replacing and adjusting the tension
How to replace the alternator belt on Lada Kalina
How to tighten a belt
The design of the generator mount for Lada Granta and Kalina 2nd generation differs from the usual one that we saw on Lada Priora or Lada Kalina 1st generation. On new Lada cars with 8 valve engines, AvtoVAZ did not provide for belt tension, so replacing the alternator belt is done differently.
When to change?
VAZ Lada Kalina vehicles use a belt drive for auxiliary units. On cars with air conditioning, the service life of such a belt is no more than 30 thousand km. On simple versions of cars, the strap can last longer, but most owners try to change it after the same 30 thousand kilometers traveled. For various reasons, the belt may fail earlier, so it must be checked periodically during vehicle operation. There should be no cracks on the working track, and delamination on the outer part of the belt is unacceptable. If such defects are present, we immediately change the strap. Another signal to replace this element is a whistle or other noise when the unit is operating.
The process of replacing the belt on a Kalina with air conditioning (sixteen valves) is presented in a video from the user Alexander.