Cars of the VAZ “8, 9, 99” family equipped with a carburetor, fuel injection system (injector) are equipped with generators of type 37.3701, 94.3701.
Both power supplies are AC, three-phase, with pre-installed rectifier and voltage regulator. The rotation side is right.
The first type of power source (hereinafter - IP) is driven by a V-belt, and the second - by a poly V-belt from the crankshaft pulley. Some production models of the “eight” and “nine” are equipped with IP made in Slovenia, marked AAK-5102.
If AAK-5102 fails, it can be completely or partially replaced by 94.3701. The process of self-prevention is not at all complicated, but it requires knowledge and initial experience in vehicle maintenance. Carrying out diagnostics in a non-professional manner does not guarantee the functionality of the equipment.
Design of the VAZ 2109 generator.
Generator 94.3701.
- casing
- output “B+” for connecting consumers
- noise suppression capacitor
- common output of additional diodes
- holder of positive diodes of the rectifier unit
- holder of negative diodes of the rectifier unit
- stator winding terminals
- voltage regulator
- brush holder
- generator back cover
- generator front cover
- stator
- stator winding
- spacer ring
- washer
- cone washer
- pulley
- screw
- rotor shaft
- front rotor shaft bearing
- beak-shaped rotor pole pieces
- rotor winding
- sleeve
- clamping screw
- rear rotor bearing
- bearing bushing
- slip rings
- negative diode
- positive diode
- additional diode
- output "D"
Generator 37.3701.
a - voltage regulator and brush assembly of generators manufactured since 1996.
- generator cover from slip ring side
- rectifier unit mounting bolt
- slip rings
- ball bearing of the rotor shaft from the sides of the slip rings
- 2.2 µF capacitor ±20% for radio interference suppression
- rotor shaft
- common terminal wire for additional diodes
- terminal “30” of the generator for connecting consumers
- plug “61” of the generator (common output of additional diodes)
- output wire “B” of the voltage regulator
- brush connected to terminal “B” of the voltage regulator
- voltage regulator
- brush connected to terminal “Ш” of the voltage regulator
- stud for attaching the generator to the tensioner
- generator cover from slip ring side
- fan impeller with generator drive pulley
- rotor pole piece
- bearing mounting washers
- spacer ring
- drive-side rotor shaft ball bearing
- steel bushing
- rotor winding (excitation winding)
- stator core
- stator winding
- rectifier unit
- alternator coupling bolt
- buffer bushing
- sleeve
- clamping sleeve
- terminal "B" of the voltage regulator
- brush holder
https://youtube.com/watch?v=%250A
What generator is installed on the VAZ 21099, VAZ 2109, VAZ 2108
| Specifications | 37.3701 | 94.3701 |
| Limit current strength at a voltage of 13.5 V and speeds above 5500 rpm | 56 | 81 |
| Adjustable voltage range | 13,5-14,4 | 13,3-14,6 |
| Gear ratio | 01.01.1970 | 01.01.1970 |
| Capacitor capacity | 2,3±15% | 2,1±15% |
Why does the generator not charge the VAZ 21099?
Note to the driver!!! If the IP drive belt breaks along the way, and you don’t have a spare one at hand, cut a 25 mm wide ring from the car inner tube.
To significantly reduce current consumption when the power unit is running, it is necessary to turn off the maximum number of current consumers: radio, radio, lighting, cooler, stove heater.
How to check the generator voltage regulator with a multimeter
What kind of generator is installed on a Prior with air conditioning?
In order to ensure the normal operation of light bulbs, power windows, windshield wipers and other electrical equipment, as well as charging the battery, you need to maintain a DC value of 13.5-14.5 volts. If this figure is less, the battery will not charge, and if it exceeds this level, the on-board electrical appliances will fail. High voltage also causes some damage to the battery, shortening its service life due to overcharging.
Therefore, to convert the current generated by the generator, there is a special device - a relay-voltage regulator. With its help, the on-board network is provided with a current that maintains the required parameters, regardless of the crankshaft speed. Situations often arise when it becomes necessary to check the generator voltage with a multimeter.
Modern relays are electronic, and their design is non-separable. If they fail, they cannot be adjusted or repaired, but require complete replacement. This is considered the only drawback of these devices, since otherwise the relays have a lot of advantages: compactness, durability, high accuracy of current parameters.
When can the voltage regulator be considered faulty?
- The headlights change brightness depending on engine speed.
- There is an insufficient charge of the battery or, conversely, its overcharging, accompanied by boiling off of the electrolyte.
- There may be a burning smell inside the car. Failure of the regulator can occur due to moisture, various mechanical damage, short circuit and other non-standard short-term electrical influences.
- Sometimes the regulator is initially of poor quality if it is a dubious product from unknown manufacturers.
There are different methods for checking the generator relay-regulator with a multimeter and establishing its functionality. The easiest way is to check with a multimeter, without dismantling the device. For this purpose, the voltage supplied to the battery to charge it is measured. For such a check, you will need an assistant to regulate engine speed with the accelerator pedal.
The verification procedure takes place in several stages:
- The car engine starts and warms up within 5 minutes.
- Open the hood while the engine is running and connect the multimeter contacts to the battery terminals. The connection must be made with correct polarity, and the switch must be set to 20 V.
- The assessment of the charging voltage coming from the generator is carried out under certain conditions. You need to check how much the generator produces with a multimeter. The low beam should be on, and all other consumers should be off. The crankshaft rotates at a speed of 1.5 to 2.5 thousand rpm. If the voltage is more than 14.8 volts, then the regulator is considered faulty and must be replaced. If the voltage is below 13.5 V, the cause of the malfunction may not be only the relay. The fault may be in the wiring or the generator itself.
- More accurate results are obtained by estimating the intensity of the current supplied by the load. This will require turning on the high beams, heater fan, windshield wiper and other consumers. In such a situation, the charging current should not be below 13.5 volts. If the indicator is still less than this value, then when all electrical equipment is turned on, the battery will not receive normal charging.
A more complete check is performed on the removed relay-regulator. Typically the electronic device sits on top of the generator, covered with a plastic cover. In some cases, the regulator may form a single unit with the brushes. To check, in addition to a multimeter, you need to prepare a 12 V test lamp with a power of no more than 3 watts and an adjustable current source. These methods are also suitable for checking the generator integral with a multimeter, that is, the integral voltage regulator.
No charging VAZ 2109
VAZ 21074 injector: generator and importance in the electrical system
>When driving a car, you should always pay attention to whether the battery is charging. The VAZ 2109 battery is needed only to start the engine
While the engine is running, all electrical appliances of the VAZ 2109 operate from. Naturally, if the generator stops working, the battery doesn’t last long. How can you tell if the battery has stopped charging? There is a standard voltmeter on the instrument panel. According to its readings, it is very clear whether the generator is working or not. When the VAZ 2109 engine is running, the voltmeter should show a voltage of about 13.5 - 14 V. If you notice that the arrow is always tilted to the right, that is, the on-board voltage is less than 12V, then there is no charging from the generator. It is also very convenient to monitor the voltage of the on-board network of the VAZ 2109 using a digital tachometer. It measures the voltage from the generator with an accuracy of tenths of a volt.
Generator VAZ 2109
I recently had the following situation: I was driving and I saw that the voltage on the instrument panel voltmeter was about 11 Volts. Clearly, there's something wrong with the generator. Well, as usual, there is no time to repair it, it’s dark and cold outside, there is no garage. Well, as always, you need to drive a car every day, you can’t do without it. Therefore, at night every day I put the battery on charge, and in the morning I put the fully charged battery in the car and drove. If you drive only during daylight hours, that is, without headlights, then the battery may last for several days. If, as I did, you have to drive to work in the dark in the morning, then in the evening the battery will run out completely. Of course, it all depends on how often you turn off and start the engine. A lot of battery energy is wasted just for rotating the starter, you can also try to drive without it, then the battery is needed only for the operation of the ignition system and light signaling (stops, turns). Until recently, I believed that no matter how dead the battery was, the VAZ 2109 could always be started from the pushrod. It turned out that this was not true. There is a certain degree of discharge when the starter no longer has enough strength to turn the crankshaft, but it is enough. I pushed it, put it in gear, started up and everything was fine. However, if the battery is completely dead, it does not even have enough power to form a spark. , don’t push, the VAZ 2109 won’t start until you recharge the battery. But still, what to do if the VAZ 2109 battery has lost charging? Of course, not every one of us is an electrician and can check the generator with all its diodes, stabilizers and collectors. The very first thing to do if the VAZ 2109 generator stops working is to check the generator brushes. It’s easy to understand that the VAZ 2109’s brushes are faulty or worn out. Turn on the ignition and look at the instrument panel.
Checking the serviceability of the VAZ 2109 generator brushes
If the brushes are faulty, then the battery charging lamp will not light up when the engine is not running. Or it will glow very dimly. After you start the engine, the light will continue to glow dimly. The dim glow is visible only in the dark; it cannot be seen during daylight hours. If the brushes are in good working order, then when the engine is not running, the battery charging lamp lights up brightly; if it is started, it immediately goes out. It should be noted right away that the VAZ 2109 produced before 1993 has old-style brushes. On the new VAZ 2109, brushes of a new type are installed, immediately with a voltage stabilizer. However, there are both new and old samples of VAZ 2109 brushes on sale. The cost of VAZ 2109 generator brushes is about $3-5. Replacing the VAZ 2109 generator brushes is very simple, the sequence is as follows: 1. Remove the ground from the battery
Removing the mass of the VAZ 2109
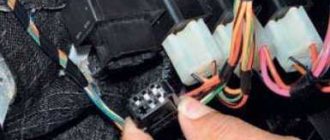
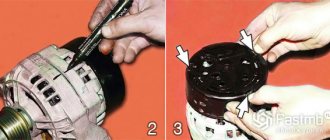
2. Disconnect the chip from the generator brush housing and remove the wires from the central stud of the generator.
Disconnect the wires from the VAZ 2109 generator
Wires pulled back
3. Now unscrew the two bolts securing the brushes to the VAZ 2109 generator housing. And slowly remove the brushes from the generator housing.
We unscrew the bolts securing the generator brushes of the VAZ 2109
4. If you want the new brushes to last a long time, you need to clean the generator commutator. To do this, loosen the nut on the generator mounting bracket, loosen the belt and remove it. We take fine sandpaper, press it against the commutator, and we ourselves rotate the generator using the drive wheel. In this way, graphite deposits from previous brushes are removed from the commutator. And the wear of the new brushes will be long. 5. Now we insert new brushes into the housing of the VAZ 2109 generator and clamp them.
Generator brushes VAZ 2109
6. We put back all the chips and wires of the VAZ 2109 generator.
VAZ 2109 generator brushes replaced
We check the functionality of the generator as indicated above.
Difficulties in reworking
Since the work is quite labor-intensive and takes a lot of time, we recommend performing the steps in stages. The quality of components and their assembly play an important role during work. Beginners may have difficulty securing some elements, so it is better to call for help from a familiar car service specialist or a person who has replaced a carburetor with an injector before.
Replacing a carburetor with an injector will require you to be careful and careful. You will need to replace a lot of parts, and this is quite difficult for a beginner to do. But if you wish and strictly follow the instructions, you can perform a really serious modernization of your car and save a lot on car service costs.
Welcome! A generator is an integral part of any car, the generator supplies current to the on-board network, which is generated when the generator pulley rotates. Thanks to this, the battery does not have to work constantly and after starting the engine, it stops supplying current to the on-board network of the car, and only one starts supplying it. generator, but there are cases when it fails (Over time, this usually happens because sand and other types of dirt get into the generator, or the generator can simply burn out due to a short circuit) and it becomes impossible to drive a car, since One battery turns on, and when it is completely discharged, the car will stall and simply won’t go anywhere, so the generator needs to be changed when it becomes unusable or repaired (we will still touch on the topic of repairing the generator in this article).
Note! To change the generator, you don’t need a lot of time and tools, it will be enough to stock up on: Several keys, one of which should be “17” and the other about “19” and a pry bar or something like it (A stick, for example)!
Summary:
Where is the generator located? It is located between the TV and between the engine, when you open the hood you will immediately see it, but it will only be attached a little differently, not as shown in the photo, but the location will be exactly the same, for clarity it is indicated in the photo below with a red arrow.
When should the generator be replaced? 1. You can understand whether it provides charging or not at all in two ways, which one you choose is up to you, we usually recommend the first method to all those people who ask us a question about how to check the generator for serviceability, and it is as follows: You can buy a multi-meter at any auto store (It is available almost everywhere), the Chinese ones are quite cheap (About 300 rubles), You do not work at the station and are not an electrician, so this multi-meter will be quite enough (If you want, of course , you can get it for more expensive), in general, you buy this device and turn on the Voltmeter function on it, after which the leads coming from the multi-meter are connected to the battery (see photo below) and pay attention to the device (If the battery is working and charged, then it will have to give out at least 12.5 Volts, if it gives out less than 12, then it needs to be charged), now the next step is to start the car and the wires coming from the multi-meter are connected in exactly the same way as before (the function should still be turned on on the device Voltmeter) and the device is looked at again, the readings of the device will definitely increase, but if they fall, then the generator is not working properly and does not charge the battery (Also look at the charge lamp, see the small photo, if it is on and the readings of the device with the engine running gradually fall, then the generator is 100% faulty).
2. Now let’s talk about the second method, let us immediately warn you that it is free, but it can have a very bad effect on the generator, this is how it is done, start the car and the choke is pulled out (it is generally not recommended to do this on an injector), so after the choke is pulled out ( Halfway somewhere, so that the engine runs at 1500 rpm) and the car works for a while (A minute is enough, even less), the minus terminal is removed from the battery, and after removal the car will definitely have to continue its work (This indicates that the on-board network the car, and the ignition is powered from the generator and not from the battery), but if it stalls immediately, then the generator does not work (The brushes are worn out or the diode bridge is burned out), in general, such a generator will have to be removed and checked for serviceability (By the way, about how repair the generator, read the article: “Repairing the generator on a VAZ”) but there is one big minus, if the generator is not working correctly (This happens because of the brushes) but it still works, then the car will not stall and because of this, it will always the car's battery is discharged and therefore, to find out more accurately whether it provides charging and whether it gives it as it should, you can only find out with a multi-meter and by the way, if you buy this device, you will not regret it, since it will be very useful to you in the future .
Dismantling the generator
First of all, you need to disconnect the battery to completely cut off the power to the car.
- disconnect all wires from the generator;
- loosen the nuts holding it in place;
- lift the device and remove the belt;
- completely unscrew the screws of the fixing bar from the cylinder block;
- under the engine there are bolts securing the bracket - they need to be removed;
- the generator is removed.
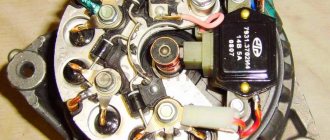
Relay regulator VAZ 2109
1 – brush holder, 2 – brushes, 3 – voltage regulator
Diagnostics of the VAZ 2109 generator regulator relay
Check the serviceability of the VAZ 2109 voltage regulator. Connect a 12 V test lamp to the brushes. Apply 12 V voltage: “ ” to the terminal, and “–” to the “ground” of the brush holder. The indicator lamp should light up
DIY replacement and removal
So, how to disassemble a VAZ generator:
- First, disconnect the battery by removing the terminals from it, this way you can turn off the power to the on-board network.
- Remove the cap from the terminal and unscrew the corresponding nut, after which you can remove the wiring from the stud.
- Disconnect the wiring block that goes to the node connector.
- Now you need to slightly loosen the tightening of the assembly to the adjustment bar. Having done this, you can lift the assembly up until it rests against the head of the BC. The generator pulley can then be freed from the belt.
- After these steps, you can completely unscrew the screw securing the bar to the BC. Then crawl under the car and remove the screws that secure the bracket to the engine. The unit can be dismantled by removing it from the engine compartment. The failed elements are disassembled and replaced with new ones, after which the generator is reassembled.
Checking for serviceability
Repair of the VAZ 2109 or VAZ 21099 generator is carried out in case of failures in the operation of the unit. There are several ways to determine generator malfunctions. The most optimal of these is diagnostics using a multimeter, but you will also need an assistant to carry it out. We will tell you further about how to check the generator on a VAZ 21099 or 2109 using a tester.
So, to determine generator faults with a multimeter, follow these steps:
- First of all, it is necessary to diagnose the VAZ voltage regulator. As practice shows, if the generator on a VAZ 2109 or VAZ 21099 does not work correctly, the problem may lie in the functionality of the three-level voltage regulator. This is especially facilitated by overvoltage in the electrical circuit. To check, you need to set the voltage measurement mode on the tester. So, start the engine and measure the voltage at the battery terminals or at the terminals of the generator unit itself. If everything is normal, then this parameter will fluctuate around 14-14.2 volts. Then press the gas and check the parameter again - it should increase, but no more than 0.5 volts. If the indicators on a VAZ 2109 carburetor or VAZ 21099 injector are different, this indicates that the element is not functioning correctly. Most likely, the VAZ 2109 voltage relay will have to be replaced.
- Next, the diode bridge of the generator is diagnosed. The bridge itself consists of six elements, three of which are considered positive and the remaining three are considered negative. Some diodes have mass at the anode, and the other part at the cathode. To check the diode bridge of the VAZ generator, the tester is switched to sound mode, that is, when the probe outputs are shorted, you can hear a characteristic sound. You are required to test each diode in different directions, and the sound should be heard in only one of them. If during testing the sound is heard in both directions, this indicates that the diode is broken. The best option would be to replace the diode bridge.
- Before disassembling the unit and repairing it, check the functionality of the stator; it is a steel cylinder, inside of which the winding of the mechanism is located. For diagnostics, you need to disconnect the stator leads from the diode bridge. First, inspect the element visually - there should be no signs of damage or burning. The multimeter is set to resistance measurement mode. First, measure the resistance parameter between the winding terminal and the housing (any terminal can be used). The obtained indicators should be high and tend to infinity. If the readings are 50 kOhm, this indicates the need to replace the generator.
- Using a multimeter, you can also check the performance of the rotor - it is a steel rod with a wound winding. At one end of the rod there are rings through which the brushes of the VAZ generator pass. You need to dismantle the rotor and visually inspect the condition of the generator winding and bearing. The integrity of the winding can be checked using a multimeter, after which the resistance parameter between the rings is measured. The results obtained should be no more than a few ohms. Replacing the VAZ 2109 generator brushes is required if they are worn out.
Node diagnostics with a tester
Pros of switching to an injector
There are quite a lot of positive aspects when switching from a carburetor to an injector. The main reasons are the following:
- Saves fuel by supplying it directly to the engine cylinder.
- Engine power increases, especially at low speeds.
- Increases stability at idle speed.
- Carbon dioxide emissions into the atmosphere are reduced by using 90% of the total potential of the fuel mixture.
The injection system is considered more modern and environmentally friendly. It ensures compliance with Euro-2 standards, which a carburetor engine cannot boast of. Due to the presence of a special controller, even when running cold, the car will start easily and operate stably.
It is worth noting that the injector also has its drawbacks. Among them:
- demands for good fuel;
- more complex diagnostics and maintenance;
- high cost of repairs.
Malfunctions of the VAZ 2108, 2109, 21099 generator
The generator is responsible for power supply to the entire on-board network of the car with the engine running. Signs of a malfunction of the generator of VAZ 2108, 2109, 21099 cars
After starting the engine, the battery discharge indicator lamp in the instrument panel lights up
The generator does not produce the required charging current. Simultaneously with the light on, the voltmeter readings tend to zero. The battery is constantly not recharged. Using a voltmeter (multimeter), we check the voltage at the battery terminals (the engine is idling). The voltmeter readings should be as follows: generator 37.3701 - 13.6 V, generator 9402.3701 - 13.2 V.
The “folk” method of checking a generator by removing the terminal from the battery while the engine is running is only suitable for carburetor engines. If the engine stalls after removing the terminal, it means the generator has stopped producing electric current.
If it is less, then the problem is not in the faulty wiring going to the control lamp and voltmeter, but in the generator. Next, sequentially, from simple to complex, from the most probable to the least probable, we look for the cause of the malfunction.
— The generator drive belt tension is loose
The belt slips on the pulley, and the generator rotor stops rotating at the required frequency. In this case, a “whistle” from the generator drive is possible. We check and adjust the belt tension if necessary.
— The generator voltage regulator is faulty
There may be a short circuit between its terminals “B” (“D+”), “W” (“DF”) or “stuck” (the brushes of the brush assembly have worn out). The easiest way to check the voltage regulator is to install a known good one. We replace the faulty regulator with a new one. Read more: “Checking the generator voltage regulator for VAZ 2108, 2109, 21099 cars.”
— The diode bridge (rectifier unit) of the generator is faulty
Most likely there is a “break” in its valves or a short circuit in the negative valves. The power diodes of the excitation winding may also be damaged. The diode bridge can be checked using an ohmmeter (multimeter in ohmmeter mode) both directly on the car and on a removed generator.
Checking the diode bridge of the generator of VAZ 2108, 2109, 21099 cars
— The generator stator is faulty
“Open” or short circuit in the stator winding. We check the stator with an ohmmeter, and if there is a malfunction, replace it with a new one.
checking the stator windings of generator 37.3701 for “break”
— The generator rotor is faulty
Perhaps the leads of the excitation winding located on the rotor have become detached from the contact rings to which the brushes are pressed. We check the rotor and replace it with a new one if necessary.
generator winding terminals 37.3701 for VAZ 2108, 2109, 21099 cars
The battery is recharged and “boils”
The generator produces too much charging current, higher: generator 37.3701 - 14.6 V, generator 9402.3701 - 14.7 V, which is checked with a voltmeter at the battery terminals. The needle on the standard voltmeter is in the red zone at the end of the scale.
— The voltage regulator is faulty
Most likely there is a short circuit between its terminal “Ш” (“DF”) and “ground”. Replace the voltage regulator with a new one or a known good one.
The generator makes noise or “howls” when operating
The nut securing the generator pulley has come loose, the generator bearings are worn out, there is an interturn short circuit or a short circuit to ground in the stator winding (the generator “howls”), a short circuit in one of the generator valves.
Notes and additions
— The causes of such malfunctions as: the warning lamp does not light up after turning the key in the ignition switch and starting the engine (the standard voltmeter shows normal voltage) or the lamp does not light up and the voltmeter does not work (or the control devices do not work completely) are not a malfunction of the generator, but a burnout of the control panel lamp, a break in its power supply circuit, a blown fuse No. 5 (F16) in the mounting block (responsible for supplying current to the excitation winding of the generator), a break in the power supply circuit of the instrument cluster (orange and orange-blue wires), a malfunction of the ignition switch.
— If the discharge warning lamp lights up at idle, and goes out when you press the gas pedal and while driving, you must first check the tension of the generator drive belt, and if that doesn’t help, then the problem is most likely in the additional resistors located in the relay mounting block and fuses. If they fail, the generator is not excited at low speeds, and therefore does not charge. It is necessary to either completely change the mounting block, or unsolder additional resistors and replace them with new ones.
More articles on generators for VAZ 2108, 2109, 21099 cars
Rotor and stator windings
First, it’s worth talking about what a stator winding is. It is from it that the voltage is removed to power the vehicle’s on-board network and charge the battery. On a VAZ-2109 car, the generator is very similar to an AC asynchronous motor. However, if you make minor changes to the design, the generator can also be used as an electric drive. Three windings on the rotor, each with a beginning and an end. The ends are connected at a common point. This connection is called a “star”.
As for the rotor winding, it is much simpler. There are no extra taps, the copper wire is wound in bulk on the rotor. The ends of the winding are connected to contacts that are located on the back of the rotor. Particular attention, of course, is paid to the magnetic circuit, due to which the field is formed around the coil. When rotating, the magnetic field induces a certain potential in the stator windings. Actually, this is what the entire operation of the generator is based on. But there are many smaller nuances that we can talk about for as long as we like.
Generator 2109: device and features
Let's start with the fact that alternating current generators are installed on the VAZ 2109: series -37.3701 (design using a V-belt drive) and series - 94.3701 (design using a poly-V-belt drive).
Let's take a closer look at the connection diagrams, methods of diagnosing and repairing the generator device on the VAZ 2109 (design features of automobile generators: series 37.3701 and 94.3701).
So, the generator is located in the front part and is mounted almost on the internal combustion engine of the car. Generators come in two types: traditional and compact. The main components of the generator on the VAZ 2109:
- frame;
- rotor;
- stator;
- brush assembly (VAZ generator brushes);
- rectifier block;
- voltage regulator.
The design of the generator series 37.3701 consists of more than 20 elements:
- bushing, clamping and buffer fittings;
- back cover of the unit, bolt fixing the rectifier device, rectifier unit with valve;
- capacitor component;
- pulley and rear bearing of the rotor shaft;
- impeller, shaft, brush connected to the output on the control mechanism, thrust ring;
- contacts for connecting electricity consumers;
- stator mechanism, rotor winding, etc.
A more complex design of the 94.3701 series generator, consisting of more than 30 elements, including:
- capacitor device, protective casing of the device;
- contact B+ and the common contact of additional diode elements with connection on the control device to output D+;
- fixing device for positive diodes of the rectifying mechanism and fixing for negative diode elements;
- shaft, coupling bolt, washers (regular, conical);
- bushing, brush assembly holder, etc.
In fact, the resource of the generator type 37.3701 is about 120 thousand kilometers; the generator 94.3701 has a slightly longer resource due to the slip rings (they are smaller in diameter).
The generator connection diagram will depend on its type. In general, the technical characteristics of generators for the VAZ 2109 are as follows:
- at a rated voltage of 14V, the highest output current for generators 37.3701 is 55A, for generators 94.3701 it is 80A;
- voltage is adjustable: 13.6-14.3V (37.3701) and 13.2-14.7V (94.3701);
- gear ratio – 1:2.04 (37.3701) and 1;2.4 (94.3701).
If we consider a generator, the general circuit includes the following elements:
- alternating current generator for VAZ 2109;
- negative and positive diode;
- car dashboard and warning light for generator and battery discharge;
- voltmeter device;
- fuse box installed in the engine compartment, under the windshield on the driver's side;
- additional resistor elements built into the fuse mounting block;
- vehicle ignition switch and relay;
- capacitor device, winding and car battery;
- generator voltage regulator relay installed in the engine compartment.
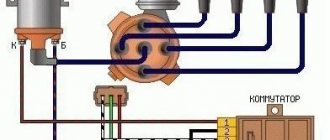
As for how to connect the VAZ 2109 generator, it will depend on the device model:
- generator model 37.370 - when you turn the ignition key, voltage is connected through the control light on the instrument panel and resistors. When the internal combustion engine is running, the voltage is supplied to the excitation winding of the valves on the rectifier block (the main voltage is supplied to the output of the regulator, the current does not pass through the control lamp and it does not light up)
- generator model 94.3701 - the connection circuit is similar to the previous one (after turning on the ignition, voltage is supplied to the regulator output through the control light).
Please note that the device works properly if the lamp lights up when you turn the key in the ignition switch, and then goes out after starting the engine. If the lamp does not go out immediately, but with some delay, this means that the generator is faulty.
Features of work
What might a faulty unit look like, how to remove and disassemble the generator, how is it rebuilt? If the device does not charge the injector or carburetor of a VAZ 21099 or 2109, first of all, let's look at the features of its functioning, namely the power circuit.
Generator power circuit
So, what does the scheme include:
- The VAZ 2109 generator itself.
- Negative diode.
- Additional element.
- Positive diode.
- The warning light also informs the driver that the battery is low.
- Vehicle dashboard.
- Voltmeter.
- The fuse box is installed in the engine compartment under the windshield opposite the driver's seat.
- Resistor elements installed in the same block.
- Ignition relay "nine".
- The castle itself.
- Battery
- Capacitor device.
- Winding.
- Generator voltage regulator relay installed in the engine compartment.
It should be noted that the connection diagram for the VAZ 2109 generator is relevant for all cars with front-wheel drive of the eighth line - both 2108 and 21099 (the author of the video is Semyon Pedan).
How to disassemble a VAZ 2110 generator: step-by-step instructions
In order to disassemble the VAZ 2110 generator, follow these steps:
- First of all, use a screwdriver or permanent marker to make a longitudinal mark on the body where the front and back covers separate. This will make it easier to assemble the generator in the future.
- We press the three spring-loaded latches on the plastic protective casing of the rectifier unit and remove it.
- Using a Phillips screwdriver, unscrew the two screws securing the voltage regulator and lift it up. Then remove the terminal of the appropriate wire from the regulator terminal and carefully remove the regulator completely. Electrically removable brushes are replaced along with the unit.
- Using a size 8 spanner, unscrew the three bolts connecting the rectifier unit to the annular terminals of the stator windings. We carefully move the conclusions to the sides. Remember the location of the thrust and insulating washers on the removed bolts. Now, using a Phillips screwdriver, unscrew the screw securing the noise suppression capacitor to the housing. Disconnect the appropriate wires. We remove the block itself and the capacitor. Using a 10 mm socket wrench, unscrew the two nuts of the contact bolts of the generator and take them out together with the spacer and insulating sleeve, and release the capacitor tip. It is worth noting that wear (or damage) of brushes is the most common cause of malfunction of the generator.
- Using a size 8 wrench, unscrew the 4 bolts holding the rear and front covers of the electric generator together. We push them apart with a face screwdriver and remove the back cover along with the stator winding.
- We remove the stator from the cover, having previously marked it with a mark of their relative position.
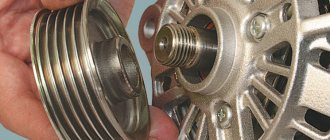
- If the front bearing needs to be replaced, remove the generator pulley. To do this, use a 22mm socket wrench to unscrew the nut securing the pulley to the rotor shaft, carefully holding it with pliers or wedging the rotor with a screwdriver. Do not damage the impeller blades, which are made of thin metal.
- Carefully remove the pulley, washers and spacer bushing.
- We return the nut to the rotor shaft, screwing it flush with the end of the armature shaft. Using a rubber hammer, knock the rotor (armature) out of the cover.
- It all depends on the degree of damage to its parts. So:
- First of all, use a screwdriver or permanent marker to make a longitudinal mark on the body where the front and back covers separate. This will make it easier to assemble the generator in the future.
- We press the three spring-loaded latches on the plastic protective casing of the rectifier unit and remove it.
- Using a Phillips screwdriver, unscrew the two screws securing the voltage regulator and lift it up. Then remove the terminal of the appropriate wire from the regulator terminal and carefully remove the regulator completely. Electrically removable brushes are replaced along with the unit.
- Using a size 8 spanner, unscrew the three bolts connecting the rectifier unit to the annular terminals of the stator windings. We carefully move the conclusions to the sides. Remember the location of the thrust and insulating washers on the removed bolts. Now, using a Phillips screwdriver, unscrew the screw securing the noise suppression capacitor to the housing. Disconnect the appropriate wires. We remove the block itself and the capacitor. Using a 10 mm socket wrench, unscrew the two nuts of the contact bolts of the generator and take them out together with the spacer and insulating sleeve, and release the capacitor tip. It is worth noting that wear (or damage) of brushes is the most common cause of malfunction of the generator.
- Using a size 8 wrench, unscrew the 4 bolts holding the rear and front covers of the electric generator together. We push them apart with a face screwdriver and remove the back cover along with the stator winding.
- We remove the stator from the cover, having previously marked it with a mark of their relative position.
- If the front bearing needs to be replaced, remove the generator pulley. To do this, use a 22mm socket wrench to unscrew the nut securing the pulley to the rotor shaft, carefully holding it with pliers or wedging the rotor with a screwdriver. Do not damage the impeller blades, which are made of thin metal.
- Carefully remove the pulley, washers and spacer bushing.
- We return the nut to the rotor shaft, screwing it flush with the end of the armature shaft. Using a rubber hammer, knock the rotor (armature) out of the cover.
Typical malfunctions and methods for their elimination
To prevent unit failure, it is necessary to ensure its high-quality and timely maintenance. As you can see from the photo of the diagram, the unit consists of many different components, so the likelihood of it breaking due to improper maintenance is quite high.
So, in what cases is a VAZ generator repaired:
- The indicator light on the dashboard does not turn on, although the unit and all equipment are working normally. Most likely, the problem is an open circuit or burnout of the indicator itself. In some cases, the reason is poor contact of the diode with the wiring; in this case, you only need to clean the contacts of the connection connector.
- The indicator on the tidy, as well as the instruments themselves on the control panel do not work. Apparently, the reason for this is the failure of the safety element, which will need to be replaced. Also, the reason may be a break or unsoldering of the wiring.
- The warning light comes on after the engine starts, but it disappears after the driver presses the gas. The essence of the problem lies in the fact that the generator unit is not excited at low engine speeds; in most cases, this is due to the desoldering of the resistor elements in the block. Conduct their diagnostics and, if necessary, solder them again.
- Another malfunction is that the indicator continues to light when the engine is turned on, while the voltmeter needle on the dashboard is in the red zone. In this case, there may be several reasons for the problem. First of all, it could be the strap slipping - you need to check it and, if necessary, tighten it. Also, the reason may be a short circuit or breakdown in the diode elements of the winding; much less often, a malfunction occurs when the voltage regulator fails.
- Another sign is that the indicator does not light up when the engine is running, but the voltmeter needle on the dashboard is in the red zone. In this case, you first need to diagnose the presence of contact between the regulator connector and the brushes. If the contact is normal, then check the brushes (they may freeze), as well as the slip rings; for the latter, the problem of oxidation is relevant. In addition, the cause of the problem may lie in the failure of the voltage regulator; usually we are talking about a break in the wiring between the contact and ground. The same symptoms appear in the event of a short circuit on the positive valves of the rectifier element.
- When the engine is running, the voltmeter needle is located in the red zone - this symptom indicates damage to the voltage regulator. In particular, we are talking about a short circuit that can occur between ground and also contact Ш. The problem can only be solved by replacing the regulator.
- If the unit is significantly louder than usual, there may be several reasons for this. First, you should check the functionality of the bearing elements, as well as the tightness of the pulley nut. In some cases, the loud operation of the unit is due to the creaking of the brushes. The brushes themselves may be of poor quality, but it is possible that the problem is dust getting on the slip rings.