Published: 01/28/2021
- How to determine generator malfunctions
- How to check the generator voltage regulator with a multimeter
- labavto.com
- How to disassemble a VAZ 2110 generator: step-by-step instructions
- How to replace a generator on a VAZ 2110 car
- Removing the generator on the "eight"
- Video: How to check the voltage of the VAZ 2108 generator
- Malfunctions of the VAZ 2108, 2109, 21099 generator
- Everything ingenious is simple: 10 amazing solutions that simplify life
- Malfunctions of the VAZ 2108, 2109, 21099 generator
- Why is a generator needed?
- Why is the battery not charging?
How to determine generator malfunctions
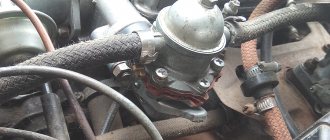
Signs of a faulty generator diode bridge. A car generator and a generator, a household power station are similar. Accordingly, the principles of troubleshooting and repair are the same. The only difference is that the car generator contains a rectifier and a voltage regulator, so the car network is designed for 12 Volts. The article discusses generator malfunctions and how you can fix them yourself. Your vehicle is equipped with a warning light that can alert you that the alternator has lost power. If this happens, you need to make sure that the sensor is working and the lamp is connected correctly.
It often happens that these lamps use a bad connector or the control relay fails. It is also possible that your battery, charging terminals are faulty, or it is simply discharged. When there is a lot of energy consumption, for example, when using lighting devices to the maximum, charging, or leaving the radio on overnight. Generator malfunctions may occur due to increased energy production when the voltage is above 14-15 Volts. The numbers vary depending on the model.
Therefore, if the battery breaks down, you should always check the generator too. Sometimes the generator begins to deliver current below the required limit of 13.2 Volts, then it is urgently necessary to check it for damage.
Before removing the generator, it is necessary to check the tension of the drive belt. Lack of electrically conductive connections between the battery or generator and the car body; voltage may be lost “on the way” to the battery. Also check the bearings for clearances and the integrity of the fuses.
For some types of faults there is no need to remove the generator. If there are knocks or noise during work, it is necessary to disconnect the wires: the noise will disappear - but a short circuit will form, unfortunately, these are expensive repairs, their cost exceeds the price of new equipment.
The noise remains - replace the bearings, they have worn out during use. Check the brushes, maybe it's time to replace them too. The contact brushes and rings may not be pressed well, then the spring should be adjusted. Get rid of dirt and burnt marks on the rings, if any. Sandpaper is the best way to remove scorch marks. If the rings become unusable, the rotor must be replaced. Check the rotor contacts with a multimeter.
Generator malfunctions in the form of a damaged rotor must be removed in the following order. Since a faulty rotor cannot be replaced, it must be completely replaced if it fails. The same applies to the stator. Remember that the rotor and stator must not have electrical contact with the body or other parts of the vehicle. A faulty stator must be replaced. Voltage rectifier diodes should not conduct current in both directions.
Typical malfunctions and methods for their elimination
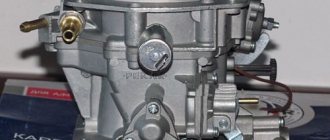
To prevent unit failure, it is necessary to ensure its high-quality and timely maintenance. As you can see from the photo of the diagram, the unit consists of many different components, so the likelihood of it breaking due to improper maintenance is quite high.
So, in what cases is a VAZ generator repaired:
- The indicator light on the dashboard does not turn on, although the unit and all equipment are working normally. Most likely, the problem is an open circuit or burnout of the indicator itself. In some cases, the reason is poor contact of the diode with the wiring; in this case, you only need to clean the contacts of the connection connector.
- The indicator on the tidy, as well as the instruments themselves on the control panel do not work. Apparently, the reason for this is the failure of the safety element, which will need to be replaced. Also, the reason may be a break or unsoldering of the wiring.
- The warning light comes on after the engine starts, but it disappears after the driver presses the gas. The essence of the problem lies in the fact that the generator unit is not excited at low engine speeds; in most cases, this is due to the desoldering of the resistor elements in the block. Conduct their diagnostics and, if necessary, solder them again.
- Another malfunction is that the indicator continues to light when the engine is turned on, while the voltmeter needle on the dashboard is in the red zone. In this case, there may be several reasons for the problem. First of all, it could be the strap slipping - you need to check it and, if necessary, tighten it. Also, the reason may be a short circuit or breakdown in the diode elements of the winding; much less often, a malfunction occurs when the voltage regulator fails.
- Another sign is that the indicator does not light up when the engine is running, but the voltmeter needle on the dashboard is in the red zone. In this case, you first need to diagnose the presence of contact between the regulator connector and the brushes. If the contact is normal, then check the brushes (they may freeze), as well as the slip rings; for the latter, the problem of oxidation is relevant. In addition, the cause of the problem may lie in the failure of the voltage regulator; usually we are talking about a break in the wiring between the contact and ground. The same symptoms appear in the event of a short circuit on the positive valves of the rectifier element.
- When the engine is running, the voltmeter needle is located in the red zone - this symptom indicates damage to the voltage regulator. In particular, we are talking about a short circuit that can occur between ground and also contact Ш. The problem can only be solved by replacing the regulator.
- If the unit is significantly louder than usual, there may be several reasons for this. First, you should check the functionality of the bearing elements, as well as the tightness of the pulley nut. In some cases, the loud operation of the unit is due to the creaking of the brushes. The brushes themselves may be of poor quality, but it is possible that the problem is dust getting on the slip rings.
How to check the generator voltage regulator with a multimeter
In order to ensure the normal operation of light bulbs, power windows, windshield wipers and other electrical equipment, as well as charging the battery, you need to maintain a DC value of 13.5-14.5 volts. If this figure is less, the battery will not charge, and if it exceeds this level, the on-board electrical appliances will fail. High voltage also causes some damage to the battery, shortening its service life due to overcharging.
Therefore, to convert the current generated by the generator, there is a special device - a relay-voltage regulator. With its help, the on-board network is provided with a current that maintains the required parameters, regardless of the crankshaft speed. Situations often arise when it becomes necessary to check the generator voltage with a multimeter.
Modern relays are electronic, and their design is non-separable. If they fail, they cannot be adjusted or repaired, but require complete replacement. This is considered the only drawback of these devices, since otherwise the relays have a lot of advantages: compactness, durability, high accuracy of current parameters.
When can the voltage regulator be considered faulty?
- The headlights change brightness depending on engine speed.
- There is an insufficient charge of the battery or, conversely, its overcharging, accompanied by boiling off of the electrolyte.
- There may be a burning smell inside the car. Failure of the regulator can occur due to moisture, various mechanical damage, short circuit and other non-standard short-term electrical influences.
- Sometimes the regulator is initially of poor quality if it is a dubious product from unknown manufacturers.
There are different methods for checking the generator relay-regulator with a multimeter and establishing its functionality. The easiest way is to check with a multimeter, without dismantling the device. For this purpose, the voltage supplied to the battery to charge it is measured. For such a check, you will need an assistant to regulate engine speed with the accelerator pedal.
The verification procedure takes place in several stages:
- The car engine starts and warms up within 5 minutes.
- Open the hood while the engine is running and connect the multimeter contacts to the battery terminals. The connection must be made with correct polarity, and the switch must be set to 20 V.
- The assessment of the charging voltage coming from the generator is carried out under certain conditions. You need to check how much the generator produces with a multimeter. The low beam should be on, and all other consumers should be off. The crankshaft rotates at a speed of 1.5 to 2.5 thousand rpm. If the voltage is more than 14.8 volts, then the regulator is considered faulty and must be replaced. If the voltage is below 13.5 V, the cause of the malfunction may not be only the relay. The fault may be in the wiring or the generator itself.
- More accurate results are obtained by estimating the intensity of the current supplied by the load. This will require turning on the high beams, heater fan, windshield wiper and other consumers. In such a situation, the charging current should not be below 13.5 volts. If the indicator is still less than this value, then when all electrical equipment is turned on, the battery will not receive normal charging.
A more complete check is performed on the removed relay-regulator. Typically the electronic device sits on top of the generator, covered with a plastic cover. In some cases, the regulator may form a single unit with the brushes. To check, in addition to a multimeter, you need to prepare a 12 V test lamp with a power of no more than 3 watts and an adjustable current source. These methods are also suitable for checking the generator integral with a multimeter, that is, the integral voltage regulator.
How to disassemble a VAZ 2110 generator: step-by-step instructions
In order to disassemble the VAZ 2110 generator, follow these steps:
- First of all, use a screwdriver or permanent marker to make a longitudinal mark on the body where the front and back covers separate. This will make it easier to assemble the generator in the future.
- We press the three spring-loaded latches on the plastic protective casing of the rectifier unit and remove it.
- Using a Phillips screwdriver, unscrew the two screws securing the voltage regulator and lift it up. Then remove the terminal of the appropriate wire from the regulator terminal and carefully remove the regulator completely. Electrically removable brushes are replaced along with the unit.
- Using a size 8 spanner, unscrew the three bolts connecting the rectifier unit to the annular terminals of the stator windings. We carefully move the conclusions to the sides. Remember the location of the thrust and insulating washers on the removed bolts. Now, using a Phillips screwdriver, unscrew the screw securing the noise suppression capacitor to the housing. Disconnect the appropriate wires. We remove the block itself and the capacitor. Using a 10 mm socket wrench, unscrew the two nuts of the contact bolts of the generator and take them out together with the spacer and insulating sleeve, and release the capacitor tip. It is worth noting that wear (or damage) of brushes is the most common cause of malfunction of the generator.
- Using a size 8 wrench, unscrew the 4 bolts holding the rear and front covers of the electric generator together. We push them apart with a face screwdriver and remove the back cover along with the stator winding.
- We remove the stator from the cover, having previously marked it with a mark of their relative position.
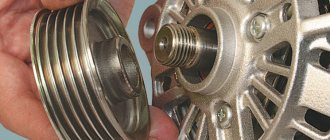
- If the front bearing needs to be replaced, remove the generator pulley. To do this, use a 22mm socket wrench to unscrew the nut securing the pulley to the rotor shaft, carefully holding it with pliers or wedging the rotor with a screwdriver. Do not damage the impeller blades, which are made of thin metal.
- Carefully remove the pulley, washers and spacer bushing.
- We return the nut to the rotor shaft, screwing it flush with the end of the armature shaft. Using a rubber hammer, knock the rotor (armature) out of the cover.
- It all depends on the degree of damage to its parts. So:
- First of all, use a screwdriver or permanent marker to make a longitudinal mark on the body where the front and back covers separate. This will make it easier to assemble the generator in the future.
- We press the three spring-loaded latches on the plastic protective casing of the rectifier unit and remove it.
- Using a Phillips screwdriver, unscrew the two screws securing the voltage regulator and lift it up. Then remove the terminal of the appropriate wire from the regulator terminal and carefully remove the regulator completely. Electrically removable brushes are replaced along with the unit.
- Using a size 8 spanner, unscrew the three bolts connecting the rectifier unit to the annular terminals of the stator windings. We carefully move the conclusions to the sides. Remember the location of the thrust and insulating washers on the removed bolts. Now, using a Phillips screwdriver, unscrew the screw securing the noise suppression capacitor to the housing. Disconnect the appropriate wires. We remove the block itself and the capacitor. Using a 10 mm socket wrench, unscrew the two nuts of the contact bolts of the generator and take them out together with the spacer and insulating sleeve, and release the capacitor tip. It is worth noting that wear (or damage) of brushes is the most common cause of malfunction of the generator.
- Using a size 8 wrench, unscrew the 4 bolts holding the rear and front covers of the electric generator together. We push them apart with a face screwdriver and remove the back cover along with the stator winding.
- We remove the stator from the cover, having previously marked it with a mark of their relative position.
- If the front bearing needs to be replaced, remove the generator pulley. To do this, use a 22mm socket wrench to unscrew the nut securing the pulley to the rotor shaft, carefully holding it with pliers or wedging the rotor with a screwdriver. Do not damage the impeller blades, which are made of thin metal.
- Carefully remove the pulley, washers and spacer bushing.
- We return the nut to the rotor shaft, screwing it flush with the end of the armature shaft. Using a rubber hammer, knock the rotor (armature) out of the cover.
Assembling the unit
We are starting to assemble a generator for the VAZ 2108, the repair has reached its final stage:
- Assembly begins by pressing the rear bearing back onto the shaft. We perform this action using a small board and a hammer.
- Place the bearing on the shaft with two or three strong blows
- If you removed the rectifier unit, return it to the same four studs for securing the rectifier unit, located in the back cover
- Now we install the back cover itself back on the rotor so that the bearing completely “sits” into the intended seat located in the back cover
- To simplify the procedure, you can use a hammer and hit the cover with gentle blows through a wooden block to “plant” it completely on the shaft
- In our front cover we replace the small (front) bearing and secure it with plates
- We take the unit out of the vice and before putting on the front cover, put a spacer ring on the shaft, which should be located between the front ball bearing and the thrust recess located on the shaft
- We put the front cover on, tighten the nuts on the studs “crosswise” so that they are tightened evenly
- We install the key into the recess of the rotor shaft, then insert the impeller and tighten it with a nut
Now the generator is assembled, now it’s convenient to install the relay with brushes in place.
Returning the unit to its place
The installation procedure is the reverse process of removal:
- We insert it into the mounting bracket
- With one hand we press on the motor from above, and with the other hand, from the side of the front right wheel, we insert the bracket mounting bolt into place
- Screw on the bolt nut, but do not tighten it
- Then we secure the dust protection using self-tapping screws.
- Now we put the drive belt on the unit pulley and install the belt tensioner bar
- We tighten the drive belt to the desired deflection value (1 - 1.5 centimeters) and at the same time tighten the nut located on the tensioner plate
- Now we tighten the nut located on the mounting bracket of our generator.
That's it, the unit has been installed successfully. For VAZ, the generator repair has been completed. Make sure once again that the minus terminal is removed from the battery and connect all the wires back to the generator. Remember that: paired wires are attached with a nut to a stud located on the back cover of the generator, and a single wire is connected using female-male connectors. Now you can connect the negative terminal to the battery and start the engine. If the work was done correctly, then the repair of electrical equipment (generator in particular) on the VAZ 2108 is completed and is no longer a problem for you. The power source began to produce the required voltage for the vehicle to operate. To be completely sure of proper operation, you can check the voltage it produces with a voltmeter. If not everything is clear about the design of the generator, then look for repairs of the VAZ 2108 in the electrical equipment section or use the training video.
Removing the generator on the "eight"
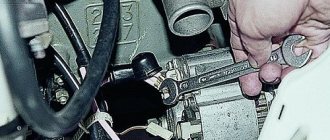
To dismantle the unit for replacement or repair, you will need “17” keys and a mounting blade. Before starting work, be sure to generously treat all threaded connections to facilitate dismantling. The procedure looks like this:
- Disconnect the negative terminal from the battery.
- Unscrew the top nut securing the generator housing to the bracket.
- Unscrew the nut on the lower mounting bolt.
- Slide the generator housing towards the engine block and remove the belt.
- Unscrew the nut from the power contact and move the wires to the side.
- Remove the lower mounting bolt.
After all these manipulations, you can completely dismantle the unit. This can be done either from below, if protection is not installed on the car, or from above.
Malfunctions of the VAZ 2108, 2109, 21099 generator
The generator is responsible for power supply to the entire on-board network of a car with a running engine.
Signs of a malfunction of the generator of VAZ 2108, 2109, 21099 cars
After starting the engine, the battery discharge indicator lamp in the instrument panel lights up
The generator does not produce the required charging current. Simultaneously with the light on, the voltmeter readings tend to zero. The battery is constantly not recharged. Using a voltmeter (multimeter), we check the voltage at the battery terminals (the engine is idling). The voltmeter readings should be as follows: generator 37.3701 - 13.6 V, generator 9402.3701 - 13.2 V.
The “folk” method of checking a generator by removing the terminal from the battery while the engine is running is only suitable for carburetor engines. If the engine stalls after removing the terminal, it means the generator has stopped producing electric current.
If it is less, then the problem is not in the faulty wiring going to the control lamp and voltmeter, but in the generator. Next, sequentially, from simple to complex, from the most probable to the least probable, we look for the cause of the malfunction.
— The generator drive belt tension is loose
The belt slips on the pulley, and the generator rotor stops rotating at the required frequency. In this case, a “whistle” from the generator drive is possible. We check and adjust the belt tension if necessary.
— The generator voltage regulator is faulty
There may be a short circuit between its terminals “B” (“D+”), “W” (“DF”) or “stuck” (the brushes of the brush assembly have worn out). The easiest way to check the voltage regulator is to install a known good one. We replace the faulty regulator with a new one. Read more: “Checking the generator voltage regulator for VAZ 2108, 2109, 21099 cars.”
— The diode bridge (rectifier unit) of the generator is faulty
Most likely there is a “break” in its valves or a short circuit in the negative valves. The power diodes of the excitation winding may also be damaged. The diode bridge can be checked using an ohmmeter (multimeter in ohmmeter mode) both directly on the car and on a removed generator.
— The generator stator is faulty
“Open” or short circuit in the stator winding. We check the stator with an ohmmeter, and if there is a malfunction, replace it with a new one.
— The generator rotor is faulty
Perhaps the leads of the excitation winding located on the rotor have become detached from the contact rings to which the brushes are pressed. We check the rotor and replace it with a new one if necessary.
The battery is recharged and “boils”
The generator produces too much charging current, higher: generator 37.3701 - 14.6 V, generator 9402.3701 - 14.7 V, which is checked with a voltmeter at the battery terminals. The needle on the standard voltmeter is in the red zone at the end of the scale.
— The voltage regulator is faulty
Most likely there is a short circuit between its terminal “Ш” (“DF”) and “ground”. Replace the voltage regulator with a new one or a known good one.
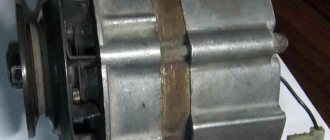
The generator makes noise or “howls” when operating
The nut securing the generator pulley has come loose, the generator bearings are worn out, there is an interturn short circuit or a short circuit to ground in the stator winding (the generator “howls”), a short circuit in one of the generator valves.
Notes and additions
— The causes of such malfunctions as: the warning lamp does not light up after turning the key in the ignition switch and starting the engine (the standard voltmeter shows normal voltage) or the lamp does not light up and the voltmeter does not work (or the control devices do not work completely) are not a malfunction of the generator, but a burnout of the control panel lamp, a break in its power supply circuit, a blown fuse No. 5 (F16) in the mounting block (responsible for supplying current to the excitation winding of the generator), a break in the power supply circuit of the instrument cluster (orange and orange-blue wires), a malfunction of the ignition switch.
— If the discharge warning lamp lights up at idle, and goes out when you press the gas pedal and while driving, you must first check the tension of the generator drive belt, and if that doesn’t help, then the problem is most likely in the additional resistors located in the relay mounting block and fuses. If they fail, the generator is not excited at low speeds, and therefore does not charge. It is necessary to either completely change the mounting block, or unsolder additional resistors and replace them with new ones.
More articles on generators for VAZ 2108, 2109, 21099 cars
Procedure for disassembling and repairing a car generator:
1. First of all, you need to remove the generator.
2. Make a longitudinal mark on the generator body with a marker; it will be useful later during assembly.
3. Use the handles to press out the three latches on the top cover.
5. Unscrew the 2 screws that secure the voltage regulator.
6. Disconnect the wire from the regulator terminal.
7. Now carefully remove it with the brush holder.
8. Unscrew the screw that secures the capacitor and 4 more that secure the unit itself.
9. Next, to remove the rectifier unit, you need to remove 3 wires with a terminal.
10. Now remove the rectifier unit with the capacitor.
11. Now, from the rectifier unit, unscrew the nut from the contact bolt, remove the washer with the spacer fork and replace the capacitor. Remove the capacitor wire lug from the contact bolt.
13. Next, use a screwdriver to pry off the cover of the car generator from the side of the slip rings.
14. Press the generator rotor in a vice (to prevent it from spinning) and unscrew the nut that holds the pulley, and then remove the spring washer and the pulley itself.
15. Remove the thrust washer.
16. On the drive side, remove the rotor from the cover.
17. Now remove the spacer ring from the rotor shaft.
18. Check the slip rings; if they have pronounced defects (scratches, nicks), then they need to be sanded with fine sandpaper. If it is impossible to sand them with sandpaper, then this can be done on a lathe (you just need to remove as small a layer of metal as possible), and then sand them again with fine sandpaper.
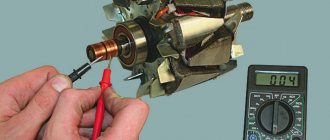
19. Next, you need to check the resistance of the rotor winding using an ohmmeter (tester). To do this, you need to connect it to the slip rings. If the tester displays “infinity,” this will mean that there is a break in one of the windings; this can only be corrected by completely replacing the rotor.
20. Then we check with a test lamp whether there is a short circuit in the winding on the rotor body. This is done as follows: turn on a regular incandescent lamp into a 220 V network and lean one wire against the generator body, and the second, first on the first ring, and then on the second. In any case, the lamp should not light up. If fire does occur in any of the positions, then the entire rotor should also be replaced with a new one. By the way, in this case you can use a small 12 V lamp and a car battery, it’s easier and safer.
21. Next, if everything is fine with the rotor, we move on to inspecting the stator. On its inner side there should not be any traces of the armature touching the stator. If such symptoms are observed, then only the bearings or the entire generator cover complete with bearings should be replaced.
22. Next, just like with the rotor, we check whether there is a break in the stator winding. We connect the test lamp to alternating current and place the test lamp one by one between all winding terminals. Only in this case should the lamp light up; if at least at one point it does not light up, replace the stator with a new one or just the winding.
23. Now they check the short circuit of the stator windings to the housing. If you connect a test lamp to the terminal of the stator winding, and a wire from the current source to the stator housing, then fire should not occur. If the lamp lights up, then again there is only one way out - replace only the winding or the entire stator.
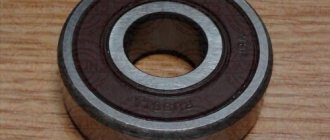
24. Inspect the drive-side generator cover and bearing assembly. If, when rotating the bearing, play is felt between the rings, rolling or jamming of the rolling elements, the protective rings are damaged or there are traces of lubricant leakage, and cracks are found in the cover, especially in the places where the generator is attached, it is necessary to replace the cover assembly with the bearing (the bearing in the cover is rolled) .
Malfunctions of the VAZ 2108, 2109, 21099 generator
The generator is responsible for power supply to the entire on-board network of the car with the engine running. Signs of a malfunction of the generator of VAZ 2108, 2109, 21099 cars
After starting the engine, the battery discharge indicator lamp in the instrument panel lights up
The generator does not produce the required charging current. Simultaneously with the light on, the voltmeter readings tend to zero. The battery is constantly not recharged. Using a voltmeter (multimeter), we check the voltage at the battery terminals (the engine is idling). The voltmeter readings should be as follows: generator 37.3701 - 13.6 V, generator 9402.3701 - 13.2 V.
The “folk” method of checking a generator by removing the terminal from the battery while the engine is running is only suitable for carburetor engines. If the engine stalls after removing the terminal, it means the generator has stopped producing electric current.
If it is less, then the problem is not in the faulty wiring going to the control lamp and voltmeter, but in the generator. Next, sequentially, from simple to complex, from the most probable to the least probable, we look for the cause of the malfunction.
— The generator drive belt tension is loose
The belt slips on the pulley, and the generator rotor stops rotating at the required frequency. In this case, a “whistle” from the generator drive is possible. We check and adjust the belt tension if necessary.
— The generator voltage regulator is faulty
There may be a short circuit between its terminals “B” (“D+”), “W” (“DF”) or “stuck” (the brushes of the brush assembly have worn out). The easiest way to check the voltage regulator is to install a known good one. We replace the faulty regulator with a new one. Read more: “Checking the generator voltage regulator for VAZ 2108, 2109, 21099 cars.”
— The diode bridge (rectifier unit) of the generator is faulty
Most likely there is a “break” in its valves or a short circuit in the negative valves. The power diodes of the excitation winding may also be damaged. The diode bridge can be checked using an ohmmeter (multimeter in ohmmeter mode) both directly on the car and on a removed generator.
Checking the diode bridge of the generator of VAZ 2108, 2109, 21099 cars
— The generator stator is faulty
“Open” or short circuit in the stator winding. We check the stator with an ohmmeter, and if there is a malfunction, replace it with a new one.
checking the stator windings of generator 37.3701 for “break”
— The generator rotor is faulty
Perhaps the leads of the excitation winding located on the rotor have become detached from the contact rings to which the brushes are pressed. We check the rotor and replace it with a new one if necessary.
generator winding terminals 37.3701 for VAZ 2108, 2109, 21099 cars
The battery is recharged and “boils”
The generator produces too much charging current, higher: generator 37.3701 - 14.6 V, generator 9402.3701 - 14.7 V, which is checked with a voltmeter at the battery terminals. The needle on the standard voltmeter is in the red zone at the end of the scale.
— The voltage regulator is faulty
Most likely there is a short circuit between its terminal “Ш” (“DF”) and “ground”. Replace the voltage regulator with a new one or a known good one.
The generator makes noise or “howls” when operating
The nut securing the generator pulley has come loose, the generator bearings are worn out, there is an interturn short circuit or a short circuit to ground in the stator winding (the generator “howls”), a short circuit in one of the generator valves.
Notes and additions
— The causes of such malfunctions as: the warning lamp does not light up after turning the key in the ignition switch and starting the engine (the standard voltmeter shows normal voltage) or the lamp does not light up and the voltmeter does not work (or the control devices do not work completely) are not a malfunction of the generator, but a burnout of the control panel lamp, a break in its power supply circuit, a blown fuse No. 5 (F16) in the mounting block (responsible for supplying current to the excitation winding of the generator), a break in the power supply circuit of the instrument cluster (orange and orange-blue wires), a malfunction of the ignition switch.
— If the discharge warning lamp lights up at idle, and goes out when you press the gas pedal and while driving, you must first check the tension of the generator drive belt, and if that doesn’t help, then the problem is most likely in the additional resistors located in the relay mounting block and fuses. If they fail, the generator is not excited at low speeds, and therefore does not charge. It is necessary to either completely change the mounting block, or unsolder additional resistors and replace them with new ones.
More articles on generators for VAZ 2108, 2109, 21099 cars
Technical characteristics and connection diagram of generators
Main technical characteristics of VAZ-2109 generators:
- the highest output current at 13V is 55 A for the 37.3701 generator and 80 A for the 94.3701,
- maximum adjustable voltage - 13.6-14.6 V and 13.2-14.7 V,
- the engine-generator gear ratio is 1:2.04 and 1:2.4, respectively.
Different generator models also have differences in the size of the slip rings. In modification 94.3701, the rings have a smaller diameter. This allows you to extend the life of the device.
Connecting the VAZ-2109 generator depends on the device model. When you turn the ignition key, voltage is connected through the indicator light on the dashboard and resistors. When the engine is running, voltage is supplied to the field winding from the valves on the rectifier block. The control lamp does not light up because no current passes through it. The main voltage is supplied to the regulator output. Since 1996, changes have been made to the design of the 37.3701 generator: the voltage regulator was placed in a metal case and connected to the brush holder.
The VAZ-2109 94.3701 generator is connected according to a similar scheme. After turning on the ignition, voltage is supplied to the regulator output through the control lamp. If the device is working properly, the lamp lights up when you turn the key, and immediately goes out after the engine starts. If the signal stays on longer than expected, the generator may malfunction.
Why is a generator needed?
It is needed to power the on-board network when the engine is running. When stopped, the entire network is powered by a battery. If you yourself replaced the VAZ-2108 generator or any other car, you saw that it has one power terminal. Several wires are connected to it:
The thickest one connects the generator to the positive terminal of the battery. It is through this wire that the battery is charged.
Please note that there are no fuses on it. Therefore, during any manipulations with the generator, it is necessary to de-energize the on-board network. A thin short wire going to the voltage regulator is necessary to power the excitation winding. It is rare, but it happens that additional equipment is connected to this output of the generator.
The cars use a rather old but proven design of the VAZ-2108 generator. The carburetor is used in the fuel injection system. On injection cars, fuel injectors and ignition coils are powered from the power output of the generator. All other consumers take power from the positive terminal of the battery.
Tools you will need:
- A universal puller for removing the bearing; as an option, you can use a rod puller, but I warn you, this is very inconvenient;
- Also find a good metal brush and a cloth-based sandpaper;
- Hammer;
- WD-40;
- Standard set of wrenches and screwdrivers.
This is what the VAZ 2101 generator looked like before repair, remember it like this, because after the overhaul it will change beyond recognition
1. First of all, you need to clean the generator from dirt, dust, oil, in short, from everything that has accumulated on it over many years of operation.
2. Unscrew the pulley nut; to do this, place the generator so that its pulley rests on the floor, then put a key on the nut at “19”. While holding the pulley against turning it, you need to apply several strong and precise blows to the key with a hammer. It is unlikely that you will be able to clamp the pulley “tightly” by hand, but this will be enough to “break” the nut and unscrew it freely.
Why is the battery not charging?
Before writing about the main reasons why the battery may not charge on VAZ 2109-2108 cars, I would like to warn all readers that the list I have given is not complete and is compiled only based on personal operating experience. So, during my short 10 years of driving experience, I had to operate a lot of cars and there were quite a lot of problems with charging the battery, and I will try to write about the main ones here.
It's no secret that the main device that is responsible for the normal operation of electrical appliances in a car is the generator. It is precisely because of the failure of some of its parts that charging may disappear completely or become weak. The main malfunctions of the generator, which entail a decrease in the charge current to the battery:
- Wear of generator brushes. This is a very common and most common reason. If they are worn down to the minimum permissible height, then the charge may disappear gradually, and then disappear altogether. To solve this problem, you just need to replace the brushes with new ones and that’s it.
- Failure of the diode bridge. The most reliable diode bridges are usually installed on VAZ 2109-2108 cars from the factory. And they are the ones who travel the most kilometers! This has already been tested not only by me, and any experienced auto electrician will confirm this. If one of the diodes or the entire rectifier unit burns out, then it also needs to be replaced. The procedure is not very fast and pleasant, but it will not cause much difficulty. Just below I’ll put a link to a page that describes the entire generator repair process.
- A more complex generator breakdown, such as a break in the rotor or stator winding. Of course, this is rare, but it still happens sometimes. The cost of these spare parts is quite low, so it is better to buy new ones and install the burned ones together than to buy a new generator.
- Poor charging may be due to slipping of the alternator belt. This becomes especially noticeable in damp or rainy weather, or when water gets on the belt. It begins to whistle, causing it to slip on the pulley, thereby preventing the generator from gaining sufficient speed to optimally charge the battery.
If you have problems with your car that are described above, then you can read all the maintenance procedures here: Repairing a generator on a VAZ 2109-2108 with your own hands. Everything is described there in quite detail and even for beginners the information will be very useful, and understanding it will not be difficult.
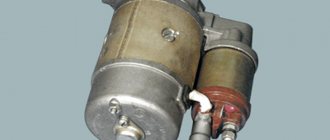
Device Description
Before we tell you how to check and repair the 2108 generator yourself, we suggest that you familiarize yourself with basic information about the device. First, let's look at the principle of operation and device. A detailed diagram of the device is shown in the photo.
Principle of operation
The purpose of the unit is to provide electrical appliances and vehicle equipment with energy, and first of all we are talking about the battery. If the mechanism breaks down, the battery stops charging normally, and due to lack of voltage, the battery does not allow the operation of electrical equipment. When the device's charge runs out, the car will simply stall, and it will not be so easy to start it later.
Designation of mechanism components in the diagram
The system is powered by the rotation of the pulley on which the belt is installed. The VAZ generator pulley receives mechanical force from the crankshaft through a belt. The latter can be either wedge or polywedge.
Device components
We will not fully list what components the generator on a VAZ 2108 car or the mechanism on a classic consists of, since the device of different generators is almost identical.
Let's look at the main elements:
- A diode rectifier used to convert alternating current to direct current.
- The generator belt, which transmits power.
- The pulley on which the belt is mounted.
- Brush unit.
- A voltage regulator relay, the purpose of which is to protect the battery from overvoltage.
- A light bulb that is displayed on the dashboard. It is used to notify the driver about malfunctions in the operation of the device (the author of the video is the Engine Repair channel! And interesting!).